RBM-20 Module - Quickstart Guide - v1.2 - Pearl Music Europe
RBM-20 Module - Quickstart Guide - v1.2 - Pearl Music Europe
RBM-20 Module - Quickstart Guide - v1.2 - Pearl Music Europe

You also want an ePaper? Increase the reach of your titles
YUMPU automatically turns print PDFs into web optimized ePapers that Google loves.
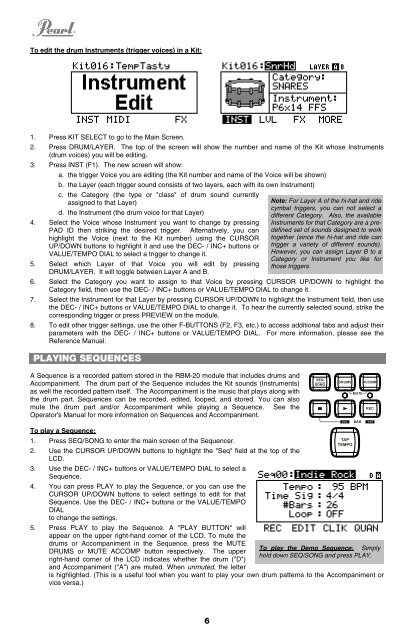
To edit the drum Instruments (trigger voices) in a Kit:<br />
1. Press KIT SELECT to go to the Main Screen.<br />
2. Press DRUM/LAYER. The top of the screen will show the number and name of the Kit whose Instruments<br />
(drum voices) you will be editing.<br />
3. Press INST (F1). The new screen will show:<br />
a. the trigger Voice you are editing (the Kit number and name of the Voice will be shown)<br />
b. the Layer (each trigger sound consists of two layers, each with its own Instrument)<br />
c. the Category (the type or "class" of drum sound currently<br />
assigned to that Layer)<br />
d. the Instrument (the drum voice for that Layer)<br />
4. Select the Voice whose Instrument you want to change by pressing<br />
PAD ID then striking the desired trigger. Alternatively, you can<br />
highlight the Voice (next to the Kit number) using the CURSOR<br />
UP/DOWN buttons to highlight it and use the DEC- / INC+ buttons or<br />
VALUE/TEMPO DIAL to select a trigger to change it.<br />
5. Select which Layer of that Voice you will edit by pressing<br />
DRUM/LAYER. It will toggle between Layer A and B.<br />
6. Select the Category you want to assign to that Voice by pressing CURSOR UP/DOWN to highlight the<br />
Category field, then use the DEC- / INC+ buttons or VALUE/TEMPO DIAL to change it.<br />
7. Select the Instrument for that Layer by pressing CURSOR UP/DOWN to highlight the Instrument field, then use<br />
the DEC- / INC+ buttons or VALUE/TEMPO DIAL to change it. To hear the currently selected sound, strike the<br />
corresponding trigger or press PREVIEW on the module.<br />
8. To edit other trigger settings, use the other F-BUTTONS (F2, F3, etc.) to access additional tabs and adjust their<br />
parameters with the DEC- / INC+ buttons or VALUE/TEMPO DIAL. For more information, please see the<br />
Reference Manual.<br />
PLAYING SEQUENCES<br />
A Sequence is a recorded pattern stored in the <strong>RBM</strong>-<strong>20</strong> module that includes drums and<br />
Accompaniment. The drum part of the Sequence includes the Kit sounds (Instruments)<br />
as well the recorded pattern itself. The Accompaniment is the music that plays along with<br />
the drum part. Sequences can be recorded, edited, looped, and stored. You can also<br />
mute the drum part and/or Accompaniment while playing a Sequence. See the<br />
Operator's Manual for more information on Sequences and Accompaniment.<br />
To play a Sequence:<br />
1. Press SEQ/SONG to enter the main screen of the Sequencer.<br />
2. Use the CURSOR UP/DOWN buttons to highlight the "Seq" field at the top of the<br />
LCD.<br />
3. Use the DEC- / INC+ buttons or VALUE/TEMPO DIAL to select a<br />
Sequence.<br />
4. You can press PLAY to play the Sequence, or you can use the<br />
CURSOR UP/DOWN buttons to select settings to edit for that<br />
Sequence. Use the DEC- / INC+ buttons or the VALUE/TEMPO<br />
DIAL<br />
to change the settings.<br />
5. Press PLAY to play the Sequence. A "PLAY BUTTON" will<br />
appear on the upper right-hand corner of the LCD. To mute the<br />
drums or Accompaniment in the Sequence, press the MUTE<br />
DRUMS or MUTE ACCOMP button respectively. The upper<br />
right-hand corner of the LCD indicates whether the drum ("D")<br />
and Accompaniment ("A") are muted. When unmuted, the letter<br />
is highlighted. (This is a useful tool when you want to play your own drum patterns to the Accompaniment or<br />
vice versa.)<br />
6<br />
Note: For Layer A of the hi-hat and ride<br />
cymbal triggers, you can not select a<br />
different Category. Also, the available<br />
Instruments for that Category are a predefined<br />
set of sounds designed to work<br />
together (since the hi-hat and ride can<br />
trigger a variety of different sounds).<br />
However, you can assign Layer B to a<br />
Category or Instrument you like for<br />
those triggers.<br />
To play the Demo Sequence: Simply<br />
hold down SEQ/SONG and press PLAY.