MICROWAVE OVEN INSTRUCTION MANUAL ... - Avanti Products
MICROWAVE OVEN INSTRUCTION MANUAL ... - Avanti Products
MICROWAVE OVEN INSTRUCTION MANUAL ... - Avanti Products

You also want an ePaper? Increase the reach of your titles
YUMPU automatically turns print PDFs into web optimized ePapers that Google loves.
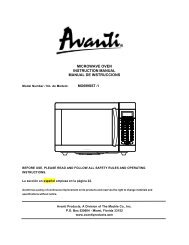
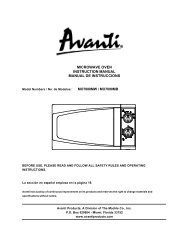
<strong>MICROWAVE</strong> <strong>OVEN</strong><br />
<strong>INSTRUCTION</strong> <strong>MANUAL</strong><br />
<strong>MANUAL</strong> DE INSTRUCCIONS<br />
Model Numbers / No. de Modelos: MO7180TW / MO7280TB<br />
BEFORE USE, PLEASE READ AND FOLLOW ALL SAFETY RULES AND OPERATING<br />
<strong>INSTRUCTION</strong>S.<br />
La sección en español empieza en la página 23.<br />
<strong>Avanti</strong> has a policy of continuous improvement on its products and reserves the right to change materials and<br />
specifications without notice.<br />
<strong>Avanti</strong> <strong>Products</strong>, A Division of The Mackle Co., Inc.<br />
P.O. Box 520604 - Miami, Florida 33152<br />
www.avantiproducts.com
REGISTRATION INFORMATION<br />
Thank you for purchasing this fine <strong>Avanti</strong> product. Please fill out this card and return it within 100 days of<br />
purchase and receive these important benefits to the following address:<br />
<strong>Avanti</strong> <strong>Products</strong>, A Division of The Mackle Co., Inc.<br />
P.O. Box 520604 - Miami, Florida 33152 USA<br />
� Protect your product:<br />
We will keep the model number and date of purchase of your new <strong>Avanti</strong> product on file to help<br />
you refer to this information in the event of an insurance claim such as fire or theft.<br />
� Promote better products:<br />
We value your input. Your responses will help us develop products designed to best meet your<br />
future needs.<br />
--------------------------------------------------------(detach here)----------------------------------------------------------<br />
<strong>Avanti</strong> Registration Card<br />
__________________________________ ______________________________________<br />
Name Model # Serial #<br />
__________________________________ ______________________________________<br />
Address Date Purchased Store/Dealer Name<br />
__________________________________ ______________________________________<br />
City State Zip Occupation<br />
__________________________________ As Your Primary Residence, Do You:<br />
Area Code Phone Number �Own �Rent<br />
Did You Purchase An Additional Warranty: Your Age:<br />
�Extended �None �under 18 �18-25 �26-30<br />
Reason For Choosing This <strong>Avanti</strong> Product: �31-35 �36-50 �over 50<br />
Please indicate the most important factors Marital Status:<br />
that influenced your decision to purchase �Married �Single<br />
this product. Is This Product Used In The:<br />
�Price �Home �Business<br />
�Product Features How Did You Learn About This Product:<br />
�<strong>Avanti</strong> Reputation �Advertising<br />
�Product Quality �In Store Demo �Personal Demo<br />
�Salesperson Recommendation �Other______________________________<br />
�Friend/Relative Recommendation Comments____________________________<br />
�Warranty _____________________________________<br />
�Other_______________________ _____________________________________<br />
3
Read this guide carefully.<br />
It is intended to help you operate and maintain<br />
your new microwave oven properly.<br />
Keep it handy to answer your questions.<br />
If you don't understand something or you need<br />
more assistance, please call:<br />
<strong>Avanti</strong> Customer Service<br />
800-220-5570<br />
Keep proof of original purchase date (such as<br />
your sales slip) with this guide to establish the<br />
warranty period.<br />
We're proud of our service and want you to be<br />
pleased. If for some reason you are not happy<br />
with the service you receive, here are some steps<br />
to follow for further assistance.<br />
FIRST, contact the people who serviced your<br />
microwave oven. Explain why you are not<br />
pleased. In most cases, this will solve the<br />
problem.<br />
HELP US HELP YOU…<br />
IF YOU NEED SERVICE<br />
5<br />
Write down the model and serial numbers.<br />
You'll find them on a label located on the rear wall<br />
of the microwave oven.<br />
Please write these numbers here:<br />
____________________________________<br />
Date of Purchase<br />
____________________________________<br />
Model Number<br />
____________________________________<br />
Serial Number<br />
Use these numbers in any correspondence or<br />
service calls concerning your microwave oven.<br />
If you received a damaged microwave oven,<br />
immediately contact the dealer (or builder) that<br />
sold you the microwave oven.<br />
Save time and money. Before you call for service,<br />
check the Troubleshooting Guide. It lists causes<br />
of minor operating problems that you can correct<br />
yourself.<br />
NEXT, if you are still not pleased, write all the<br />
details, including your telephone number, and<br />
send it to:<br />
Customer Service<br />
<strong>Avanti</strong> <strong>Products</strong><br />
10880 NW 30 Street<br />
Miami, FL 33172 USA
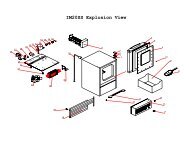
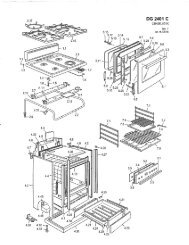
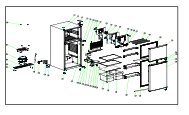
PARTS AND FEATURES<br />
DOOR SAFETY LOCK SYSTEM<br />
2 . <strong>OVEN</strong> WINDOW<br />
3 . <strong>OVEN</strong> AIR VENT<br />
4 . ROLLER RING<br />
5 . GLASS TRAY<br />
6 . CONTROL PANEL<br />
6
TABLE OF CONTENTS<br />
Registration Information 3<br />
Help Us Help You … 5<br />
Parts And Features 6<br />
Important Safety Instructions 8<br />
Installation Instructions 9<br />
Before Using Your Appliance 9<br />
Installation Of Your Appliance 9<br />
Safety Precautions 9<br />
Electrical Connection 11<br />
Operating Your Appliance 11<br />
Operation Procedure 12<br />
Control Panel 13<br />
Special Oven Features 14<br />
How To Set The Oven Controls 14<br />
Quick Cook Settings 17<br />
Cooking Techniques 19<br />
Care And Maintenance 19<br />
Cleaning Your Appliance 19<br />
Troubleshooting Guide 20<br />
Service For Your Appliance 20<br />
Limited Warranty 21<br />
Wiring Diagram 22<br />
INSTRUCCIONES EN ESPAÑOL 23~38<br />
7
�WARNING�<br />
IMPORTANT SAFETY <strong>INSTRUCTION</strong>S<br />
To reduce the risk of fire, electrical shock, or<br />
injury when using your appliance, follow these<br />
basic precautions:<br />
? Read all instructions before using the appliance.<br />
? Precautions to avoid possible exposure to excessive microwave energy.<br />
? This appliance must be grounded. Connect only to properly grounded outlet. See GROUNDING<br />
<strong>INSTRUCTION</strong>S.<br />
? Install or locate the appliance only in accordance with the provided installation instructions.<br />
? When cleaning surfaces of door and oven that comes together on the closing door, use only mild,<br />
nonabrasive soaps, or detergents applied with a sponge or soft cloth.<br />
? Liquids, such as water, coffee, or tea are able to be overheated beyond the boiling point without<br />
appearing to be boiling. Visible bubbling or boiling when the container is removed from the<br />
microwave oven is not always present. THIS COULD RESULT IN VERY HOT LIQUIDS SUDDENLY<br />
BOILING OVER WHEN THE CONTAINER IS DISTURBED OR A UTENSIL IS INSERTED INTO<br />
THE LIQUID.<br />
? Some products such as whole eggs and sealed containers-(for example, closed glass jars)<br />
may explode and should not be heated in microwave oven.<br />
? Use this microwave oven only for its intended use as described in this manual.<br />
? Do not use corrosive chemicals or vapors in this appliance. This type of oven is specifically<br />
designed to heat, cook, or dry food. It is not designed for industrial or laboratory use.<br />
? As with any appliance, close supervision is necessary when used by children.<br />
? Do not operate this microwave oven if it has a damaged cord or plug, if it is not working<br />
properly, or if it has been damaged or dropped.<br />
? To reduce the risk of fire in the oven cavity:<br />
? Do not overcook food. Carefully attend microwave oven if paper, plastic, or<br />
combustible materials are placed inside the oven to facilitate cooking.<br />
? Remove wire twist-ties from bags before placing bag in oven.<br />
? If materials inside the oven should ignite, keep oven door closed, turn oven off at the<br />
wall switch, or shut off power at the fuse or circuit breaker panel.<br />
? Do not use the cavity for storage purposes. Do not leave paper products, cooking<br />
utensils, or food in the cavity when not in use.<br />
? Only qualified service personnel should service this appliance. Contact the nearest<br />
authorized service facility for examination, repair or adjustment.<br />
? Do not cover or block any openings on this appliance.<br />
? Do not use this microwave oven to heat corrosive chemicals (for example, sulfides and<br />
chlorides). Vapors from such corrosive chemicals may interact with the contact and springs<br />
of the safety interlock switches thereby rendering them inoperable.<br />
? Do not immerse cord or plug in water.<br />
? Keep cord away from heated surfaces.<br />
? Do not let cord hang over edge of table or counter.<br />
? Never clean appliance parts with flammable fluids. The fumes can create a fire hazard or<br />
explosion.<br />
? Do not store or use gasoline or any other flammable vapors and liquids in the vicinity of this<br />
or any other appliance. The fumes can create a fire hazard or explosion.<br />
-Save these instructions-<br />
8
INSTALLATION <strong>INSTRUCTION</strong>S<br />
� BEFORE USING YOUR APPLIANCE<br />
? Remove the exterior and interior packing.<br />
? Check to be sure you have all of the following parts:<br />
? Glass Tray<br />
? Roller Ring<br />
? Instruction Manual<br />
? Inspect the oven after unpacking for any visual damage such as:<br />
? Misaligned Door<br />
? Damaged Door<br />
? Dents or Holes in Door Window and Screen<br />
? Dents in Cavity<br />
If any of the above is visible, DO NOT use the oven.<br />
� INSTALLATION OF YOUR APPLIANCE<br />
? When positioning the microwave oven, it should be set on a flat, steady surface.<br />
? Do not block air vents. If they are blocked during operation, the oven may overheat and eventually<br />
cause oven failure.<br />
? Poor television reception and radio interference may result if the oven is located close to a TV, radio,<br />
antenna, or antenna wire. Position the oven as far from them as possible.<br />
? Clean the interior surface with lukewarm water using a soft cloth.<br />
? Keep the oven away from hot air, steam or splashing liquids when choosing a place to locate it,<br />
otherwise, the unit’s operation may be adversely affected, causing it to break down.<br />
? Direct sunlight may affect the acrylic coating and heat sources may increase electrical consumption.<br />
? Plug the appliance into an exclusive properly installed-grounded wall outlet. Do not under any<br />
circumstances cut or remove the third (ground) prong from the power cord. Any questions concerning<br />
power and or grounding should be directed toward a certified electrician or an authorized <strong>Avanti</strong><br />
<strong>Products</strong> service center.<br />
? DO NOT place anything on the top of the oven.<br />
? Keep the oven at least 5 inches away from both sidewalls and away from rear wall to ensure the<br />
proper ventilation.<br />
? DO NOT remove the turn-table drive shaft.<br />
� SAFETY PRECAUTIONS<br />
General Use<br />
? DO NOT attempt to tamper with or make any adjustments or repairs to door, control panel or any<br />
other part of the oven. Do NOT remove outer panel from oven. Repairs should only be done by<br />
qualified service personnel.<br />
? DO NOT operate the oven empty. The microwave energy will reflect continuously throughout the<br />
oven if no food or water is present to absorb energy.<br />
? If a fire occurs in the oven, touch the START/STOP pad and LEAVE THE DOOR CLOSED.<br />
Disconnect the power cord, or shut off power at the fuse or circuit breaker panel.<br />
? DO NOT attempt to dry clothes, newspapers or other materials in oven. They may catch on fire.<br />
? DO NOT use recycled paper products, as they may contain impurities, which may cause sparks<br />
and/or fires when us ed.<br />
? DO NOT hit or strike control panel. Damage to controls may occur.<br />
9
Utensils<br />
? METAL CONTAINERS or dishes with metallic rims should not be used. Arcing may occur.<br />
? METAL TWIST-TIES may not be used in the microwave oven.<br />
? DO NOT use SEALED JARS or NARROW NECK bottles for cooking or reheating. They may<br />
shatter.<br />
? DO NOT use CONVENTIONAL THERMOMETERS in the microwave oven. They may cause<br />
arcing. Use only those labeled “Microwave Safe” and follow all directions. Check the food in<br />
several places.<br />
? Remove PLASTIC STORE WRAPS before cooking or defrosting in the oven.<br />
RECOMMENDED<br />
? Microwave browning dish – Use to brown exterior of small items such as steaks, chops, or<br />
pancakes. Follow the directions provided with your browning dish.<br />
? Microwaveable plastic wrap – Use to retain steam. Leave a small opening for some steam to<br />
escape and avoid placing it directly on the food.<br />
? Paper towels and napkins – Use for short -term heating and covering; these absorb excess<br />
moisture and prevent splattering. Do not use recycled paper towels, which may contain metal and<br />
could ignite.<br />
Food<br />
? Never use your microwave oven for HOME CANNING. The oven is not designed to permit<br />
proper canning. Improperly canned food may spoil and be dangerous to consume.<br />
? COOKING TIMES are approximate. Factors that may affect cooking are starting temperature,<br />
altitude, volume, size and shape of food and utensils used. As you become familiar with the<br />
oven, you will be able to adjust for these factors.<br />
? It is better to UNDERCOOK RATHER THAN OVERCOOK foods. If food is undercooked, it can<br />
always be returned to the oven for further cooking. If food is overcooked, nothing can be done.<br />
Always start with minimum cooking times.<br />
? SMALL QUANTITIES of food or foods with LOW MOISTURE content can burn, dry out or catch<br />
on fire if cooked too long.<br />
? DO NOT boil eggs in their shell. Pressure may build up and the eggs will explode.<br />
? Potatoes, apples, egg yolks, whole acorn squash and sausage are examples of food with<br />
NONPOROUS SKINS. These must be pierced before cooking to prevent bursting.<br />
? POPCORN must be popped in a microwave corn popper. Microwave popped corn produces a<br />
lower yield than conventional popping. DO NOT use oven for popcorn unless popped in a<br />
microwave approved popcorn utensil or unless it’s commercially packaged and recommended<br />
especially for microwave ovens. DO NOT use oil unless specified by the manufacturer.<br />
? DO NOT attempt to deep fat fry in your oven.<br />
? HEATED LIQUIDS can ERUPT if not mixed with air. DO NOT heat liquids in your microwave<br />
oven without first stirring.<br />
10
� ELECTRICAL CONNECTION<br />
This appliance must be grounded. In the event of an electrical short circuit, grounding reduces<br />
the risk of electrical shock by providing an escape wire for the electric current. This appliance is<br />
equipped with a cord having a grounding wire with a grounding plug. The plug must be inserted<br />
into an outlet that is properly installed and grounded.<br />
The power cord of this appliance is equipped with a three-prong plug which mates with standard three<br />
prong wall outlets to minimize the possibility of electrical shock.<br />
Do not under any circumstances cut or remove the third ground prong from the power cord supplied.<br />
Use of extension cords is not recommended.<br />
�Warning�<br />
Improper use of the grounded plug can result in the risk of electrical shock. Consult a qualified<br />
electrician or service person if the grounding instructions are not completely understood, or if<br />
doubt exists as to whether the appliance is properly grounded.<br />
This appliance requires a standard 115/120 Volts A.C. ~/60Hz electrical outlet with three-prong ground.<br />
The cord should be secured behind the appliance and not left exposed or dangling to prevent accidental<br />
injury.<br />
OPERATING YOUR APPLIANCE<br />
Although your oven is provided with safety features, it is important to observe the following:<br />
? It is important not to defeat or tamper with safety interlocks.<br />
? Do not place any object between the oven front face and the door or allow residue to accumulate on<br />
sealing surfaces. Wipe the sealing area frequently with a mild detergent, rinse and wipe dry. Never<br />
use abrasive powders or pads.<br />
11
? When opened, the door must not be subjected to strain, for example, a child hanging on an opened<br />
door or any load which could cause the oven to fall forward and cause injury and damage the door.<br />
Do not operate the oven if it is damaged, until it has been repaired by a qualified service person. It is<br />
particularly important that the oven closes properly and that there is no damage to the:<br />
? Door (bent).<br />
? Hinges and latches (broken or loosened).<br />
? Door seals and sealing surfaces.<br />
? The oven should not be adjusted or repaired by anyone except properly qualified service personnel.<br />
� OPERATION PROCEDURE<br />
? Plug the power supply cord into a standard 3-pronged 15 Amp, 120V AC 60 Hz.<br />
? After placing the food in a suitable container, open the oven door and put it on the glass tray.<br />
The glass tray and roller guide must always be in place during cooking.<br />
? Shut the door. Make sure that it is firmly closed.<br />
? The oven door can be opened at any time during operation by pulling on the door handle. The oven<br />
will automatically shut off. To restart the oven, close the door and then touch START/STOP.<br />
? Each time a pad is touched, a BEEP will sound to acknowledge the touch. One of the function pads<br />
must be touched before the number pads. Two BEEPS indicates the oven does not accept the entry,<br />
check and try again.<br />
? The oven automatically cooks on high power and defrosts on low power.<br />
? When the oven is first plugged in the display will show “ENTER CLOCK TIME”, if you prefer to not<br />
have the clock displayed, touch reset.<br />
? When the START/STOP pad is touched during the oven operation, the oven stops cooking. If the<br />
oven door is opened during the oven operation, all information is retained.<br />
? If the START/STOP pad is touched and the oven does not operate, check the area between the door<br />
and door seal for obstructions and make sure the door is closed securely. The oven will not start<br />
cooking until the door is completely closed and the program has been set.<br />
12
� CONTROL PANEL<br />
Follow the applicable instructions for operation and control, which are given in “HOW TO SET THE <strong>OVEN</strong><br />
CONTROLS”.<br />
13<br />
BAKED POTATO, POPCORN, PIZZA,<br />
BEVERAGE, FROZEN DINNER, REHEAT<br />
Instant settings to cook popular foods. Allows<br />
you to reheat or cook food automatically without<br />
entering power level or time.<br />
POWER<br />
Use to set power level.<br />
TIMER<br />
You can use the TIMER function independently,<br />
even while a cooking program is going on in the<br />
oven.<br />
COOK<br />
Used for multi-stage cooking. Cook at one<br />
power level for a period of time, then the oven<br />
automatically switches to another power level for<br />
the rest of cooking time.<br />
COOK BY WEIGHT<br />
Touch to enter weight of meat accurately. The<br />
oven automatically sets the cooking time and<br />
power level.<br />
DEFROST BY WEIGHT<br />
Touch to set the weight of the food to be<br />
defrosted. The oven automatically divides the<br />
defrosting time into periods of alternating defrost<br />
and stand times by cycling on and off.<br />
SPEED DEFROST<br />
Touch to set defrosting time. The oven<br />
automatically divides the defrosting time into<br />
periods of alternating defrost and stand times by<br />
cycling on and off.<br />
NUMBER PADS (0-9)<br />
Touch to set time or amounts.<br />
CLOCK<br />
Sets the current time. Touch to set the clock.<br />
RESET<br />
Clears all previous settings if touched before<br />
cooking starts.<br />
START/STOP<br />
Touch to start or stop cooking.
TIMER<br />
? Use to set cooking time.<br />
? Allows you to set up to 99 minutes and 99 seconds<br />
RESET<br />
? Touch to cancel the selected power level, cook or defrost times previously programmed. The time of day clock<br />
is not cancelled.<br />
START/STOP<br />
? Touch to start the defrost or cook programs.<br />
? The cook indicator light and the oven light will come on and the cooling fan will operate.<br />
NOTE: END OF OPERATION- Display will show “END”.<br />
? Four beeps will sound, the cook indicator light will go out and the time of day will return to the display window.<br />
The oven light and cooking fan will turn off.<br />
? The oven will automatically continue to sound three beeps every two minutes until the oven door is opened or<br />
the RESET pad is touched.<br />
NOTE: TO INTERRUPT OPERATION –Open the oven door.<br />
? The oven immediately stops.<br />
? If no further cooking is required, touch the RESET pad.<br />
? To continue cooking, close the oven door and touch the START/STOP pad. The oven will restart.<br />
SPEED DEFROST<br />
? Used to defrost frozen foods by time.<br />
? This cycle starts at medium – high power, then automatically reduces to medium – low and then to low as the<br />
food thaws.<br />
? SPEED DEFROST indicator light and cook indicator light will both come on during the defrost cycle.<br />
� SPECIAL <strong>OVEN</strong> FEATURES<br />
MINUTE TIMER<br />
Use for timing things done outside the oven.<br />
1. Use the number pads to set the time from one second to 99 minutes and 99 seconds.<br />
2. Touch POWER and then touch the number pad “0”.<br />
3. Touch START/STOP.<br />
Four beeps will sound at the end of the elapsed time. The oven light and cooling fan will come on while the timer is<br />
operating but there are no microwaves present.<br />
AUTO TIMER<br />
After a DEFROST or COOK PROGRAM has completed, the oven will automatically continue to sound three beeps<br />
every two minutes until the oven door is opened or the RESET pad is touched.<br />
CHILD PROOF LOCK<br />
Use to prevent unsupervised operation of the oven by children. The CHILD PROOF LOCK indicator will be lit on<br />
the display and the oven cannot be operated while the CHILD PROOF LOCK is set.<br />
� HOW TO SET THE <strong>OVEN</strong> CONTROLS<br />
SIGNALS DURING <strong>OVEN</strong> SETTINGS<br />
ONE SIGNAL: Oven accepts the entry.<br />
TWO SIGNALS: Oven does not accept the entry, check and try again.<br />
14
SETTING THE CLOCK<br />
1. Touch CLOCK pad.<br />
2. Use the number pads to enter the correct time.<br />
You must touch at least three numbers to set the<br />
clock (one for hour and two for minutes).<br />
3. Touch CLOCK pad again.<br />
NOTE:<br />
This is a 12 hour clock. When the oven is first plugged<br />
in or when power resumes after a power interruption,<br />
the display will show ENTER CLOCK TIME. If you<br />
prefer not to have the clock displayed, touch RESET.<br />
You can check the clock time while cooking is in<br />
progress by touching the CLOCK pad.<br />
SETTING THE <strong>OVEN</strong> TIMER<br />
1. Touch TIMER.<br />
2. Enter the amount of time by touching the number<br />
pads. Digit time is in minutes and seconds and set<br />
left to right. Set one digit (a 5 for 5 seconds) or up<br />
to four digits (2405 for 24 minutes, 5 seconds).<br />
3. Touch START/STOP.<br />
NOTE:<br />
Time countdown can be seen in display for 3 seconds<br />
before clock or cooking time is returned to display.<br />
Touch TIMER and then touch RESET to cancel<br />
TIMER during timing process.<br />
SETTING A COOKING PROGRAM<br />
A. One-stage Cooking<br />
1. Use the number pads to set a cooking time. You<br />
can set a cooking time from one second to 99<br />
minutes and 99 seconds.<br />
2. If you want to set a power level other than 100%<br />
power, touch POWER, then<br />
3. Use the number pads to enter the power level.<br />
You can set the power level from 1 to 9.<br />
15<br />
4. Touch START/STOP to start cooking.<br />
Use single digits to set a cooking power level:<br />
B. Two-stage Cooking<br />
Some recipes require different stages of cooking at<br />
different temperatures.<br />
1. SET STAGE 1:<br />
Follow steps 1, 2 and 3 in “One-stage Cooking”. DO<br />
NOT TOUCH START/STOP.<br />
2. SET STAGE 2:<br />
Touch COOK then enter proper cooking time and<br />
(lower) power level. (Most 2-stage recipes use lower<br />
power for second stage.)<br />
3. Touch START/STOP.<br />
NOTE:<br />
Number pad Cooking power<br />
9 90%<br />
8 80%<br />
7 70%<br />
6 60%<br />
5 50%<br />
4 40%<br />
3 30%<br />
2 20%<br />
1 10%<br />
After total time has elapsed, 4 signals sound and END<br />
appears in display. Touch RESET or open oven door<br />
to clear END before starting another cooking function.
SPEED DEFROST<br />
1. Touch SPEED DEFROST.<br />
2. Enter desired defrosting time by touching correct<br />
number pads. Digital timer sets minutes and<br />
seconds from left to right so a single digit can be<br />
set (5 for 5 seconds ) or up to 4 digits (2405 for 24<br />
minutes 5 seconds).<br />
3. Touch START/STOP.<br />
NOTE:<br />
After the time has elapsed four beeps sound and the<br />
word END appears in display. Touch RESET pad or<br />
open the door to clear END before starting another<br />
cooking function.<br />
After setting SPEED DEFROST, oven can be<br />
programmed to automatically switch to one or two-<br />
stage cooking.<br />
A. For speed defrost and one stage cooking, follow<br />
steps above. Before touching START/STOP,<br />
touch COOK, enter time and power level. Then<br />
touch START/STOP.<br />
B. For speed defrost and two stage cooking, follow<br />
steps above. Before touching START/STOP, enter<br />
two-stage cooking programs.<br />
COOK BY WEIGHT<br />
1. Touch COOK BY WEIGHT.<br />
2. Enter the one digit code by touching the correct<br />
number pad.<br />
3. Enter weight.<br />
4. Touch START/STOP.<br />
Cook By Weight Code Description<br />
Note:<br />
CODE TYPE MAX WEIGHT<br />
1 Beef 5 lb. 16 oz<br />
2 Mutton 5 lb. 16 oz<br />
3 Pork 5 lb. 4 oz<br />
Meat must be defrosted and at refrigerated<br />
temperature.<br />
Weight must be in pounds and ounces.<br />
16<br />
Ounce weights less than 10 must be preceded by a 0.<br />
If label gives weight in pounds only, change the<br />
fraction of a pound to ounces using the following chart.<br />
Converting Fractions of a Pound to Ounces<br />
Fractions of a<br />
pound<br />
Ounces<br />
Less than .03 0<br />
.03 to .09 1<br />
.10 to .15 2<br />
.16 to .21 3<br />
.22 to .27 4<br />
.28 to .34 5<br />
.35 to .40 6<br />
.41 to .46 7<br />
.47 to .53 8<br />
.54 to 59 9<br />
.60 to .65 10<br />
.66 to .71 11<br />
.72 to .78 12<br />
.79 to .84 13<br />
.85 to .90 14<br />
.91 to .97 15<br />
above .97<br />
go to next<br />
even<br />
Turn meat over when oven beeps twice. Touch<br />
START/STOP to resume cooking.<br />
After total cooking time, 4 beeps sound and END<br />
appears in display. Touch RESET or open oven door<br />
to clear END before starting another cooking function.<br />
Let meat stand few minutes before carving.<br />
DEFROST BY WEIGHT<br />
1. Touch DEFROST BY WEIGHT.<br />
2. Enter weight.<br />
3. Touch START/STOP pad.<br />
NOTE:<br />
Weight must be in pounds and ounces. Ounce weights<br />
less than 10 must be preceded by a 0. If label gives<br />
weight in pounds only, change the fraction of a pound<br />
to ounces using the chart given above.<br />
Turn food over when oven signals twice. Touch<br />
START/STOP pad to resume defrosting.<br />
After total defrosting time, 4 signals sound and END<br />
appears in display. Touch RESET or open oven door
to clear END before starting another cooking function.<br />
SETTING CHILD LOCK<br />
The safety lock prevents unsupervised operation by<br />
children.<br />
To set this mode press and hold RESET pad for 3<br />
seconds.<br />
� QUICK COOK SETTINGS<br />
The QUICK COOK settings allow you to cook or<br />
reheat food automatically without entering power level<br />
or time.<br />
For smaller portions, simply touch the applicable pad<br />
and START/STOP. For larger portions, push the pad<br />
twice.<br />
FROZEN DINNER, BAKED POTATO and<br />
BEVERAGE allow you to cook multiple amounts of the<br />
same food. Simply touch pad once, and ENTER AMT<br />
appears in the display. Enter the amount of servings<br />
by touching the correct number pad then touch<br />
START/STOP.<br />
POPCORN<br />
1. Touch POPCORN.<br />
2. CODE and 3:10 (3 min. 10 sec.) appears in the<br />
display. POPCORN automatically sets the<br />
cooking time for a 3 to 3 1/2 oz. bag of microwave<br />
popcorn.<br />
3. Touch START/STOP.<br />
NOTE:<br />
To change the current preset POPCORN time: Touch<br />
POPCORN twice. ENTER TIME appears in display.<br />
Touch number pads to enter minutes and seconds.<br />
Touch START/STOP. This new cooking time will<br />
remain whenever you use the POPCORN setting.<br />
17<br />
LOCK is indicated on the display.<br />
To cancel, press and hold RESET for 3 seconds.<br />
LOCK indication disappears.<br />
BAKED POTATO<br />
For 3.5 to 5 oz. potatoes:<br />
1. Touch BAKED POTATO once.<br />
2. Enter number of potatoes by touching number<br />
pads from 1 to 4. Cooking times for small-medium<br />
potatoes are as follows:<br />
1 potato 6 min. 00 sec.<br />
2 potatoes 8 min. 00 sec.<br />
3 potatoes 10 min. 00 sec.<br />
4 potatoes 12 min. 00 sec.<br />
3. Touch START/STOP.<br />
For the large 6 to 8 oz. potatoes:<br />
1. Touch POTATO twice.<br />
2. Enter number of potatoes by touching number<br />
pads from 1 to 4. Cooking times for large potatoes<br />
are as follows:<br />
1 potato 8 min. 00 sec.<br />
2 potatoes 11 min. 00 sec.<br />
3 potatoes 14 min. 00 sec.<br />
4 potatoes 17 min. 00 sec.<br />
3. Touch START/STOP.<br />
PIZZA<br />
Reheating a slice of pizza:<br />
1. Touch PIZZA once. CODE and 3:30 (3 min. 30<br />
sec.) appears.<br />
2. Touch START/STOP.<br />
Heating a whole frozen pizza:
1. Touch PIZZA twice. CODE and 6:30 (6 min. 30<br />
sec.) appears.<br />
2. Touch START/STOP.<br />
BEVERAGE<br />
For 4 to 6 oz. coffee cups:<br />
1. Touch BEVERAGE once.<br />
2. Enter number of cups by touching number pads<br />
from 1 to 4. Cooking times are as follows:<br />
1 cup. 1 min. 10 sec<br />
2 cups. 2 min. 20 sec<br />
3 cups. 3 min. 30 sec<br />
4 cups. 4 min. 40 sec<br />
3. Touch START/STOP.<br />
For the larger 7 to 9 oz. coffee mugs:<br />
1. Touch BEVERAGE twice.<br />
2. Enter number of mugs by touching number pads<br />
from 1 to 4. Cooking times are as follows:<br />
1 mug 1 min. 30 sec.<br />
2 mugs 3 min. 10 sec.<br />
3 mugs 4 min. 50 sec.<br />
4 mugs 6 min. 30 sec.<br />
3. Touch START/STOP.<br />
FROZEN DINNER<br />
For one or two small (5-7 oz.) frozen dinners:<br />
18<br />
1. Touch FROZEN DINNER once.<br />
2. For 1 entree, just touch START/STOP. For 2<br />
entrees, touch the number pad “2”. Cooking times<br />
for small-size entrees are as follows:<br />
1 entree 5 min. 55 sec.<br />
2 entrees 11 min. 00 sec.<br />
3. Touch START/STOP pad.<br />
For one large (8-10 oz.) frozen dinner:<br />
1. Touch FROZEN DINNER twice.<br />
2. For 1 entree, just touch START/STOP. For 2<br />
entrees, touch the number pad “2”. Cooking times<br />
for larger entrees are as follows:<br />
1 entree 12 min. 00 sec.<br />
2 entrees 20 min. 00 sec. *<br />
3. Touch START/STOP.<br />
REHEAT<br />
1. Touch REHEAT pad. CODE and 4:10 (4 min. 10<br />
sec.) appears.<br />
2. Touch START/STOP.<br />
*Note: the quick cook timings quoted above may be updated, please always take the timings actually shown on the<br />
screen of your microwave oven as the correct ones.
� COOKING TECHNIQUES<br />
Your microwave makes cooking easier than conventional cooking, provided you keep these<br />
considerations in mind.<br />
Stirring<br />
Stir foods such as casseroles and vegetables while cooking to distribute heat evenly. Food at the outside<br />
of the dish absorbs more energy and heats more quickly, so stir from the outside to the center. The oven<br />
will turn off when you open the door to stir your food.<br />
Arrangement<br />
Arrange unevenly shaped foods, such as chicken pieces or chops, with the thicker, meatier parts toward<br />
the outside of the turntable where they receive more microwave energy. To prevent overcooking, place<br />
delicate areas, such as asparagus tips, toward the center of the turntable.<br />
Turning<br />
Turn foods over midway through cooking to expose all parts to microwave energy. This is especially<br />
important with large foods such as roasts.<br />
Standing<br />
Foods cooked in the microwave build up internal heat and continue to cook for a few minutes after<br />
heating stops. Let foods stand to complete cooking, especially foods such as cakes and whole<br />
vegetables. Roasts need this time to complete cooking in the center without overcooking the outer areas.<br />
All liquids, such as soup or hot chocolate, should be shaken or stirred when cooking is complete. Let<br />
liquids stand a moment before serving. When heating baby food, stir well at removal and test the<br />
temperature before serving.<br />
Adding Moisture<br />
Microwave energy is attracted to water molecules. Food that is uneven in moisture content should be<br />
covered or allowed to stand so that the heat disperses evenly. Add a small amount of water to dry food to<br />
help them cook.<br />
CARE AND MAINTENANCE<br />
� CLEANING YOUR APPLIANCE<br />
? Turn the oven off and remove the power plug from the wall socket before cleaning.<br />
? Keep the inside of the oven clean. When food splatters or spilled liquids adhere to oven walls, wipe<br />
with a damp cloth. Mild detergent may be used if the oven gets very dirty. The use of harsh<br />
detergent or abrasives is not recommended.<br />
? The outside oven surfaces should be cleaned with a damp cloth. To prevent damage to the operating<br />
parts inside the oven, water should not be allowed to seep into the ventilation openings.<br />
? Do not allow the control panel to become wet. Clean with a soft, damp cloth. Do not use detergents,<br />
abrasives or spray-on cleaners on the control panel. When cleaning the control Panel, leave oven<br />
door open to prevent oven from accidentally turning on.<br />
? If steam accumulates inside or around the outside of the oven door, wipe with a soft cloth. This may<br />
occur when the microwave oven is operated under high humidity conditions and in no way indicates<br />
malfunction of the unit.<br />
? It is occasionally necessary to remove the glass tray for cleaning. Wash the tray in warm sudsy water<br />
or in a dishwasher.<br />
? The roller ring and oven cavity floor should be cleaned regularly to avoid excessive noise. Simply<br />
wipe the bottom surface of the oven with mild detergent, water or window cleaner and dry. The roller<br />
ring may be washed in mild sudsy water or dishwasher. Cooking vapors collect during repeated use<br />
but in no way affect the bottom surface or roller ring wheels. When removing the roller ring from<br />
cavity floor for cleaning, be sure to replace it in the proper position.<br />
? Remove odors from your oven by combining a cup of water with the juice and skin of one lemon in a<br />
deep microwavable bowl. Microwave for 5 minutes. Wipe thoroughly and dry with a soft cloth.<br />
? When it becomes necessary to replace the oven light, please consult a dealer to have it replaced.<br />
19
PROBLEMS WITH YOUR APPLIANCE?<br />
You can solve many common appliance problems easily, saving you the cost of a possible service call.<br />
Try the suggestions below to see if you can solve the problem before calling the servicer.<br />
TROUBLESHOOTING GUIDE<br />
PROBLEM POSSIBLE CAUSE<br />
Appliance does not operate. Not plugged in.<br />
The circuit breaker tripped or a blown fuse.<br />
The door is not closed properly.<br />
The light does not work. The circuit breaker tripped or a blown fuse.<br />
The appliance is unplugged.<br />
The bulb has burned out (see the maintenance<br />
section for the replacement procedure).<br />
Vibrations. Check to assure that the appliance is level.<br />
SERVICE FOR YOUR APPLIANCE<br />
We are proud of our customer service organization and the network of professional service technicians<br />
that provide service on your <strong>Avanti</strong> appliances. With the purchase of your <strong>Avanti</strong> appliance, you can be<br />
confident that if you ever need additional information or assistance, the <strong>Avanti</strong> <strong>Products</strong> Customer<br />
Service team will be here for you. Just call us toll-free.<br />
Product Information<br />
800-323-5029<br />
Part Orders<br />
800-220-5570<br />
In-Home Repair Service<br />
800-220-5570<br />
AVANTI PRODUCTS CUSTOMER SERVICES<br />
Whatever your questions are about our products,<br />
help is available.<br />
You may order parts and accessories that will be<br />
delivered directly to your home by personal<br />
check, money order, Master Card, or Visa.<br />
An <strong>Avanti</strong> <strong>Products</strong> authorized service center will<br />
provide expert repair service, scheduled at a time<br />
that is convenient for you. Our trained servicers<br />
know your appliance inside and out.<br />
20
<strong>Avanti</strong> Microwave Ovens<br />
Limited Warranty<br />
LIMITED ONE-YEAR WARRANTY<br />
<strong>Avanti</strong> <strong>Products</strong> will repair or replace, without charge, any part of your product, which proves to be<br />
defective in material or workmanship under normal use during the first year after the date of original<br />
purchase by a consumer. This warranty is good for the original purchaser during the warranty period and<br />
applies only in the continental United States. Transportation of this product to and from the designated<br />
service facility is the responsibility of the consumer.<br />
LIMITED TWO-YEAR WARRANTY<br />
During the second year of use, <strong>Avanti</strong> <strong>Products</strong> will furnish, as needed, a replacement part in exchange<br />
for any part, which fails due to a defect in material or workmanship. All labor and transportation charges<br />
are the responsibility of the owner.<br />
LIMITED SEVEN-YEAR WARRANTY-MAGNETRON TUBE<br />
For an additional 6-year period beyond the first year of the general coverage of this warranty, <strong>Avanti</strong><br />
<strong>Products</strong> will replace a magnetron tube, which fails due to a defect in material or workmanship. The<br />
consumer will be responsible for all labor, service charge and transportation.<br />
This warranty is good for the original purchaser during the warranty period and applies only in the<br />
continental United States.<br />
Implied warranties of the merchantability or, to the extent applicable, fitness for a particular purpose, are<br />
limited in duration to seven years, the same duration as the basic limited warranty provided hereby. Some<br />
states do not allow limitations on how long an implied warranty may last.<br />
So, this limitation may not apply to you.<br />
<strong>Avanti</strong> <strong>Products</strong> shall not be liable for any food loss or for any other incidental or consequential damages<br />
not for any special damages or any further loss which may arise in connection with its warranted<br />
appliance or any claims under this warranty. Some states do not allow the exclusion or limitation of<br />
incidental or consequential damages. So the above exclusion or limitation may not apply to you.<br />
To obtain service under this warranty, contact any of the <strong>Avanti</strong> <strong>Products</strong> service centers. A list of the<br />
service centers can be obtained from your dealer or from <strong>Avanti</strong> <strong>Products</strong>, 10880 N.W. 30 th Street, Miami,<br />
Fl 33172. The user must keep a copy of the bill of sale verifying the purchase date to validate the<br />
warranty.<br />
THE ABOVE WARRANTIES DO NOT APPLY<br />
1. To damages or problems, which result from improper installation or delivery.<br />
2. To damages or problems, which result form misuse, abuse, accident, alteration, or incorrect<br />
electrical current or voltage.<br />
3. To service calls. (Unit must be brought or shipped to and from applicable service centers)<br />
4. To any other product used for anything other than normal private household use.<br />
5. To light bulbs.<br />
This warranty gives you specific legal rights, and you may also have other rights, which vary from state to<br />
state.<br />
AVANTI PRODUCTS, A DIVISION OF THE MACKLE CO., INC.<br />
P.O. BOX 520604 – MIAMI, FLORIDA 33172<br />
21
WIRING DIAGRAM<br />
22
PRECAUCION<br />
INSTRUCCIONES EN ESPAÑOL<br />
PARA REDUCIR EL RIESGO DE INCENDIO,<br />
DESCARGA ELECTRICA, O DAÑO CUANDO<br />
ESTE USANDO SU HORNO MICROONDAS,<br />
SIGA ESTAS INDICACIONES.<br />
? LEA TODAS LAS INSTRUCCIONES ANTES DE USAR SU HORNO MICROONDAS.<br />
? ALGUNOS PRODUCTOS TALES COMO HUEVOS ENTEROS Y ENVASES SELLADOS<br />
(POR EJEMPLO, FRASCOS DE VIDRIO) PUEDEN EXPLOTAR, POR LO QUE NO DEBEN<br />
SER CALENTADOS EN SU HORNO MICROONDAS.<br />
? USE SU HORNO MICROONDAS SOLAMENTE PARA LO QUE SE INDICA EN ESTE<br />
<strong>MANUAL</strong>.<br />
? NO USE SUSTANCIAS QUIMICAS CORROSIVAS O GASES EN ESTE HORNO. ESTE<br />
TIPO DE HORNO MICROONDAS ESTA DISEÑADO ESPECIFICAMENTE PARA<br />
CALENTAR, COCINAR, Y DESHIDRATAR ALIMENTOS, NO ESTA DISEÑADO PARA USO<br />
INDUSTRIAL O DE LABORATORIO.<br />
? COMO CON TODO ELECTRODOMESTICO, ES NECESARIA LA SUPERVISION DE UNA<br />
PERSONA ADULTA CUANDO SEA OPERADO POR NIÑOS.<br />
? NO USE SU HORNO MICROONDAS SI TIENE EL CORDON O EL ENCHUFE DAÑADOS,<br />
SI NO ESTA FUNCIONANDO APROPIADAMENTE, O SI ESTE SUFRIO UN GOLPE O UNA<br />
CAIDA.<br />
? PARA REDUCIR EL RIESGO DE CHISPAS O FUEGO EN EL INTERIOR DEL HORNO<br />
MICROONDAS:<br />
? NO RECOCINE ALIMENTOS. ESTE AL PENDIENTE DE SU HORNO MICROONDAS<br />
CUANDO COCINE ALIMENTOS QUE VENGAN CON ALGUN TIPO DE ENVOLTURA<br />
COMO: PAPEL, PLASTICO, O MATERIAL QUE PUEDA SERVIR COMO<br />
COMBUSTIBLE, PODRIA INICIAR UN INCENDIO.<br />
? RETIRE EL ALAMBRE METALICO QUE SE UTILIZA PARA CERRAR LAS BOLSAS<br />
ANTES DE COLOCAR EL ALIMENTO DENTRO DEL HORNO.<br />
? SI ALGUNO DE LOS MATERIALES QUE ESTAN DENTRO DEL HORNO SE INCENDIA,<br />
MANTENGA LA PUERTA DEL HORNO MICROONDAS BIEN CERRADA,<br />
DESCONECTELO O APAGUE LA LLAVE GENERAL DE ELECTRICIDAD.<br />
? NO ALMACENE OBJETOS, NI DEJE PAPELES, UTENSILIOS DE COCINA, O<br />
ALIMENTOS DENTRO DE SU HORNO MICROONDAS.<br />
? SOLO PERSONAL DE SERVICIO AUTORIZADO PUEDE BRINDAR SERVICIO TECNICO A<br />
SU HORNO MICROONDAS. COMUNIQUESE CON EL SERVICIO TECNICO AUTORIZADO<br />
MAS CERCANO PARA EXAMINAR, REPARAR O ARREGLAR SU HORNO MICROONDAS.<br />
? NO CUBRA NI OBSTRUYA NINGUN TIPO DE VENTILACION DE SU HORNO.<br />
? NO USE SU HORNO MICROONDAS PARA CALENTAR SUSTANCIAS QUIMICAS<br />
CORROSIVAS (POR EJEMPLO, SULFUROS Y CLORUROS), EL GAS DE DICHOS<br />
QUIMICOS PUEDE INTERACTUAR CON LOS CONTACTOS Y RESORTES DE LA LLAVE<br />
DE SEGURIDAD, DEJANDOLA INOPERABLE.<br />
? NO SUMERJA EL CORDON NI EL ENCHUFE DENTRO DEL AGUA.<br />
? MANTENGA SU HORNO MICROONDAS ALEJADO DE SUPERFICIES CALIENTES.<br />
? NO DEJE EL CORDON COLGANDO EN EL BORDE DE MESAS O MOSTRADORES.<br />
? NO LIMPIE SU HORNO MICROONDAS CON LIQUIDOS INFLAMABLES. LOS GASES QUE<br />
ESTOS EMITEN PUEDEN OCASIONAR UNA EXPLOCION Y/O INCENDIO.<br />
? NO ALMACENAR NI USAR GASOLINA, NINGUN TIPO DE GAS O LIQUIDO INFLAMABLE<br />
CERCA DE SU HORNO MICROONDAS O DE OTROS ELECTRODOMESTICOS, YA QUE<br />
PUEDEN PRODUCIR UN INCENDIO Y DESENCADENAR UNA EXPLOSION.<br />
GUARDE LAS INSTRUCCIONES CERCA DE SU ALCANCE.<br />
23
INDICACIONES PARA LA INSTALACION<br />
ANTES DE USAR SU HORNO MICROONDAS<br />
? RETIRE LA ENVOLTURA EXTERIOR E INTERIOR<br />
? VERIFIQUE QUE TENGA LAS SIGUIENTES PARTES:<br />
? PLATO DE VIDRIO<br />
? ARO GIRATORIO<br />
? <strong>MANUAL</strong> DE USO<br />
? VERIFICAR QUE EL HORNO MICROONDAS NO TENGA LOS SIGUIENTES DAÑOS:<br />
? PUERTA MAL ALINEADA O DESCUADRADA<br />
? PUERTA DAÑADA<br />
? ABOLLADURAS O AGUJEROS EN LA PUERTA Y/O PANTALLA.<br />
? ABOLLADURAS DENTRO DEL HORNO.<br />
SI SU HORNO MICROONDAS MUESTRA ALGUNA DE LAS CARACTERISTICAS ARRIBA<br />
MENCIONADAS, NO LO USE.<br />
INSTALACION DE SU HORNO MICROONDAS<br />
? DEBE UBICAR SU HORNO MICROONDAS EN UNA SUPERFICIE PLANA Y ESTABLE.<br />
? NO OBSTRUYA NINGUN TIPO DE VENTILACION. SI ESTO SUCEDE MIENTRAS USTED OPERA<br />
SU HORNO MICROONDAS OCASIONARA QUE ESTE SE RECALIENTE Y QUE<br />
EVENTUALMENTE SE MALOGRE.<br />
? COLOCAR EL HORNO MICROONDAS CERCA A SU TELEVISOR, RADIO, ANTENA O CABLES<br />
DE LA ANTENA, PODRIA OCASIONAR MALA SEÑAL EN LA TELEVISION E INTERFERENCIA EN<br />
LA RADIO. POR LO TANTO RECOMENDAMOS UBICAR SU HORNO MICROONDAS LO MÁS<br />
ALEJADO POSIBLE DE ÉSTOS ARTEFACTOS.<br />
? LIMPIE LA SUPERFICIE INTERIOR DEL HORNO MICROONDAS CON UN TRAPO SUAVE<br />
HUMEDECIDO CON UN POCO DE AGUA TIBIA.<br />
? MANTENGA SU HORNO MICROONDAS ALEJADO DEL AIRE CALIENTE, VAPOR O DE LAS<br />
SALPICADURAS DE LÍQUIDOS CUANDO ESCOJA UN LUGAR DONDE UBICARLO, DE NO<br />
HACERLO SU FUNCIONAMIENTO PODRIA SER AFECTADO OCASIONANDO UNA AVERIA.<br />
? LOS RAYOS SOLARES DIRECTOS PODRIAN AFECTAR EL REVESTIMIENTO ACRILICO Y LAS<br />
FUENTES DE CALOR PODRIAN INCREMENTAR EL CONSUMO ELECTRICO.<br />
? CONECTE SU HORNO MICROONDAS A UN TOMACORRIENTE DE PARED EXCLUSIVO Y<br />
APROPIADO. BAJO NINGUNA RAZON SE DEBE RETIRAR LA TERCERA PUNTA (CABLE DE<br />
TIERRA) DEL ENCHUFE. CUALQUIER CONSULTA RESPECTO A LA CORRIENTE ELECTRICA<br />
Y/O EL CABLE DE TIERRA, DEBE SER DIRIGIDA A UN ELECTRICISTA CERTIFICADO O A UN<br />
CENTRO DE SERVICIOS AUTORIZADO POR AVANTI PRODUCTS.<br />
? NO COLOQUE OBJETOS SOBRE SU HORNO MICROONDAS.<br />
? PARA ASEGURAR UNA VENTILACION APROPIADA MANTENGA SU HORNO MICROONDAS A<br />
POR LO MENOS 5 PULGADAS DE LA PARED.<br />
? NO REMUEVA EL EJE DEL MOTOR GIRATORIO.<br />
MEDIDAS DE PRECAUCION<br />
USO GENERAL<br />
? NO INTENTE MANIPULAR, AJUSTAR O REPARAR LA PUERTA, EL PANEL DE CONTROL O<br />
CUALQUIER PARTE DE SU HORNO MICROONDAS. NO REMUEVA EL PANEL DE CONTROL<br />
DEL HORNO. LAS REPARACIONES DEBERAN SER REALIZADAS POR PERSONAL DE<br />
SERVICIO CALIFICADO.<br />
? NO UTILISE EL HORNO CUANDO ESTE VACIO. SI NO HAY ALIMENTOS O AGUA DENTRO DEL<br />
HORNO MICROONDAS, QUE PUEDAN ABSORBER TODA LA ENERGIA DE LAS MICROONDAS,<br />
ESTA SE REFLEJARA CONTINUAMENTE DENTRO EL HORNO.<br />
? DE SUCEDER UN INCENDIO, PRESIONE LA TECLA START/STOP EN EL PANEL DE CONTROL<br />
24
Y DEJE LA PUERTA CERRADA. DESCONECTE EL ENCHUFE O DESCONECTELO DE LA CAJA<br />
GENERAL DE LA ELECTRICIDAD.<br />
? NO INTENTE SECAR ROPA, PERIODICOS, U OTRO TIPO DE MATERIALES EN EL HORNO.<br />
ESTOS PODRIAN INCENDIARSE.<br />
? NO USE PRODUCTOS DE PAPEL RECICLADO, ESTOS CONTIENEN IMPUREZAS QUE PUEDEN<br />
CAUSAR CHISPAS Y/O FUEGO CUANDO SON USADOS.<br />
? NO GOLPEE EL PANEL DE CONTROL, PODRIA DAÑAR LOS CONTROLES.<br />
UTENSILIOS<br />
? NO USE ENVASES DE METAL O PLATOS CON BORDES METALICOS, PODRIAN OCASIONAR<br />
CHISPAS.<br />
? NO USE ALAMBRES METALICOS PARA CERRAR BOLSAS EN SU HORNO MICROONDAS.<br />
? NO USE FRASCOS SELLADOS O BOTELLAS DE CUELLO ESTRECHO PARA COCINAR O<br />
RECALENTAR. PODRIAN ROMPERSE.<br />
? NO USE TERMOMETROS CONVENCIONALES EN EL MICROONDAS. SOLO USE LOS<br />
LLAMADOS “<strong>MICROWAVE</strong> SAFE” (PARA USO EN MICROONDAS) SIGUIENDO SUS<br />
INSTRUCCIONES.<br />
? RETIRE LAS ENVOLTURAS PLASTICAS DE LOS ALIMENTOS ANTES DE COCINARLOS O<br />
DESCONGELARLOS.<br />
RECOMENDACIONES<br />
? PLATO DORADOR DE MICROONDAS: USELO PARA DORAR EL EXTERIOR DE COMIDAS<br />
PEQUEÑAS TALES COMO CARNE DE RES, DE CERDO O PANQUEQUES. SIGA LAS<br />
INSTRUCCIONES QUE VIENEN CON EL PLATO DORADOR.<br />
? ENVOLTURAS PLASTICAS PARA MICROONDAS: USELAS PARA RETENER EL VAPOR DE<br />
AGUA, DEJANDO UNA PEQUEÑA ABERTURA PARA DEJAR ESCAPAR UN POCO DEL MISMO,<br />
EVITANDO ASI QUE CAIGA DIRECTAMENTE SOBRE LA COMIDA.<br />
? TOALLAS DE PAPEL Y SERVILLETAS: USELAS COMO COBERTOR PARA CALENTAR POR<br />
CORTO TIEMPO, ESTAS ABSORBERAN EL EXCESO DE HUMEDAD Y PREVENDRAN<br />
SALPICADURAS. NO USE TOALLAS DE PAPEL RECICLADAS, ESTAS PODRIAN CONTENER<br />
METAL LO QUE OCASIONARIA UN INCENDIO.<br />
ALIMENTOS<br />
? NUNCA USE SU HORNO MICROONDAS COMO ALACENA. LOS ALIMENTOS QUE ALMACENE<br />
DENTRO DEL HORNO PUEDE MALOGRARSE VOLVIENDOSE PELIGROSOS PARA EL<br />
CONSUMO.<br />
? LOS TIEMPOS PREDETERMINADOS DE COCCION SON APROXIMADOS. LOS FACTORES<br />
QUE PUEDEN AFECTAR SU COCIMIENTO SON LA TEMPERATURA INICIAL, LA ALTITUD<br />
DONDE USTED SE ENCUENTRE, EL VOLUMEN, EL TAMAÑO, LA FORMA DEL ALIMENTO Y<br />
LOS UTENSILIOS USADOS. TAN PRONTO COMO SE ACOSTUMBRE AL MANEJO DEL HORNO<br />
MICROONDAS LE SERA MUY FACIL AJUSTARSE A ESTOS FACTORES.<br />
? ES MEJOR NO RECOCINAR LOS ALIMENTOS. SI LOS ALIMENTOS NO ESTAN TOTALMENTE<br />
COCIDOS, PUEDE COCINARLOS POR UN TIEMPO MAS, RECUERDE QUE SI ESTOS SE<br />
QUEMAN YA NADA PODRA HACER. SIEMPRE EMPIECE CON LOS TIEMPOS MINIMOS DE<br />
COCCION.<br />
? CUANDO EL TIEMPO DE COCCION ES MUY LARGO, LOS ALIMENTOS EN PEQUEÑAS<br />
CANTIDADES O MUY SECOS CORREN EL RIESGO DE QUEMARSE, DESHIDRATARSE O<br />
INCENDIARSE.<br />
? NUNCA HIERVA HUEVOS CON LA CASCARA. LA PRESION DEL HORNO PUEDE AUMENTAR<br />
LO QUE HARA QUE LOS HUEVOS REVIENTEN.<br />
? LOS ALIMENTOS CON PIEL O CASCARA NO POROSA (POR EJEMPLO LAS PAPAS,<br />
MANZANAS, YEMA DE HUEVO, MAIZ ENTERO, CALABAZAS Y SALCHICHA) DEBEN SER<br />
PINCHADOS ANTES DE SER COCINADOS PARA EVITAR QUE REVIENTEN.<br />
? LAS PALOMITAS DE MAIZ DEBEN SER PREPARADAS EN UN RECIPIENTE ESPECIAL PARA<br />
25
HORNO MICROONDAS. LAS PALOMITAS DE MAIZ PREPARADAS EN HORNO MICROONDAS<br />
TIENEN UN MENOR RENDIMIENTO QUE LAS PREPARADAS EN UNA OLLA CONVENCIONAL.<br />
NO DEBE USAR EL HORNO MICROONDAS PARA PREPARAR PALOMITAS DE MAIZ A MENOS<br />
QUE CUENTE CON LOS UTENSILIOS INDICADOS PARA PREPARARLAS O QUE YA VENGAN<br />
EMPACADAS Y RECOMENDADAS ESPECIALMENTE PARA SER PREPARADAS EN UN HORNO<br />
MICROONDAS. NO USE ACEITE, A MENOS QUE EL FABRICANTE DEL PRODUCTO LO<br />
ESPECIFIQUE.<br />
? NO INTENTE FREIR DENTRO DE SU HORNO MICROONDAS.<br />
? LOS LIQUIDOS CALIENTES PUEDEN ERUPCIONAR SI NO TIENEN AIRE. NO CALIENTE<br />
LIQUIDOS EN SU HORNO MICROONDAS SIN HABERLOS MEZCLADO PRIMERO.<br />
CONEXION ELECTRICA<br />
ESTE ARTEFACTO DEBE SER CONECTADO A TIERRA. EN EL CASO QUE OCURRA UN CORTO<br />
CIRCUITO, LA CONEXION A TIERRA REDUCIRA EL RIESGO DE RECIBIR UNA DESCARGA<br />
ELECTRICA POR TENER UN ALAMBRE PARA EL ESCAPE DE LA CORRIENTE ELECTRICA. ESTE<br />
HORNO MICROONDAS ESTA EQUIPADO CON UN ENCHUFE QUE POSEE UN CABLE DE TIERRA.<br />
EL CABLE DEBE SER CONECTADO EN UN TOMACORRIENTE QUE ESTE APROPIADAMENTE<br />
INSTALADO Y QUE POSEA UN RECEPTOR PARA CABLE DE TIERRA.<br />
ADVERTENCIA<br />
EL USO INAPROPIADO DEL CABLE DE TIERRA PUEDE RESULTAR EN UNA DESCARGA<br />
ELECTRICA. CONSULTE A UN ELECTRICISTA O PERSONAL DE SERVICIO CALIFICADO SI TIENE<br />
ALGUNA DUDA SOBRE LAS INSTRUCCIONES DE INSTALACION DEL CABLE DE TIERRA.<br />
EL CORDON DEL HORNO MICROONDAS ESTA EQUIPADO CON UN ENCHUFE DE TRES PUNTAS<br />
EL CUAL ENCAJA PERFECTAMENTE EN UN TOMACORRIENTE DE PARED DE TRES PUNTAS<br />
ESTANDA R PARA REDUCIR EL RIESGO DE UNA DESCARGA ELECTRICA.<br />
BAJO NINGUNA CIRCUNSTANCIA CORTE O RETIRE LA TERCERA PUNTA DEL ENCHUFE YA QUE<br />
ESTA ES LA CONEXION A TIERRA.<br />
NO USE UNA EXTENSION ELECTRICA.<br />
LA CORRIENTE ELECTRICA DE ESTE HORNO MICROONDAS ES DE 115 A 120 VOLTIOS, TIENE<br />
UNA SALIDA ELECTRICA DE 60 HZ Y UN ENCHUFE DE TIERRA DE TRES PUNTAS QUE VA<br />
CONECTADO AL TOMACORRIENTE DE PARED.<br />
ASUGURE EL ENCHUFE DETRAS DEL ARTEFACTO Y NO LO DEJE EXPUESTO O COLGADO PARA<br />
PREVENIR ACCIDENTES.<br />
OPERANDO SU HORNO MICROONDAS<br />
AUNQUE SU HORNO MICROONDAS ESTE EQUIPADO CON CARACTERISTICAS DE SEGURIDAD,<br />
ES IMPORTANTE TOMAR NOTA DE LO SIGUIENTE:<br />
? NO TRABE O FUERZE LOS SEGUROS INTERNOS CON EL PROPOSITO DE HACER<br />
FUNCIONAR SU UNIDAD.<br />
? NO DEJE NINGUN OBJETO ENTRE LA CARA FRONTAL DEL HORNO Y LA PUERTA. NO DEJE<br />
QUE SE ACUMULEN RESIDUOS EN LAS SUPERFICIES SELLADAS. LIMPIE DICHAS<br />
SUPERFICIES FRECUENTEMENTE CON UN DETERGENTE SUAVE, ENJUAGUE Y SÉQUELO.<br />
NUNCA USE DETERGENTE EN POLVO O ESPONJAS ABRASIVAS.<br />
? CUANDO LA PUERTA ESTE ABIERTA NO LA FUERZE DEMASIADO, POR EJEMPLO UN NIÑO<br />
COLGANDOSE DE ELLA O UNA CARGA QUE CAUSE QUE EL HORNO SE CAIGA HACIA<br />
DELANTE Y DE ESTA MANERA DAÑE LA PUERTA<br />
26
? SI SU HORNO MICROONDAS ESTA MALOGRADO NO LO USE HASTA QUE HAYA SIDO<br />
REPARADO POR PERSONAL DE SERVICIO CALIFICADO. ES IMPORTANTE QUE SU HORNO<br />
MICROONDAS CIERRE APROPIADAMENTE Y QUE NO TENGA DAÑOS EN:<br />
? PUERTA (DOBLADA)<br />
? BISAGRAS Y MANIJAS (ROTAS O SUELTAS)<br />
? SELLOS DE LAS PUERTAS Y SUPERFICIES SELLADAS<br />
? SU HORNO MICROONDAS DEBE SER REPARADO SOLO POR PERSONAL DE SERVICIO<br />
DEBIDAMENTE CALIFICADO.<br />
OPERACION<br />
? CONECTE EL ENCHUFE A UN TOMACORRIENTE ESTANDAR DE 3 PUNTAS (120V AC 60 HZ,15<br />
AMP).<br />
? CUANDO EL HORNO SE CONECTA POR PRIMERA VEZ LA PANTALLA DEL PANEL DE<br />
CONTROL MOSTRARA EL MENSAJE “ENTER CLOCK TIME” (ENTRE LA HORA DEL RELOJ), SI<br />
NO DESEA QUE SE MUESTRE LA HORA DEL RELOJ PRESIONE LA TECLA RESET.<br />
? LUEGO DE COLOCAR LA COMIDA EN UN ENVASE ADECUADO ABRA LA PUERTA DEL HORNO<br />
Y PONGALA SOBRE EL PLATO DE VIDRIO (ESTE Y EL ARO GIRATORIO DEBEN ESTAR<br />
SIEMPRE EN SU LUGAR CUANDO EL HORNO ESTE TRABAJANDO).<br />
? CIERRE LA PUERTA.<br />
? SI PRESIONA LA TECLA START/STOP Y EL HORNO NO COCINA, ASEGURESE QUE LA<br />
PUERTA ESTE BIEN CERRADA Y VERIFIQUE QUE NO TENGA OBSTRUCCIONES. EL HORNO<br />
NO COMENZARA A COCINAR HASTA QUE LA PUERTA ESTE COMPLETAMENTE CERRADA Y<br />
EL HORNO SE HAYA PROGRAMADO CORRECTAMENTE.<br />
? CADA VEZ QUE UNA TECLA DEL PANEL DE CONTROL SEA MARCADA USTED ESCUCHARA<br />
EL SONIDO DE UN TIMBRE (BEEP). USTED DEBERA MARCAR ALGUNA DE LAS TECLAS DE<br />
FUNCIONES ANTES DE HACERLO CON LAS TECLAS NUMERICAS. DOS BEEP INDICARAN<br />
QUE EL HORNO NO ACEPTA LA INDICACION DIGITADA, POR FAVOR VERIFIQUELA Y VUELVA<br />
A INTENTARLO.<br />
? EL HORNO COCINA AUTOMATICAMENTE CON LA POTENCIA MAS ALTA Y DESCONGELA<br />
CON LA MAS BAJA.<br />
? LA PUERTA DEL HORNO PUEDE ABRIRSE EN CUALQUIER MOMENTO AUNQUE ESTE EN<br />
FUNCIONAMIENTO, EL HORNO SE APAGARA AUTOMATICAMENTE PERO TODA LA<br />
INFORMACION QUEDARA RETENIDA. PARA REINICIAR SU FUNCIONAMIENTO CIERRE LA<br />
PUERTA DEL HORNO Y PRESIONE LA TECLA START/STOP EN EL PANEL DE CONTROL.<br />
? CUANDO PRESIONE LA TECLA START/STOP MIENTRAS EL HORNO MICROONDAS OPERA,<br />
ESTE DEJARA DE COCINAR.<br />
PANEL DE CONTROL<br />
A CONTINUACION LE INDICAMOS LAS INSTRUCCIONES PARA EL MANEJO DE LOS COMANDOS<br />
DEL PANEL DE CONTROL:<br />
POWER (POTENCIA)<br />
SE USA PARA SELECCIONAR EL NIVEL DE POTENCIA<br />
TIMER (MEDIDOR DE TIEMPO) PARA COMIDAS EXTERNAS<br />
USTED PUEDE USAR ESTA FUNCION INDEPENDIENTEMENTE, AUN CUANDO EL HORNO ESTE<br />
EN USO.<br />
COOK (COCINAR)<br />
SE USA PARA COCINAR EN ETAPAS Y POTENCIAS DISTINTAS. USTED PODRA<br />
COCINAR A UNA POTENCIA POR UN PERIODO DE TIEMPO, LUEGO EL HORNO CAMBIARA<br />
AUTOMATICAMENTE LA POTENCIA PARA EL RESTO DE LA COCCION (SEGUN HAYA SIDO<br />
27
PROGRAMADO POR USTED)<br />
COOK BY WEIGHT (COCINAR SEGUN EL PESO)<br />
CON SOLO DIGITAR EL PESO Y EL TIPO DE LA CARNE, EL HORNO FIJA AUTOMATICAMENTE EL<br />
TIEMPO DE COCCION Y EL NIVEL DE POTENCIA<br />
DEFROST BY WEIGHT (DESCONGELAR SEGUN EL PESO)<br />
USTED SOLO DEBE INGRESAR EL PESO DE LA COMIDA A SER DESCONGELADA,<br />
SEGUIDAMENTE EL HORNO DIVIDIRA Y FIJARA AUTOMATICAMENTE, EL TIEMPO E INTERVALOS<br />
CON LOS QUE DESCONGELARÁ LOS ALIMENTOS, ALTERNANDO ETAPAS DE COCCION<br />
(ENCENDIDO) Y REPOSO (APAGADO).<br />
NUMBER PADS (0-9) (TECLADO NUMERICO)<br />
EL TECLADO DE NUMEROS SIRVE PARA INGRESAR TIEMPOS Y CANTIDADES.<br />
CLOCK (RELOJ)<br />
SE USA PARA INGRESAR LA HORA ACTUAL EN EL RELOJ.<br />
RESET (REINICIO)<br />
REINICIA TODAS LAS PROGRAMACIONES SI SE MARCA ANTES DE COMENZAR A COCINAR.<br />
START/STOP (COMENZAR/PARAR)<br />
SE USA PARA INICIAR, DETENER O FINALIZAR EL FUNCIONAMIENTO DEL HORNO.<br />
POP CORN (PALOMITAS DE MAIZ), BAKED POTATO (PAPA HORNEADA), PIZZA, BEVERAGE<br />
(BEBIDAS), FROZEN DINNER (COMIDAS CONGELADAS), REHEAT (RECALENTAR)<br />
SON FUNCIONES PRE-PROGRAMADAS. ESTAS OPCIONES LE PERMITIRAN COCINAR O<br />
RECALENTAR ALIMENTOS AUTOMATICAMENTE SIN NECESIDAD DE INGRESAR LA POTENCIA<br />
O EL TIEMPO DE COCCION.<br />
TIMER (MEDIDOR DE TIEMPO)<br />
? SE USA PARA PROGRAMAR EL TIEMPO DE COCINADO<br />
? PERMITE PROGRAMAR HASTA 99 MINUTOS Y 99 SEGUNDOS<br />
RESET (REINICIAR)<br />
? CANCELA EL NIVEL DE POTENCIA, EL TIEMPO DE COCCION Y DESCONGELADO<br />
PREVIAMENTE PROGRAMADOS.<br />
? LA HORA DEL RELOJ NO PUEDE SER CANCELADA.<br />
START/STOP (INICIAR/TERMINAR)<br />
? INICIA, DETIENE O FINALIZA TODOS LOS PROGRAMAS.<br />
? LA LUZ INDICADORA DE COCCION Y LA DEL HORNO SE ENCENDERAN Y EL VENTILADOR<br />
DE REFRIGERACION EMPEZARA A FUNCIONAR.<br />
NOTA : AL TERMINO DE UNA FUNCION - LA PANTALLA MOSTRARA EL MENSAJE “END”<br />
? CUANDO ALGUNA FUNCION LLEGUE A SU TERMINO, SU HORNO MICROONDAS LE AVISARA<br />
DE LA SIGUIENTE MANERA:<br />
? ESCUCHARA TRES VECES EL SONIDO BEEP, LA LUZ INDICADORA DE COCCION SE<br />
APAGARA Y LA PANTALLA MOSTRARA NUEVAMENTE LA HORA.<br />
? LA LUZ DEL HORNO Y EL VENTILADOR DE REFRIGERACION SE APAGARAN<br />
? EL HORNO EMITIRA AUTOMATICAMENTE, Y CADA DOS MINUTOS, TRES VECES EL SONIDO<br />
BEEP HASTA QUE LA PUERTA DEL HORNO SE ABRA O SE TOQUE LA TECLA RESET<br />
NOTA: INTERRUPCION DE UNA FUNCION - ABRA LA PUERTA DEL HORNO<br />
28
? EL HORNO SE DETENDRA INMEDIATAMENTE.<br />
? SI NO NECESITA SEGUIR COCINANDO PRESIONE LA TECLA RESET.<br />
? PARA CONTINUAR COCINANDO CIERRE LA PUERTA DEL HORNO Y PRESIONE LA TECLA<br />
START/STOP. EL HORNO SEGUIRA COCINANDO.<br />
SPEED DEFROST (DESCONGELADO RAPIDO)<br />
? ESTA FUNCION SIRVE PARA DESCONGELAR COMIDA.<br />
? ESTE CICLO COMIENZA CON UNA POTENCIA ALTA-MEDIA, LUEGO SE REDUCE A MEDIA-<br />
BAJA AUTOMATICAMENTE, Y TERMINA EN LA POTENCIA MAS BAJA MIENTRAS LA COMIDA<br />
TERMINA DE DESCONGELARSE.<br />
? LA LUZ INDICADORA DE DESCONGELAMIENTO RAPIDO Y LA DE COCCION ESTARAN<br />
PRENDIDAS DURANTE EL TODO EL CICLO.<br />
CARACTERISTICAS ESPECIALES DE SU HORNO MICROONDAS<br />
MINUTE TIMER (MEDIDOR DE TIEMPO POR MINUTOS)<br />
SE USA PARA TOMAR EL TIEMPO A COSAS QUE SE HACEN FUERA DEL HORNO. CUANDO EL<br />
TIEMPO PROGRAMADO HAYA TRANSCURRIDO EL HORNO EMITIRA TRES VECES EL SONIDO<br />
BEEP. LA LUZ DEL HORNO Y EL VENTILADOR DE REFRIGERACION ESTARAN ENCENDIDOS<br />
MIENTRAS EL MEDIDOR DE TIEMPO ESTE ACTIVO.<br />
AUTO TIMER (MEDIDOR DE TIEMPO AUTOMATICO)<br />
LUEGO DE TERMINAR LOS PROGRAMAS DE COCINADO O DESCONGELADO, EL HORNO<br />
EMITIRA TRES VECES EL SONIDO BEEP CADA DOS MINUTOS HASTA QUE SE ABRA LA PUERTA<br />
O SE PRESIONE LA TECLA RESET.<br />
CHILD PROOF LOCK (SEGURO A PRUEBA DE NIÑOS)<br />
SU HORNO MICROONDAS CUENTA CON UNA FUNCION QUE PERMITE BLOQUEARLO, DE ESTA<br />
MANERA EVITARA EL USO INDEBIDO Y ACCIDENTAL DEL MISMO. MIENTRAS ESTE<br />
PROGRAMADO, EL INDICADOR CHILD PROOF LOCK ESTARA ENCENDIDO Y EL HORNO NO<br />
PODRA OPERARSE.<br />
COMO PROGRAMAR LOS CONTROLES DEL HORNO<br />
SEÑALES DURANTE LA PROGRAMACION DEL HORNO<br />
UNA SEÑAL (BEEP) EL HORNO ACEPTA LOS DATOS PARA LA PROGRAMACION.<br />
DOS SEÑALES (BEEP) EL HORNO NO ACEPTA LA INDICACION DIGITADA, VERIFIQUELA E<br />
INTENTE NUEVAMENTE.<br />
PROGRAMANDO EL RELOJ<br />
1. PRESIONE LA TECLA CLOCK<br />
2. USE LAS TECLAS NUMERICAS PARA INGRESAR LA HORA CORRECTA. SE DEBEN DIGITAR<br />
AL MENOS TRES NUMEROS PARA PROGRAMAR LA HORA (UNO PARA LA HORA Y DOS PARA<br />
LOS MINUTOS)<br />
3. PRESIONE LA TECLA CLOCK NUEVAMENTE.<br />
NOTA: ESTE ES UN RELOJ DE 12 HORAS.<br />
CUANDO EL HORNO ES CONECTADO POR PRIMERA VEZ O CUANDO LA CORRIENTE RETORNE<br />
LUEGO DE UNA INTERRUPCION, LA PANTALLA MOSTRARA EL MENSAJE ENTER CLOCK TIME<br />
(INGRESE LA HORA). SI NO DESEA PROGRAMARLA PRESIONE RESET. USTED PUEDE VER LA<br />
HORA DEL RELOJ MIENTRAS COCINA PRESIONANDO LA TECLA CLOCK.<br />
PROGRAMANDO EL MEDIDOR DE TIEMPO<br />
1. PRESIONE LA TECLA TIMER<br />
2. INGRESE EL TIEMPO USANDO LAS TECLAS NUMERICAS. EL TIEMPO ESTA EXPRESADO EN<br />
29
MINUTOS Y SEGUNDOS Y SE LEE DE IZQUIERDA A DERECHA. PUEDE DIGITAR DE UNO (EL<br />
5 PARA 5 SEGUNDOS) HASTA CUATRO NUMEROS (2405 PARA 24 MINUTOS, 5 SEGUNDOS)<br />
3. PRESIONE LA TECLA START/STOP<br />
NOTA: LA CUENTA REGRESIVA SE PODRA VER EN LA PANTALLA POR TRES SEGUNDOS ANTES<br />
QUE EL RELOJ O EL TIEMPO DE COCCION RETORNEN A LA PANTALLA. PRESIONE TIMER Y<br />
LUEGO RESET PARA CANCELAR EL MEDIDOR DE TIEMPO CUANDO ESTE ACTIVADO.<br />
CONFIGURANDO UN PROGRAMA DE COCCION<br />
A. ONE STAGE-COOKING (COCCION EN UNA SOLA ETAPA)<br />
1. USE LAS TECLAS NUMERICAS PARA PROGRAMAR EL TIEMPO DE COCCION. SE PUEDE<br />
PROGRAMAR TIEMPOS DE COCCION ENTRE 01 SEGUNDO(S) Y 99 MINUTOS CON 99<br />
SEGUNDOS.<br />
2. SI DESEA PROGRAMAR UN NIVEL DE POTENCIA DISTINTO DE 100% PRESIONE POWER<br />
3. PRESIONE LAS TECLAS NUMERICAS PARA INGRESAR EL NIVEL DE POTENCIA (DE 1 A 9),<br />
USE SOLO UN DIGITO PARA PROGRAMAR EL NIVEL DE POTENCIA.<br />
4. PRESIONE START/STOP PARA INICIAR LA COCCION.<br />
TECLADO NIVEL DE<br />
NUMERICO POTENCIA<br />
9 90%<br />
8 80%<br />
7 70%<br />
6 60%<br />
5 50%<br />
4 40%<br />
3 30%<br />
2 20%<br />
1 10%<br />
B. TWO-STAGE COOKING (COCCION EN DOS ETAPAS)<br />
ESTA FUNCION ES IDEAL PARA LAS RECETAS QUE REQUIEREN ETAPAS DE COCCION A<br />
DISTINTAS TEMPERATURAS.<br />
1. PROGRAMANDO LA ETAPA 1:<br />
SIGA LOS PASOS 1 Y 2 DE “COCCION EN UNA SOLA ETAPA”. NO PRESIONE START/STOP.<br />
2. PROGRAMANDO LA ETAPA 2:<br />
PRESIONE COOK E INGRESE EL TIEMPO DE COCCION ADECUADO Y EL NUEVO NIVEL DE<br />
POTENCIA (LA MAYORIA DE LAS RECETAS USAN EL NIVEL DE COCCION MAS BAJO PARA<br />
LA SEGUNDA ETAPA).<br />
3. PRESIONE START/STOP<br />
NOTA: CUANDO EL TIEMPO DE COCCION HAYA FINALIZADO, EL HORNO EMITIRA CUATRO<br />
VECES EL SONIDO BEEP Y EL MENSAJE END (FIN) APARECERA EN LA PANTALLA.<br />
PRESIONE RESET O ABRA LA PUERTA DEL HORNO PARA QUE EL MENSAJE END<br />
DESAPAREZCA ANTES DE INICIAR OTRA COCCION.<br />
DESCONGELADO RAPIDO (SPEED DEFROST)<br />
1. PRESIONE LA TECLA SPEED DEFROST<br />
2. INTRODUZCA EL TIEMPO DE DESCONGELAMIENTO PRESIONANDO LAS TECLAS<br />
NUMERICAS. USTED DEBERA MARCAR EL TIEMPO EN MINUTOS Y SEGUNDOS, DE<br />
IZQUIERDA A DERECHA. PUEDE DIGITAR DE UNO (MARQUE 5 PARA 5 SEGUNDOS) HASTA<br />
CUATRO DIGITOS (2405 PARA 24 MINUTOS, 5 SEGUNDOS)<br />
3. PRESIONE START/STOP<br />
30
NOTA: CUANDO EL TIEMPO DE COCCION HAYA FINALIZADO, EL HORNO HARA CUATRO VECES<br />
EL SONIDO BEEP Y EL MENSAJE END (FIN) APARECERA EN LA PANTALLA. PRESIONE<br />
RESET O ABRA LA PUERTA DEL HORNO PARA QUE EL MENSAJE END DESAPAREZCA<br />
ANTES DE INICIAR OTRA COCCION.<br />
DESPUES DE FIJAR EN EL HORNO LA FUNCION DE DESCONGELADO-RAPIDO USTED PUEDE<br />
PROGRAMARLO PARA INTERCALARLA CON LAS FUNCIONES DE COCCION EN UNA O DOS<br />
ETAPAS.<br />
PARA USAR CONJUNTAMENTE LAS FUNCIONES DE DESCONGELADO-RAPIDO Y COCCION EN<br />
UNA SOLA ETAPA, SIGA ESTAS INSTRUCCIONES:<br />
1. SIGA LOS PASOS 1 Y 2 DE LA FUNCION DESCONGELADO-RAPIDO.<br />
2. PRESIONE LA TECLA COOK E INGRESE EL TIEMPO DE COCCION Y NIVEL DE POTENCIA.<br />
3. PRESIONE LA TECLA START/STOP.<br />
PARA USAR LA FUNCION DE DESCONGELADO-RAPIDO Y COCCION EN DOS ETAPAS, SIGA<br />
ESTAS INSTRUCCIONES:<br />
1. SIGA LOS PASOS 1 Y 2 DE LA FUNCION DESCONGELADO-RAPIDO.<br />
2. PRESIONE LA TECLA COOK E INGRESE EL TIEMPO DE COCCION Y NIVEL DE POTENCIA.<br />
3. INGRESE LA PROGRAMACION PARA COCCION EN DOS ETAPAS<br />
4. PRESIONE LA TECLA START/STOP.<br />
COCCION POR PESO (COOK BY WEIGHT)<br />
1. PRESIONE LA TECLA COOK BY WEIGHT.<br />
2. INTRODUZCA EL DIGITO DEL CODIGO CORRESPONDIENTE (VER TABLA)<br />
3. DIGITE EL PESO.<br />
4. PRESIONE LA TECLA START/STOP<br />
DESCRIPCION DE CODIGOS DE UN DIGITO PARA COCINAR POR PESO<br />
CODIGO TIPO PESO<br />
MAXIMO<br />
1 CARNE 5 LBS. 16 OZ.<br />
2 CORDERO 5 LBS. 16 OZ.<br />
3 PUERCO 5 LBS. 04 OZ.<br />
NOTA: LA CARNE DEBE ESTAR DESCONGELADA Y REFRIGERADA.<br />
EL PESO TIENE QUE ESTAR EN LIBRAS Y ONZAS.<br />
LOS PESOS MENORES A 10 ONZAS DEBEN SER INGRESADOS ANTEPONIENDO UN<br />
CERO.<br />
SI LA ETIQUETA DE LA COMIDA SOLO MUESTRA EL PESO EN LIBRAS, CONVIERTA LAS<br />
FRACCIONES (DE HABERLAS) A ONZAS USANDO LA SIGUIENTE TABLA.<br />
31
CONVIRTIENDO FRACCIONES DE LIBRAS A ONZAS.<br />
FRACCIONES DE<br />
LIBRA<br />
ONZAS<br />
.01 HASTA .02 0<br />
.03 HASTA .09 1<br />
.10 HASTA .15 2<br />
.16 HASTA .21 3<br />
.22 HASTA .27 4<br />
.28 HASTA .34 5<br />
.35 HASTA .40 6<br />
.41 HASTA .46 7<br />
.47 HASTA .53 8<br />
.54 HASTA .59 9<br />
.60 HASTA .65 10<br />
.66 HASTA .71 11<br />
.72 HASTA .78 12<br />
.79 HASTA .84 13<br />
.85 HASTA .90 14<br />
.91 HASTA .97 15<br />
.98 HASTA .99 AUMENTAR UNA LIBRA MAS<br />
VOLTEE LA CARNE CUANDO EL HORNO HAGA EL SONIDO BEEP DOS VECES, OPRIMA LA<br />
TECLA START/STOP PARA CONTINUAR COCINANDO<br />
CUANDO EL TIEMPO DE COCCION HAYA FINALIZADO, EL HORNO EMITIRA CUATRO VECES EL<br />
SONIDO BEEP Y EL MENSAJE END (FIN) APARECE RA EN LA PANTALLA. PRESIONE RESET O<br />
ABRA LA PUERTA DEL HORNO PARA QUE EL MENSAJE END DESAPAREZCA ANTES DE INICIAR<br />
OTRA COCCION.<br />
DEJE QUE LA CARNE REPOSE POR UNOS MINUTOS ANTES DE CORTARLA<br />
DEFROST BY WEIGHT (DESCONGELAMIENTO POR PESO)<br />
1. PRESIONE LA TECLA DEFROST BY WEIGHT.<br />
2. INGRESE EL PESO USANDO EL TECLADO NUMERICO.<br />
3. PRESIONE LA TECLA START/STOP<br />
NOTA: EL PESO TIENE QUE ESTAR EN LIBRAS Y ONZAS.<br />
LOS PESOS MENORES A 10 ONZAS DEBEN SER DIGITADOS ANTEPONIENDO UN CERO.<br />
SI LA ETIQUETA DE LA COMIDA SOLO MUESTRA EL PESO EN LIBRAS, CONVIERTA LAS<br />
FRACCIONES (DE HABERLAS) A ONZAS USANDO LA TABLA DE CONVERSION.<br />
DELE LA VUELTA A LA CARNE CUANDO EL HORNO HAGA EL SONIDO BEEP DOS VECES,<br />
OPRIMA LA TECLA START/STOP PARA CONTINUAR COCINANDO.<br />
CUANDO EL TIEMPO DE COCCION HAYA FINALIZADO, EL HORNO HARA CUATRO VECES EL<br />
SONIDO BEEP Y EL MENSAJE END (FIN) APARECERA EN LA PANTALLA. PRESIONE RESET O<br />
ABRA LA PUERTA DEL HORNO PARA QUE EL MENSAJE END DESAPAREZCA ANTES DE INICIAR<br />
OTRA COCCION.<br />
PROGRAMANDO EL SEGURO PARA NIÑOS<br />
ESTE SEGURO PREVIENE LAS OPERACIONES INDEBIDAS Y ACCIDENTALES DE SU HORNO<br />
32
MICROONDAS. PARA PROGRAMARLO MANTENGA PRESIONADA LA TECLA RESET POR 3<br />
SEGUNDOS.<br />
EL MENSAJE LOCK (BLOQUEADO) APARECERA EN LA PANTALLA.<br />
PARA CANCELAR LA FUNCION MANTENGA PRESIONADA LA TECLA RESET POR 3 SEGUNDOS,<br />
EL MENSAJE LOCK (BLOQUEADO) DESAPARECERA DE LA PANTALLA.<br />
PROGRAMACION DE LA FUNCION COCCION RAPIDA<br />
ESTA FUNCION LE PERMITIRA COCINAR O RECALENTAR COMIDAS AUTOMATICAMENTE SIN<br />
NECESIDAD DE INGRESAR EL NIVEL DE POTENCIA O EL TIEMPO DE COCCION.<br />
PARA PORCIONES PEQUEÑAS, SIMPLEMENTE PRESIONE LA TECLA QUE APLIQUE PARA EL<br />
TIPO DE COMIDA Y SEGUIDAMENTE LA TECLA START/STOP. PARA PORCIONES MAS GRANDES,<br />
PRESIONE LA MISMA TECLA DOS VECES.<br />
LAS TECLAS FROZEN DINNER (COMIDAS CONGELADAS), BAKED POTATO (PAPA AL HORNO) Y<br />
BEVERAGE (BEBIDAS) LE PERMITEN COCINAR MUCHAS CANTIDADES DE LA MISMA COMIDA.<br />
SIMPLEMENTE PRESIONE UNA VEZ LA TECLA APROPIADA PARA EL TIPO DE ALIMENTO,<br />
APARECERA EL MENSAJE ENTER AMT (INGRESE LA CANTIDAD) EN LA PANTALLA. INGRESE EL<br />
NUMERO DE PORCIONES DIGITANDOLAS CON LAS TECLAS NUMERICAS, LUEGO PRESIONE<br />
START/STOP.<br />
TECLA PALOMITAS DE MAIZ (POP CORN)<br />
1. PRESIONE LA TECLA POP CORN<br />
2. LOS MENSAJES CODE (CODIGO) Y 3:10 (3 MINUTOS Y 10 SEGUNDOS) APARECERAN EN LA<br />
PANTALLA. ESTA FUNCION PROGRAMA AUTOMATICAMENTE EL TIEMPO DE COCINADO<br />
PARA BOLSAS DE PALOMITAS DE MAIZ (POP CORN) DE 3 A 3.5 ONZAS PARA HORNO<br />
MICROONDAS.<br />
3. PRESIONE START/STOP<br />
NOTA: PARA CAMBIAR EL TIEMPO PRE-PROGRAMADO, PRESIONE LA TECLA POP CORN DOS<br />
VECES. EL MENSAJE ENTER TIME (INGRESE EL TIEMPO) APARECERA EN LA PANTALLA.<br />
INGRESE LOS MINUTOS Y SEGUNDOS USANDO LAS TECLAS NUMERICAS. PRESIONE<br />
START/STOP. EN ADELANTE, CUANDO USE LA FUNCION POP CORN, EL NUEVO TIEMPO DE<br />
COCCION INGRESADO PERMANECERA COMO PRE-PROGRAMADO.<br />
TECLA PAPA AL HORNO (BAKED POTATO)<br />
PARA PAPAS DE 3.5 A 5 ONZAS:<br />
1. PRESIONE LA TECLA POTATO UNA VEZ<br />
2. INGRESE EL NUMERO DE PAPAS, DE 1 A 4, USANDO LAS TECLAS NUMERICAS. LOS<br />
TIEMPOS DE COCINADO PARA PAPAS DE TAMAÑO PEQUEÑO-MEDIANO SON LOS<br />
SIGUIENTES:<br />
3. PRESIONE START/STOP<br />
PARA PAPAS DE 6 A 8 ONZAS:<br />
CANTIDADES<br />
TIEMPO DE<br />
COCCION<br />
1 PAPA 6 MIN. 00 SEC.<br />
2 PAPAS 8 MIN. 00 SEC.<br />
3 PAPAS 10 MIN. 00 SEC.<br />
4 PAPAS 12 MIN. 00 SEC.<br />
33
1. PRESIONE LA TECLA POTATO DOS VECES<br />
2. INGRESE EL NUMERO DE PAPAS, DE 1 A 4, USANDO LAS TECLAS NUMERICAS. LOS<br />
TIEMPOS DE COCINADO PARA PAPAS DE TAMAÑO GRANDE SON LOS SIGUIENTES:<br />
3. PRESIONE START/STOP<br />
CANTIDADES<br />
TIEMPO DE<br />
COCCION<br />
1 PAPA 8 MIN. 00 SEC.<br />
2 PAPAS 11 MIN. 00 SEC.<br />
3 PAPAS 14 MIN. 00 SEC.<br />
4 PAPAS 17 MIN. 00 SEC.<br />
PIZZAS<br />
RECALENTANDO UNA TAJADA DE PIZZA:<br />
1. PRESIONE LA TECLA PIZZA UNA VEZ. LOS MENSAJES CODE (CODIGO) Y 3:30 (3 MINUTO Y<br />
30 SEGUNDOS) APARECERAN EN LA PANTALLA.<br />
2. PRESIONE START/STOP<br />
CALENTANDO UNA PIZZA CONGELADA COMPLETA<br />
1. PRESIONE LA TECLA PIZZA DOS VECES. LOS MENSAJES CODE (CODIGO) Y 6:30 (6 MINUTO<br />
Y 30 SEGUNDOS) APARECERAN EN LA PANTALLA.<br />
2. PRESIONE START/STOP<br />
BEBIDAS (BEVERAGE)<br />
PARA ENVASES DE 4 A 6 ONZAS.<br />
1. PRESIONE LA TECLA BEVERAGE UN VEZ.<br />
2. INGRESE EL NUMERO DE ENVASES, DE 1 A 4, USANDO LAS TECLAS NUMERICAS. LOS<br />
TIEMPOS DE COCINADO PARA BEBIDAS SON LOS SIGUIENTES:<br />
3. PRESIONE START/STOP<br />
CANTIDADES<br />
TIEMPO DE<br />
COCCION<br />
1 TAZA 1 MIN. 10 SEC.<br />
2 TAZAS 2 MIN. 20 SEC.<br />
3 TAZAS 3 MIN. 30 SEC.<br />
4 TAZAS 4 MIN. 40 SEC.<br />
PARA TAZAS DE CAFE DE 7 A 9 ONZAS:<br />
1. PRESIONE LA TECLA BEVERAGE DOS VECES.<br />
2. INGRESE EL NUMERO DE TAZAS, DE 1 A 4, USANDO LAS TECLAS NUMERICAS. LOS<br />
TIEMPOS DE COCINADO SON LOS SIGUIENTES:<br />
3. PRESIONE START/STOP<br />
CANTIDADES<br />
TIEMPO DE<br />
COCCION<br />
1 TAZA 1 MIN. 30 SEC.<br />
2 TAZAS 3 MIN. 10 SEC.<br />
3 TAZAS 4 MIN. 50 SEC.<br />
4 TAZAS 6 MIN. 30 SEC.<br />
34
COMIDAS CONGELADAS (FROZEN DINNER)<br />
PARA UNA O DOS COMIDAS CONGELADAS PEQUEÑAS (DE 7 A 9 ONZAS):<br />
1. PRESIONE LA TECLA FROZEN DINNER UNA VEZ<br />
2. PARA UNA PORCION, PRESIONE START/STOP. PARA 2 PORCIONES, DIGITE EL “2” EN EL<br />
TECLADO NUMERICO.<br />
3. LOS TIEMPOS DE COCCION PARA COMIDAS CONGELADAS PEQUEÑAS SON LOS<br />
SIGUIENTES:<br />
TIEMPO DE<br />
CANTIDADES COCCION<br />
1 PORCION 5 MIN. 55 SEC.<br />
2 PORCIONES 11 MIN. 00 SEC.<br />
4. PRESIONE START/STOP<br />
PARA PORCIONES GRANDES (DE 10 A 12 ONZAS)<br />
1. PRESIONE LA TECLA FROZEN DINNER DOS VECES.<br />
2. PARA UNA PORCION, SOLO PRESIONE START/STOP. PARA 2 PORCIONES, DIGITE EL “2” EN<br />
EL TECLADO NUMERICO.<br />
3. LOS TIEMPOS DE COCCION PARA COMIDAS CONGELADAS GRANDES SON LOS<br />
SIGUIENTES:<br />
4. PRESIONE START/STOP<br />
CANTIDADES<br />
TIEMPO DE<br />
COCCION<br />
1 PORCION 12 MIN. 00 SEC.<br />
2 PORCIONES 20 MIN. 00 SEC.<br />
RECALENTAR (REHEAT)<br />
1. PRESIONE LA TECLA REHEAT. LOS MENSAJES CODE (CODIGO) Y 4:10 (4 MINUTOS Y 10<br />
SEGUNDOS) APARECERAN EN LA PANTALLA.<br />
2. PRESIONE START/STOP<br />
NOTA: CON EL AFAN DE MEJORAR NUESTROS PRODUCTOS, AVANTI PRODUCTS PUEDE<br />
ACTUALIZAR LOS TIEMPOS DE COCCION RAPIDA, POR LO QUE PODRIAN VARIAR EN LA<br />
PANTALLA DE SU MICROONDAS RESPECTO A ESTE <strong>MANUAL</strong>. EN TODO CASO TOME COMO<br />
CORRECTOS LOS QUE APARECEN EN LA PANTALLA DE SU HORNO MICROONDAS.<br />
TECNICAS DE COCINA<br />
COCINAR EN SU HORNO MICROONDAS ES MAS FACIL QUE EN LA COCINA CONVENCIONAL,<br />
SIEMPRE QUE TENGA EN MENTE ESTAS CONSIDERACIONES:<br />
MEZCLE<br />
MUEVA ALIMENTOS TALES COMO GUISOS Y VEGETALES MIENTRAS LOS COCINE PARA<br />
DISTRIBUIR EL CALOR DE UNA MANERA PAREJA. LA COMIDA QUE SE ENCUENTRE EN LA<br />
PARTE EXTERNA DEL PLATO GIRATORIO ABSORBERA ENERGIA Y CALOR MAS RAPIDAMENTE,<br />
POR LO QUE DEBE CAMBIARLAS DE POSICION CON LAS QUE SE ENCUENTREN EN LA PARTE<br />
35
INTERNA. EL HORNO DEJARA DE FUNCIONAR CUANDO USTED ABRA LA PUERTA PARA<br />
CAMBIAR DE POSICION LAS COMIDAS.<br />
ORDENE<br />
ACOMODE LA COMIDA CON FORMA IRREGULAR, TALES COMO PIEZAS DE POLLO O CERDO,<br />
PONIENDO LAS PARTES CON MAS CARNE EN EL EXTREMO EXTERIOR DEL PLATO GIRATORIO<br />
DONDE RECIBIRAN MAYOR ENERGIA DE LAS MICROONDAS. PARA PREVENIR LA SOBRE<br />
COCCION UBIQUE LOS ALIMENTOS DELICADOS, COMO LAS PUNTAS DE LOS ESPARRAGOS, EN<br />
EL CENTRO DEL PLATO GIRATORIO.<br />
VOLTEE<br />
VOLTEE Y MEZCLE SU COMIDA A LA MITAD DE LA COCCION PARA QUE TODAS LAS PARTES<br />
ESTEN EXPUESTAS AL CALOR DEL MICROONDAS. ESTO ES DE MUCHA IMPORTANCIA PARA<br />
COMIDAS GRANDES TALES COMO ASADOS.<br />
REPOSE<br />
LOS ALIMENTOS COCINADOS EN HORNO DE MICROONDAS INCREMENTAN EL CALOR INTERNO<br />
POR LO QUE SE CONTINUAN COCINANDO ALGUNOS MINUTOS DESPUÉS QUE EL HORNO DEJO<br />
DE FUNCIONAR. DEJELOS REPOSAR POR UNOS MINUTOS, HASTA QUE SE HAYA TERMINADO<br />
DE COCINAR POR COMPLETO, SOBRE TODO SI SE TRATA DE TORTAS O VEGETALES<br />
ENTEROS. EL ASADO NECESITA DE ESTE REPOSO PARA COCINAR LA PARTE INTERNA SIN<br />
RECALENTAR LAS AREAS EXTERNAS. TODOS LOS LIQUIDOS, COMO SOPAS O CHOCOLATE,<br />
DEBEN SER MEZCLADOS CUANDO LA COCCION ESTE COMPLETA. DEJELOS REPOSAR ANTES<br />
DE SERVIRLOS. CUANDO CALIENTE COMIDA DE BEBE MEZCLELA BIEN Y PRUEBE LA<br />
TEMPERATURA ANTES DE SERVIRLA.<br />
HUMEDEZCA<br />
LAS MOLECULAS DE AGUA ATRAEN LA ENERGIA DEL MICROONDAS. LOS ALIMENTOS SECOS<br />
DEBEN SER CUBIERTOS O PUESTOS DE TAL MANERA QUE EL CALOR SE PUEDA DISPERSAR<br />
UNIFORMEMENTE. AÑADA UN POCO DE AGUA A LA COMIDA MUY SECA PARA AYUDAR SU<br />
COCCIÓN<br />
CUIDADO Y MANTENIMIENTO<br />
LIMPIEZA DE SU HORNO MICROONDAS<br />
APAGUE Y DESCONECTE EL ENCHUFE DE PARED ANTES DE LIMPIAR SU HORNO.<br />
MANTENGA EL INTERIOR DE SU HORNO MICROONDAS LIMPIO. LOS ALIMENTOS SALPICAN O<br />
DERRAMAN PARTICULAS Y LIQUIDOS QUE SE ADHIEREN A LAS PAREDES DEL HORNO, ES<br />
RECOMENDABLE LIMPIARLAS CON UN PAÑO HUMEDO. PUEDE USAR UN DETERGENTE MUY<br />
SUAVE SI EL HORNO SE ENCUENTRA MUY SUCIO. NO RECOMENDAMOS EL USO DE<br />
DETERGENTES O ABRASIVOS FUERTES.<br />
USTED DEBE LIMPIAR LAS PARTES EXTERNAS DE SU HORNO MICROONDAS CON UN PAÑO<br />
HUMEDO. PARA PREVENIR DAÑOS EN LAS PARTES INTERNAS DE SU HORNO, EL AGUA NO SE<br />
DEBE FILTRAR DENTRO DE LAS REJILLAS DE VENTILACION.<br />
NO PERMITA QUE EL PANEL DE CONTROL SE MOJE. LIMPIELO CON UN PAÑO SUAVE Y<br />
HUMEDO. NO USE DETERGENTES, ABRASIVOS O LIMPIADORES EN SPRAY.<br />
CUANDO LIMPIE EL PANEL DE CONTROL DEJE LA PUERTA ABIERTA DEL HORNO PARA<br />
PREVENIR QUE ESTE COMIENCE A FUNCIONAR ACCIDENTALMENTE.<br />
SI SE ACUMULA VAPOR DE AGUA DENTRO O ALREDEDOR DE LA PUERTA DEL HORNO<br />
MICROONDAS LIMPIELA CON UN PAÑO SUAVE. ESTO PUEDE OCURRIR CUANDO SU HORNO<br />
MICROONDAS ESTA FUNCIONANDO DENTRO DE UN AMBIENTE HUMEDO, Y DE NINGUNA<br />
MANERA SE DEBE DE INTERPRETAR COMO UN MAL FUNCIONAMIENTO DEL HORNO.<br />
OCASIONALMENTE ES NECESARIO RETIRAR EL PLATO GIRATORIO DE VIDRIO PARA LAVARLO.<br />
HAGALO CON AGUA TIBIA JABONOSA O EN LA LAVADORA DE PLATOS.<br />
EL ARO GIRATORIO Y EL PISO INTERIOR DEL HORNO DEBEN SER LIMPIADOS REGULARMENTE<br />
PARA EVITAR EL RUIDO EXCESIVO. SIMPLEMENTE LIMPIE LA SUPERFICIE INFERIOR DE SU<br />
36
HORNO CON UN PAÑO, DETERGENTE SUAVE, UN POCO DE AGUA O CON LIQUIDO PARA<br />
LIMPIAR VIDRIOS Y LUEGO SEQUELO. EL ARO GIRATORIO PUEDE SER LAVADO EN AGUA<br />
LIGERAMENTE JABONOSA O EN LA LAVADORA DE PLATOS.<br />
DEBIDO AL USO REPETIDO DEL HORNO, ESTE ACUMULA VAPORES DE COCINA, ESTO NO<br />
AFECTA EL PISO INTERIOR NI LAS RUEDAS DEL ARO GIRATORIO. CUANDO RETIRE EL ARO<br />
GIRATORIO DE LA CAVIDAD INFERIOR PARA LIMPIARLO, ASEGURESE DE COLOCARLA<br />
NUEVAMENTE EN LA POSICION APROPIADA.<br />
SI SU HORNO MICROONDAS TIENE MAL OLOR, COMBINE EN UNA TAZA DE AGUA EL JUGO Y<br />
LA CASCARA DE UN LIMON. PONGA EN MARCHA SU HORNO MICROONDAS POR 5 MINUTOS.<br />
FROTE Y SEQUE COMPLETAMENTE TODO SU HORNO MICROONDAS CON UN PAÑO SUAVE.<br />
POR FAVOR VISITE A UN REPRESENTANTE AUTORIZADO PARA QUE EFECTUE EL REEMPLAZO<br />
DEL BOMBILLO CUANDO SEA NECESARIO.<br />
PROBLEMAS CON SU HORNO MICROONDAS?<br />
USTED PUEDE RESOLVER MUCHOS PROBLEMAS COMUNES DE SU HORNO MICROONDAS,<br />
AHORRANDOLE EL GASTO DE UNA POSIBLE VISITA DEL SERVICIO TECNICO.<br />
PRUEBE LAS SIGUIENTES SUGERENCIAS PARA VERIFICAR SI USTED PUEDE RESOLVER EL<br />
PROBLEMA ANTES DE LLAMAR AL SERVICIO TECNICO.<br />
GUIA PARA SOLUCIONAR PROBLEMAS<br />
PROBLEMA SOLUCION<br />
SU ARTEFACTO NO FUNCIONA NO ESTA CONECTADO A LA CORRIENTE<br />
ELECTRICA.<br />
EL INTERRUPTOR SALTO O SE QUEMO UN<br />
FUSIBLE<br />
LA PUERTA NO ESTA CERRADA<br />
APROPIADAMENTE<br />
LA LUZ NO PRENDE EL INTERRUPTOR SALTO O SE QUEMO UN<br />
FUSIBLE<br />
EL ARTEFACTO ESTA DESCONECTADO<br />
EL FOCO SE QUEMO (LEA LA PAGINA DE<br />
MANTENIMIENTO PARA VER EL PROCEDIMIENTO<br />
DE REEMPLAZO)<br />
VIBRACIONES ASEGURESE QUE EL HORNO MICROONDAS<br />
ESTE UBICADO EN UN LUGAR TOTALMENTE<br />
PLANO.<br />
37<br />
PRINTED IN CHINA