front-loading automatic washer use and care guide ... - Whirlpool
front-loading automatic washer use and care guide ... - Whirlpool
front-loading automatic washer use and care guide ... - Whirlpool

Create successful ePaper yourself
Turn your PDF publications into a flip-book with our unique Google optimized e-Paper software.
10<br />
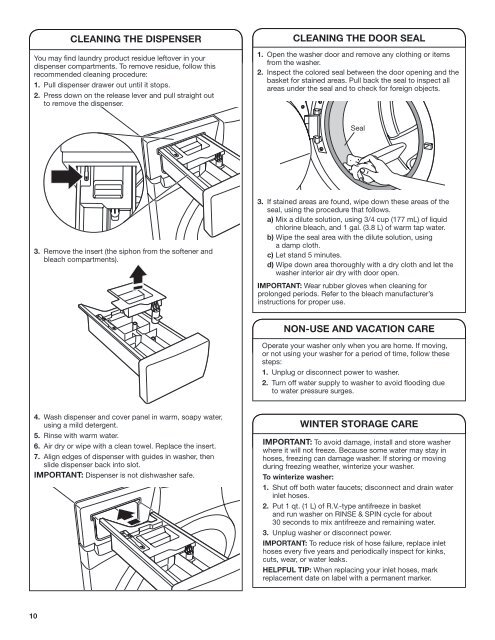
CLEANING THE DISPENSER<br />
You may find laundry product residue leftover in your<br />
dispenser compartments. To remove residue, follow this<br />
recommended cleaning procedure:<br />
1. Pull dispenser drawer out until it stops.<br />
2. Press down on the release lever <strong>and</strong> pull straight out<br />
to remove the dispenser.<br />
3. Remove the insert (the siphon from the softener <strong>and</strong><br />
bleach compartments).<br />
4. Wash dispenser <strong>and</strong> cover panel in warm, soapy water,<br />
using a mild detergent.<br />
5. Rinse with warm water.<br />
6. Air dry or wipe with a clean towel. Replace the insert.<br />
7. Align edges of dispenser with <strong>guide</strong>s in <strong>washer</strong>, then<br />
slide dispenser back into slot.<br />
IMPORTANT: Dispenser is not dish<strong>washer</strong> safe.<br />
CLEANING THE DOOR SEAL<br />
1. Open the <strong>washer</strong> door <strong>and</strong> remove any clothing or items<br />
from the <strong>washer</strong>.<br />
2. Inspect the colored seal between the door opening <strong>and</strong> the<br />
basket for stained areas. Pull back the seal to inspect all<br />
areas under the seal <strong>and</strong> to check for foreign objects.<br />
Seal<br />
3. If stained areas are found, wipe down these areas of the<br />
seal, using the procedure that follows.<br />
a) Mix a dilute solution, using 3/4 cup (177 mL) of liquid<br />
chlorine bleach, <strong>and</strong> 1 gal. (3.8 L) of warm tap water.<br />
b) Wipe the seal area with the dilute solution, using<br />
a damp cloth.<br />
c) Let st<strong>and</strong> 5 minutes.<br />
d) Wipe down area thoroughly with a dry cloth <strong>and</strong> let the<br />
<strong>washer</strong> interior air dry with door open.<br />
IMPORTANT: Wear rubber gloves when cleaning for<br />
prolonged periods. Refer to the bleach manufacturer’s<br />
instructions for proper <strong>use</strong>.<br />
NON-USE AND VACATION CARE<br />
Operate your <strong>washer</strong> only when you are home. If moving,<br />
or not using your <strong>washer</strong> for a period of time, follow these<br />
steps:<br />
1. Unplug or disconnect power to <strong>washer</strong>.<br />
2. Turn off water supply to <strong>washer</strong> to avoid flooding due<br />
to water pressure surges.<br />
WINTER STORAGE CARE<br />
IMPORTANT: To avoid damage, install <strong>and</strong> store <strong>washer</strong><br />
where it will not freeze. Beca<strong>use</strong> some water may stay in<br />
hoses, freezing can damage <strong>washer</strong>. If storing or moving<br />
during freezing weather, winterize your <strong>washer</strong>.<br />
To winterize <strong>washer</strong>:<br />
1. Shut off both water faucets; disconnect <strong>and</strong> drain water<br />
inlet hoses.<br />
2. Put 1 qt. (1 L) of R.V.-type antifreeze in basket<br />
<strong>and</strong> run <strong>washer</strong> on RINSE & SPIN cycle for about<br />
30 seconds to mix antifreeze <strong>and</strong> remaining water.<br />
3. Unplug <strong>washer</strong> or disconnect power.<br />
IMPORTANT: To reduce risk of hose failure, replace inlet<br />
hoses every five years <strong>and</strong> periodically inspect for kinks,<br />
cuts, wear, or water leaks.<br />
HELPFUL TIP: When replacing your inlet hoses, mark<br />
replacement date on label with a permanent marker.