70-0001 DNS Inst. Manual - Bushnell
70-0001 DNS Inst. Manual - Bushnell
70-0001 DNS Inst. Manual - Bushnell

You also want an ePaper? Increase the reach of your titles
YUMPU automatically turns print PDFs into web optimized ePapers that Google loves.
4<br />
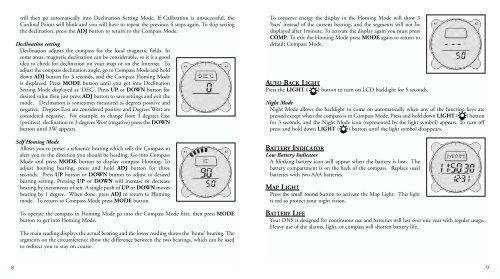
SETTING THE TIME<br />
Default Time Mode / Time Settings<br />
Press MODE button until Time Mode is displayed. Press and hold down ADJ for 3 seconds. Press<br />
UP or DOWN button until desired value appears, and then press MODE button for next setting.<br />
Press ADJ button at any time to save changes and exit. When this is done, seconds will be reset<br />
to 00. A small "A" or "P" will be to the lower left of the hours to denote AM or PM.<br />
Date Settings<br />
When setting the date the year is also displayed. Press MODE<br />
button until Time Mode is displayed. Press and hold down ADJ for<br />
3 seconds. Press MODE button and scroll to desired setting to<br />
change. Press UP or DOWN button until desired value appears, and<br />
then press MODE button for next setting. Press ADJ button at any<br />
time to save changes and exit.<br />
For 24/12 hour setting press MODE button until Time Mode is<br />
displayed. Press and hold down ADJ for 3 seconds. Press MODE<br />
button and scroll through settings until 24/12 hour setting appears,<br />
then press UP or DOWN button to enter desired setting. Press ADJ<br />
button at any time to save changes and exit.<br />
New Settings<br />
TEMPERATURE<br />
Temperature Mode<br />
Press MODE/NEXT button until Time Mode is displayed. If<br />
already in Time Mode then just press MODE/NEXT button and<br />
Temperature Mode is displayed. Press UP or DOWN button to<br />
toggle between Celsius and Fahrenheit readings.<br />
ALARM<br />
Alarm Setting Mode<br />
Press MODE button until Alarm Mode is displayed. The alarm<br />
consists of 5 alarms, 4 for Time and 1 for Temperature. Press UP or<br />
DOWN button to scroll through the different alarms. Press and<br />
hold down ADJ for 3 seconds until the minute blinks, press UP or<br />
DOWN button to adjust to desired values. Press MODE button for<br />
next setting. Press ADJ button at any time to save changes and exit.<br />
The alarm is activated automatically after adjustments have been<br />
made. To stop the alarm from beeping, press any button.<br />
The alarm can also be turned on or off by going to the relevant alarm<br />
and pressing the COMP button to activate alarm function, press<br />
again to activate Snooze function, and press again to de-activate<br />
alarm.<br />
5