Cartouche de communications réseau IQTM (cartouche ... - Rain Bird
Cartouche de communications réseau IQTM (cartouche ... - Rain Bird
Cartouche de communications réseau IQTM (cartouche ... - Rain Bird

You also want an ePaper? Increase the reach of your titles
YUMPU automatically turns print PDFs into web optimized ePapers that Google loves.
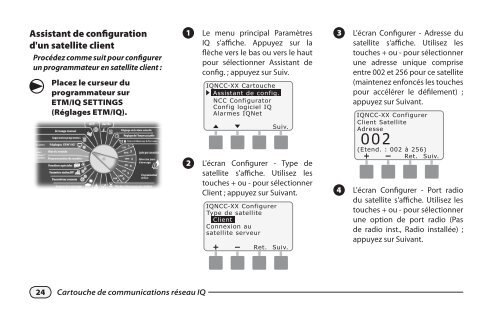
Assistant <strong>de</strong> configuration<br />
d'un satellite client<br />
Procé<strong>de</strong>z comme suit pour configurer<br />
un programmateur en satellite client :<br />
Placez le curseur du<br />
programmateur sur<br />
ETM/IQ SETTINGS<br />
(Réglages ETM/IQ).<br />
A<br />
B<br />
24 <strong>Cartouche</strong> <strong>de</strong> <strong>communications</strong> <strong>réseau</strong> IQ<br />
Le menu principal Paramètres<br />
IQ s'affiche. Appuyez sur la<br />
flèche vers le bas ou vers le haut<br />
pour sélectionner Assistant <strong>de</strong><br />
config. ; appuyez sur Suiv.<br />
IQNCC-XX <strong>Cartouche</strong><br />
Assistant <strong>de</strong> config.<br />
NCC Configurator<br />
Config logiciel IQ<br />
Alarmes IQNet<br />
Suiv.<br />
L'écran Configurer - Type <strong>de</strong><br />
satellite s'affiche. Utilisez les<br />
touches + ou - pour sélectionner<br />
Client ; appuyez sur Suivant.<br />
IQNCC-XX Configurer<br />
Type <strong>de</strong> satellite<br />
Client<br />
Connexion au<br />
satellite serveur<br />
Ret. Suiv.<br />
C<br />
D<br />
L'écran Configurer - Adresse du<br />
satellite s'affiche. Utilisez les<br />
touches + ou - pour sélectionner<br />
une adresse unique comprise<br />
entre 002 et 256 pour ce satellite<br />
(maintenez enfoncés les touches<br />
pour accélérer le défilement) ;<br />
appuyez sur Suivant.<br />
IQNCC-XX Configurer<br />
Client Satellite<br />
Adresse<br />
2<br />
(Etend. : 002 à 256)<br />
Ret. Suiv.<br />
L'écran Configurer - Port radio<br />
du satellite s'affiche. Utilisez les<br />
touches + ou - pour sélectionner<br />
une option <strong>de</strong> port radio (Pas<br />
<strong>de</strong> radio inst., Radio installée) ;<br />
appuyez sur Suivant.