- Page 1 and 2:
N Wireless Modem Router EN FR DE NL
- Page 3 and 4:
Introduction Thank you for purchasi
- Page 5 and 6:
Introduction Placement of your N Wi
- Page 7 and 8:
Introduction 4. Choose the “Quiet
- Page 9 and 10:
Introduction Free Tech Support* You
- Page 11 and 12:
Product Overview Integrated 10/100
- Page 13 and 14:
Knowing your Modem Router Package C
- Page 15 and 16:
Knowing your Modem Router The Route
- Page 17 and 18:
Knowing your Modem Router F. Intern
- Page 19 and 20:
Knowing your Modem Router I. Reset
- Page 21 and 22:
Connecting and Configuring your Mod
- Page 23 and 24:
Connecting and Configuring your Mod
- Page 25 and 26:
Connecting and Configuring your Mod
- Page 27 and 28:
Connecting and Configuring your Mod
- Page 29 and 30:
Connecting and Configuring your Mod
- Page 31 and 32:
Connecting and Configuring your Mod
- Page 33 and 34:
Alternate Setup Method Logging into
- Page 35 and 36:
Alternate Setup Method 5. Internet-
- Page 37 and 38:
Alternate Setup Method Connection T
- Page 39 and 40:
Alternate Setup Method 6. MTU - Ent
- Page 41 and 42:
Alternate Setup Method Setting your
- Page 43 and 44: Alternate Setup Method Setting Cust
- Page 45 and 46: Using the Web-Based Advanced User I
- Page 47 and 48: Using the Web-Based Advanced User I
- Page 49 and 50: Using the Web-Based Advanced User I
- Page 51 and 52: Using the Web-Based Advanced User I
- Page 53 and 54: Using the Web-Based Advanced User I
- Page 55 and 56: Using the Web-Based Advanced User I
- Page 57 and 58: Using the Web-Based Advanced User I
- Page 59 and 60: Using the Web-Based Advanced User I
- Page 61 and 62: Using the Web-Based Advanced User I
- Page 63 and 64: Using the Web-Based Advanced User I
- Page 65 and 66: Using the Web-Based Advanced User I
- Page 67 and 68: Using the Web-Based Advanced User I
- Page 69 and 70: Using the Web-Based Advanced User I
- Page 71 and 72: Using the Web-Based Advanced User I
- Page 73 and 74: Using the Web-Based Advanced User I
- Page 75 and 76: Using the Web-Based Advanced User I
- Page 77 and 78: Using the Web-Based Advanced User I
- Page 79 and 80: Manually Configuring Network Settin
- Page 81 and 82: Manually Configuring Network Settin
- Page 83 and 84: Manually Configuring Network Settin
- Page 85 and 86: Recommended Web Browser Settings 4.
- Page 87 and 88: Troubleshooting 2. Unplug power to
- Page 89 and 90: Troubleshooting I can’t connect t
- Page 91 and 92: Troubleshooting I am having difficu
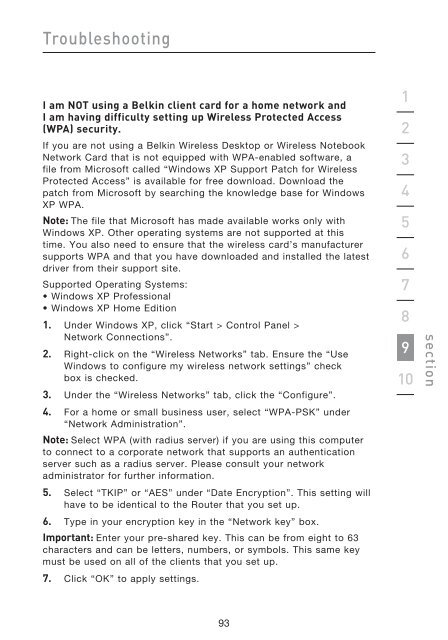
- Page 93: Troubleshooting Do Belkin products
- Page 97 and 98: Troubleshooting Wireless Comparison
- Page 99 and 100: Information Belkin International, I
- Page 101 and 102: Belkin Tech Support UK: 0845 607 77
- Page 103 and 104: Table des matières 1. Introduction
- Page 105 and 106: Introduction La technologie sans-fi
- Page 107 and 108: Introduction 2. Éviter les obstacl
- Page 109 and 110: Introduction 5. Une connexion sécu
- Page 111 and 112: Présentation du produit Caractéri
- Page 113 and 114: Présentation du produit Point d’
- Page 115 and 116: Faites connaissance avec votre mode
- Page 117 and 118: Faites connaissance avec votre mode
- Page 119 and 120: Faites connaissance avec votre mode
- Page 121 and 122: Branchement et configuration du mod
- Page 123 and 124: Branchement et configuration du mod
- Page 125 and 126: Branchement et configuration du mod
- Page 127 and 128: Branchement et configuration du mod
- Page 129 and 130: Branchement et configuration du mod
- Page 131 and 132: Branchement et configuration du mod
- Page 133 and 134: Autre méthode de configuration Ét
- Page 135 and 136: Autre méthode de configuration (1)
- Page 137 and 138: Autre méthode de configuration Ste
- Page 139 and 140: Autre méthode de configuration Con
- Page 141 and 142: Autre méthode de configuration Pou
- Page 143 and 144: Autre méthode de configuration Con
- Page 145 and 146:
Utilisation de l’Interface utilis
- Page 147 and 148:
Utilisation de l’Interface utilis
- Page 149 and 150:
Utilisation de l’Interface utilis
- Page 151 and 152:
Utilisation de l’Interface utilis
- Page 153 and 154:
Utilisation de l’Interface utilis
- Page 155 and 156:
Utilisation de l’Interface utilis
- Page 157 and 158:
Utilisation de l’Interface utilis
- Page 159 and 160:
Utilisation de l’Interface utilis
- Page 161 and 162:
Utilisation de l’Interface utilis
- Page 163 and 164:
Utilisation de l’Interface utilis
- Page 165 and 166:
Utilisation de l’Interface utilis
- Page 167 and 168:
Utilisation de l’Interface utilis
- Page 169 and 170:
Utilisation de l’Interface utilis
- Page 171 and 172:
Utilisation de l’Interface utilis
- Page 173 and 174:
Utilisation de l’Interface utilis
- Page 175 and 176:
Utilisation de l’Interface utilis
- Page 177 and 178:
Utilisation de l’Interface utilis
- Page 179 and 180:
Utilisation de l’Interface utilis
- Page 181 and 182:
Configuration manuelle des paramèt
- Page 183 and 184:
Configuration manuelle des paramèt
- Page 185 and 186:
Paramètres de navigateur recommand
- Page 187 and 188:
Dépannage Le CD de l’assistant d
- Page 189 and 190:
Dépannage Je n’arrive pas à me
- Page 191 and 192:
Dépannage • Mon réseau sans fil
- Page 193 and 194:
Dépannage J’éprouve des difficu
- Page 195 and 196:
Dépannage J’éprouve des difficu
- Page 197 and 198:
Dépannage Quelle est la différenc
- Page 199 and 200:
Dépannage Assistance technique Vou
- Page 201 and 202:
Information Belkin se réserve le d
- Page 203 and 204:
Kabelloser N Modem-Router EN FR DE
- Page 205 and 206:
Einleitung Wir beglückwünschen Si
- Page 207 and 208:
Einleitung Aufstellung des Kabellos
- Page 209 and 210:
Einleitung 4. Wählen Sie den „ru
- Page 211 and 212:
Einleitung Kostenloser technischer
- Page 213 and 214:
Produktübersicht Integrierter 10/1
- Page 215 and 216:
Beschreibung des Modem-Routers Verp
- Page 217 and 218:
Beschreibung des Modem-Routers Der
- Page 219 and 220:
Beschreibung des Modem-Routers F. I
- Page 221 and 222:
Beschreibung des Modem-Routers 1. R
- Page 223 and 224:
Anschließen und Konfigurieren des
- Page 225 and 226:
Anschließen und Konfigurieren des
- Page 227 and 228:
Anschließen und Konfigurieren des
- Page 229 and 230:
Anschließen und Konfigurieren des
- Page 231 and 232:
Anschließen und Konfigurieren des
- Page 233 and 234:
Anschließen und Konfigurieren des
- Page 235 and 236:
Alternatives Einrichtungsverfahren
- Page 237 and 238:
Alternatives Einrichtungsverfahren
- Page 239 and 240:
Alternatives Einrichtungsverfahren
- Page 241 and 242:
Alternatives Einrichtungsverfahren
- Page 243 and 244:
Alternatives Einrichtungsverfahren
- Page 245 and 246:
Alternatives Einrichtungsverfahren
- Page 247 and 248:
Verwenden der Webgestützten Erweit
- Page 249 and 250:
Verwenden der Webgestützten Erweit
- Page 251 and 252:
Verwenden der Webgestützten Erweit
- Page 253 and 254:
Verwenden der Webgestützten Erweit
- Page 255 and 256:
Verwenden der Webgestützten Erweit
- Page 257 and 258:
Verwenden der Webgestützten Erweit
- Page 259 and 260:
Verwenden der Webgestützten Erweit
- Page 261 and 262:
Verwenden der Webgestützten Erweit
- Page 263 and 264:
Verwenden der Webgestützten Erweit
- Page 265 and 266:
Verwenden der Webgestützten Erweit
- Page 267 and 268:
Verwenden der Webgestützten Erweit
- Page 269 and 270:
Verwenden der Webgestützten Erweit
- Page 271 and 272:
Verwenden der Webgestützten Erweit
- Page 273 and 274:
Verwenden der Webgestützten Erweit
- Page 275 and 276:
Verwenden der Webgestützten Erweit
- Page 277 and 278:
Verwenden der Webgestützten Erweit
- Page 279 and 280:
Verwenden der Webgestützten Erweit
- Page 281 and 282:
Manuelles Konfigurieren der Netzwer
- Page 283 and 284:
Manuelles Konfigurieren der Netzwer
- Page 285 and 286:
Manuelles Konfigurieren der Netzwer
- Page 287 and 288:
Empfohlene Browser-Einstellungen 4.
- Page 289 and 290:
Fehlerbehebung 2. Trennen Sie die S
- Page 291 and 292:
Fehlerbehebung Ich kann keine kabel
- Page 293 and 294:
Fehlerbehebung Rate gefunden haben.
- Page 295 and 296:
Fehlerbehebung Unterstützen die Pr
- Page 297 and 298:
Fehlerbehebung Ich habe in einem He
- Page 299 and 300:
Fehlerbehebung Vergleich zwischen v
- Page 301 and 302:
Informationen Eingeschränkte leben
- Page 303 and 304:
Belkin Technischer Support GB: 0845
- Page 305 and 306:
Inhoud 1. Inleiding ...............
- Page 307 and 308:
Inleiding Revolutionaire draadloze
- Page 309 and 310:
Inleiding 2. Vermijd obstakels en i
- Page 311 and 312:
Inleiding 5. Veilige verbindingen,
- Page 313 and 314:
Productoverzicht Productkenmerken B
- Page 315 and 316:
Productoverzicht Integrated N Wirel
- Page 317 and 318:
Kennismaken met uw modem/router Int
- Page 319 and 320:
Kennismaken met uw modem/router D.
- Page 321 and 322:
Kennismaken met uw modem/router (G)
- Page 323 and 324:
Uw modem/router aansluiten en confi
- Page 325 and 326:
Uw modem/router aansluiten en confi
- Page 327 and 328:
Uw modem/router aansluiten en confi
- Page 329 and 330:
Uw modem/router aansluiten en confi
- Page 331 and 332:
Uw modem/router aansluiten en confi
- Page 333 and 334:
Uw modem/router aansluiten en confi
- Page 335 and 336:
Alternatieve installatiemethode Sta
- Page 337 and 338:
Alternatieve installatiemethode (1)
- Page 339 and 340:
Alternatieve installatiemethode Sta
- Page 341 and 342:
Alternatieve installatiemethode Set
- Page 343 and 344:
Alternatieve installatiemethode Voo
- Page 345 and 346:
Alternatieve installatiemethode Het
- Page 347 and 348:
Gebruik maken van de geavanceerde w
- Page 349 and 350:
Gebruik maken van de geavanceerde w
- Page 351 and 352:
Gebruik maken van de geavanceerde w
- Page 353 and 354:
Gebruik maken van de geavanceerde w
- Page 355 and 356:
Gebruik maken van de geavanceerde w
- Page 357 and 358:
Gebruik maken van de geavanceerde w
- Page 359 and 360:
Gebruik maken van de geavanceerde w
- Page 361 and 362:
Gebruik maken van de geavanceerde w
- Page 363 and 364:
Gebruik maken van de geavanceerde w
- Page 365 and 366:
Gebruik maken van de geavanceerde w
- Page 367 and 368:
Gebruik maken van de geavanceerde w
- Page 369 and 370:
Gebruik maken van de geavanceerde w
- Page 371 and 372:
Gebruik maken van de geavanceerde w
- Page 373 and 374:
Gebruik maken van de geavanceerde w
- Page 375 and 376:
Gebruik maken van de geavanceerde w
- Page 377 and 378:
Gebruik maken van de geavanceerde w
- Page 379 and 380:
Gebruik maken van de geavanceerde w
- Page 381 and 382:
Gebruik maken van de geavanceerde w
- Page 383 and 384:
Netwerkinstellingen handmatig confi
- Page 385 and 386:
Netwerkinstellingen handmatig confi
- Page 387 and 388:
Aanbevolen instellingen van de webb
- Page 389 and 390:
Problemen oplossen De cd met de Set
- Page 391 and 392:
Problemen oplossen Ik kan geen draa
- Page 393 and 394:
Problemen oplossen • De prestatie
- Page 395 and 396:
Problemen oplossen Controleer dus e
- Page 397 and 398:
Problemen oplossen Ik heb problemen
- Page 399 and 400:
Problemen oplossen Belangrijk: Voer
- Page 401 and 402:
Problemen oplossen Technische onder
- Page 403 and 404:
Informatie Belkin International, In
- Page 405 and 406:
Módem Router inalámbrico N EN FR
- Page 407 and 408:
Introducción Gracias por haber adq
- Page 409 and 410:
Introducción Colocación de su Mó
- Page 411 and 412:
Introducción 4. Elija el canal “
- Page 413 and 414:
Introducción Asistencia técnica g
- Page 415 and 416:
Generalidades sobre el producto Con
- Page 417 and 418:
Presentación de su Módem router C
- Page 419 and 420:
Presentación de su Módem router E
- Page 421 and 422:
Presentación de su Módem router G
- Page 423 and 424:
Presentación de su Módem router I
- Page 425 and 426:
Conexión y configuración de su M
- Page 427 and 428:
Conexión y configuración de su M
- Page 429 and 430:
Conexión y configuración de su M
- Page 431 and 432:
Conexión y configuración de su M
- Page 433 and 434:
Conexión y configuración de su M
- Page 435 and 436:
Conexión y configuración de su M
- Page 437 and 438:
Método alternativo de configuraci
- Page 439 and 440:
Método alternativo de configuraci
- Page 441 and 442:
Método alternativo de configuraci
- Page 443 and 444:
Método alternativo de configuraci
- Page 445 and 446:
Método alternativo de configuraci
- Page 447 and 448:
Método alternativo de configuraci
- Page 449 and 450:
Utilización de la interfaz de usua
- Page 451 and 452:
Utilización de la interfaz de usua
- Page 453 and 454:
Utilización de la interfaz de usua
- Page 455 and 456:
Utilización de la interfaz de usua
- Page 457 and 458:
Utilización de la interfaz de usua
- Page 459 and 460:
Utilización de la interfaz de usua
- Page 461 and 462:
Utilización de la interfaz de usua
- Page 463 and 464:
Utilización de la interfaz de usua
- Page 465 and 466:
Utilización de la interfaz de usua
- Page 467 and 468:
Utilización de la interfaz de usua
- Page 469 and 470:
Utilización de la interfaz de usua
- Page 471 and 472:
Utilización de la interfaz de usua
- Page 473 and 474:
Utilización de la interfaz de usua
- Page 475 and 476:
Utilización de la interfaz de usua
- Page 477 and 478:
Utilización de la interfaz de usua
- Page 479 and 480:
Utilización de la interfaz de usua
- Page 481 and 482:
Utilización de la interfaz de usua
- Page 483 and 484:
Configuración manual de los ajuste
- Page 485 and 486:
Configuración manual de los ajuste
- Page 487 and 488:
Configuración manual de los ajuste
- Page 489 and 490:
Ajustes recomendados para el navega
- Page 491 and 492:
Resolución de problemas 2.Desconec
- Page 493 and 494:
Resolución de problemas No me pued
- Page 495 and 496:
Resolución de problemas Pruebe dif
- Page 497 and 498:
Resolución de problemas ¿Soportan
- Page 499 and 500:
Resolución de problemas NO estoy u
- Page 501 and 502:
Resolución de problemas Tabla de c
- Page 503 and 504:
Información Garantía de por vida
- Page 505 and 506:
Asistencia técnica de Belkin R.U.:
- Page 507 and 508:
Indice 1. Introduzione ............
- Page 509 and 510:
Introduzione Rivoluzionaria tecnolo
- Page 511 and 512:
Introduzione 2. Evitare possibili o
- Page 513 and 514:
Introduzione 5. Le connessioni sicu
- Page 515 and 516:
Descrizione generale del prodotto C
- Page 517 and 518:
Descrizione generale del prodotto A
- Page 519 and 520:
Informazioni sul Modem Router Impos
- Page 521 and 522:
Informazioni sul Modem Router D. St
- Page 523 and 524:
Informazioni sul Modem Router (G) (
- Page 525 and 526:
Collegamento e configurazione del M
- Page 527 and 528:
Collegamento e configurazione del M
- Page 529 and 530:
Collegamento e configurazione del M
- Page 531 and 532:
Collegamento e configurazione del M
- Page 533 and 534:
Collegamento e configurazione del M
- Page 535 and 536:
Collegamento e configurazione del M
- Page 537 and 538:
Metodo di installazione alternativo
- Page 539 and 540:
Metodo di installazione alternativo
- Page 541 and 542:
Metodo di installazione alternativo
- Page 543 and 544:
Metodo di installazione alternativo
- Page 545 and 546:
Metodo di installazione alternativo
- Page 547 and 548:
Metodo di installazione alternativo
- Page 549 and 550:
L’interfaccia utente avanzata bas
- Page 551 and 552:
L’interfaccia utente avanzata bas
- Page 553 and 554:
L’interfaccia utente avanzata bas
- Page 555 and 556:
L’interfaccia utente avanzata bas
- Page 557 and 558:
L’interfaccia utente avanzata bas
- Page 559 and 560:
L’interfaccia utente avanzata bas
- Page 561 and 562:
L’interfaccia utente avanzata bas
- Page 563 and 564:
L’interfaccia utente avanzata bas
- Page 565 and 566:
L’interfaccia utente avanzata bas
- Page 567 and 568:
L’interfaccia utente avanzata bas
- Page 569 and 570:
L’interfaccia utente avanzata bas
- Page 571 and 572:
L’interfaccia utente avanzata bas
- Page 573 and 574:
L’interfaccia utente avanzata bas
- Page 575 and 576:
L’interfaccia utente avanzata bas
- Page 577 and 578:
L’interfaccia utente avanzata bas
- Page 579 and 580:
L’interfaccia utente avanzata bas
- Page 581 and 582:
L’interfaccia utente avanzata bas
- Page 583 and 584:
L’interfaccia utente avanzata bas
- Page 585 and 586:
Configurazione manuale delle impost
- Page 587 and 588:
Configurazione manuale delle impost
- Page 589 and 590:
Impostazioni del browser web consig
- Page 591 and 592:
Risoluzione delle anomalie Il CD di
- Page 593 and 594:
Risoluzione delle anomalie Non si r
- Page 595 and 596:
Risoluzione delle anomalie • Il l
- Page 597 and 598:
Risoluzione delle anomalie si incon
- Page 599 and 600:
Risoluzione delle anomalie Si incon
- Page 601 and 602:
Risoluzione delle anomalie Qual è
- Page 603 and 604:
Risoluzione delle anomalie Assisten
- Page 605 and 606:
Informazioni Belkin si riserva il d


