Bluetooth™ Access Point Point d'accès Bluetooth ... - Belkin
Bluetooth™ Access Point Point d'accès Bluetooth ... - Belkin
Bluetooth™ Access Point Point d'accès Bluetooth ... - Belkin

You also want an ePaper? Increase the reach of your titles
YUMPU automatically turns print PDFs into web optimized ePapers that Google loves.
P74186ea_F8T030_QIG.qxd 11-04-2003 08:51 Page 1<br />
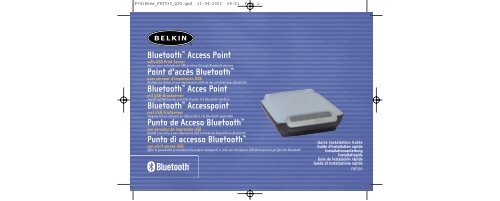
<strong>Bluetooth</strong> <strong>Access</strong> <strong>Point</strong><br />
with USB Print Server<br />
<strong>Access</strong> your network and USB printers through <strong>Bluetooth</strong> devices<br />
<strong>Point</strong> <strong>d'accès</strong> <strong>Bluetooth</strong> <br />
avec serveur d'impression USB<br />
Accédez au réseau et aux imprimantes USB via des périphériques <strong>Bluetooth</strong><br />
<strong>Bluetooth</strong> Acces <strong>Point</strong><br />
mit USB-Druckserver<br />
Zugriff auf Netzwerke und USB-Drucker mit <strong>Bluetooth</strong>-Geräten<br />
<strong>Bluetooth</strong> <strong>Access</strong>point<br />
met USB Printserver<br />
Toegang tot uw netwerk en USB printers via <strong>Bluetooth</strong> apparaten<br />
Punto de Acceso <strong>Bluetooth</strong> <br />
con servidor de impresión USB<br />
Acceda a su red y a sus impresoras USB a través de dispositivos <strong>Bluetooth</strong><br />
Punto di accesso <strong>Bluetooth</strong> <br />
con print server USB<br />
Offre la possibilità di accedere alle proprie stampanti in rete con interfaccia USB attraverso le periferiche <strong>Bluetooth</strong><br />
Quick Installation Guide<br />
Guide d’installation rapide<br />
Installationsanleitung<br />
Installatiegids<br />
Guía de instalación rápida<br />
Guida di installazione rapida<br />
F8T030
P74186ea_F8T030_QIG.qxd 11-04-2003 08:51 Page 2<br />
<strong>Bluetooth</strong> <strong>Access</strong> <strong>Point</strong><br />
with USB Print Server<br />
<strong>Access</strong> your network and USB<br />
printers through <strong>Bluetooth</strong> devices<br />
Quick Installation Guide<br />
F8T030
P74186ea_F8T030_QIG.qxd 11-04-2003 08:51 Page 4<br />
Introduction<br />
Congratulations and thank you for purchasing the <strong>Bluetooth</strong> <strong>Access</strong> <strong>Point</strong> with USB<br />
Print Server (the AP) from <strong>Belkin</strong>. This guide will lead you through the basic steps<br />
needed for installation. For further information, please refer to the <strong>Belkin</strong> User Manual<br />
included with your packaging.<br />
Package Contents<br />
• <strong>Bluetooth</strong> <strong>Access</strong> <strong>Point</strong> with USB Print Server<br />
• Print Server Utility CD-ROM<br />
• 5V DC, 1A Power Supply<br />
• User Manual<br />
• Quick Installation Guide<br />
• Registration Card<br />
System Requirements<br />
• A computing device equipped with <strong>Bluetooth</strong> wireless technology<br />
• TCP/IP networking protocol installed in each wired computer connected to the LAN<br />
Hardware Installation<br />
Connecting Network Cables and Powering On<br />
1. Connect one end of a standard CAT5 twisted-pair cable to the RJ45 connector on<br />
the AP and connect the other end to a 10Base-T or 100Base-T Ethernet router,<br />
switch, or wall jack.<br />
wall jack
P74186ea_F8T030_QIG.qxd 11-04-2003 08:51 Page 6<br />
Hardware Installation<br />
2. Connect the included power adapter into an available power outlet. Attach the<br />
barrel plug into the power jack of the AP. You should see the power LED light turn<br />
on, the system light blink a few times, and then the system, LAN, USB 1, USB 2,<br />
and <strong>Bluetooth</strong> lights will blink repeatedly as the AP initiates itself. The initiation<br />
process will take approximately 20 seconds.<br />
TIP: The system LED blinks once per second indicating that the AP is functioning properly. The system light<br />
will blink three times per second if the IP address has not been set. If any lights other than the power light<br />
remain solid, consult the Troubleshooting guide at the end of your User Manual. If the problem persists,<br />
contact <strong>Belkin</strong> Technical Support at 00-800-223-55460.<br />
Hardware Installation<br />
Connecting USB Printers (optional)<br />
The AP supports up to two USB printers. Please do not connect any devices other than<br />
a USB printer directly to these ports.<br />
1. Attach one end of a USB cable to one of the USB ports on the AP.<br />
2. Connect the other end to an available<br />
USB printer.<br />
3. Repeat steps 1 and 2 above for a<br />
second printer.<br />
Note: You must have the printer driver installed<br />
in each computer you wish to print from prior<br />
to use.
P74186ea_F8T030_QIG.qxd 11-04-2003 08:51 Page 8<br />
Configuring your Network Settings<br />
Software Setup<br />
In order to connect to the Internet, your AP needs an IP address. Typically, these are<br />
provided to the AP by a DHCP server.<br />
The AP is set to obtain an IP address from the Ethernet via DHCP. However, it is<br />
possible for you to pre-configure a fixed IP address into the AP. This can be done<br />
via the web manager using the <strong>Bluetooth</strong> interface (refer to your User Manual for<br />
more information).<br />
Software Installation<br />
Requirements:<br />
• Windows® 98 SE, Me, 2000, XP<br />
• Computer must be connected to the same Local Area Network as the AP<br />
• Computer must have the appropriate printer driver installed<br />
Software Setup<br />
Installing the Software<br />
1. Insert the USB Print Server Utility CD-ROM in the computer you wish to print from.<br />
2. Click on the “Setup.exe” file.<br />
3. You should see the following appear on your screen. Click on the “Next” button to<br />
begin the installation process.
P74186ea_F8T030_QIG.qxd 11-04-2003 08:51 Page 10<br />
Software Setup<br />
4. Once the software installation is complete, you will receive a message confirming<br />
the installation process.<br />
Configuring your Printer<br />
Note: You must add a printer as a “local” printer (not as a “network” printer), and select the printer port<br />
named “<strong>Belkin</strong>” (see step 4). To set up the printer:<br />
1. Go to the Control Panel and open the “Printers” folder.<br />
2. Select the printer that is connected to the AP.<br />
3. Select “File” then “Properties” from the menu. (You may also right-click on the<br />
printer and select “Properties”.)<br />
Software Setup<br />
4. Under the “Ports” tab, you will see a list of ports that are installed on your<br />
computer. Highlight the port named “<strong>Belkin</strong>” and click on “Configure Port”.
P74186ea_F8T030_QIG.qxd 11-04-2003 08:51 Page 12<br />
5. Click on “Locate Servers”.<br />
Software Setup<br />
6. You will see the server “BELKIN_xxx”. Select it by clicking on it.<br />
7. Click “OK” and then close the “Print Server Properties” window.<br />
8. Your networked computer is now ready to print.
P74186ea_F8T030_QIG.qxd 11-04-2003 08:51 Page 14<br />
belkin.com<br />
<strong>Belkin</strong> Corporation<br />
501 West Walnut Street<br />
Compton • CA • 90220 • USA<br />
Tel: +1 310.898.1100<br />
Fax: +1 310.898.1111<br />
<strong>Belkin</strong> Components, Ltd.<br />
Express Business Park • Shipton Way • Rushden<br />
NN10 6GL • United Kingdom<br />
Tel: +44 (0) 1933 35 2000<br />
Fax: +44 (0) 1933 31 2000<br />
<strong>Belkin</strong> Components B.V.<br />
Starparc Building • Boeing Avenue 333<br />
1119 PH Schiphol-Rijk • The Netherlands<br />
Tel: +31 (0) 20 654 7300<br />
Fax: +31 (0) 20 654 7349<br />
<strong>Belkin</strong> GmbH<br />
Hanebergstrasse 2<br />
80637 München • Germany<br />
Tel.: +49 (0) 89 143405 0<br />
Fax: +49 (0) 89 143405 100<br />
<strong>Belkin</strong> Tech Support<br />
US: +1 310.898.1100 ext. 2263<br />
+1 800.223.5546 ext. 2263<br />
Europe: 00 800 223 55 460<br />
Australia: 1800 666 040<br />
P74186<br />
© 2003 <strong>Belkin</strong> Corporation. All rights reserved. All trade names are registered trademarks of respective manufacturers listed.<br />
The <strong>Bluetooth</strong> name and the <strong>Bluetooth</strong> trademarks are owned by <strong>Bluetooth</strong> SIG, Inc., and are used by <strong>Belkin</strong> Corporation under license.<br />
<strong>Point</strong> d’accès <strong>Bluetooth</strong> <br />
avec serveur<br />
d'impression USB<br />
Accédez au réseau et aux imprimantes<br />
USB via des périphériques <strong>Bluetooth</strong><br />
Guide d’installation rapide<br />
F8T030
P74186ea_F8T030_QIG.qxd 11-04-2003 08:51 Page 2<br />
Introduction<br />
Félicitations ! Merci d'avoir choisi le point <strong>d'accès</strong> <strong>Bluetooth</strong> avec serveur d'impression<br />
USB (le point <strong>d'accès</strong>) de <strong>Belkin</strong> Ce guide vous indiquera les étapes élémentaires à<br />
suivre pour l'installation. Pour plus d'informations, reportez-vous au manuel de<br />
l'utilisateur <strong>Belkin</strong> livré avec l'appareil.<br />
Contenu de la boîte<br />
• <strong>Point</strong> d’accès <strong>Bluetooth</strong> avec serveur<br />
d’impression USB<br />
• CD-ROM contenant le pilote du serveur d'impression<br />
• Bloc d’alimentation 5 V CC 1 A<br />
• Manuel de l’utilisateur<br />
• Guide d’installation rapide<br />
• Carte d’enregistrement<br />
Configuration requise<br />
• Périphérique informatique équipé de la technologie sans fil <strong>Bluetooth</strong><br />
• Protocole réseau TCP/IP installé sur chaque ordinateur relié au LAN par un câble<br />
Installation du matériel<br />
Branchement des câbles réseau et mise sous tension<br />
1. Branchez une extrémité d’un câble à paires torsadées CAT5 standard sur le<br />
connecteur RJ45 du point d’accès et l’autre extrémité à un routeur, à un Switch ou<br />
à une prise murale<br />
Ethernet 10Base-T ou<br />
100Base-T.<br />
prise murale
P74186ea_F8T030_QIG.qxd 11-04-2003 08:51 Page 4<br />
Installation du matériel<br />
2. Branchez l'adaptateur de courant fourni sur une prise secteur disponible. Raccordez<br />
la fiche cylindrique à la prise d'alimentation du point <strong>d'accès</strong>. Le témoin<br />
d'alimentation doit s'allumer, celui du système doit clignoter plusieurs fois, puis les<br />
témoins du système, LAN, USB 1, USB 2 et <strong>Bluetooth</strong> doivent clignoter plusieurs fois<br />
pendant l'initialisation du point <strong>d'accès</strong>. Le processus dure environ 20 secondes.<br />
ASTUCE : Le témoin du système clignote une fois par seconde pour indiquer que le point d’accès fonctionne<br />
correctement. Il clignote trois fois par seconde si l’adresse IP n’est pas définie. Si d’autres témoins restent<br />
allumés en permanence, consultez le guide Dépannage à la fin de ce manuel. Si le problème persiste,<br />
contactez l’assistance <strong>Belkin</strong> au 00-800-223-55460.<br />
Installation du matériel<br />
Branchement d’imprimantes USB (facultatif)<br />
Le point d’accès prend en charge jusqu’à deux imprimantes USB. Ne branchez pas<br />
directement d’autres périphériques qu’une imprimante USB sur ces ports.<br />
1. Reliez une extrémité du câble USB à l’un des ports USB du point d’accès.<br />
2. Branchez l’autre extrémité sur une<br />
imprimante USB disponible.<br />
3. Répétez les étapes 1 et 2 ci-dessus pour<br />
installer une seconde imprimante.<br />
Remarque : Avant toute utilisation, le pilote d’imprimante<br />
doit être installé sur les ordinateurs à partir desquels vous<br />
souhaitez imprimer.
P74186ea_F8T030_QIG.qxd 11-04-2003 08:51 Page 6<br />
Installation du logiciel<br />
Configuration des paramètres réseau<br />
Pour pouvoir accéder à Internet, votre point d’accès doit avoir une adresse IP.<br />
Habituellement, elle lui est fournie par un serveur DHCP.<br />
Le point d’accès est défini de manière à obtenir une adresse IP pour Ethernet via DHCP.<br />
Toutefois, il vous est possible de configurer une adresse IP fixe sur le point d’accès.<br />
Vous pouvez le faire par l’intermédiaire du gestionnaire Web en utilisant l’interface<br />
<strong>Bluetooth</strong> (reportez-vous au manuel de l’utilisateur pour plus d’informations).<br />
Installation du logiciel<br />
Configuration requise :<br />
• Windows® 98 SE, Me, 2000, XP<br />
• L’ordinateur doit être connecté au même réseau local que le point d’accès.<br />
• Le pilote d’imprimante approprié doit être installé sur l’ordinateur.<br />
Installation du logiciel<br />
Installation du logiciel<br />
1. Insérez le CD-ROM contenant l’utilitaire de serveur d’impression USB dans<br />
l’ordinateur à partir duquel vous souhaitez imprimer.<br />
2. Cliquez sur le fichier « Setup.exe ».<br />
3. 3. La fenêtre suivante apparaît à l'écran. Cliquez sur le bouton « Next » (Suivant)<br />
pour commencer l'installation.
P74186ea_F8T030_QIG.qxd 11-04-2003 08:51 Page 8<br />
Installation du logiciel<br />
4. Une fois le logiciel installé, un message vous confirme la fin du processus<br />
d’installation.<br />
Configuration de l’imprimante<br />
Remarque : Vous devez ajouter une imprimante en tant qu’imprimante « locale » et non en tant<br />
qu’imprimante « réseau ». Ensuite, sélectionnez le port d’imprimante « <strong>Belkin</strong> » (voir étape 4).<br />
Pour installer l’imprimante :<br />
1. Ouvrez le Panneau de configuration, puis le dossier « Imprimantes ».<br />
2. Choisissez celle qui est connectée au point d’accès.<br />
3. Dans le menu « Fichier », cliquez sur « Propriétés ». (Vous pouvez également cliquer<br />
sur l’imprimante avec le bouton droit de la souris et choisir « Propriétés ».)<br />
Installation du logiciel<br />
4. Dans l’onglet « Ports » figure la liste des ports installés sur l’ordinateur. Mettez le<br />
port « <strong>Belkin</strong> » en surbrillance, puis cliquez sur « Configurer le port ».
P74186ea_F8T030_QIG.qxd 11-04-2003 08:51 Page 10<br />
Installation du logiciel<br />
5. Cliquez sur « Locate Servers » (Rechercher les serveurs).<br />
6. Vous verrez le serveur « BELKIN_xxx ». Pour le sélectionner, cliquez dessus.<br />
7. Cliquez sur « OK », puis fermez la fenêtre « Propriétés du serveur d’impression ».<br />
8. L’ordinateur en réseau est maintenant prêt à imprimer.
P74186ea_F8T030_QIG.qxd 11-04-2003 08:51 Page 12<br />
belkin.com<br />
<strong>Belkin</strong> Corporation<br />
501 West Walnut Street<br />
Compton • CA • 90220 • États-Unis<br />
Tél.: +1 310.898.1100<br />
Fax : +1 310.898.1111<br />
<strong>Belkin</strong> Components, Ltd.<br />
Express Business Park • Shipton Way • Rushden<br />
NN10 6GL • Royaume-Uni<br />
Tél.: +44 (0) 1933 35 2000<br />
Fax : +44 (0) 1933 31 2000<br />
<strong>Belkin</strong> Components B.V.<br />
Starparc Building • Boeing Avenue 333<br />
1119 PH Schiphol-Rijk • Pays-Bas<br />
Tél.: +31 (0) 20 654 7300<br />
Fax : +31 (0) 20 654 7349<br />
<strong>Belkin</strong> GmbH<br />
Hanebergstrasse 2<br />
80637 München • Allemagne<br />
Tél.: +49 (0) 89 143405 0<br />
Fax : +49 (0) 89 143405 100<br />
Support technique <strong>Belkin</strong><br />
États-Unis : +1 310.898.1100 poste 2263<br />
+1 800.223.5546 poste 2263<br />
Europe : 00 800 223 55 460<br />
Australie : 1800 666 040<br />
P74186<br />
© 2003 <strong>Belkin</strong> Corporation. Tous droits réservés. Toutes les raisons commerciales sont des marques déposées de leurs fabricants respectifs.<br />
Le nom <strong>Bluetooth</strong> et les marques de commerce <strong>Bluetooth</strong> sont la propriété de <strong>Bluetooth</strong> SIG, Inc. et sont utilisés sous licence par <strong>Belkin</strong> Corporation.<br />
<strong>Bluetooth</strong> <strong>Access</strong> point<br />
mit USB-Druckserver<br />
Zugriff auf Netzwerke und USB-<br />
Drucker mit <strong>Bluetooth</strong>-Geräten<br />
Installationsanleitung<br />
F8T030
P74186ea_F8T030_QIG.qxd 11-04-2003 08:51 Page 2<br />
Einführung<br />
Wir beglückwünschen Sie zum Kauf des <strong>Bluetooth</strong> Netzzugangspunkts mit USB-<br />
Druckserver von <strong>Belkin</strong>. Diese Kurzanleitung zeigt Ihnen, wie Sie Ihr <strong>Belkin</strong> Gerät<br />
installieren. Weitere Informationen finden Sie im mitgelieferten <strong>Belkin</strong><br />
Benutzerhandbuch.<br />
Packungsinhalt<br />
• <strong>Bluetooth</strong> <strong>Access</strong> <strong>Point</strong> mit USB-Druckserver<br />
• CD-ROM mit Dienstprogrammen für den Druckserver<br />
• Netzteil (5 V DC / 1 A)<br />
• Benutzerhandbuch<br />
• Installationsanleitung<br />
• Registrierungskarte<br />
Systemanforderungen<br />
• Computer mit <strong>Bluetooth</strong> Funkschnittstelle<br />
• TCP/IP Netzwerkprotokoll auf allen Computern, die über Kabel mit dem LAN<br />
verbunden sind.<br />
Hardwareinstallation<br />
Anschließen der Netzwerkkabel, Inbetriebnahme<br />
1. Schließen Sie ein standardmäßiges CAT5-Kabel mit verdrilltem Leitungspaar an die<br />
RJ45-Buchse des Zugangspunkts und an einen 10Base-T oder 100Base-T Ethernet-<br />
Router, -Switch oder eine<br />
Netzwerksteckdose an.<br />
Netzwerk-Anschlussbuchse
P74186ea_F8T030_QIG.qxd 11-04-2003 08:51 Page 4<br />
Hardwareinstallation<br />
2. Schließen Sie das enthaltene Netzteil an eine freie Netzsteckdose an. Stecken Sie<br />
den Ausgangsstecker des Netzteils in die Netzbuchse des Zugangspunkts. Jetzt<br />
müsste die Betriebsanzeige aufleuchten, wobei die Systemanzeige mehrmals<br />
aufblinkt. Danach blinken die System-, LAN-, USB 1-, USB 2- und die <strong>Bluetooth</strong>-<br />
Anzeige wiederholt auf, während der Zugangspunkt initialisiert wird. Die<br />
Initialisierung nimmt ca. 20 Sekunden in Anspruch.<br />
TIPP: Die Systemanzeige blinkt einmal pro Sekunde auf und zeigt damit an, dass der Zugangspunkt<br />
ordnungsgemäß funktioniert. Die Systemanzeige blinkt dreimal pro Sekunde auf, wenn die IP-Adresse noch<br />
nicht eingestellt wurde. Wenn neben der Betriebsanzeige weitere LEDs permanent aufleuchten, finden Sie<br />
im Benutzerhandbuch im Abschnitt „Fehlerbehebung“ weitere Informationen. Bleibt das Problem weiterhin<br />
bestehen, wenden Sie sich unter der Nummer 00-800-223-55460. an den technischen Kundendienst von <strong>Belkin</strong>.<br />
Hardwareinstallation<br />
Anschließen von USB-Druckern (optional)<br />
Der Zugangspunkt unterstützt bis zu zwei USB–Drucker. Bitte beachten Sie, dass an die<br />
entsprechenden Schnittstellen ausschließlich USB-Drucker angeschlossen werden<br />
dürfen.<br />
1. Schließen Sie ein USB-Kabel an eine USB-Schnittstelle des Zugangspunkts an.<br />
2. Verbinden Sie das andere Kabelende mit<br />
einem USB-Drucker.<br />
3. Wiederholen Sie Schritt 1 und 2, wenn Sie<br />
einen zweiten Drucker anschließen<br />
möchten.<br />
Hinweis: Der Druckertreiber muss auf jedem Computer<br />
installiert sein, von dem aus Sie drucken möchten.
P74186ea_F8T030_QIG.qxd 11-04-2003 08:51 Page 6<br />
Softwareinstallation<br />
Konfigurieren der Netzwerkeinstellungen<br />
Damit Sie eine Verbindung zum Internet herstellen können, benötigt Ihre<br />
Zugangspunkt eine IP-Adresse. Normalerweise werden Internet-Adressen durch einen<br />
DHCP-Server zugewiesen.<br />
Der Zugangspunkt ist so konfiguriert, dass er über DHCP eine IP-Adresse aus dem<br />
Ethernet anfordert. Sie können auf dem Zugangspunkt aber auch manuell eine feste IP-<br />
Adresse einstellen. Hierzu nutzen Sie den Webmanager und die <strong>Bluetooth</strong>-Schnittstelle.<br />
(Weitere Informationen hierzu finden Sie im Benutzerhandbuch.)<br />
Softwareinstallation<br />
Systemanforderungen:<br />
• Windows® 98 SE, ME, 2000 oder XP<br />
• Computer und <strong>Access</strong> <strong>Point</strong> müssen an dasselbe LAN angeschlossen werden<br />
• Auf dem Computer muss der Treiber für das genutzte Druckermodell installiert sein<br />
Softwareinstallation<br />
Installieren der Software<br />
1. Legen Sie die Druckerdienstprogramm-CD in den Computer ein, mit dem Sie drucken<br />
möchten.<br />
2. Klicken Sie auf die Datei setup.exe.<br />
3. Jetzt müsste das folgende Dialogfeld angezeigt werden. Klicken Sie auf “Weiter”, um<br />
die Installation zu starten.
P74186ea_F8T030_QIG.qxd 11-04-2003 08:51 Page 8<br />
Softwareinstallation<br />
4. Nach dem Installieren der Software erhalten Sie eine Bestätigungsmeldung.<br />
Konfigurieren des Druckers<br />
Hinweis: Sie müssen einen Drucker als “lokalen” Drucker (und nicht als “Netzwerkdrucker”) hinzufügen und<br />
die Druckerschnittstelle “<strong>Belkin</strong>” auswählen (siehe Schritt 4). So richten Sie den Drucker ein:<br />
1. Öffnen Sie die Systemsteuerung, und doppelklicken Sie auf die Option “Drucker”.<br />
2. Wählen Sie den Drucker aus, der am <strong>Access</strong> <strong>Point</strong> angeschlossen ist.<br />
3. Wählen Sie im Menü “Datei” die Option “Eigenschaften”. (Sie können auch mit der<br />
rechten Maustaste auf den Drucker klicken und “Eigenschaften” wählen.)<br />
Softwareinstallation<br />
4. Auf der Registerkarte “Anschlüsse” werden die Schnittstellen aufgelistet, die im<br />
Computer installiert sind. Markieren Sie die Schnittstelle “<strong>Belkin</strong>”, und klicken Sie<br />
auf “Konfigurieren”.
P74186ea_F8T030_QIG.qxd 11-04-2003 08:51 Page 10<br />
Softwareinstallation<br />
5. Klicken Sie auf “Locate Servers” (Server suchen).<br />
6. Der Server “BELKIN_xxx” wird angezeigt. Klicken Sie auf den Server, um ihn<br />
auszuwählen.<br />
7. Klicken Sie auf “OK”, und schließen Sie dann das Fenster “Eigenschaften des<br />
Druckservers”.<br />
8. Der Netzwerkdrucker ist jetzt betriebsbereit
P74186ea_F8T030_QIG.qxd 11-04-2003 08:51 Page 12<br />
belkin.com<br />
<strong>Belkin</strong> Corporation<br />
501 West Walnut Street<br />
Compton • CA • 90220 • USA<br />
Tel: +1 310.898.1100<br />
Fax: +1 310.898.1111<br />
<strong>Belkin</strong> Components, Ltd.<br />
Express Business Park • Shipton Way • Rushden<br />
NN10 6GL • Großbritannien<br />
Tel: +44 (0) 1933 35 2000<br />
Fax: +44 (0) 1933 31 2000<br />
<strong>Belkin</strong> Components B.V.<br />
Starparc Building • Boeing Avenue 333<br />
1119 PH Schiphol-Rijk • Niederlande<br />
Tel: +31 (0) 20 654 7300<br />
Fax: +31 (0) 20 654 7349<br />
<strong>Belkin</strong> GmbH<br />
Hanebergstrasse 2<br />
80637 München • Deutschland<br />
Tel: +49 (0) 89 143405 0<br />
Fax: +49 (0) 89 143405 100<br />
<strong>Belkin</strong> Kundendienst<br />
USA +1 310.898.1100, Durchwahl: 2263<br />
+1 800.223.5546, Durchwahl: 2263<br />
Europa: 00 800 223 55 460<br />
Australien: 1800 666 040<br />
P74186<br />
© 2003 <strong>Belkin</strong> Corporation. Alle Rechte vorbehalten. Alle Produktnamen sind eingetragene Marken der angegebenen Hersteller.<br />
Die Bezeichnung <strong>Bluetooth</strong> und die anderweitigen <strong>Bluetooth</strong> Marken sind Eigentum der <strong>Bluetooth</strong> SIG, Inc. Verwendung durch die <strong>Belkin</strong> Corporation unter Lizenz.<br />
<strong>Bluetooth</strong> <strong>Access</strong>point<br />
met USB Printserver<br />
Toegang tot uw netwerk en USB<br />
printers via <strong>Bluetooth</strong> apparaten<br />
Beknopte installatiegids<br />
F8T030
P74186ea_F8T030_QIG.qxd 11-04-2003 08:51 Page 2<br />
Inleiding<br />
Wij danken u hartelijk voor uw aankoop van dit <strong>Belkin</strong> <strong>Bluetooth</strong>® <strong>Access</strong>point met<br />
USB printserver (het <strong>Access</strong>point) waarvan u veel plezier zult hebben. Deze<br />
installatiegids helpt u bij de belangrijkste stappen die voor de installatie nodig zijn.<br />
Zie voor meer informatie de <strong>Belkin</strong> handleiding die in de verpakking is bijgesloten.<br />
Inhoud verpakking<br />
• <strong>Bluetooth</strong> accesspoint met USB printserver<br />
• Cd-rom met printserver utility<br />
• 5 VDC, 1 A voedingsadapter<br />
• Handleiding<br />
• Beknopte installatiegids<br />
• Registratiekaart<br />
Systeemvereisten<br />
• Computerapparaat met <strong>Bluetooth</strong> technologie voor draadloze communicatie<br />
• TCP/IP netwerkprotocol geïnstalleerd in elke met een kabel op het lokale netwerk<br />
(LAN) aangesloten computer<br />
Hardware installeren<br />
Netwerkkabels aansluiten en voeding inschakelen<br />
1. Sluit het ene einde van een standaard CAT5 twisted-pair kabel aan op de RJ45<br />
connector op het <strong>Access</strong>point en het andere einde op een 10Base-T of 100Base-T<br />
Ethernet router,<br />
switch of<br />
wandcontactdoos.<br />
wandcontactdoos met contrasteker
P74186ea_F8T030_QIG.qxd 11-04-2003 08:51 Page 4<br />
Hardware installeren<br />
2. Sluit de bijgeleverde voedingsadapter aan op een stopcontact voor netvoeding<br />
en bevestig de plug in de voedingsingang van het accesspoint. Als het accesspoint<br />
opstart moet u zien dat de statusled voor voeding oplicht en de systeem status<br />
led een paar keer knippert waarna de systeem status led en de statusleds voor LAN,<br />
USB 1, USB 2 en <strong>Bluetooth</strong> herhaaldelijk knipperen. Deze initiatieprocedure neemt<br />
ongeveer 20 seconden in beslag.<br />
TIP: De systeem status led knippert eenmaal per seconde om aan te geven dat het <strong>Access</strong>point correct<br />
functioneert. De systeemstatusled knippert drie maal per seconde als het IP adres niet is ingesteld. Als<br />
andere led’s dan de status voedingsled continu blijven branden, zie dan de aanwijzingen voor<br />
probleemoplossing achter in uw handleiding. Als u het probleem niet zelf kunt oplossen, neem dan contact<br />
op met <strong>Belkin</strong>, afdeling Technische Ondersteuning, telefoon: 00 800-223-55460.<br />
USB printers aansluiten (optie)<br />
Hardware installeren<br />
Het <strong>Access</strong>point ondersteunt totaal twee USB printers. Sluit geen andere apparaten dan<br />
USB printers rechtstreeks op deze poorten aan.<br />
1. Bevestig het ene einde van een USB kabel in een van de USB poorten van het<br />
accesspoint.<br />
2. Sluit het andere einde aan op een<br />
beschikbare USB printer.<br />
3. Herhaal de bovenstaande stappen 1 en 2<br />
voor een tweede printer.<br />
Let op: Vóór gebruik moet op elke computer waarmee u<br />
wilt printen de printerdriver zijn geïnstalleerd.
P74186ea_F8T030_QIG.qxd 11-04-2003 08:51 Page 6<br />
Software installeren<br />
Uw netwerkinstellingen configureren<br />
Uw <strong>Access</strong>point moet een IP adres hebben om verbinding te kunnen maken met het<br />
internet. Meestal worden IP adressen aan het <strong>Access</strong>point geleverd door een DHCP server.<br />
Het <strong>Access</strong>point is zo ingesteld dat het via DHCP een IP adres van het Ethernet kan<br />
krijgen. U kunt echter ook vooraf een vast IP-adres in het <strong>Access</strong>point invoeren. Dit is<br />
mogelijk via de webmanager met behulp van de <strong>Bluetooth</strong> interface (zie voor meer<br />
informatie uw gebruikershandleiding).<br />
Software installeren<br />
Vereisten:<br />
• Windows® 98 SE, Me, 2000 of XP<br />
• De computer moet op hetzelfde lokale netwerk (LAN) zijn aangesloten als het<br />
<strong>Access</strong>point<br />
• Op de computer moet de geschikte printerdriver zijn geïnstalleerd<br />
Software installeren<br />
Software installeren<br />
1. Plaats de cd-rom met de USB printerserver utility in het optisch station van de<br />
computer waarvan u wilt printen.<br />
2. Klik op het bestand ‘Setup.exe’.<br />
3. Op uw beeldscherm moet u nu het volgende zien. Klik op ‘Next’ (Volgende) om de<br />
installatieprocedure te starten.
P74186ea_F8T030_QIG.qxd 11-04-2003 08:51 Page 8<br />
Software installeren<br />
4. Zodra de installatie van de software is voltooid, ontvangt u een kennisgeving die<br />
de installatieprocedure bevestigt.<br />
Uw printer configureren<br />
Let op: U moet een printer als ‘lokale’ printer toevoegen (niet als ‘netwerk’ printer) en de printerpoort met<br />
de naam ‘<strong>Belkin</strong>’ selecteren (zie stap 4). U installeert de printer als volgt:<br />
1. Ga naar ‘Control Panel’ (Configuratiescherm) en open de folder ‘Printers’.<br />
2. Selecteer de printer die op het <strong>Access</strong>point is aangesloten.<br />
3. In het menu selecteert u ‘File’ (Bestand) en dan ‘Properties’ (Eigenschappen).<br />
(U kunt ook met uw rechter muisknop op de printer klikken en ‘Properties’<br />
(Eigenschappen) selecteren.<br />
Software installeren<br />
4. Onder de tab ‘Ports’ (Poorten) ziet u een overzicht van de poorten die op uw<br />
computer zijn geïnstalleerd. Markeer de poort met de naam ‘<strong>Belkin</strong>’ en klik op<br />
‘Configure Port’ (Poort configureren).
P74186ea_F8T030_QIG.qxd 11-04-2003 08:51 Page 10<br />
Software installeren<br />
5. Klik op ‘Locate Servers’ (Servers opzoeken).<br />
6. U ziet de server met de naam ‘BELKIN_xxx’. Selecteer deze door erop te klikken.<br />
7. Klik op ‘OK’ en sluit dan het venster ‘Print Server Properties’ (Eigenschappen van<br />
printserver).<br />
8. Uw printer is nu aangesloten op het netwerk en klaar om te printen.
P74186ea_F8T030_QIG.qxd 11-04-2003 08:52 Page 12<br />
belkin.com<br />
<strong>Belkin</strong> Corporation<br />
501 West Walnut Street<br />
Compton • CA • 90220 • USA<br />
Tel: +1 310.898.1100<br />
Fax: +1 310.898.1111<br />
<strong>Belkin</strong> Components, Ltd.<br />
Express Business Park • Shipton Way • Rushden<br />
NN10 6GL • Verenigd Koninkrijk<br />
Tel: +44 (0) 1933 35 2000<br />
Fax: +44 (0) 1933 31 2000<br />
<strong>Belkin</strong> Components B.V.<br />
Starparc Building • Boeing Avenue 333<br />
1119 PH Schiphol-Rijk • Nederland<br />
Tel: +31 (0) 20 654 7300<br />
Fax: +31 (0) 20 654 7349<br />
<strong>Belkin</strong> GmbH<br />
Hanebergstrasse 2<br />
80637 München • Duitsland<br />
Tel: +49 (0) 89 143405 0<br />
Fax: +49 (0) 89 143405 100<br />
<strong>Belkin</strong> technische helpdesk<br />
USA: +1-310.898.1100 toestel 2263<br />
+1 800.223.5546 toestel 2263<br />
Europa: 00 800 223 55 460<br />
Australië: 1800 666 040<br />
P74186<br />
© 2003 <strong>Belkin</strong> Corporation. Alle rechten voorbehouden. Alle handelsnamen zijn gedeponeerde handelsmerken van de betreffende rechthebbenden.<br />
De naam <strong>Bluetooth</strong> en de <strong>Bluetooth</strong> handelsmerken zijn eigendom van <strong>Bluetooth</strong> SIG, Inc. En deze worden door <strong>Belkin</strong> Corporation in licentie gebruikt.<br />
Punto de Acceso <strong>Bluetooth</strong> <br />
con servidor de<br />
impresión USB<br />
Acceda a su red y a sus impresoras USB<br />
a través de dispositivos <strong>Bluetooth</strong><br />
Guía de instalación rápida<br />
F8T030
P74186ea_F8T030_QIG.qxd 11-04-2003 08:52 Page 2<br />
Introducción<br />
Felicidades y gracias por adquirir de este punto de acceso <strong>Bluetooth</strong> con servidor<br />
de impresión USB (el PA) de <strong>Belkin</strong>. La presente guía le conducirá por los pasos<br />
básicos necesarios para la instalación. Para más información, consulte el manual<br />
del usuario de <strong>Belkin</strong> incluido en el paquete.<br />
Contenido del paquete<br />
• Punto de acceso <strong>Bluetooth</strong> con servidor<br />
de impresión USB<br />
• CD-ROM con la utilidad del servidor de impresión<br />
• Fuente de alimentación de 5V CC, 1A<br />
• Manual del usuario<br />
• Guía de instalación rápida<br />
• Tarjeta de registro<br />
Requisitos del sistema<br />
• Un dispositivo informático equipado con tecnología inalámbrica <strong>Bluetooth</strong><br />
• Protocolo de interconexión en red TCP/IP instalado en todos los ordenadores<br />
conectados a la LAN<br />
Instalación del hardware<br />
Conexión de los cables de red y encendido<br />
1. Conecte un extremo de un cable estándar de pares trenzados CAT5 al conector RJ45<br />
del PA y conecte el otro extremo a un enrutador de 10Base-T o 100Base-T,<br />
Ethernet, al<br />
conmutador o a una<br />
toma de pared.<br />
toma de pared
P74186ea_F8T030_QIG.qxd 11-04-2003 08:52 Page 4<br />
Instalación del hardware<br />
2. Conecte el adaptador de alimentación adjunto a una salida de corriente disponible.<br />
Inserte el enchufe cilíndrico en la toma de alimentación del PA. Se encenderá la luz del<br />
LED de alimentación, la luz de sistema parpadeará una serie de veces y después las luces<br />
de sistema, LAN, USB 1, USB 2 y <strong>Bluetooth</strong> parpadearán repetidamente mientras el PA se<br />
inicia por sí solo. El proceso de inicio conllevará aproximadamente 20 segundos.<br />
CONSEJO: El LED de sistema parpadeará una vez por segundo indicando que el PA está funcionando<br />
correctamente. La luz de sistema parpadeará tres veces por segundo si la dirección IP no ha sido establecida.<br />
Si cualquier otra luz, además de la luz de encendido, permanece iluminada, consulte la guía de resolución<br />
de problemas al final de su manual del usuario. Si el problema persiste, póngase en contacto con el servicio<br />
de asistencia técnica de <strong>Belkin</strong> en el teléfono 00-800-223-55460.<br />
Instalación del hardware<br />
Conexión de impresoras USB (opcional)<br />
El PA soporta hasta dos impresoras USB. No conecte directamente a estos puertos<br />
ningún dispositivo que no sea una impresora USB.<br />
1. Conecte un extremo de un cable USB a uno de los puertos USB del PA.<br />
2. Conecte el otro extremo a una impresora<br />
USB disponible.<br />
3. Repita los pasos 1 y 2 anteriores para una<br />
segunda impresora.<br />
Atención: el controlador de la impresora deberá<br />
encontrarse instalado en todos los ordenadores desde los<br />
que desee imprimir antes de su utilización.
P74186ea_F8T030_QIG.qxd 11-04-2003 08:52 Page 6<br />
Instalación del software<br />
Configuración de sus ajustes de red<br />
Para poder conectarse a Internet, su PA precisará de una dirección IP. Habitualmente,<br />
ésta es suministrada al PA por parte de un servidor DHCP.<br />
El PA está configurado para obtener una dirección IP desde Ethernet a través del DHCP.<br />
No obstante, usted también puede establecer previamente una dirección IP fija en el<br />
PA. Esta acción puede ser ejecutada a través del administrador de Internet utilizando<br />
la interfaz <strong>Bluetooth</strong> (consulte el Manual del Usuario para más información).<br />
Instalación del software<br />
Requisitos:<br />
• Windows® 98 SE, Me, 2000, XP<br />
• El ordenador deberá estar conectado a la misma Red de Área Local (LAN) que el PA<br />
• El ordenador deberá tener instalado el controlador apropiado para la impresora<br />
Instalación del software<br />
Instalación del software<br />
1. Inserte el CD-ROM con la utilidad del servidor de impresión USB en el ordenador<br />
desde el que desee imprimir.<br />
2. Haga clic en el archivo “Setup.exe”.<br />
3. En su pantalla deberá aparecer el siguiente recuadro. Haga clic en el botón “Next”<br />
(Siguiente) para comenzar el proceso de instalación.
P74186ea_F8T030_QIG.qxd 11-04-2003 08:52 Page 8<br />
Instalación del software<br />
4. Una vez completada la instalación del software, recibirá un mensaje confirmando el<br />
proceso de instalación.<br />
Configuración de su impresora<br />
Atención: Deberá añadir una impresora como impresora “local” (no como impresora de red [“network”]),<br />
y seleccionar el puerto de impresora llamado “<strong>Belkin</strong>” (véase el paso 4). Para configurar la impresora:<br />
1. Vaya a “Control Panel” (Panel de control) y abra la carpeta “Printers” (Impresoras).<br />
2. Seleccione la impresora que está conectada al PA.<br />
3. Seleccione “File” (Archivo) y después “Properties” (Propiedades) del menú.<br />
(asimismo, puede hacer clic con el botón derecho del ratón sobre la impresora y<br />
seleccionar “Properties” [Propiedades]).<br />
Instalación del software<br />
4. En la pestaña “Ports” (puertos), verá una lista de los puertos instalados en su<br />
ordenador. Marque el puerto llamado "<strong>Belkin</strong>" y haga clic en "Configure Port"<br />
(Configurar puerto).
P74186ea_F8T030_QIG.qxd 11-04-2003 08:52 Page 10<br />
Instalación del software<br />
5. Haga clic en “Locate Servers” (Buscar servidores).<br />
6. Verá el servidor "BELKIN_xxx". Selecciónelo haciendo clic sobre él.<br />
7. Haga clic en “OK” (Aceptar) y después cierre la ventana de “Print Server Properties”<br />
(Propiedades del servidor de impresión).<br />
8. Su ordenador conectado en red estará ahora listo para imprimir.
P74186ea_F8T030_QIG.qxd 11-04-2003 08:52 Page 12<br />
belkin.com<br />
<strong>Belkin</strong> Corporation<br />
501 West Walnut Street<br />
Compton • CA • 90220 • EE.UU.<br />
Tel.: +1 310.898.1100<br />
Fax: +1 310.898.1111<br />
<strong>Belkin</strong> Components, Ltd.<br />
Express Business Park • Shipton Way • Rushden<br />
NN10 6GL • Reino Unido<br />
Tel.: +44 (0) 1933 35 2000<br />
Fax: +44 (0) 1933 31 2000<br />
<strong>Belkin</strong> Components B.V.<br />
Starparc Building • Boeing Avenue 333<br />
1119 PH Schiphol-Rijk • Holanda<br />
Tel.: +31 (0) 20 654 7300<br />
Fax: +31 (0) 20 654 7349<br />
<strong>Belkin</strong> GmbH<br />
Hanebergstrasse 2<br />
80637 München • Alemania<br />
Tel.: +49 (0) 89 143405 0<br />
Fax: +49 (0) 89 143405 100<br />
Asistencia técnica de <strong>Belkin</strong><br />
EE.UU.: +1 310.898.1100 ext. 2263<br />
+1 800.223.5546 ext. 2263<br />
Europa: 00 800 223 55 460<br />
Australia: 1800 666 040<br />
P74186<br />
©2003 <strong>Belkin</strong> Corporation. Todos los derechos reservados. Todos los nombres comerciales son marcas registradas de los respectivos fabricantes enumerados.<br />
El nombre de <strong>Bluetooth</strong> y las marcas registradas de <strong>Bluetooth</strong> son propiedad de <strong>Bluetooth</strong> SIG, Inc., y son empleadas con licencia por parte de <strong>Belkin</strong> Corporation<br />
Punto di accesso <strong>Bluetooth</strong> <br />
con print server USB<br />
Offre la possibilità di accedere alle<br />
proprie stampanti di rete con<br />
interfaccia USB attraverso le<br />
periferiche <strong>Bluetooth</strong><br />
Guida di installazione rapida<br />
F8T030
P74186ea_F8T030_QIG.qxd 11-04-2003 08:52 Page 2<br />
Introduzione<br />
Congratulazioni e grazie per aver acquistato il punto di accesso <strong>Bluetooth</strong> con print<br />
server USB di <strong>Belkin</strong>. Questa guida ha lo scopo di fornirvi le informazioni fondamentali<br />
per eseguire l’installazione. Per maggiori informazioni, vi rimandiamo al Manuale<br />
Utente fornito nella confezione.<br />
Contenuto della confezione<br />
• Punto di accesso <strong>Bluetooth</strong> con print server USB<br />
• CD con utility per print server<br />
• Alimentazione 5V DC, 1°<br />
• Manuale utente<br />
• Guida di installazione rapida<br />
• Cartolina di registrazione<br />
Requisiti del sistema<br />
• Una periferica dotata di tecnologia wireless <strong>Bluetooth</strong>.<br />
• Protocollo di rete TCP/IP installato su ogni computer collegato via cavo alla rete LAN<br />
Installazione dell’hardware<br />
Collegamento dei cavi di rete e accensione<br />
1. Collegare un’estremità del cavo a doppino ritorto standard CAT5 al connettore RJ45<br />
previsto sul punto di accesso e l’altra estremità ad un router, uno switch o una<br />
presa a muro 10Base-<br />
T o 100Base-T<br />
Ethernet.<br />
presa a muro
P74186ea_F8T030_QIG.qxd 11-04-2003 08:52 Page 4<br />
Installazione dell’hardware<br />
2. Collegare l’adattatore di corrente ad una presa di alimentazione disponibile. Inserire la<br />
spina nella presa di alimentazione del punto di accesso. Il LED di segnalazione<br />
alimentazione dovrebbe accendersi, la spia di sistema lampeggiare un paio di volte,<br />
seguita dal lampeggio ripetuto del sistema, della rete LAN, delle prese USB 1 e USB e<br />
della connessione <strong>Bluetooth</strong> mentre il punto di accesso si avvia. Il processo di<br />
iniziazione dura circa 20 secondi.<br />
SUGGERIMENTO: il LED di sistema lampeggia una volta al secondo per indicare il corretto funzionamento del<br />
punto di accesso. La spia di sistema lampeggia tre volte al secondo nel caso l’indirizzo IP non sia stato<br />
impostato. Nel caso altre spie, oltre a quelle dell’alimentazione, dovessero rimanere fisse, consultare la guida<br />
di Rilevazione e risoluzione delle anomalie in fondo al Manuale Utente. Se il problema persiste, rivolgersi<br />
all’Assistenza Tecnica <strong>Belkin</strong> al numero 00-800-223-55460.<br />
Installazione dell’hardware<br />
Connessione delle stampanti USB (opzionale)<br />
Il punto di accesso è in grado di gestire due diverse stampanti USB. Non collegare<br />
direttamente a queste porte altre periferiche che non abbiano l’interfaccia USB.<br />
1. Collegare un’estremità del cavo USB ad una delle porte USB previste nel punto di<br />
accesso.<br />
2. Collegare l’altra estremità ad una<br />
stampante disponibile con interfaccia USB.<br />
3. Ripetere le fasi 1 e 2 descritte in<br />
precedenza anche per la seconda<br />
stampante.<br />
Nota: in ogni computer dal quale si desidera lanciare la<br />
stampa, prima di procedere con il suo utilizzo, dovrà<br />
essere installato il driver per la stampante.
P74186ea_F8T030_QIG.qxd 11-04-2003 08:52 Page 6<br />
Software Setup<br />
Configurazione delle impostazioni di rete<br />
Per collegarsi ad Internet, il punto di accesso richiede un indirizzo IP. Generalmente,<br />
gli indirizzi sono forniti al punto di accesso dal server DHCP.<br />
Il punto di accesso viene impostato in modo da poter ricevere un indirizzo IP da<br />
Ethernet attraverso il protocollo DHCP. Tuttavia, è anche possibile eseguire una<br />
configurazione preliminare di un indirizzo IP fisso all’interno del punto di accesso.<br />
Questa operazione può essere eseguita attraverso il web manager utilizzando<br />
l’interfaccia <strong>Bluetooth</strong> (per maggiori informazioni vedere il Manuale Utente).<br />
Software d’installazione<br />
Requisiti:<br />
• Windows® 98 SE, Me, 2000, XP<br />
• Il computer deve essere collegato alla stessa rete locale (LAN) del punto di accesso<br />
• Nel computer deve essere stato installato il driver adatto alla stampante utilizzata<br />
Software Setup<br />
Installazione del software<br />
1. Inserire il CD-ROM contenente la utility per il print server USB nell’apposito drive<br />
computer dal quale si desidera lanciare il comando di stampa.<br />
2. Fare clic sul file “Setup.exe”.<br />
3. Sullo schermo dovrebbe apparire la seguente immagine. Fare clic su “Next” (Avanti)<br />
per avviare il processo di installazione.
P74186ea_F8T030_QIG.qxd 11-04-2003 08:52 Page 8<br />
Software Setup<br />
4. Una volta terminato il processo di installazione, un messaggio conferma che il<br />
processo di installazione è andato a buon fine.<br />
Configurazione della stampante<br />
Nota: la stampante deve essere aggiunta come stampante “locale” (non come stampante di “rete”),<br />
selezionando la porta della stampante “<strong>Belkin</strong>” (vedi fase 4). Per impostare la stampante:<br />
1. Andare in “Control Panel” (Pannello di Controllo) e aprire la cartella “Printers”<br />
(Stampanti).<br />
2. Selezionare la stampante collegata al punto di accesso.<br />
3. Selezionare “File” e “Properties” (Proprietà) dal menu. (Oppure fare clic con il tasto<br />
destro del mouse sulla stampante e selezionare “Properties” (Proprietà)).<br />
Software Setup<br />
4. Nella tabella “Ports” (Porte) compare l’elenco delle porte presenti nel computer.<br />
Evidenziare la porta “<strong>Belkin</strong>” e fare clic sul comando “Configure Port” (Configura<br />
porta).
P74186ea_F8T030_QIG.qxd 11-04-2003 08:52 Page 10<br />
Software Setup<br />
5. Fare clic su “Locate Servers” (Posiziona server).<br />
6. Compare il server “BELKIN_xxx”. Selezionarlo con un clic.<br />
7. Fare clic su "OK" e chiudere la finestra “Print Server Properties”<br />
(Proprietà del print server).<br />
8. Il computer in rete è pronto a stampare.
P74186ea_F8T030_QIG.qxd 11-04-2003 08:52 Page 12<br />
belkin.com<br />
<strong>Belkin</strong> Corporation<br />
501 West Walnut Street<br />
Compton • CA • 90220 • USA<br />
Tel: +1 310.898.1100<br />
Fax: +1 310.898.1111<br />
<strong>Belkin</strong> Components, Ltd.<br />
Express Business Park • Shipton Way • Rushden<br />
NN10 6GL • Regno Unito<br />
Tel: +44 (0) 1933 35 2000<br />
Fax: +44 (0) 1933 31 2000<br />
<strong>Belkin</strong> Components B.V.<br />
Starparc Building • Boeing Avenue 333<br />
1119 PH Schiphol-Rijk • Paesi Bassi<br />
Tel: +31 (0) 20 654 7300<br />
Fax: +31 (0) 20 654 7349<br />
<strong>Belkin</strong> GmbH<br />
Hanebergstrasse 2<br />
80637 München • Germania<br />
Tel: +49 (0) 89 143405 0<br />
Fax: +49 (0) 89 143405 100<br />
Assistenza tecnica <strong>Belkin</strong><br />
USA: +1 310.898.1100 est. 2263<br />
+1 800.223.5546 est. 2263<br />
Europa: 00 800 223 55 460<br />
Australia: 1800 666 040<br />
P74186<br />
© 2003 <strong>Belkin</strong> Corporation. Tutti i diritti riservati. Tutti i nomi commerciali sono marchi registrati dai rispettivi produttori elencati.<br />
Il nome <strong>Bluetooth</strong> ed i marchi commerciali <strong>Bluetooth</strong> sono di proprietà della <strong>Bluetooth</strong> SIG, Inc. e sono utilizzati da <strong>Belkin</strong> Corporation su concessione di licenza.<br />
Ponto de acesso <strong>Bluetooth</strong> <br />
com servidor de impressão USB<br />
Aceda à sua rede e impressoras USB<br />
através de dispositivos <strong>Bluetooth</strong><br />
Guia de instalação rápida<br />
F8T030
P74186ea_F8T030_QIG.qxd 11-04-2003 08:52 Page 2<br />
Introdução<br />
Parabéns e obrigado pela aquisição do ponto de acesso <strong>Bluetooth</strong> com servidor de<br />
impressão USB (o PA) da <strong>Belkin</strong>. Este guia irá auxiliá-lo nos passos necessários para<br />
completar a instalação. Para mais informações, consulte o Manual do utilizador da<br />
<strong>Belkin</strong> incluído na embalagem.<br />
Conteúdo do pacote<br />
• Ponto de acesso <strong>Bluetooth</strong> com servidor<br />
de impressão USB<br />
• CD-ROM Utilitário do servidor de impressão<br />
• Fonte de alimentação de 5V DC, 1A<br />
• Manual do utilizador<br />
• Guia de instalação rápida<br />
• Formulário de registo<br />
Requisitos do sistema<br />
• Um dispositivo electrónico equipado com a tecnologia <strong>Bluetooth</strong> sem fio<br />
• Protocolo de ligação em rede TCP/IP instalado em cada um dos computadores<br />
ligados à rede LAN<br />
Instalação do hardware<br />
Ligação dos cabos de rede e ligação do sistema<br />
1. Ligue uma das pontas do cabo standard CAT5 de pares trançados ao conector RJ45<br />
do PA e ligue a outra ponta ao router, switch ou tomada de parede Ethernet<br />
10Base-T ou<br />
100Base-T.<br />
Tomada de parede
P74186ea_F8T030_QIG.qxd 11-04-2003 08:52 Page 4<br />
Instalação do hardware<br />
2. Ligue o adaptador de alimentação incluído no fornecimento a uma tomada de<br />
alimentação disponível. Ligue o conector à ficha de alimentação do PA. O LED de<br />
alimentação acende-se, a luz do sistema pisca durante algum tempo e, de seguida,<br />
as luzes do sistema, LAN, USB 1, USB2 e <strong>Bluetooth</strong> piscam repetidamente conforme<br />
o PA se vai iniciando. Este processo de iniciação dura aprox. 20 segundos.<br />
SUGESTÃO: O LED de sistema pisca uma vez por segundo para indicar que o PA está a funcionar<br />
correctamente. A luz de sistema pisca três vezes por segundo se o Endereço IP não estiver definido. Se<br />
qualquer uma das luzes, à excepção da luz de alimentação, ficar permanentemente acesa, consulte o guia de<br />
Resolução de problemas na parte final do Manual do utilizador. Se o problema persistir, contacte o Apoio<br />
Técnico da <strong>Belkin</strong> através do telefone 00-800-223-55460.<br />
Instalação do hardware<br />
Ligação de impressoras USB (opcional)<br />
O PA suporta até duas impressoras USB. Não ligue outros dispositivos, que não uma<br />
impressora USB, directamente a estas portas.<br />
1. Ligue uma das pontas do cabo USB a uma das portas USB do PA.<br />
2. Ligue a outra ponta a uma impressora<br />
USB disponível.<br />
3. Repita os passos 1 e 2 para a segunda<br />
impressora.<br />
Nota: O controlador da impressora já tem de estar<br />
instalado em cada um dos computadores, a partir dos<br />
quais pretende imprimir.
P74186ea_F8T030_QIG.qxd 11-04-2003 08:52 Page 6<br />
Configurar as definições de rede<br />
Configurar o software<br />
O seu PA precisa de um endereço IP para poder ligar à Internet. Normalmente os<br />
endereços são fornecidos ao PA por um servidor DHCP.<br />
O PA está configurado para obter um endereço IP da Ethernet via DHCP. No entanto,<br />
poderá pré-configurar um endereço IP fixo para o PA, nomeadamente através do gestor<br />
da web usando o interface <strong>Bluetooth</strong> (consulte o seu Manual do utilizador para mais<br />
informações).<br />
Instalação do software<br />
Requisitos:<br />
• Windows® 98 SE, Me, 2000, XP<br />
• O computador tem de estar ligado à mesma rede local do PA<br />
• O controlador da respectiva impressora tem de estar instalado no computador.<br />
Instalação do software<br />
Configurar o software<br />
1. Coloque o CD-ROM do Utilitário Servidor de impressão USB no computador a partir<br />
do qual pretende fazer impressões.<br />
2. Faça clique sobre o ficheiro “Setup.exe”.<br />
3. O seguinte ecrã deverá aparecer no monitor. Faça clique sobre o botão “Seguinte”<br />
para iniciar o processo de instalação.
P74186ea_F8T030_QIG.qxd 11-04-2003 08:52 Page 8<br />
Configurar o software<br />
4. Depois de concluir a instalação do software verá uma mensagem a confirmar que o<br />
processo de instalação está completo.<br />
Configurar a impressora<br />
Nota: Tem de adicionar uma impressora como impressora “local” (não como impressora de “rede”) e<br />
seleccionar a porta com o nome “<strong>Belkin</strong>” (ver passo 4). Para configurar a impressora:<br />
1. Vá até ao Painel de controlo e abra a pasta “Impressoras”.<br />
2. Seleccione a impressora que está ligada ao PA.<br />
3. No menu, seleccione “Ficheiro” e de seguida “Propriedades” (também pode optar por<br />
premir a tecla direita do rato sobre a impressora e seleccionar “Propriedades”).<br />
Configurar o software<br />
4. Por baixo do separador “Portas” aparece uma lista das portas que estão instaladas<br />
no seu computador. Opte pela porta com o nome “<strong>Belkin</strong>” e faça clique sobre<br />
“Configurar Porta”.
P74186ea_F8T030_QIG.qxd 11-04-2003 08:52 Page 10<br />
5. Faça clique sobre “Localizar servidores”.<br />
Configurar o software<br />
6. Aparece o servidor “BELKIN_xxx”. Seleccione-o através de um clique com o rato.<br />
7. Faça clique sobre “OK” e feche a janela “Propriedades do Servidor de impressão”.<br />
8. O seu computador ligado em rede já está pronto para começar a imprimir.
P74186ea_F8T030_QIG.qxd 11-04-2003 08:52 Page 12<br />
belkin.com<br />
<strong>Belkin</strong> Corporation<br />
501 West Walnut Street<br />
Compton • CA • 90220 • EUA<br />
Tel: +1 310.898.1100<br />
Fax: +1 310.898.1111<br />
<strong>Belkin</strong> Components, Ltd.<br />
Express Business Park • Shipton Way • Rushden<br />
NN10 6GL • Reino Unido<br />
Tel: +44 (0) 1933 35 2000<br />
Fax: +44 (0) 1933 31 2000<br />
<strong>Belkin</strong> Components B.V.<br />
Starparc Building • Boeing Avenue 333<br />
1119 PH Schiphol-Rijk • Holanda<br />
Tel: +31 (0) 20 654 7300<br />
Fax: +31 (0) 20 654 7349<br />
<strong>Belkin</strong> GmbH<br />
Hanebergstrasse 2<br />
80637 München • Alemanha<br />
Tel: +49 (0) 89 143405 0<br />
Fax: +49 (0) 89 143405 100<br />
Apoio técnico da <strong>Belkin</strong><br />
EUA: +1 310.898.1100 ext. 2263<br />
+1 800.223.5546 ext. 2263<br />
Europa: 00 800 223 55 460<br />
Austrália: 1800 666 040<br />
P74186<br />
© 2003 <strong>Belkin</strong> Corporation. Todos os direitos reservados. Todos os nomes de marcas são marcas registadas dos respectivos fabricantes enunciados no texto.<br />
O nome <strong>Bluetooth</strong> e as marcas <strong>Bluetooth</strong> são propriedade da <strong>Bluetooth</strong> SIG, Inc., sendo utilizados pela <strong>Belkin</strong> Corporation sob licença.
P74186ea_F8T030_QIG.qxd 11-04-2003 08:52 Page 14<br />
belkin.com<br />
<strong>Belkin</strong> Corporation<br />
501 West Walnut Street<br />
Compton • CA • 90220 • USA<br />
Tel: +1 310.898.1100<br />
Fax: +1 310.898.1111<br />
<strong>Belkin</strong> Components, Ltd.<br />
Express Business Park • Shipton Way • Rushden<br />
NN10 6GL • United Kingdom<br />
Tel: +44 (0) 1933 35 2000<br />
Fax: +44 (0) 1933 31 2000<br />
<strong>Belkin</strong> Components B.V.<br />
Starparc Building • Boeing Avenue 333<br />
1119 PH Schiphol-Rijk • The Netherlands<br />
Tel: +31 (0) 20 654 7300<br />
Fax: +31 (0) 20 654 7349<br />
<strong>Belkin</strong> GmbH<br />
Hanebergstrasse 2<br />
80637 München • Germany<br />
Tel.: +49 (0) 89 143405 0<br />
Fax: +49 (0) 89 143405 100<br />
<strong>Belkin</strong> Tech Support<br />
US: +1 310.898.1100 ext. 2263<br />
+1 800.223.5546 ext. 2263<br />
Europe: 00 800 223 55 460<br />
Australia: 1800 666 040<br />
P74186ea<br />
© 2003 <strong>Belkin</strong> Corporation. All rights reserved. All trade names are registered trademarks of respective manufacturers listed.<br />
The <strong>Bluetooth</strong> name and the <strong>Bluetooth</strong> trademarks are owned by <strong>Bluetooth</strong> SIG, Inc., and are used by <strong>Belkin</strong> Corporation under license.