Owner's Manual - Ergomotion
Owner's Manual - Ergomotion
Owner's Manual - Ergomotion
Create successful ePaper yourself
Turn your PDF publications into a flip-book with our unique Google optimized e-Paper software.
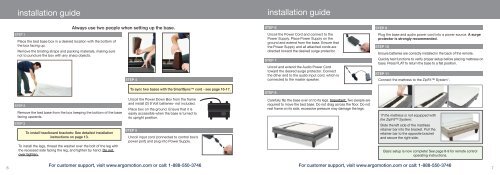
installation guide<br />
STEP 1<br />
Place the bed base box in a desired location with the bottom of<br />
the box facing up.<br />
Remove the binding straps and packing materials, making sure<br />
not to puncture the box with any sharp objects.<br />
STEP 2<br />
Remove the bed base from the box keeping the bottom of the base<br />
facing upwards.<br />
STEP 3<br />
To install headboard brackets: See detailed installation<br />
instructions on page 13.<br />
To install the legs, thread the washer over the bolt of the leg with<br />
the recessed side facing the leg, and tighten by hand. Do not<br />
over tighten.<br />
Always use two people when setting up the base.<br />
STEP 4<br />
To sync two bases with the SmartSync cord - see page 16-17.<br />
Uncoil the Power Down Box from the frame<br />
and install (2) 9 Volt batteries- not included.<br />
Place box on the ground. Ensure that it is<br />
easily accessible when the base is turned to<br />
its upright position.<br />
STEP 5<br />
Uncoil input cord (connected to control box’s<br />
power port) and plug into Power Supply.<br />
installation guide<br />
For customer support, visit www.ergomotion.com or call: 1-888-550-3746 For customer support, visit www.ergomotion.com or call: 1-888-550-3746<br />
6 7<br />
STEP 6<br />
Uncoil the Power Cord and connect to the<br />
Power Supply. Place Power Supply on the<br />
ground and extend from the base. Ensure that<br />
the Power Supply and all attached cords are<br />
directed toward the desired surge protector.<br />
STEP 7<br />
Uncoil and extend the Audio Power Cord<br />
toward the desired surge protector. Connect<br />
the other end to the audio input cord, which is<br />
connected to the master speaker.<br />
STEP 8<br />
Carefully flip the base over on to its legs. Important: Two people are<br />
required to move the bed base. Do not drag across the floor. Do not<br />
rest frame on its side, excessive pressure may damage the legs.<br />
STEP 9<br />
Plug the base and audio power cord into a power source. A surge<br />
protector is strongly recommended.<br />
STEP 10<br />
Ensure batteries are correctly installed in the back of the remote.<br />
Quickly test functions to verify proper setup before placing mattress on<br />
base. Press FLAT to return the base to a flat position.<br />
STEP 11<br />
Connect the mattress to the ZipFit System*.<br />
*If the mattress is not equipped with<br />
the ZipFit System:<br />
Slide the left side of the mattress<br />
retainer bar into the bracket. Pull the<br />
retainer bar to the opposite bracket<br />
and secure the right side.<br />
Basic setup is now complete! See page 8-9 for remote control<br />
operating instructions.


