Instruction Manual - Service - Black & Decker
Instruction Manual - Service - Black & Decker
Instruction Manual - Service - Black & Decker
You also want an ePaper? Increase the reach of your titles
YUMPU automatically turns print PDFs into web optimized ePapers that Google loves.
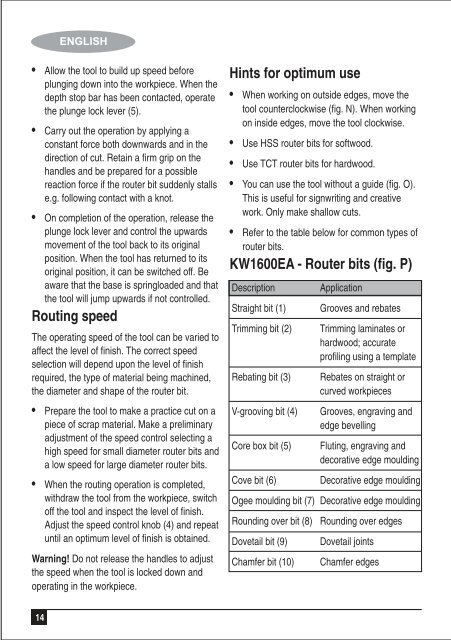
• Allow the tool to build up speed before<br />
plunging down into the workpiece. When the<br />
depth stop bar has been contacted, operate<br />
the plunge lock lever (5).<br />
• Carry out the operation by applying a<br />
constant force both downwards and in the<br />
direction of cut. Retain a firm grip on the<br />
handles and be prepared for a possible<br />
reaction force if the router bit suddenly stalls<br />
e.g. following contact with a knot.<br />
• On completion of the operation, release the<br />
plunge lock lever and control the upwards<br />
movement of the tool back to its original<br />
position. When the tool has returned to its<br />
original position, it can be switched off. Be<br />
aware that the base is springloaded and that<br />
the tool will jump upwards if not controlled.<br />
Routing speed<br />
The operating speed of the tool can be varied to<br />
affect the level of finish. The correct speed<br />
selection will depend upon the level of finish<br />
required, the type of material being machined,<br />
the diameter and shape of the router bit.<br />
• Prepare the tool to make a practice cut on a<br />
piece of scrap material. Make a preliminary<br />
adjustment of the speed control selecting a<br />
high speed for small diameter router bits and<br />
a low speed for large diameter router bits.<br />
• When the routing operation is completed,<br />
withdraw the tool from the workpiece, switch<br />
off the tool and inspect the level of finish.<br />
Adjust the speed control knob (4) and repeat<br />
until an optimum level of finish is obtained.<br />
Warning! Do not release the handles to adjust<br />
the speed when the tool is locked down and<br />
operating in the workpiece.<br />
14<br />
ENGLISH<br />
Hints for optimum use<br />
• When working on outside edges, move the<br />
tool counterclockwise (fig. N). When working<br />
on inside edges, move the tool clockwise.<br />
• Use HSS router bits for softwood.<br />
• Use TCT router bits for hardwood.<br />
• You can use the tool without a guide (fig. O).<br />
This is useful for signwriting and creative<br />
work. Only make shallow cuts.<br />
• Refer to the table below for common types of<br />
router bits.<br />
KW1600EA - Router bits (fig. P)<br />
Description Application<br />
Straight bit (1) Grooves and rebates<br />
Trimming bit (2) Trimming laminates or<br />
hardwood; accurate<br />
profiling using a template<br />
Rebating bit (3) Rebates on straight or<br />
curved workpieces<br />
V-grooving bit (4) Grooves, engraving and<br />
edge bevelling<br />
Core box bit (5) Fluting, engraving and<br />
decorative edge moulding<br />
Cove bit (6) Decorative edge moulding<br />
Ogee moulding bit (7) Decorative edge moulding<br />
Rounding over bit (8) Rounding over edges<br />
Dovetail bit (9) Dovetail joints<br />
Chamfer bit (10) Chamfer edges


