download - SpanSet GmbH & Co. KG
download - SpanSet GmbH & Co. KG
download - SpanSet GmbH & Co. KG

Create successful ePaper yourself
Turn your PDF publications into a flip-book with our unique Google optimized e-Paper software.
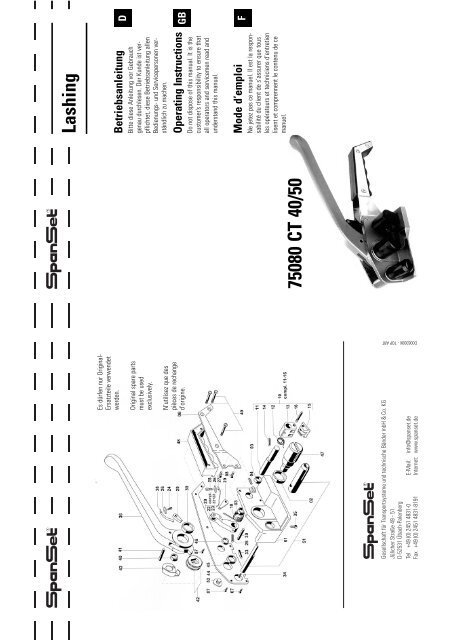
Lashing<br />
Es dürfen nur Original-<br />
Ersatzteile verwendet<br />
werden.<br />
D<br />
GB<br />
Betriebsanleitung<br />
Bitte diese Anleitung vor Gebrauch<br />
genau durchlesen. Der Kunde ist verpflichtet,<br />
diese Betriebsanleitung allen<br />
Bedienungs- und Servicepersonen verständlich<br />
zu machen.<br />
Operating Instructions<br />
Do not dispose of this manual. It is the<br />
customer’s responsibility to ensure that<br />
all operators and servicemen read and<br />
understand this manual.<br />
Original spare parts<br />
must be used<br />
exclusively.<br />
N’utilisez que des<br />
pièces de rechange<br />
d’origine.<br />
F<br />
Mode d’emploi<br />
Ne jetez pas ce manuel. Il est la responsabilité<br />
du client de s’assurer que tous<br />
les opérateurs et techniciens d’entretien<br />
lisent et comprennent le contenu de ce<br />
manuel.<br />
75080 CT 40/50<br />
D006309X - TOP ART<br />
Gesellschaft für Transportsysteme und technische Bänder mbH & <strong>Co</strong>. <strong>KG</strong><br />
Jülicher Straße 49 - 51<br />
D-52531 Übach-Palenberg<br />
Tel +49 (0) 2451 4831-0 E-Mail: info@spanset.de<br />
Fax +49 (0) 2451 4831-8191 Internet: www.spanset.de
D<br />
4. Insérer la feuillard dans les fentes du<br />
dispositif de coupe et du rouleau de tension.<br />
Tenir l’appareil de la main gauche et tendre<br />
la bande de la main droite en faisant aller et<br />
venir le levier tendeur.<br />
Tendeur 75080 CT 40/50<br />
Mode d’emploi<br />
1./2. Appuyer la bande autour le paquet.<br />
Insérer la bande dans la boucle. Tirer la<br />
bande à main.<br />
Einstellungen<br />
Vor Inbetriebnahme des Apparats prüfen, ob<br />
er auf die Dicke des verwendeten Bandes<br />
eingestellt ist.<br />
Sicherheitsvorschriften<br />
Der Spanner 75080 CT 40/50 wurde für eine<br />
sichere Handhabung während des Umreifens<br />
entwickelt und gebaut.<br />
D<br />
GB<br />
F<br />
5. Abaisser complètement le levier tendeur<br />
avec la main droite jusque la bande se<br />
coupe. Dégager l’appareil de côté.<br />
3. Prendre le tendeur de la main droite et<br />
appuyer sur le levier de tension. Dans cette<br />
position insérer le feuillard sous le presseur<br />
jusqu’à ce qu’elle touche l’arrêt du bâti.<br />
Rélâcher le levier.<br />
Fig. 1<br />
Band einlegen.<br />
Im gespannten Zustand Gewindestift<br />
(Fig. 1/1) bis zum Klinkenarm (Fig. 1/2)<br />
eindrehen.<br />
Wenn das Band rutscht, muss der<br />
Gewindestift 1/4 - 1/2 Umdrehungen<br />
zurückgedreht werden.<br />
1. Vor dem Gebrauch des Spanners 75080 CT<br />
40/50 die Betriebsanleitung lesen.<br />
GB<br />
2. Beim Arbeiten Augen-, Gesichts- und<br />
Handschutz (schnittfeste Handschuhe)<br />
tragen.<br />
F<br />
3. Beim Umreifen Hand oder andere<br />
Körperteile nicht zwischen Band und Packgut<br />
legen.<br />
4. Beim Durchschneiden des Bandes den<br />
oberen Teil festhalten und abseits stehen.<br />
Achtung: Der untere Bandteil wird aufspringen!<br />
5. Beim Spannen kann das Band reißen.<br />
Nicht in der Flucht des Bandes stehen.<br />
6. Es dürfen nur Original-Ersatzteile verwendet<br />
werden. Die Verwendung von anderen<br />
Ersatzteilen schließt Garantieleistungen und<br />
Haftpflicht aus.<br />
Instruction de’entretien<br />
Huiler périodiquement les pièces articlées<br />
(huile pour machine).<br />
Nettoyer journellement cliquet des souilleures<br />
déchets.
D<br />
4. Insert the upper strap into the slot of the<br />
cutter mechanism and the windlass. Hold the<br />
tool and strap with your left hand and move<br />
the tension lever forth and back until the<br />
strap is tensioned.<br />
Tensioner 75080 CT 40/50<br />
Operation Instructions<br />
1./2. Put strap around the package. Insert<br />
strap into the buckle and tighten strap by<br />
hand.<br />
Adjustments<br />
Before setting the tool into operation, make<br />
sure that the tool has been adjusted to the<br />
correct thickness of strapping in use.<br />
Safety Instructions<br />
This tool was designed and manufactured for<br />
safe handling during the strapping operation.<br />
D<br />
GB<br />
1. Before using the tool read the operating<br />
instructions.<br />
Fig. 1<br />
Insert the strap and tension it<br />
In tensioned condition turn set screw<br />
(Fig. 1/1) up to the clamp frame<br />
If the strap slips, the threaded pin must<br />
loosened 1/4 - 1/2 rotation<br />
GB<br />
F<br />
5. Depress the tension lever from the tensioner<br />
completely until the strap is cut. Pivot<br />
the tensioner away from the strap.<br />
3. Take the tensioner by the right hand and<br />
depress tension lever. Place strap under the<br />
gripper so that it touches the housing with<br />
the right hand edge. Release tension lever.<br />
2. When operating the tool, wear eye-, faceand<br />
hand-protection (Cutting protected gloves).<br />
F<br />
3. Do not put hand or other body parts<br />
between strap and package.<br />
4. When cutting the strap, hold the upper<br />
portion and stay safely away.<br />
Caution: The lower strap will snap forward.<br />
5. Do not stand in line with the strap while it<br />
is tensioned. The strap could break!<br />
6. Original spare parts must be used exclusively.<br />
Not using original spare parts will dissolve<br />
the warranty and the limited liability.<br />
Maintenance Instructions<br />
Periodically lubricate all moving parts with<br />
drops of light machine oil.<br />
Daily clean clamp of any dirt or strap residue.
D<br />
4. Das obere Band in den Schlitz der<br />
Schneidevorrichtung und in die Anzugswelle<br />
einschieben. Apparat und Band mit der linken<br />
Hand festhalten. Durch Hin- und Herbewegen<br />
des Spannhebels mit der rechten<br />
Hand Band spannen.<br />
Spanner 75080 CT 40/50<br />
Bedienungsanleitung<br />
1./2. Band um das Packgut legen, in Schnalle<br />
einfädeln und Band von Hand anziehen.<br />
Reglages<br />
Avant de travailler avec l’appareil il faut examiner<br />
si l’appareil est ajusté sur l’épaisseur<br />
de la feuillard utilisé.<br />
Instructions de sécurité<br />
Cet appareil a été conçu et construit pour<br />
assurer toute sécurité pendant le cerclage.<br />
D<br />
GB<br />
3. Spanner in die rechte Hand nehmen,<br />
Spannelement niederdrücken. Band unter<br />
den Klinkenfuß bis zum Anschlag einlegen.<br />
Spannhebel loslassen.<br />
1. Avant l’utilisation de l’appareil consultez<br />
le mode d’emploi.<br />
F<br />
5. Spannhebel mit der rechten Hand ganz<br />
hinunterdrücken, bis das Band abgeschnitten<br />
ist. Apparat seitlich ausfahren.<br />
Fig. 1<br />
Insertion et tendre la bande.<br />
En état tendu il faut tourner le goujon<br />
fileté (Fig. 1/1) jusqu’à la butée de branche<br />
à cliquets (Fig. 1/2).<br />
Si la bande glisse sous la plaque dentée,<br />
dévisser le goujon fileté 1/4 - 1/2 rotation.<br />
GB<br />
2. Pendant le travail, portez des protections<br />
pour les yeux, le visage et les mains (gants<br />
de sûreté).<br />
F<br />
3. Ne mettez pas la main ou d’autres parties<br />
du cords entre le feuillard et l’emballage.<br />
4. En coupant le feuillard, restez à côté et<br />
retenez bien le brin supérieur du feuillard.<br />
Attention: Soyez prudent, le brin inférieur<br />
sautera en avant.<br />
5. Ne restez jamais en ligne de la bande<br />
quand celle-ci est tendue, car la bande peut<br />
se casser quand elle est tendue.<br />
6. N’utilisez que des pièces de rechange<br />
d’origine. En cas contraire peut refuser les<br />
prestations de garantie.<br />
Wartungsanleitung<br />
Periodisch alle beweglichen Teile mit leichtem<br />
Maschinenöl schmieren.<br />
Täglich den Klinkenfuß von Schmutz und<br />
Bandresten reinigen.