
Create successful ePaper yourself
Turn your PDF publications into a flip-book with our unique Google optimized e-Paper software.
D Bedienungsanleitung Brotbackautomat<br />
GB Instruction Manual Automatic Bread Maker<br />
F Mode d’emploi de la machine à pain<br />
I Istruzioni per l’uso della macchina del pane<br />
CZ Návod k použití Domácí pekárna<br />
<strong>BHG</strong> <strong>395</strong>
<strong>BHG</strong> <strong>395</strong><br />
D<br />
Inhalt<br />
Wichtige Sicherheitshinweise ............... 6<br />
Hinweise zum Bedienfeld.................... 7<br />
Warmhaltefunktion.......................... 9<br />
Speicherfunktion............................ 9<br />
Zeitphasen-Tabelle.......................... 10<br />
Sperre des Bedienfelds...................... 11<br />
Umgebung.................................. 11<br />
Warnhinweise ............................... 11<br />
So backen Sie Brot........................... 11<br />
Spezielle Einweisung ........................ 12<br />
Reinigung und Pflege ....................... 13<br />
Kleine Lebensmittelkunde .................. 14<br />
Fehlerbehebung............................. 16<br />
Rezepte...................................... 19<br />
Garantie ..................................... 22<br />
F<br />
TABLE DES MATIERES<br />
Consignes de sécurité importantes ......... 40<br />
Remarques sur le panneau de commande.... 41<br />
Fonction de maintien au chaud ............. 43<br />
Fonction memoire .......................... 43<br />
Tableau des phases.......................... 44<br />
Blocage du panneau de commande ........ 45<br />
Environnement . . . . . . . . . . . . . . . . . . . . . . . . . . . . . 45<br />
Avertissement............................... 45<br />
Voila comment faire cuire faire .............. 45<br />
Consignes speciales ......................... 46<br />
Nettoyage et entretien ...................... 47<br />
Petite introduction aux aliments ............ 47<br />
Reparation des defaillances ................. 50<br />
Recettes ..................................... 53<br />
Garantie ..................................... 56<br />
GB<br />
Contents<br />
Important safeguards. . . . . . . . . . . . . . . . . . . . . . . 23<br />
Control Panel Guide......................... 24<br />
Keep warm .................................. 26<br />
Memory ..................................... 26<br />
Time setting table........................... 27<br />
Control panel lock function.................. 28<br />
Environment................................. 28<br />
Warning display. . . . . . . . . . . . . . . . . . . . . . . . . . . . . 28<br />
How to make bread.......................... 28<br />
Special introduction......................... 29<br />
Cleaning and maintenance.................. 30<br />
A little fool science .......................... 31<br />
Troubleshooting guide...................... 33<br />
Recipes - Appropriate for the programs..... 36<br />
Guarantee................................... 39<br />
I<br />
Contenuto<br />
Avvertenze importanti per la sicurezza ..... 57<br />
Indicazioni per il pannello comandi ......... 58<br />
Funzione di mantenimento in caldo ........ 60<br />
Funzione di memoria........................ 60<br />
Tabella con le fasi di tempo ................. 61<br />
Blocco del pannello comandi ............... 62<br />
Ambiente.................................... 62<br />
Avvertenze di pericolo ...................... 62<br />
Così si fa il pane ............................. 62<br />
Funzioni speciali............................. 63<br />
Pulizia e manutenzione ..................... 64<br />
Piccolo manuale di cucina ................... 64<br />
Risoluzione dei problemi.................... 67<br />
Ricette....................................... 70<br />
Garanzia..................................... 73<br />
CZ<br />
Obsah<br />
Důležité bezpečnostní pokyny.............. 74<br />
Pokyny k ovládacímu panelu................ 75<br />
Funkce udržování teploty.................... 77<br />
Paměťová funkce............................ 77<br />
Tabulka časového rozvržení jednotlivých fázi... 78<br />
Zablokování ovládacího panelu............. 79<br />
Prostředí..................................... 79<br />
Výstražná doporučení....................... 79<br />
Chléb upečete následujícím způsobem..... 79<br />
Speciální instrukce........................... 80<br />
Čištění a údržba.............................. 81<br />
Potraviny .................................... 81<br />
Odstranění problémů. . . . . . . . . . . . . . . . . . . . . . . 84<br />
Recepty...................................... 87<br />
Zárucní list................................... 90<br />
3
<strong>BHG</strong> <strong>395</strong><br />
<strong>BHG</strong> <strong>395</strong><br />
1<br />
2<br />
3<br />
4<br />
D<br />
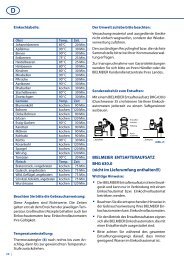
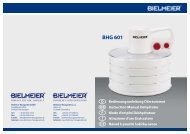
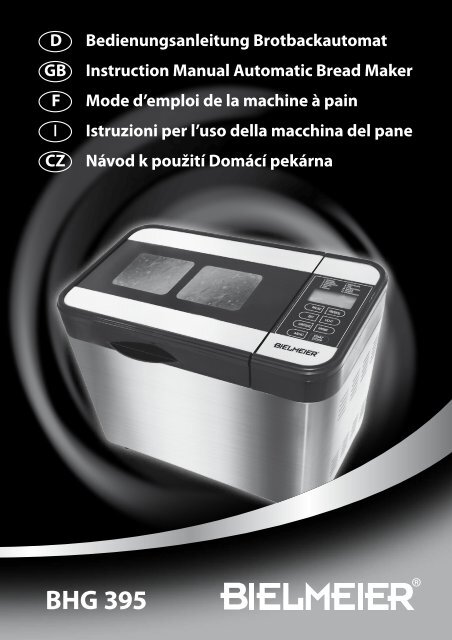
1 Griff<br />
2 Deckel<br />
3 Sichtfenster<br />
4 Bedienfeld<br />
5 Gehäuse<br />
6 Backform<br />
7 Knethaken für Backform<br />
8 Doppelbackform<br />
9 Knethaken für Doppelbackform<br />
10 Messbecher<br />
11 Messlöffel<br />
12 Knethakenentferner<br />
13 Teigschaber<br />
Änderungen vorbehalten.<br />
I<br />
1 Manico<br />
2 Coperchio<br />
3 Oblò<br />
4 Pannello comandi<br />
5 Corpo macchina<br />
6 Recipiente pane<br />
7 Lame impastatrici recipiente<br />
8 Recipiente pane a due scomparti<br />
9 Lame impastatrici recipiente a due<br />
scomparti<br />
10 Tazza graduata<br />
11 Misurino<br />
12 Gancio di estrazione lame<br />
13 Spatola<br />
Il prodotto può essere soggetto a modifiche.<br />
D<br />
GB<br />
Technische Daten:<br />
• Anschlusswert: 230 V ~ 50 Hz / 815 W<br />
• Maße (H x B x T): 305 x 400 x 255 mm<br />
• Gewicht (brutto/netto): 11,2 kg / 8,8 kg<br />
Technical Details:<br />
• Connected load: 230 V ~ 50 Hz / 815 W<br />
• Measurements (h x w x d): <br />
305 x 400 x 255 mm<br />
• Weight (gross/net): 11,2 kg / 8,8 kg<br />
5<br />
6<br />
7<br />
8<br />
9<br />
10<br />
11<br />
12<br />
13<br />
GB 1 Handle<br />
2 Lid<br />
3 View Windows<br />
4 Control Panel<br />
5 Housing<br />
6 Bread Pan<br />
7 Kneading Blades<br />
8 Double Bread Pan<br />
9 Kneading Blades for Double Pan<br />
10 Measuring Cup<br />
11 Measuring Spoon<br />
12 Hook<br />
13 Dough Scraper<br />
F<br />
Product may be subject to change.<br />
1 Poignée<br />
2 Couvercle<br />
3 Lucarnes<br />
4 Panneau de commande<br />
5 Boîtier<br />
6 Moule à pain<br />
7 Crochets de pétrissage<br />
8 Moule double<br />
9 Crochets de pétrissagem<br />
10 Verre gradué<br />
11 Mesurette<br />
12 Retire-crochets<br />
13 Spatule<br />
CZ 1 Úchyt<br />
2 Víko<br />
3 Průhledové okénko<br />
4 Ovládací panel<br />
5 Kryt<br />
6 Velká forma na pečení<br />
7 Hnětací hák pro velkou formu<br />
8 Dělená forma na pečení<br />
9 Hnětací hák pro dělenou formu<br />
10 Velká odměrka<br />
11 Malá odměrka<br />
12 Háček na odstranění hnětače<br />
13 Stěrka<br />
Změny vyhrazeny.<br />
F<br />
I<br />
CZ<br />
DONNÉES TECHNIQUES :<br />
• Alimentation: 230 V ~ 50 Hz / 815 W<br />
• Dimensions (H x L x P): 305 x 400 x 255 mm<br />
• Poids (brut/net): 11,2 kg / 8,8 kg<br />
DATI TECNICI:<br />
• Tipologia di connessione:<br />
230 V ~ 50 Hz / 815 W<br />
• Dimensioni (A x L x P): 305 x 400 x 255 mm<br />
• Peso (lordo/netto): 11,2 kg / 8,8 kg<br />
TECHNICKE UDAJE:<br />
• Připojení: 230 V ~ 50 Hz / 815 W<br />
• Rozměry (v x š x h): 305 x 400 x 255 mm<br />
• Hmotnost (brutto/netto) 11,2 kg / 8,8 kg<br />
4<br />
Sous réserve de modification.<br />
5
D<br />
D<br />
6<br />
Wichtig!<br />
Bitte lesen Sie die Gebrauchsanweisung<br />
vor der inbetriebnahme sorgfältig<br />
durch und bewahren Sie diese auf.<br />
Sicherheitshinweise<br />
Beim Gebrauch von Elektrogeräten sind zum<br />
Schutz gegen elektrischen Schlag, Verletzungsund<br />
Brandgefahr folgende grundsätzliche Sicherheitsmaßnahmen<br />
zu beachten.<br />
• Dieses Gerät ist nur für den hauswirtschaftlichen<br />
Gebrauch und nicht für den gewerblichen<br />
Einsatz geeignet.<br />
• Überprüfen Sie vor Anschluss an die Stromversorgung,<br />
ob die Netzspannung mit der Angabe<br />
des Typenschildes auf dem Gerät übereinstimmt.<br />
• Dieses Gerät ist mit einem Schutzkontaktstecker<br />
ausgestattet und darf nur an eine<br />
vorschriftsmäßig installierte Schutzkontaktsteckdose<br />
angeschlossen werden.<br />
• Nutzen Sie das Gerät nur bestimmungsgemäß.<br />
• Nutzen Sie das Gerät nicht im Freien.<br />
• Das Gerät darf nicht mehr benutzt werden,<br />
wenn:<br />
– dessen Netzanschlussleitung oder<br />
Stecker beschädigt ist,<br />
– das Gerät nicht einwandfrei funktioniert,<br />
– es heruntergefallen ist,<br />
– es irgendwelche Beschädigungen<br />
aufweist.<br />
In diesen Fällen muss das Gerät dem Hersteller<br />
oder seinem Kundendienst zur Über prüfung,<br />
Reparatur oder Neueinstellung zurückgeschickt<br />
werden.<br />
• Verwenden Sie nur das vom Hersteller empfohlene<br />
Zubehör. Die Benutzung von anderen<br />
Zubehörteilen kann Beschädigungen am Gerät<br />
oder gar Verletzungen verursachen.<br />
• Starten Sie das Gerät niemals, solange die Backform<br />
nicht korrekt eingesetzt und mit den notwendigen<br />
Zutaten gefüllt ist.<br />
• Schlagen Sie niemals auf die Ecken oder die<br />
Oberseite der Backform, um das Brot zu entnehmen.<br />
Dies kann zur Beschädigung der Form<br />
führen.<br />
• Um einen elektrischen Schlag zu vermeiden,<br />
tauchen Sie niemals das Kabel, den Stecker<br />
oder das Gehäuse in Wasser oder andere<br />
Flüssigkeiten.<br />
• Ziehen Sie nach jedem Gebrauch den Netzstecker.<br />
Ebenso bevor Sie Zubehör anbringen<br />
oder entfernen und ehe Sie es reinigen.<br />
• Stoppen Sie alle laufenden Programme, bevor<br />
Sie den Netzstecker aus der Steckdose ziehen.<br />
• Achten Sie darauf, dass das Anschlusskabel<br />
nicht von Tisch oder Arbeitsplatte herunterhängt.<br />
Schützen Sie das Kabel vor heißen Flächen.<br />
• Stellen Sie das Gerät nicht auf oder in die Nähe<br />
eines heißen Gas- oder Elektrokochers oder in<br />
einen aufgeheizten Backofen.<br />
• Bringen Sie niemals Metallfolien oder andere<br />
Materialien in den Brotbackautomaten ein. Sie<br />
bergen das Risiko von Brand oder Kurzschluss.<br />
• Stellen Sie sicher, dass das Gerät nicht mit leicht<br />
entzündlichem Material (z. B. Vorhänge, Textilien,<br />
Wände, u. ä.) in Berührung kommt oder<br />
bedeckt wird. Können Hitze und Dampf des<br />
Backautomaten nicht frei abziehen, stellt dies<br />
eine Brand gefahr dar.<br />
• Das Gerät erhitzt sich während des Betriebes.<br />
Berühren Sie daher keine heißen Oberflächen,<br />
benutzen Sie nur Griffe und Schalter.<br />
• Berühren Sie niemals rotierende Teile.<br />
• Transportieren Sie das Gerät nicht, wenn es<br />
heiße Flüssigkeiten (z. B. Marmelade) enthält.<br />
• Das Gerät ist nicht für die Benutzung durch Personen<br />
mit eingeschränkter geistiger / physi scher<br />
Fähigkeit oder Kinder vorgesehen. Sie erkennen<br />
die Gefahr nicht, die beim Umgang mit elektrischen<br />
Geräten entstehen kann. Deshalb lassen<br />
Sie nie Kinder unbeaufsichtigt mit dem Elektrogerät<br />
hantieren. Lassen Sie in Gegenwart von<br />
Kindern besondere Sorgfalt walten.<br />
• Kinder sollten immer beaufsichtigt werden,<br />
um sicher zu stellen, dass sie das Gerät nicht<br />
als Spielzeug benutzen.<br />
Vor dem ersten Gebrauch<br />
1. Bitte überprüfen Sie, ob alle Teile und das<br />
Zubehör vollständig und schadenfrei sind.<br />
2. Reinigen Sie alle Teile wie im Abschnitt<br />
„Reinigung und Pflege“ angegeben.<br />
3. Stellen Sie den BACKEN-Modus ein und backen<br />
Sie ohne Inhalt etwa 10 Minu ten. Lassen Sie<br />
das Gerät abkühlen, entfernen die Teile und<br />
reinigen Sie die Teile erneut.<br />
4. Trocknen Sie alle Teile gut ab und bauen diese<br />
wieder zusammen. Das Gerät ist nun zur<br />
Nutzung bereit.<br />
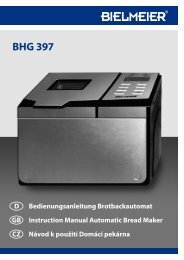
Hinweise zum Bedienfeld *<br />
14<br />
15<br />
16<br />
17<br />
18<br />
1. Normal<br />
2. Vollkorn<br />
3. Französisch<br />
4. Schnell<br />
5. SÜSS<br />
6. Kuchen<br />
Kneten 1 AUFGEHEN 1 KneTEN 2 AUFGEHEN 2<br />
AUFGEHEN 3 BaCkeN WarmHALTEN<br />
1000g 1200g 1400g<br />
PAUSE<br />
ZEIT<br />
GRÖSSE<br />
MENÜ<br />
14 wählbare Programme<br />
15 Programmabschnitt<br />
16 Tastensperre<br />
17 gewähltes Programm<br />
7. Marmelade<br />
8. Teig<br />
9. Ultraschnell<br />
10. Backen<br />
11. Dessert<br />
12. Hausgemacht<br />
HELL MITTEL DUNKEL<br />
PROZESS<br />
LICHT<br />
FARBE<br />
START<br />
STOPP<br />
19<br />
20<br />
18 Brotgröße<br />
19 Programmdauer<br />
20 Bräunungsgrad<br />
* Der Hersteller behält sich vor, Änderungen am Bedienfeld<br />
ohne vorherige Ankündigung zu unternehmen.<br />
Nach dem Anschluss an das<br />
Stromnetz<br />
Sobald Sie das Gerät mit der Stromversorgung<br />
verbinden, ertönt ein Piepton und „1 2:55, 1200 g,<br />
MITTEL” erscheint auf dem Display. Jedoch blinkt<br />
der Doppelpunkt zwischen den Ziffern „2” und<br />
„55” (19) nicht.<br />
Die Ziffer „1” zeigt das voreingestellte Programm<br />
(17) an. Das Gewicht von „1200 g” (18) und die<br />
Bräunungsstufe „MITTEL” (20) sind die ab Werk<br />
eingestellten Vorgaben.<br />
START / STOPP<br />
Anhand dieser Taste wird das gewählte Backprogramm<br />
an- oder ausgeschaltet. Um das Programm<br />
zu starten, halten Sie die START / STOPP-<br />
Taste bitte 1,5 Sekunden lang gedrückt. Ein kurzer<br />
Piepton ist zu hören und die beiden Punkte der<br />
Zeitanzeige beginnen zu blinken – das Programm<br />
startet.<br />
Nach dem Programmstart sind keine anderen<br />
Tasten außer der START / STOPP-, LICHT- und<br />
PAUSE-Taste betriebsbereit.<br />
Halten Sie, um das Programm wieder zu stoppen,<br />
die START / STOPP-Taste etwa 1,5 Sekunden lang<br />
gedrückt. Es ertönt ein Piepton der bestätigt, dass<br />
das Programm abgeschaltet ist. Diese Funktion<br />
sorgt dafür, eine ungewollte Unterbrechung des<br />
Backvorganges zu vermeiden.<br />
MENÜ<br />
Wählen Sie das gewünschte Programm durch<br />
Drücken der MENÜ-Taste. Nach jedem Tastendruck<br />
(begleitet von einem akustischen Signal) ändert<br />
sich die Programmanzeige (17). Die Funktionen der<br />
12 verschiedenen Programme (14) werden nachfolgend<br />
erklärt.<br />
1. Normal: Einfaches Kneten, Aufgehen lassen<br />
und Backen von normalem Brot. Geben Sie Zutaten<br />
zur Geschmacksverbesserung bei.<br />
2. Vollkorn: Kneten, Aufgehen lassen und<br />
Backen von Brot aus Vollkornmehl. Es ist nicht<br />
ratsam die Funktion der Zeitverzögerung zu nutzen,<br />
da das Ergebnis nicht allzu gut ist.<br />
3. Französisch: Kneten, Aufgehen lassen und<br />
Backen von Brot mit verlängerter Gehzeit. Das<br />
Brot hat eine knusprige Kruste und eine luftige<br />
Struktur.<br />
7
D<br />
D<br />
8<br />
4. Schnell: Kneten, Aufgehen lassen und<br />
Backen von Brot in kürzerer Zeit als das NORMAL<br />
-Programm. Das fertige Brot ist normalerweise<br />
kleiner und dichter als das normale Brot.<br />
5. Süss: Kneten, Aufgehen lassen und Backen von<br />
süßem Gebäck. Sie können Zutaten hinzufügen,<br />
um das Aroma zu verbessern.<br />
6. Kuchen: Kneten, Aufgehen lassen und Backen.<br />
Die Gehphase wird von Backpulver oder Soda<br />
unterstützt.<br />
7. Marmelade: Kochen von Marmelade und<br />
Konfitüre unter ständigem Rühren. Obst oder<br />
Gemüse muss zerkleinert werden, ehe es in die<br />
Backform hinein gegeben wird.<br />
8. Teig: Kneten und Aufgehen lassen ohne Backvorgang.<br />
Entnehmen Sie den Teig und nutzen Sie<br />
ihn zur Herstellung von Pizza, Brötchen, Dampfnudeln<br />
usw.<br />
9. Ultraschnell: Kneten, Aufgehen lassen und<br />
Backen in kürzester Zeit. Das erzeugte Brot ist von<br />
dichter Beschaffenheit.<br />
10. Backen: Nur Backen, ohne Kneten oder Aufgehen<br />
lassen. Nutzen Sie diese Funktion auch<br />
zur Verlängerung der Backzeit von anderen Programmen.<br />
Die Backzeit stellen Sie durch Drücken der ZEIT-<br />
Taste ein. Halten Sie diese gedrückt, läuft die Zeit<br />
schneller ab.<br />
11. Dessert: Kneten, Aufgehen lassen und<br />
Backen von Nachspeisen.<br />
12. Hausgemacht: Hier können Sie Ihr eigenes<br />
Programm eingeben, indem Sie selbst die<br />
Zeit für jeden Schritt bestimmen. Sie können die<br />
unten angegebenen Zeiten für Kneten, Aufgehen<br />
lassen, Backen und Warmhalten einstellen,<br />
um Ihr persönliches Lieblingsbrot zu kreieren.<br />
Der Zeit bereich liegt bei jedem Programm abschnitt<br />
(15) wie folgt:<br />
KNETEN 1<br />
AUFGEHEN 1<br />
KNETEN 2<br />
AUFGEHEN 2<br />
AUFGEHEN 3<br />
BACKEN<br />
WARMHALTEN<br />
6 – 14 Minuten<br />
20 – 60 Minuten<br />
5 – 20 Minuten<br />
5 – 120 Minuten<br />
0 – 120 Minuten<br />
0 – 80 Minuten<br />
0 – 60 Minuten<br />
Im Menü HAUSGEMACHT:<br />
1. Drücken Sie die PROZESS-Taste einmal. Es erscheint<br />
KNETEN 1 (15) auf der LCD-Anzeige.<br />
Betätigen Sie anschließend die ZEIT-Taste, um<br />
die Zeit (19) in Minuten einzugeben. Die Zeit<br />
läuft schneller ab wenn Sie die ZEIT-Taste gedrückt<br />
halten. Drücken Sie die PROZESS-Taste,<br />
um Ihre Wahl für den ersten Schritt zu bestätigen.<br />
2. Betätigen Sie die PROZESS-Taste, um zum<br />
nächsten Schritt zu gelangen. AUFGEHEN 1<br />
(15) erscheint auf der LCD Anzeige. Drücken<br />
Sie die ZEIT- Taste, um die Zeit (19) einzustellen<br />
und bestätigen Sie Ihre Wahl durch erneutes<br />
Drücken der PROZESS-Taste.<br />
3. Auf diese Weise stellen Sie bitte die verbliebenen<br />
Schritte ein. Drücken Sie START / STOPP, um<br />
den Programmiermodus zu verlassen.<br />
4. Betätigen Sie die START / STOPP-Taste erneut,<br />
um das Programm zu starten.<br />
Hinweis: Die Einstellung wird für den nächsten<br />
Gebrauch gespeichert.<br />
FARBE<br />
Wählen Sie anhand dieser Taste den gewünschten<br />
Bräunungsgrad der Brotkruste: HELL, MITTEL<br />
oder DUNKEL (20).<br />
GRÖSSE<br />
Drücken Sie diese Taste, um das Gewicht des Brotes<br />
einzustellen: 1000 g, 1200 g oder 1400 g. Ihre Wahl<br />
wird auf dem Display (18) angezeigt. Bitte beachten<br />
Sie, dass die Backzeit je nach Brotgewicht<br />
variiert.<br />
Brotbackmischungen für 750 g-Brote<br />
Wenn Sie diese Brotbackmischungen verwenden,<br />
stellen Sie 1000 g (18) bei dem Brotbackautomaten<br />
ein. Mit dieser Einstellung gelingen<br />
Ihre Brote sicherlich!<br />
Sollte Ihr Brot etwas zu dunkel werden, verringern<br />
Sie den Bräunungsgrad oder stoppen Sie<br />
das Programm ca. 5 – 10 Minuten vor Programmende<br />
durch Drücken der START / STOPP- Taste.<br />
Tipps & Tricks<br />
Tipps & Tricks<br />
Die GRÖSSE kann nur für folgende Programme<br />
gewählt werden: 1. NORMAL, 2. VOLLKORN, 3. FRAN-<br />
ZÖSISCH, 4. SCHNELL, 5. SÜSS und 9. ULTRA SCHNELL.<br />
Gewichtseinstellung 1400 g<br />
Bitte testen Sie sich langsam an diese Füll menge<br />
heran! Beginnen Sie Ihr Brotrezept bei einer Gesamtmenge<br />
von 1200 g zu testen.<br />
Durch die Aufgehphasen besteht vor allem<br />
bei stark aufgehenden Teigen (z. B. Weißbrot,<br />
süßes Brot) die Gefahr, dass der Teig über die<br />
Form läuft.<br />
Ist nach dem Backen noch Platz in der Form,<br />
können Sie die Menge schrittweise er höhen.<br />
Vielen Dank für Ihr Verständnis!<br />
LICHT<br />
Wird diese Taste einmal betätigt, schaltet sich die<br />
Beleuchtung ein. Dies ist zweckmäßig zur Überprüfung<br />
des Backvorgangs.<br />
Ein erneuter Tastendruck innerhalb einer Minute<br />
führt zum Erlöschen der Beleuchtung. Wird die Taste<br />
innerhalb einer Minute nicht betätigt, schaltet<br />
sich die Beleuchtung automatisch aus.<br />
ZEIT<br />
Wenn Sie wünschen, dass das Gerät nicht sofort mit<br />
dem Backen beginnt, können Sie mithilfe dieser<br />
Taste die gewünschte Zeitverzögerung eingeben.<br />
So stellen Sie die Zeitverzögerung ein:<br />
1. Wählen Sie das gewünschte Programm (17), das<br />
Brotgewicht (18) und die Bräunung (20).<br />
2. Wählen Sie die Verzögerung aus, indem Sie die<br />
ZEIT-Taste betätigen. Die Zeitangabe am Display<br />
(19) schließt die Laufzeit des gewählten<br />
Programmes ein.<br />
Nehmen wir an, es ist nun 20:30 Uhr und Sie<br />
wünschen, dass Ihr Brot morgens, um 7 Uhr<br />
fertig gebacken ist. In diesem Fall beträgt<br />
die Gesamtzeit 10 Stunden und 30 Minuten.<br />
Drücken Sie die ZEIT-Taste bis 10:30 auf dem<br />
Display (19) erscheint. Die Zeitzunahme erfolgt<br />
in 10 Minuten Schritten.<br />
3. Drücken Sie die START / STOPP-Taste, um das<br />
zeitverzögerte Programm zu starten. Der Dop-<br />
pelpunkt der Zeitanzeige beginnt zu blinken.<br />
Die ablaufende, restliche Zeit wird angezeigt.<br />
Beachten Sie bitte, dass die maximale Zeitverzögerung<br />
13 Stunden beträgt. Nutzen Sie keine<br />
verderblichen Zutaten wie Eier, frische Milch,<br />
Früchte oder Zwiebeln im Verzögerungsmodus.<br />
PROZESS<br />
Mithilfe dieser Taste stellen Sie im Menü 12 (HAUS-<br />
GEMACHT) Ihr persönliches Backprogramm ein.<br />
PAUSE<br />
Nach dem Beginn des Programms kann der Betrieb<br />
mittels der PAUSE-Taste jederzeit unterbrochen<br />
werden. Drücken Sie die Taste für ca. 1,5 Sekunden<br />
– das Programm wird unterbrochen, die Einstellungen<br />
bleiben jedoch gespeichert. Die restliche<br />
Betriebszeit wird blinkend auf dem Display<br />
angezeigt.<br />
Das Programm wird fortgesetzt sobald die PAUSE-<br />
Taste erneut betätigt wird.<br />
Warmhaltefunktion<br />
Das Brot kann automatisch bis zu einer Stunde<br />
nach dem Backen warm gehalten werden (15).<br />
Wenn Sie das Brot während des Warmhaltens herausnehmen<br />
wollen, schalten Sie das Programm<br />
mittels der START / STOPP-Taste aus.<br />
Speicherfunktion<br />
Wenn die Stromversorgung während der Brotherstellung<br />
unterbrochen wird, kann der Vorgang<br />
auto matisch innerhalb von 10 Minuten fortgesetzt<br />
werden, auch ohne dass Sie die START / STOPP-<br />
Taste betätigen.<br />
Wenn die Unterbrechung mehr als 10 Minuten<br />
beträgt, kann der Automat das Programm nicht<br />
speichern. Entnehmen Sie die Zutaten aus der<br />
Backform, entsorgen diese und geben neue<br />
Zutaten hinein. Starten Sie den Automaten neu.<br />
War der Teig bei Stromausfall erst in der Knetphase<br />
und hat die Aufgehphase noch nicht erreicht,<br />
können Sie den START / STOPP-Knopf erneut<br />
drücken und das Programm von vorne starten.<br />
9
D<br />
D<br />
10<br />
zeitphasen-Tabelle<br />
Programm-Nr.<br />
Einstellungen<br />
GRÖSSE<br />
Einstellungen<br />
FARBE<br />
KNETEN 1<br />
AUFGEHEN 1<br />
KNETEN 2<br />
AUFGEHEN 2<br />
AUFGEHEN 3<br />
BACKEN<br />
Gesamtzeit des<br />
Programms<br />
Signal um Zutaten<br />
hinzuzugeben bei<br />
1 1400 g HELL, 10 Min. 20 Min. 15 Min. 25 Min. 45 Min. 65 Min. 3:00 2:20<br />
1200 g MITTEL, 10 Min. 20 Min. 15 Min. 25 Min. 45 Min. 60 Min. 2:55 2:15 ✓<br />
1000 g DUNKEL 10 Min. 20 Min. 12 Min. 25 Min. 48 Min. 55 Min. 2:50 2:13<br />
2 1400 g HELL, 10 Min. 25 Min. 20 Min. 35 Min. 65 Min. 65 Min. 3:40 2:55<br />
1200 g MITTEL, 8 Min. 25 Min. 18 Min. 35 Min. 65 Min. 60 Min. 3:32 2:50 ✓<br />
1000 g DUNKEL 8 Min. 25 Min. 16 Min. 35 Min. 70 Min. 55 Min. 3:30 2:50<br />
3 1400 g HELL, 18 Min. 40 Min. 22 Min. 30 Min. 50 Min. 70 Min. 3:50 2:40<br />
1200 g MITTEL, 16 Min. 40 Min. 19 Min. 30 Min. 50 Min. 65 Min. 3:40 2:35 ✓<br />
1000 g DUNKEL 13 Min. 40 Min. 17 Min. 30 Min. 50 Min. 60 Min. 3:30 2:30<br />
4 1400 g HELL, 10 Min. 10 Min. 10 Min. — 30 Min. 70 Min. 2:10 1:45<br />
1200 g MITTEL, 10 Min. 10 Min. 10 Min. — 30 Min. 65 Min. 2:05 1:40 ✓<br />
1000 g DUNKEL 10 Min. 10 Min. 10 Min. — 30 Min. 60 Min. 2:00 1:35<br />
5 1400 g HELL, 10 Min. 5 Min. 20 Min. 33 Min. 40 Min. 62 Min. 2:50 2:25<br />
1200 g MITTEL, 10 Min. 5 Min. 20 Min. 32 Min. 40 Min. 58 Min. 2:45 2:20 ✓<br />
1000 g DUNKEL 10 Min. 5 Min. 15 Min. 32 Min. 47 Min. 53 Min. 2:42 2:22<br />
6<br />
HELL,<br />
— MITTEL, 6 Min. 5 Min. 10 Min. 9 Min. — 80 Min. 1:50 1:34 ✓<br />
DUNKEL<br />
7 — — — 15 Min. — — 45 Min. 20 Min. 1:20 — —<br />
8 — — 20 Min. — — 30 Min. 40 Min. — 1:30 — —<br />
9 1400 g HELL, 10 Min. — 5 Min. — 33 Min. 60 Min. 1:48 1:38<br />
1200 g MITTEL, 10 Min. — 5 Min. — 28 Min. 55 Min. 1:38 1:28 ✓<br />
1000 g DUNKEL 10 Min. — 5 Min. — 28 Min. 52 Min. 1:35 1:25<br />
10<br />
—<br />
HELL,<br />
MITTEL, — — — — —<br />
10 Min.<br />
bis<br />
0:10<br />
bis — ✓<br />
DUNKEL<br />
60 Min. 1:00<br />
11<br />
—<br />
HELL,<br />
MITTEL,<br />
DUNKEL<br />
13 Min. — — — 25 Min. 60 Min. 1:38 — ✓<br />
12<br />
—<br />
HELL,<br />
MITTEL,<br />
DUNKEL<br />
6 Min.<br />
bis<br />
14 Min.<br />
20 Min.<br />
bis<br />
60 Min.<br />
5 Min.<br />
bis<br />
20 Min.<br />
5 Min.<br />
bis<br />
120 Min.<br />
0 Min.<br />
bis<br />
120 Min.<br />
0 Min.<br />
bis<br />
80 Min.<br />
0:36<br />
bis<br />
7:54<br />
während<br />
KNETEN 2<br />
Warmhalten<br />
✓<br />
Sperre des Bedienfelds<br />
Das Bedienfeld kann zum Schutz vor ungewollter<br />
Bedienung mit einer Tastensperre (16) belegt<br />
werden. Betätigen Sie erst die PROZESS-Taste<br />
und dann die FARBE-Taste. Das Bedienfeld ist nun<br />
mit Ausnahme der PROZESS- und FARBE - Tasten<br />
gesperrt. Diese Funktion schützt vor ungewollten<br />
Programmunterbrechungen durch Betätigen<br />
der Tasten.<br />
Heben Sie die Tastensperre auf indem Sie erst<br />
die PROZESS-Taste und dann die FARBE-Taste<br />
drücken. Wenn Sie die Tastensperre nicht einschalten,<br />
werden die Bedientasten automatisch<br />
5 Mi nuten nach Beginn eines Programms gesperrt.<br />
Die Tastensperre (16) muss aufgehoben<br />
werden, bevor Sie weitere Einstellungen am Gerät<br />
vornehmen können.<br />
Umgebung<br />
Der Brotbackautomat kann bei unter schiedlichen<br />
Raumtemperaturen verwendet werden. Es können<br />
jedoch Unterschiede bei der Brotgröße auftreten,<br />
je nachdem ob es an einem warmen oder<br />
kalten Platz gebacken wurde. Wir empfehlen eine<br />
Raumtemperatur zwischen 15°C und 34°C.<br />
Warnhinweise<br />
• Zeigt das Display (19) „H HH“ nach dem Starten<br />
des Programmes an, bedeutet das, dass ist<br />
die Temperatur im Backraum noch zu hoch ist.<br />
Das Programm muss beendet werden. Öffnen<br />
Sie den Deckel und lassen Sie das Gerät voll -<br />
ständig abkühlen (ca. 10 – 20 Minuten) bevor<br />
Sie es nutzen.<br />
• Wenn das Display (19) „E E0” oder „E E1” anzeigt,<br />
nachdem Sie „START / STOPP“ gedrückt<br />
haben, ist der Temperaturfühler beschädigt<br />
und muss von einem qualifizierten Kundendienst<br />
geprüft werden.<br />
So backen Sie Brot<br />
1. Stellen Sie die Brotform (6 / 8) in die richtige Position,<br />
drücken Sie diese nach unten bis sie hörbar<br />
einrastet. Stecken Sie die Knethaken (7 / 9)<br />
auf die Antriebswelle. Fetten Sie vorher die<br />
Antriebswellen und die Knethaken z. B. mit<br />
Margarine, damit sich diese Teile leicht wieder<br />
lösen lassen.<br />
2. Geben Sie die Zutaten in die Backform (6 / 8).<br />
Bitte beachten Sie hierzu die Reihenfolge, die<br />
im Rezept angegeben ist. Normalerweise geben<br />
Sie zuerst das Wasser oder eine andere<br />
Flüssigkeit in die Form, dann Zucker, Salz und<br />
Mehl. Geben Sie die Hefe oder das Backpulver<br />
immer erst als letzte Zutat hinzu.<br />
Hinweis: Bitte beachten Sie die Mengenangaben<br />
zu Treibmittel und Mehl im jeweiligen<br />
Rezept.<br />
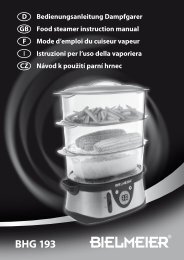
3. Drücken Sie mit den Fingern eine kleine Kuhle<br />
in das Mehl und geben Sie die Hefe hinein.<br />
Stellen Sie sicher, dass die Hefe nicht mit Flüssigkeiten<br />
oder Salz in Berührung kommt.<br />
Hefe oder Backpulver<br />
Trockene Zutaten<br />
Wasser oder andere<br />
Flüssigkeiten<br />
4. Schließen Sie den Deckel (2) und stecken Sie<br />
den Stecker in die Steckdose.<br />
5. Drücken Sie die MENÜ-Taste bis Sie das gewünschte<br />
Programm (17) ausgewählt haben.<br />
6. Wählen Sie das gewünschte Gewicht (18) Ihres<br />
Brotes durch Drücken der GRÖSSE-Taste.<br />
7. Um die gewünschte Krustenfärbung (20) einzustellen,<br />
drücken Sie die FARBE-Taste.<br />
8. Stellen Sie die Zeitverzögerung (19) anhand<br />
der ZEIT-Taste ein. Sie können diesen Schritt<br />
überspringen, wenn Sie wünschen, dass der<br />
Brotautomat sofort anfängt zu arbeiten.<br />
9. Halten Sie die START / STOPP-Taste 1,5 Sekunden<br />
lang gedrückt, um das Programm zu starten.<br />
10. Wenn das Programm 1. NORMAL, 2. VOLL-<br />
KORN, 3. FRANZÖSISCH, 4. SCHNELL, 5. SÜSS,<br />
6. KUCHEN, 9. ULTRASCHNELL oder 12. HAUS-<br />
GEMACHT eingestellt ist, ertönt während des<br />
Betriebs ein Signalton. Nun können weitere<br />
Zutaten hinzugefügt werden. Öffnen Sie den<br />
Deckel (2) und geben Sie die Zutaten hinein.<br />
11
D<br />
D<br />
Tipps & Tricks<br />
Tipp<br />
12<br />
Bei kleineren Mengen kann sich der Teig oft<br />
nicht gleich mäßig in der Backform verteilen<br />
– sammelt sich also nur auf einer Seite an. Dies<br />
führt beim späteren Back vorgang zu einem<br />
ungleichmäßigen Ergebnis.<br />
Um einen schönen Brotlaib zu erhalten, ebnen<br />
Sie den Teig in der Backform mithilfe des<br />
Teigschabers (13) nach Abschluss der zweiten<br />
Knet phase (KNETEN 2) (15).<br />
Klebt der Teig stark am Teigschaber (13), tauchen<br />
Sie ihn kurz in Mehl.<br />
11. Die Dauer des Backvorgangs ist vom gewählten<br />
Programm (17), der Laibgröße (18) und<br />
-bräunung (20) abhängig. Um den Backvorgang<br />
zu überprüfen, drücken Sie die LICHT-<br />
Taste und sehen durch das Sichtfenster –<br />
öffnen Sie nicht den Deckel (2)!<br />
Hinweis: Es ist möglich, dass während des<br />
Backens Dampf durch die Ventilschlitze des<br />
Deckels nach außen dringt. Das ist normal.<br />
Sind Sie sich nicht sicher, ob Ihr Brot durchgebacken<br />
ist? Stechen Sie mit einem hölzernen<br />
Schaschlikstäbchen in das Brot. Bleibt kein<br />
Teig daran kleben, ist Ihr Brot fertig!<br />
12. Wenn der Backvorgang beendet ist, hören<br />
Sie einen Piepton. Drücken Sie die START /<br />
STOPP-Taste ca. 1,5 Sekunden lang, um das<br />
Programm abzuschließen. Sie können nun das<br />
Brot ent nehmen. Öffnen Sie hierzu den Deckel<br />
(2) mit Ofenhandschuhen und ziehen die Backform<br />
(6 / 8) nach oben aus dem Gerät.<br />
Achtung: Die Brotform und das Brot können<br />
sehr heiß sein. Seien Sie sehr vorsichtig.<br />
13. Lassen Sie die Brotform (6 / 8) abkühlen bevor<br />
Sie das Brot herausnehmen. Nutzen Sie den<br />
Teigschaber (13), um das Brot an den Seiten<br />
vorsichtig zu lockern. Verwenden Sie dafür<br />
niemals ein Messer, die Antihaftbeschichtung<br />
der Backform würde beschädigt werden.<br />
14. Drehen Sie die Brotform (6 / 8) auf den Kopf,<br />
halten Sie diese über einen Rost oder ein sauberes<br />
Backblech und schütteln die Form vorsichtig<br />
bis das Brot heraus fällt.<br />
15. Lassen Sie das Brot ca. 20 Minuten abkühlen<br />
bevor Sie es in Scheiben schneiden.<br />
Hinweis: Wir empfehlen, das Brot mit einem elektrischen<br />
Brotschneider oder einem gezahnten<br />
Messer zu schneiden. Nutzen Sie keine kleinen<br />
Küchen messer! Diese sind ungeeignet und werden<br />
das Brot nur un regel mäßig abschneiden.<br />
16. Wenn Sie nicht in der Nähe sind oder am Ende<br />
des Backvorganges nicht die START / STOPP-<br />
Taste gedrückt haben, wird das Brot automatisch<br />
eine Stunde lang warm gehalten.<br />
Das Ende der Warmhaltefunktion wird durch<br />
10 Signaltöne angezeigt.<br />
17. Nach Verwendung oder bei Nichtgebrauch,<br />
trennen Sie das Gerät durch Ziehen des Netzsteckers<br />
von der Stromversorgung.<br />
Achtung: Bevor Sie den Laib in Scheiben schneiden,<br />
entfernen Sie bitte mit dem beiliegenden<br />
Knethakenentferner (12) die Knethaken (7 / 9)<br />
aus dem Brot. Diese stecken in der Unterseite des<br />
Brotes. Der Laib ist noch heiß, ziehen Sie bitte<br />
nicht mit den Fingern an den Haken.<br />
Hinweis: Wenn Sie das Brot nicht ganz aufessen,<br />
lagern Sie es bitte in einer verschlossenen<br />
Plastiktüte oder einem luftdicht verschließbaren<br />
Gefäß. Sie können das Brot ca. 3 Tage bei Raumtemperatur<br />
lagern.<br />
Wenn Sie das Brot länger aufbewahren möchten,<br />
packen Sie es in eine gut verschlossene Plastiktüte<br />
ein und lagern Sie es im Kühlschrank. So können<br />
Sie es bis zu 10 Tagen lagern.<br />
Da das selbst gemachte Brot keine Konservierungsstoffe<br />
enthält, ist die Haltbarkeit nicht länger<br />
als die der Brote vom Bäcker.<br />
Spezielle Einweisung<br />
SCHNELLE BROTE: MENÜ 4 (SCHNELL) UND <br />
MENÜ 9 (ULTRASCHNELL)<br />
Schnelle Brote werden mit Backpulver oder Soda<br />
hergestellt, die durch Flüssigkeit und Hitze aktiviert<br />
werden. Um gute Ergebnisse zu erzielen,<br />
geben Sie die Flüssigkeit zuerst in die Brotform<br />
(6 / 8), die trockenen Zutaten in den oberen Teil.<br />
In der ersten Knetphase kann es dazu kommen,<br />
dass die trockenen Zutaten sich in den Ecken der<br />
Brotform sammeln. Nun ist es nötig, nachzuhelfen<br />
und die Zutaten zu verrühren, um ein Verklumpen<br />
zu vermeiden. Verwenden Sie ausschließlich<br />
Küchen geräte aus Holz dafür und drücken Sie die<br />
PAUSE-Taste vor dem Öffnen des Deckels.<br />
DAS ULTRASCHNELL-PROGRAMM <br />
(ULTRASCHNELL), Menü 9<br />
Der Brotbackautomat kann mit dem ULTRA-<br />
SCHNELL-Programm innerhalb einer Stunde und<br />
38 Minuten, Brot backen. Bitte beachten Sie, dass<br />
die Wassertemperatur hierzu 48 – 50°C betragen<br />
muss, nutzen Sie bitte ein Thermometer, um die<br />
Temperatur genau zu messen. Der Einfluss der<br />
Temperatur ist wesentlich und wirkt sich stark auf<br />
das Backergebnis aus.<br />
Wenn die Wassertemperatur zu niedrig ist wird<br />
das Brot nicht aufgehen und nicht die gewünschte<br />
Größe erreichen. Wenn die Temperatur zu hoch ist<br />
wird der Hefepilz abgetötet, bevor der Gehprozess<br />
in Gang gesetzt wird. So wird das Brot ebenfalls<br />
nicht richtig aufgehen und das Backergebnis<br />
negativ beeinflusst.<br />
DIE DOPPELBACKFORM (8)<br />
Bitte beachten Sie bei der Einstellung der Brotgröße<br />
das maximale Fassungsvermögen jeder Backform<br />
seite. Diese beträgt jeweils 500 g.<br />
Die Doppelbackform (8) kann für folgende zwei<br />
Zwecke genutzt werden:<br />
• Zur Herstellung von zwei Broten der gleichen<br />
Sorte zur gleichen Zeit.<br />
• Zur gleichzeitigen Herstellung von zwei unterschiedlichen<br />
Broten mit einem Programm.<br />
Hinweis: Die Menüeinstellung der Brotgröße ist<br />
auf 1000 g zu setzten.<br />
Reinigung und Pflege<br />
Ziehen Sie vor der Ausführung von Reinigungsarbeiten<br />
den Netzstecker aus der Steckdose und<br />
lassen das Gerät vollständig abkühlen.<br />
Sowohl die Brotbackform (6 / 8) als auch die Knethaken<br />
(7 / 9) sind spülmaschinenfest.<br />
BACKFORM (6) UND DOPPELTE BACKFORM (8)<br />
Entnehmen Sie die Backform (6 / 8) durch Ziehen<br />
am Griff. Wischen Sie die Backform (6 / 8) von innen<br />
und außen mit einem feuchten Tuch ab.<br />
Benutzen Sie keine scharfen oder aggressiven<br />
Reiniger, um die Antihaftbeschichtung nicht zu<br />
be schädigen. Die Form (6 / 8) muss vollständig<br />
trocken sein bevor Sie diese wieder im Gerät einsetzen.<br />
Hinweis: Setzen Sie die Backform (6 / 8) ein, indem<br />
Sie diese leicht nach unten drücken bis sie in der<br />
kor rekten Position sitzt.<br />
Wenn ein Herunterdrücken nicht möglich ist, ändern<br />
Sie die Position leicht bis sie genau sitzt und<br />
drücken Sie sie dann herunter.<br />
KNETHAKEN (7 / 9)<br />
Wenn die Knethaken (7 / 9) schwierig aus dem Brot<br />
zu entfernen sind, benutzen Sie bitte den beiliegenden<br />
Hakenentferner (12).<br />
Wischen Sie die Haken (7 / 9) vorsichtig mit einem<br />
feuchten Baumwolltuch ab.<br />
Benutzen Sie keine scharfen oder aggressiven<br />
Reiniger, um die Antihaftbeschichtung nicht zu<br />
beschädigen.<br />
Deckel (2) mit Sichtfenstern (3)<br />
Wischen Sie den Deckel (2) außen und innen vorsichtig<br />
mit einem feuchten Tuch ab.<br />
Nutzen Sie keine aggressiven Reiniger zur Reinigung,<br />
dies beschädigt die Hochglanzoberfläche.<br />
GEHÄUSE (5)<br />
Wischen Sie die Außenseite des Gehäuses (5) vorsichtig<br />
mit einem feuchten Tuch ab.<br />
Nutzen Sie keine aggressiven Reiniger zur Reinigung,<br />
dies beschädigt die Edelstahloberfläche<br />
des Automaten. Tauchen Sie das Gehäuse (5) zur<br />
Reinigung niemals in Wasser.<br />
VOR LÄNGERER AUFBEWAHRUNG <br />
DES AUTOMATEN<br />
Bevor der Brotbackautomat zur Aufbewahrung<br />
eingepackt wird, stellen Sie sicher, dass er komplett<br />
abgekühlt, sauber und trocken ist. Der<br />
Deckel (2) muss geschlossen sein.<br />
13
D<br />
D<br />
14<br />
Kleine Lebensmittelkunde<br />
Mehl<br />
Mehl ist die wichtigste Grundzutat Ihres Brotes.<br />
• Brotmehl, auch Glutenmehl oder Starkmehl<br />
genannt, ist wahrscheinlich aus Hartweizen<br />
gemahlen. Es hat einen hohen Anteil an Gluten<br />
(Klebereiweiß) und Proteinen. Diese natürlichen<br />
Mittel verleihen dem Teig die Fähigkeit<br />
die Form zu bewahren und das durch die Hefe<br />
produzierte Kohlendioxid zu erhalten. Somit ist<br />
dieses Mehl zum Backen von Brot besonders gut<br />
geeignet.<br />
• Weißmehl besteht aus einer Mischung ausgewählter<br />
Weich- und Hartweizensorten und ist<br />
für schnelles Backen oder Kekse geeignet.<br />
• Vollkornmehl enthält alle Stoffe des eigentlichen<br />
Getreidekorns – auch die Kleie, die feste<br />
äußere Haut des Weizens. Diese stellt eine<br />
ideale Quelle für Ballast stoffe dar.<br />
Sollten Sie dieses Mehl verwenden, achten<br />
Sie bitte darauf, dass es fein gemahlen ist.<br />
Die enthaltene Kleie verhindert die Abgabe<br />
von Gluten, sodass Brote aus dieser Art von<br />
Mehl kleiner und schwerer sind als solche aus<br />
Weißmehl. Daher wird dieses Mehl, um eine<br />
leichtere Beschaffenheit zu erzielen, oft mit<br />
anderen Mehlsorten gemischt.<br />
• Dunkles Weizenmehl, auch Schwarzmehl<br />
oder grobes Mehl genannt, ist ein ballaststoffreiches<br />
Mehl. Es ist dem Vollkornmehl ähnlich.<br />
Um eine gute Laibgröße nach dem Backen zu<br />
erreichen, muss es mit großen Mengen anderer<br />
Mehlsorten gemischt werden.<br />
• Mehl mit Backpulverzusatz enthält – wie der<br />
Name schon verrät – bereits Backpulver und<br />
eignet sich gut zur Herstellung von Kuchen.<br />
• Maismehl und Hafermehl werden aus Mais<br />
bzw. Hafer gemahlen. Sie werden als Zusätze<br />
eingesetzt, um Schwarzbrot herzustellen.<br />
Hafer mehl steigert den Geschmack und verbessert<br />
die Beschaffenheit Ihres Brotes.<br />
Zucker<br />
Zucker ist eine sehr wichtige Zutat. Er unterstützt<br />
die Hefe bei der Fermentierung. Zudem macht<br />
Zucker das Brot weicher im Geschmack, erhöht<br />
den Nährwert und verlängert die Haltbarkeit.<br />
Meist wird weißer Zucker verwendet. Brauner<br />
Zucker, Puderzucker, Sirup oder Honig können,<br />
je nach Geschmack, auch eingesetzt werden.<br />
Achtung: Verwenden Sie ausschließlich feinen<br />
Zucker. Grober Zucker kann die Antihaftschicht<br />
Ihrer Backform beschädigen<br />
Hinweis: Sie können Zucker auch weglassen. In<br />
diesem Fall geht das Brot weniger auf.<br />
Salz<br />
Natürlich trägt Salz zum Geschmack und der<br />
Krusten färbung von Brot bei – es kann aber auch<br />
benutzt werden, um eine besonders aktive Hefe<br />
abzubremsen. Erhöhen Sie daher nicht die im<br />
Rezept angegebene Menge.<br />
Hinweis: Wird Salz aus Gesundheitsgründen ganz<br />
weggelassen, kann Ihr Brot höher als gewöhnlich<br />
aufgehen.<br />
Fett, Butter und pflanzliches Öl<br />
Fett macht das Brot weich und verlängert die Haltbarkeit.<br />
Butter sollte geschmolzen oder in kleine<br />
Stücke gehackt werden bevor sie zugegeben wird.<br />
Hefe<br />
Während der Gehphase setzt die Hefe Kohlendi<br />
oxid frei, welches das Brot aufgehen lässt<br />
und die innere Struktur weich macht. Die Hefe<br />
benötigt zum Aufgehen Zucker und Mehl als<br />
Nährstoff.<br />
1 TL aktive Trockenhefe = ¾ TL Instanthefe<br />
1,5 TL aktive Trockenhefe = 1 TL Instanthefe<br />
2 TL aktive Trockenhefe = 1,5 TL Instanthefe<br />
Frische Hefe muss im Kühlschrank gelagert werden,<br />
da der Hefepilz bei hohen Temperaturen<br />
abgetötet wird.<br />
Überprüfen Sie beim Kauf das Produktions- und<br />
Mindesthaltbarkeitsdatum der Hefe. Lagern Sie<br />
Hefe nach jedem Gebrauch so schnell wie möglich<br />
wieder im Kühlschrank.<br />
Hinweis: Geringes Auf gehen des Brotes lässt sich<br />
normalerweise auf schlechte Hefe zurück führen.<br />
So überprüfen Sie, ob die Hefe noch frisch ist:<br />
1. Schütten Sie einen halben Becher warmes Wasser<br />
(45 – 50°C) in einen Messbecher.<br />
2. Geben Sie einen Teelöffel weißen Zucker hinzu<br />
und rühren Sie um. Dann streuen Sie zwei Teelöffel<br />
Hefe über das Wasser.<br />
3. Stellen Sie den Messbecher für 10 Minuten an<br />
einem warmen Ort. Rühren Sie nicht um.<br />
4. Der entstandene Schaum sollte danach etwa<br />
eine Tasse ergeben, sonst ist die Hefe inaktiv.<br />
Backpulver<br />
Backpulver wird genutzt, um Brote und Kuchen im<br />
ULTRASCHNELL-Modus herzustellen. Es braucht<br />
keine Gehphase und erzeugt Gase, die in Form<br />
von kleinen Blasen die Textur des Brotes beeinflussen.<br />
Soda<br />
Soda ist dem Backpulver sehr ähnlich. Es kann<br />
auch in Kombination mit Backpulver verwendet<br />
werden.<br />
Wasser und andere Flüssigkeiten<br />
Wasser ist eine essentielle Zutat bei der Herstellung<br />
von Brot. Eine Temperatur von 20 – 25°C ist<br />
optimal. Das Wasser kann auch ersetzt werden,<br />
z. B. durch Frischmilch oder Wasser, das mit 2 %<br />
Milchpulver gemischt wurde. Dies verbessert<br />
das Aroma des Brotes und die Farbe der Kruste.<br />
Einige Rezepte verlangen auch Zitronen-, Apfel -<br />
oder Orangensaft, um den Geschmack zu verbessern.<br />
Eier<br />
Eier können die Beschaffenheit des Brotes verbessern,<br />
sie machen das Brot nahrhaft und größer.<br />
Die Eier müssen zunächst von der Schale befreit<br />
und dann gleichmäßig verrührt werden.<br />
Abmessen der Zutaten<br />
Der wichtigste Schritt bei der Verwendung des-<br />
Brotbackautomaten ist das genaue Abmessen der<br />
einzelnen Zutaten mit Hilfe des Messbechers (10)<br />
und des Messlöffels (11). Messen Sie jede Flüssigkeit<br />
und auch die trockenen Zutaten sehr genau<br />
oder das Resultat Ihrer Bemühungen wird dürftig<br />
oder unannehmbar.<br />
Abmessen von Flüssigkeiten<br />
Wasser, Frischmilch oder Milchpulverlösungen<br />
sollten mit einem Messbecher (10) abgemessen<br />
werden. Halten Sie den Becher gerade während<br />
Sie die Flüssigkeit abmessen. Wenn Sie Speiseöl<br />
oder andere Zutaten abmessen, reinigen Sie den<br />
Messbecher (10) nachher gründlich.<br />
Trockene Zutaten<br />
Trockene Zutaten müssen locker in den Messbecher<br />
(10) gegeben werden. Die Zutaten dürfen<br />
nicht angedrückt werden, da ein Zuviel – sei es<br />
auch noch so gering – die Ausge wogenheit des<br />
Rezeptes beeinflussen kann.<br />
Wenn Sie nur kleine Mengen trockener Zutaten<br />
abmessen, nutzen Sie einen Messlöffel (11). Es<br />
handelt sich bei den Angaben um gestrichene,<br />
nicht gehäufte Löffel.<br />
Messlöffel (11):<br />
<br />
<br />
Entspricht 1 Esslöffel<br />
Entspricht 1 Teelöffel<br />
Reihenfolge der Zutaten<br />
Die Reihenfolge, in der die Zutaten zugegeben<br />
werden sollen, muss eingehalten werden. Im<br />
Allgemeinen gilt diese Reihenfolge:<br />
Flüssige Zutat, Eier, Salz und Milchpulver usw.<br />
Das Mehl darf beim Zugeben nicht vollkommen<br />
von Flüssigkeit durchweicht werden. Die Hefe darf<br />
nur auf das trockene Mehl gegeben werden und<br />
darf nicht mit Salz in Berührung kommen.<br />
Nachdem der Teig einige Zeit geknetet wurde,<br />
ertönt ein Signal. Jetzt können Sie Früchte oder<br />
ähnliches dazu geben. Wenn Sie die Früchte zu<br />
früh hinzugeben, wird das Aroma und die Konsistenz<br />
durch das lange Kneten beeinträchtigt.<br />
Wenn Sie die Zeitverzögerung nutzen, dürfen<br />
Sie niemals verderbliche Zutaten wie Eier oder<br />
Früchte hinzugeben.<br />
15
D<br />
D<br />
Fehlerbehebung<br />
Nr. Störung Grund Abhilfe<br />
Nr. Störung Grund Abhilfe<br />
1 Rauch entweicht während<br />
des Backens aus der<br />
Lüftungsöffnung<br />
2 Die Kruste am Boden des<br />
Brotes ist zu dick<br />
Einige Zutaten haften an den<br />
Heizelementen oder befinden<br />
sich zu nah daran.<br />
Wenn Sie das Gerät zum<br />
ersten Mal nutzen kann Öl an<br />
den Heiz elementen haften.<br />
Sie haben das Brot zu lange<br />
warm gehalten und zu lange<br />
in der Form gelassen, so dass<br />
der Wasserverlust zu hoch war.<br />
Ziehen Sie den Stecker aus<br />
der Steckdose, lassen Sie das<br />
Gerät abkühlen und reinigen<br />
Sie die Heizelemente. Seien<br />
Sie vorsichtig, um Verbrennungen<br />
zu vermeiden.<br />
Wenn Sie das Gerät zum<br />
ersten Mal nutzen, lassen Sie<br />
es leer laufen und öffnen Sie<br />
den Deckel.<br />
Entnehmen Sie das Brot<br />
frühest möglich und halten<br />
Sie es nicht warm.<br />
7 Die Tastensperre lässt sich<br />
plötzlich nicht mehr lösen<br />
durch Drücken der<br />
PROZESS-und anschließend<br />
der FARBE-Taste (während<br />
des Betriebs oder nach Ende<br />
des Backvorgangs).<br />
8 Sie hören den Motor arbeiten<br />
aber der Teig wird nicht<br />
geknetet.<br />
Technischer Fehler.<br />
Die Backform ist nicht gut<br />
befestigt oder die Teigmenge<br />
ist zu groß, um geknetet zu<br />
werden.<br />
Ziehen Sie den Netzstecker<br />
aus der Steckdose und<br />
stecken Sie ihn nach kurzer<br />
Wartezeit wieder ein.<br />
Ihr l aufendes Programm<br />
wird nur kurz unterbrochen<br />
und fährt von selbst fort<br />
(vgl. Speicherfunktion).<br />
Überprüfen Sie, ob die<br />
Backform gut befestigt ist.<br />
Stellen Sie sicher, dass<br />
der Teig laut Rezept hergestellt<br />
wurde und die<br />
Zutaten richtig dosiert<br />
wurden.<br />
3 Es ist sehr schwierig das Brot<br />
aus der Form zu lösen.<br />
4 Die Zutaten sind ungleichmäßig<br />
vermischt.<br />
5 Nach dem Backen ist das Brot<br />
trocken und hat keine braune<br />
Kruste.<br />
Die Knethaken hängen an<br />
den Antriebswellen fest.<br />
Das gewählte Programm ist<br />
nicht geeignet.<br />
Der Drehwiderstand ist zu<br />
hoch, so dass die Knethaken<br />
sich kaum drehen können.<br />
Der Deckel wurde mehrmals<br />
geöffnet.<br />
Falsche Programmwahl.<br />
Nachdem Sie das Brot entnommen<br />
haben, gießen Sie<br />
heißes Wasser in die Form, so<br />
dass die Knethaken bedeckt<br />
sind. Entnehmen Sie diese<br />
nach ca. 10 Min. und reinigen<br />
Sie sie. Fetten Sie vor der<br />
nächsten Verwendung die<br />
Antriebswelle.<br />
Wählen Sie das richtige<br />
Programm.<br />
Überprüfen Sie den Sitz der<br />
Knethaken. Entnehmen Sie<br />
die Brotform und lassen Sie<br />
das Gerät leer laufen.<br />
Bei Fehlfunktionen kontaktieren<br />
Sie bitte die Servicestelle.<br />
Öffnen Sie den Deckel nicht,<br />
während des Programmablaufs.<br />
Informieren Sie sich über die<br />
richtige Programmwahl (S. 9).<br />
9 Das Brot ist so groß, dass<br />
es von unten gegen den<br />
Deckel drückt.<br />
10 Das Brot ist zu klein oder ist<br />
nicht aufgegangen.<br />
11 Der Teig ist so groß, dass er<br />
über den Rand der Form<br />
hinauswächst.<br />
12 Das Brot fällt in der Mitte<br />
zusammen wenn Sie es<br />
backen.<br />
Zuviel Hefe, Wasser oder<br />
Mehl.<br />
Es kann sein, dass die Umgebungstemperatur<br />
zu<br />
hoch ist (ideal: 15°C – 34°C).<br />
Keine oder zu wenig Hefe. Die<br />
Hefe kann auch alt und damit<br />
nicht mehr aktiv<br />
sein.<br />
Ein weiterer Grund können<br />
die zu hohe Wassertemperatur,<br />
zu geringe<br />
Umgebungstemperatur<br />
oder zuviel Salz sein.<br />
Sie haben vielleicht zu viel<br />
Flüssigkeit verwendet, so<br />
dass der Teig zu flüssig ist.<br />
Eventuell haben Sie zu viel<br />
Hefe benutzt.<br />
Das Mehl ist nicht stark<br />
genug, um den Teig aufgehen<br />
zu lassen.<br />
Überprüfen Sie die erwähnten<br />
Faktoren.<br />
Verringern Sie gegebenenfalls<br />
die Mengen.<br />
Überprüfen Sie die Menge<br />
und die Aktivität der Hefe.<br />
Erhöhen Sie gegebenenfalls<br />
die Umgebungstemperatur.<br />
Reduzieren Sie die Flüssigkeitsmenge<br />
und verbessern<br />
Sie die Konsistenz des<br />
Teiges.<br />
Benutzen Sie Brotmehl<br />
oder Starkmehl.<br />
16<br />
6 Das Display zeigt „H HH“<br />
an, nachdem Sie den<br />
START / STOPP-Knopf gedrückt<br />
haben.<br />
Die Temperatur im Brotautomaten<br />
ist zu hoch, um<br />
Brot herzustellen.<br />
Drücken Sie erneut die START /<br />
STOPP-Taste und ziehen Sie<br />
den Stecker aus der Steckdose.<br />
Entnehmen Sie die Backform<br />
und lassen Sie den Deckel solange<br />
offen bis der Automat<br />
abgekühlt ist.<br />
Die Hefe wirkt zu schnell<br />
oder die Temperatur ist zu<br />
hoch.<br />
Zu viel Wasser macht den<br />
Teig zu schwer und zu<br />
flüssig.<br />
Verwenden Sie die Hefe bei<br />
Raumtemperatur.<br />
Passen Sie gegebenenfalls<br />
die Wassermenge an.<br />
17
D<br />
D<br />
Nr. Störung Grund Abhilfe<br />
13 Das Brot ist sehr schwer und<br />
die Struktur dicht.<br />
Sie verwendeten zu viel<br />
Mehl und zu wenig Wasser.<br />
Nehmen Sie weniger Mehl<br />
oder mehr Wasser.<br />
Rezepte – PASSEND ZU DEN PROGRAMMEN<br />
Die Mengenangaben in den Rezepten für Brotmehl und Hefe entsprechen dem Maximum.<br />
1 Tasse = 250 ml • 1 EL = 3 TL • 1 EL = 15 ml • 1 TL = 5 ml<br />
Sie haben zu viele Früchte<br />
verwendet oder zu viel Vollkornmehl.<br />
14 Die Mitte des Brotes ist hohl. Sie haben zu viel Wasser oder<br />
Hefe bzw. kein Salz verwendet.<br />
15 An der Oberfläche des Brotes<br />
hängt noch Pulver.<br />
16 Die Kruste ist zu dick und<br />
die Farbe ist zu dunkel beim<br />
Backen von Kuchen oder<br />
Nahrungsmitteln mit viel<br />
Zucker.<br />
Die Wassertemperatur ist zu<br />
hoch.<br />
Im Brot befinden sich sehr<br />
glutenhaltige Inhaltsstoffe.<br />
Das Brot konnte nicht genügend<br />
geknetet werden<br />
weil es zu wenig Wasser<br />
enthält.<br />
Die verschiedenen Rezepte<br />
haben großen Einfluss auf die<br />
Brotherstellung. Die Farbe<br />
wird sehr dunkel, wenn Sie<br />
viel Zucker verwenden.<br />
Reduzieren Sie die Menge<br />
der genannten Zutaten und<br />
nehmen Sie mehr Hefe.<br />
Reduzieren Sie die Menge<br />
an Wasser und Hefe und<br />
verwenden Sie etwas Salz.<br />
Überprüfen Sie die Wassertemperatur.<br />
Geben Sie keine oder<br />
weniger stark glutenhaltigen<br />
Lebensmittel ins Brot.<br />
Überprüfen Sie die Wassermenge<br />
und die Mechanik<br />
des Brotbackautomaten.<br />
Wenn die Farbe für ein Rezept<br />
mit viel Zucker zu dunkel ist,<br />
unterbrechen Sie den Backvorgang<br />
5 – 10 Minuten vor<br />
Ende, indem Sie die START /<br />
STOPP-Taste drücken.<br />
Bevor Sie den Kuchen<br />
oder das Brot entnehmen,<br />
lassen Sie den Deckel noch<br />
20 Minuten geschlossen.<br />
Tipps & Tricks<br />
• Butter / Margarine: Sie können, je nach<br />
Geschmack, auch andere Fette verwenden:<br />
Olivenöl, Schmalz oder Schweinefett für<br />
Schlemmer usw.<br />
• Milchpulver: Sie können Milchpulver auch<br />
durch frische Milch ersetzen. Verringern Sie<br />
in diesem Fall das Wasser um die gleiche<br />
Menge der hinzugefügten Milch.<br />
• Wasser: Mineralwasser macht jedes Brot<br />
leichter und luftiger. Ideal bei schweren Mehlsorten.<br />
Bauernbrot<br />
Brotgröße<br />
Zutat<br />
1400 g /<br />
3 LB<br />
1200 g /<br />
2,5 LB<br />
1000 g /<br />
2 LB<br />
Buttermilch 530 ml 490 ml 370 ml<br />
Butter / Margarine 1 ¾ EL 1 ½ EL 1 EL<br />
Salz 1 ¾ TL 1 ½ TL 1 TL<br />
Zucker 1 ¾ EL 1 ½ EL 1 EL<br />
Weißmehl 455 g 420 g 315 g<br />
Vollroggenmehl 455 g 420 g 315 g<br />
Trockenhefe 1 ¾ TL 1 ½ TL 1 TL<br />
Programm: NORMAL<br />
Französisches Knusperbrot<br />
Brotgröße<br />
Zutat<br />
1400 g /<br />
3 LB<br />
1200 g /<br />
2,5 LB<br />
1000 g /<br />
2 LB<br />
Wasser 500 ml 460 ml 350 ml<br />
Butter / Margarine 3 EL 2 ¼ EL 1 ½ EL<br />
Milchpulver 2 EL 1 ½ EL 1 EL<br />
Zucker 3 ½ EL 3 EL 2 EL<br />
Salz 1 ¾ TL 1 ½ TL 1 TL<br />
Weißmehl 910 g 840 g 630 g<br />
Trockenhefe 1 ¾ TL 1 ½ TL 1 TL<br />
Programm: FRANZÖSISCH<br />
Schnelles Maisbrot<br />
Brotgröße<br />
Zutat<br />
1400 g /<br />
3 LB<br />
1200 g /<br />
2,5 LB<br />
1000 g /<br />
2 LB<br />
Milch 530 ml 490 ml 370 ml<br />
Butter / Margarine 3 ½ EL 3 EL 2 EL<br />
Milchpulver 1 ¾ TL 1 ½ TL 1 TL<br />
Zucker 2 TL 1 ½ TL 1 TL<br />
Salz 2 TL 1 ½ TL 1 TL<br />
Brotmehl 650 g 600 g 450 g<br />
Maismehl 260 g 240 g 180 g<br />
Backpulver 8 TL 6 TL 4 TL<br />
Programm: SCHNELL<br />
Vollkornbrot<br />
Kuchenbrot<br />
Brotgröße<br />
Zutat<br />
1400 g /<br />
3 LB<br />
1200 g /<br />
2,5 LB<br />
1000 g /<br />
2 LB<br />
Brotgröße<br />
Zutat<br />
1400 g /<br />
3 LB<br />
1200 g /<br />
2,5 LB<br />
1000 g /<br />
2 LB<br />
Korrekte Entsorgung dieses Produkts<br />
Wasser 500 ml 460 ml 350 ml<br />
Butter / Margarine 1 ¾ EL 1 ½ EL 1 EL<br />
Milch 530 ml 490 ml 370 ml<br />
Butter / Margarine 90 g 75 g 50 g<br />
18<br />
Innerhalb der EU weist dieses Symbol darauf hin, dass dieses Produkt nicht über den<br />
Hausmüll entsorgt werden darf. Altgeräte enthalten wertvolle recyclingfähige Materialien,<br />
die einer Wiederverwertung zugeführt werden sollten, um der Umwelt bzw. der<br />
menschlichen Gesundheit nicht durch unkontrollierte Müllbeseitigung zu schaden.<br />
Bitte entsorgen Sie Altgeräte deshalb über geeignete Sammelsysteme oder senden Sie<br />
das Gerät zur Entsorgung an die Stelle, bei der Sie es gekauft haben. Diese wird dann<br />
das Gerät der stofflichen Verwertung zuführen.<br />
Salz 1 ¾ TL 1 ½ TL 1 TL<br />
Zucker 1 ¾ TL 1 ½ TL 1 TL<br />
Brotmehl 190 g 150 g 110 g<br />
Multigetreidemehl 720 g 690 g 520 g<br />
Trockenhefe 3 ½ TL 3 TL 2 TL<br />
Programm: VOLLKORN<br />
Eier 4 St 4 St 3 St<br />
Zucker 90 g 75 g 50 g<br />
Salz 1 ¾ TL 1 ½ TL 1 TL<br />
Weißmehl 910 g 840 g 630 g<br />
Trockenhefe 1 ¾ TL 1 ½ TL 1 TL<br />
Programm: SÜSS<br />
19
D<br />
D<br />
Kuchen<br />
Marmeladen<br />
Ultraschnelles Weizenkeimbrot<br />
Rührkuchen<br />
Zutaten 1. Geben Sie Eier, Butter Zucker und Vanillezucker<br />
in eine Schüssel und rühren die Mischung mit<br />
Eier<br />
3 St<br />
einem Hand mixer schaumig.<br />
Zucker<br />
125 g<br />
2. Fügen Sie nun das Mehl und Backpulver zur<br />
Butter / Margarine<br />
125 g Mischung und verrühren alles gleich mäßig.<br />
Vanillezucker<br />
1 Päckchen<br />
3. Verfeinern Sie jetzt Ihren Teig mit etwas Milch.<br />
Milch<br />
bis ¼ Tasse<br />
4. Geben Sie den Teig in die mit Butter oder Öl<br />
Weißmehl<br />
300 g ausgeriebene Brotbackform und starten Sie<br />
Backpulver<br />
1 Päckchen das KUCHEN-Programm.<br />
5. Wollen Sie noch Schokostreußel, o. ä. hinzufügen?<br />
Dann geben Sie diese jetzt hinzu. Der<br />
Brotbackautomat rührt sie unter.<br />
Orangengelee<br />
Zutaten<br />
Orangensaft<br />
klein geschnittene Orange<br />
Zitronensaft<br />
Gelierzucker (3 plus 1)<br />
Programm: MARMELADE<br />
Waldbeerenkonfitüre<br />
Zutaten<br />
zerdrückte Waldbeeren<br />
1 L<br />
1 St<br />
50 ml<br />
500 g<br />
1 kg<br />
Brotgröße<br />
Zutat<br />
1400 g /<br />
3 LB<br />
1200 g /<br />
2,5 LB<br />
1000 g /<br />
2 LB<br />
Wasser (48°C) 490 ml 450 ml 340 ml<br />
Kümmel 2 TL 1 ½ TL 1 TL<br />
Olivenöl 2 EL 1 ½ EL 1 EL<br />
Honig 2 EL 1 ½ EL 1 EL<br />
Salz 2 TL 1 ½ TL 1 TL<br />
Weizenkeime 100 g 90 g 70 g<br />
Weißmehl 810 g 750 g 560 g<br />
Trockenhefe 2 ½ TL 2 TL 1 ½ TL<br />
Programm: ULTRASCHNELL<br />
20<br />
Rotweinkuchen<br />
Zutaten 1. Verrühren Sie in einer Schüssel Eier, Butter,<br />
Zucker, Vanillezucker und Salz mit einem<br />
Eier<br />
3 St<br />
Handmixer schaumig.<br />
Zucker<br />
150 g<br />
2. Geben Sie anschließend Mehl, Backpulver,<br />
Butter / Margarine<br />
250 g Kakao sowie Zimt zur Mischung und verrühren<br />
Sie die Zutaten gut Weißmehl<br />
250 g<br />
miteinander.<br />
Backpulver<br />
Kakao<br />
Zimt<br />
Salz<br />
Raspelschokolade<br />
Rotwein<br />
Rumknusperkuchen<br />
1 Päckchen<br />
1 ½ EL<br />
2 TL<br />
1 Prise<br />
100 g<br />
bis 1⁄8 L<br />
3. Gießen Sie nun Rotwein hinhein, bis der Teig<br />
reißt.<br />
4. Geben Sie den Teig in die mit Butter oder Öl<br />
ausgeriebene Brotbackform und verteilen Sie<br />
die Raspelschokolade auf der Mischung. Starten<br />
Sie nun das KUCHEN-Programm.<br />
Zutaten 1. Verrühren Sie in einer Schüssel Eier, Butter,<br />
Zucker, Vanillezucker und Salz mit einem<br />
Eier<br />
4 St<br />
Handmixer schaumig.<br />
Zucker<br />
100 g<br />
2. Fügen Sie nun das Mehl und Backpulver zur<br />
Butter / Margarine<br />
75 g Mischung. Verrühren Sie alles gleich mäßig und<br />
Vanillezucker<br />
1 Päckchen gießen währenddessen den Rum hinzu.<br />
Salz<br />
1 Prise 3. Geben Sie den Teig in die mit Butter oder Öl<br />
Rum<br />
4 EL ausgeriebene Brotbackform und verteilen<br />
Weißmehl<br />
150<br />
Sie die gehackte Rumknusperschokolade auf<br />
g<br />
der Mischung. Starten Sie nun das KUCHEN-<br />
Backpulver<br />
1 Päckchen Programm.<br />
gehackte Rumknusperschokolade 50 g<br />
Tipps & Tricks<br />
Zitronensaft (bei sehr süßen Früchten) bis 100 ml<br />
Gelierzucker (2 plus 1)<br />
500 g<br />
Programm: MARMELADE<br />
• Wollen Sie testen, wie stark Ihre Marmelade,<br />
Konfitüre oder Gelee andickt? Entnehmen<br />
Sie etwas heiße Masse mit einem<br />
Löffel und geben Sie diese auf einen kalten<br />
Porzellanteller. Sie kühlt innerhalb weniger<br />
Minuten ab und Sie können die Festigkeit<br />
überprüfen.<br />
• Ist die Marmelade, o. ä. zu flüssig? Geben<br />
Sie etwas Zitronensäure hinzu. Diese lässt<br />
die Masse stärker gelieren.<br />
• Ist Ihre Marmelade, o. ä. zu dick? Geben<br />
Sie etwas Wasser oder Fruchtsaft hinzu. Somit<br />
wird das Geliermittel etwas verdünnt.<br />
Buttermilchteig für Brötchen, o. ä.<br />
Gewicht<br />
Zutat<br />
1400 g /<br />
3 LB<br />
1200 g /<br />
2,5 LB<br />
1000 g /<br />
2 LB<br />
Buttermilch 450 ml 420 ml 310 ml<br />
Eier 2 St 1 St 1 St<br />
Salz 2 TL 1 ½ TL 1 TL<br />
Vollweizenmehl 320 g 300 g 220 g<br />
Weißmehl 490 g 450 g 340 g<br />
Trockenhefe 2 TL 1 ½ TL 1 TL<br />
Programm: TEIG<br />
Dessert<br />
Apfelschnitte<br />
Zutaten<br />
mittelfest kochende Äpfel<br />
Zitronensaft<br />
Eier<br />
brauner Zucker<br />
Allzweckmehl<br />
Haferflocken<br />
Butter / Margarine (weich)<br />
Programm: DESSERT<br />
Reispudding<br />
Zutaten<br />
leicht verrührte Eier<br />
Milch<br />
gekochter Reis<br />
Zucker<br />
Rosinen (optional)<br />
Vanille<br />
Zimt<br />
Programm: DESSERT<br />
6 St<br />
1 TL<br />
1 St<br />
½ Tasse<br />
1 Tasse<br />
¹⁄3 Tasse<br />
3 ½ EL<br />
4 St<br />
1 ¾ Tassen<br />
3 Tassen<br />
½ Tasse<br />
1 Tasse<br />
1 TL<br />
2 TL<br />
21
D<br />
GB<br />
GARANTIE<br />
Für die am Verkaufstag beginnende Garantie gelten innerhalb der EU und der Schweiz folgende<br />
Bestimmungen:<br />
1. Garantiedauer: 2 Jahre<br />
2. Garantieleistungen:<br />
a) Nach unserer Wahl Reparatur oder Austausch<br />
von Teilen, die nach unserer Überprüfung<br />
Material- oder Fertigungsfehler aufweisen.<br />
b) Die Garantie wird nur bei Vorzeigen dieser<br />
Garantiekarte und der Verkaufsrechnung<br />
geleistet. Die Karte ist nur gültig, wenn<br />
sie am Verkaufstag vollständig ausgefüllt<br />
wurde.<br />
c) Die Garantieleistung gilt nur gegenüber dem<br />
Erstverbraucher.<br />
d) Durch die Reparatur oder den Austausch von<br />
Teilen innerhalb der Garantiedauer wird die<br />
ursprüngliche Garantiezeit weder verlängert<br />
noch erneuert.<br />
e) Transportkosten gehen zu Lasten des Käufers<br />
(gilt nicht für die ersten 6 Monate der Garantiezeit).<br />
f) Sofern der Schaden oder Mangel nicht beseitigt<br />
werden kann oder die Nachbesserung<br />
von uns abgelehnt oder unzumutbar verzögert<br />
wird, wird innerhalb von 6 Monaten ab<br />
Kauf- / Lieferdatum auf Wunsch des Endabnehmers<br />
entweder kostenfrei Ersatz geliefert<br />
oder der Minderwert vergütet oder das Gerät<br />
gegen Erstattung des Kaufpreises, jedoch<br />
nicht über den marktüblichen Preis hinaus,<br />
zurückgenommen.<br />
3. Die Garantie gilt nicht:<br />
• für Kratzer und Flecken am Gerät.<br />
• für Beleuchtungs- und Kontrolllampen.<br />
• für Motorbürsten.<br />
• für leicht zerbrechliche Teile aus Bakelit, Glas,<br />
Plastik und so weiter, es sei denn, es handelt<br />
sich um Materialfehler, die von uns als solche<br />
anerkannt werden.<br />
• für Beschädigungen, die durch falsche Installation<br />
oder Befestigung verursacht wurden.<br />
• wenn das Gerät an ein Stromnetz mit höherer<br />
Spannung, als auf dem Gerät angegeben, angeschlossen<br />
wird.<br />
• bei falscher oder unsachgemäßer Bedienung.<br />
• bei mangelnder Sorgfalt.<br />
• bei ungenügender oder falscher Wartung.<br />
• bei Fallenlassen des Gerätes oder einzelner<br />
Teile.<br />
• bei unsachgemäßem Transport oder unsachgemäßer<br />
Verpackung für den Transport.<br />
4. Die Garantie erlischt:<br />
• wenn das Gerät für andere als für Haushaltszwecke<br />
eingesetzt wird.<br />
• wenn Personen, die nicht von unserer Firma<br />
dazu ermächtigt sind, Reparaturen oder Änderungen<br />
durchführen.<br />
Für dieses Gerät leisten wir 2 Jahre Garantie für Mängel, die auf Fertigungs- oder Materialfehler<br />
zurückzuführen sind. Die Garantiezeit beginnt mit dem Tag der Übergabe und wird nur bei Vorlage<br />
der Garantiekarte und der Verkaufsrechnung gewährt. Weitergehende Ansprüche bestehen nicht.<br />
important!<br />
PLEASE READ THE OPERATING INSTRUC-<br />
TIONS CAREFULLY BEFORE USING THE<br />
APPLIANCE AND KEEP THEM FOR FUTURE<br />
REFERENCE.<br />
IMPORTANT SAFEGUARDS<br />
Before using the appliance, the following basic<br />
precautions should always be followed:<br />
• This appliance is designed for household use<br />
only and is not intended for commercial purposes.<br />
• Before using, check that the power supply<br />
corresponds to the one shown on the rating<br />
plate.<br />
• This appliance features a grounded plug.<br />
Please ensure the wall outlet in your house is<br />
well grounded.<br />
• Do not use the appliance for other than its<br />
intended use.<br />
• Do not use outdoors.<br />
• Do not operate any appliance:<br />
– with a damaged cord or plug,<br />
– after the appliance malfunctions,<br />
– if it is dropped,<br />
– if it is damaged in any manner.<br />
Return the appliance to the manufacturer or<br />
the nearest authorized service agent for examination,<br />
repair or electrical or mechanical<br />
adjustment.<br />
• The use of accessories not recommended by<br />
the appliance manufacturer may cause injuries.<br />
• Unplug the appliance when not in use, before<br />
inserting or removing parts and before cleaning.<br />
• Turn all controls to OFF, and then remove the<br />
plug from the wall outlet.<br />
• Do not let the cord hang over the edge of a<br />
table or a hot surface.<br />
• Do not place on or near a hot gas or electric<br />
burner or in a heated oven.<br />
• Metal foils or other materials must not be inserted<br />
into the bread maker, as this can result<br />
in a risk of a fire or short circuit.<br />
• Do not cover the bread maker with a towel or<br />
any other material; heat and steam must be<br />
able to escape freely. If the appliance is covered<br />
by or comes into contact with a combustible<br />
material, a fire may result.<br />
• Do not touch hot surfaces. Use handles or<br />
knobs.<br />
• Do not touch any moving or spinning parts of<br />
the machine when in operation.<br />
• Extreme caution must be used when moving<br />
an appliance containing hot oil or other hot<br />
liquids.<br />
• This appliance is not intended for use by persons<br />
with reduced physical sensory or mental<br />
capabilities, including children. Children are<br />
unaware of the possible dangers associated<br />
with electrical appliances. For this reason,<br />
never leave a child alone and unsupervised<br />
with the appliance, and exercise extra caution<br />
when using the appliance in the presence of<br />
children.<br />
Modell:<br />
Wichtig! Bitte notieren Sie hier den auf<br />
dem Typenschild am Gerät befindlichen<br />
FD-Code:<br />
• Do not turn the appliance on without first filling<br />
the bread pans and then inserting them<br />
properly.<br />
• Do not strike the bread pan on the top or edge<br />
to remove the bread; this may damage the<br />
bread pan.<br />
22<br />
Stempel und Unterschrift des Verkäufers<br />
Verkaufsdatum<br />
• To protect against electric shock, never immerse<br />
the appliance in water and protect the<br />
power cord from moisture.<br />
23
GB<br />
GB<br />
24<br />
FOR THE FIRST USE<br />
1. Check that all parts and accessories are complete<br />
and free of damage.<br />
2. Clean all parts as described in the „Cleaning<br />
and Maintenance” section.<br />
3. Set the bread maker to BACKEN (bake) mode,<br />
and bake empty for about 10 minutes. Then,<br />
let it cool down and clean all the removable<br />
parts again.<br />
4. Dry all parts thoroughly and assemble them.<br />
The appliance is now ready for use.<br />
CONTROL PANEL GUIDE*<br />
14<br />
15<br />
16<br />
17<br />
18<br />
1. Normal<br />
2. Vollkorn<br />
3. Französisch<br />
4. Schnell<br />
5. SÜSS<br />
6. Kuchen<br />
Kneten 1 AUFGEHEN 1 KneTEN 2 AUFGEHEN 2<br />
AUFGEHEN 3 BaCkeN WarmHALTEN<br />
1000g 1200g 1400g<br />
PAUSE<br />
ZEIT<br />
GRÖSSE<br />
MENÜ<br />
14 selectable programs<br />
15 program step<br />
16 lock function<br />
17 selected program<br />
____________________________<br />
7. Marmelade<br />
8. Teig<br />
9. Ultraschnell<br />
10. Backen<br />
11. Dessert<br />
12. Hausgemacht<br />
HELL MITTEL DUNKEL<br />
PROZESS<br />
LICHT<br />
FARBE<br />
START<br />
STOPP<br />
18 loaf size<br />
19 operation time<br />
20 crust colour<br />
19<br />
20<br />
* The control panel may be subject to change without<br />
prior notice.<br />
After power-up<br />
As soon as the bread maker is plugged into the<br />
socket, a beep will be heard and “1 2:55, 1200<br />
g, MITTEL (medium)” will appear on the display<br />
screen. However, the colon between “2” and “55”<br />
(19) will not blink.<br />
The “1” indicates the default program (17). The<br />
“1200 g” (18) and “MITTEL” (medium) (20) are the<br />
default settings.<br />
START / STOPP (start / stop)<br />
The button is used for starting and stopping the<br />
baking program.<br />
To start a program, press the START / STOPP (start<br />
/ stop) button for approximately 1.5 seconds. A<br />
short beep will be heard, the colon in the time<br />
display will begin to blink, and the program will<br />
start. Once a program has begun, all of the buttons<br />
are deactivated except START / STOPP (start<br />
/ stop), LICHT (light) and PAUSE (break).<br />
To stop the program, press the START / STOPP<br />
(start / stop) button for approximately 1.5 seconds.<br />
A beeping sound indicates that the program<br />
has been switched off.<br />
This feature helps prevent any unintentional interruption<br />
of the program.<br />
MENÜ (program)<br />
Select the desired program by pressing the<br />
MENÜ (program) button. Each press of the button<br />
(accompanied by a beeping signal) changes<br />
the indicated program (17). The functions of 12<br />
programs (14) are explained below.<br />
1. NORMAL (basic): For kneading, rising and baking<br />
whole wheat bread. Use of the delay function<br />
is not advised, as it can produce poor results.<br />
2. VOLLKORN (whole wheat): Kneading, rise and<br />
baking of whole wheat bread. It is not advised to<br />
use the delay function as this can produce poor<br />
results.<br />
3. FRANZÖSISCH (french): For kneading, rising<br />
and baking with a longer rising time. This program<br />
yields breads with crisper crusts and loose<br />
textures.<br />
4. SCHNELL (quick): For kneading, rising and<br />
baking loaves in less time than “NORMAL” breads<br />
need. Breads baked with this program are usually<br />
smaller and denser.<br />
5. SÜSS (sweet): For kneading, rising and baking<br />
sweet bread. You may also add ingredients to<br />
increase flavour.<br />
6. KUCHEN (cake): For kneading, rising and baking,<br />
but rising with soda or baking powder.<br />
7. Marmelade (jam): For boiling jams and marmalades.<br />
The mixture is stirred throughout the<br />
cooking process. Fruits or vegetables must be<br />
chopped before putting them in the bread pan.<br />
8. TEIG (dough): For kneading and rising, but<br />
without baking. Remove the dough and use to<br />
make bread rolls, pizza, steamed bread, etc.<br />
9. Ultraschnell (ultra fast): For kneading, rising<br />
and baking loaves quickly; produces bread<br />
with a dense texture.<br />
10. BACKEN (bake): For baking only, no kneading<br />
or rising. Also used to increase the baking time<br />
for selected programs. Press ZEIT (time) to adjust<br />
baking time. If you hold this button down, the<br />
time will increase rapidly.<br />
11. Dessert (dessert): For kneading, rising and<br />
baking desserts.<br />
12. Hausgemacht (homemade): The user can<br />
set the time of kneading, rising, baking and keeping<br />
warm.<br />
The time range of each program (15) is as follows:<br />
KNETEN 1 (knead 1) 6 – 14 minutes<br />
AUFGEHEN 1 (rise 1) 20 – 60 minutes<br />
KNETEN 2 (knead 2) 5 – 20 minutes<br />
AUFGEHEN 2 (rise 2) 5 – 120 minutes<br />
AUFGEHEN 3 (rise 3) 0 – 120 minutes<br />
BACKEN (bake) 0 – 80 minutes<br />
WARMHALTEN (keep warm) 0 – 60 minutes<br />
Using HAUSGEMACHT (homemade) Program:<br />
1. Press PROZESS (cycle) once. KNETEN 1 (knead<br />
1) (15) will appear on LCD. Press the ZEIT<br />
(time) button to adjust the minutes (19). Press<br />
PROZESS (cycle) again to confirm the time for<br />
this step.<br />
2. Press PROZESS (cycle) move to the next step.<br />
AUFGEHEN 1 (rise 1) (15) appear on LCD. Press<br />
the ZEIT (time) button to adjust the minutes<br />
(19). Hold the ZEIT (time) button down to<br />
change the time rapidly. Press PROZESS (cycle)<br />
again to confirm.<br />
3. Use the same procedure to go through the<br />
remaining steps. When all of the setting have<br />
been selected, press START / STOPP (start /<br />
stop) button to exit the adjusting mode.<br />
4. Press the START / STOPP (start / stop) button<br />
again to begin the program.<br />
Note: The settings will be stored for the next<br />
time you want to use this program.<br />
FARBE (colour)<br />
With the FARBE (colour) button you can set the<br />
crust colour to HELL (light), MITTEL (medium) or<br />
DUNKEL (dark) (20).<br />
GRÖSSE (loaf size)<br />
Press this button to select the size of the bread:<br />
1000 g, 1200 g or 1400 g. The LCD (18) will display<br />
the corresponding sizes.<br />
Please note the program time may vary depending<br />
on the size of the loaf.<br />
Please note the program time may vary depending<br />
on the size of the loaf: 1. NORMAL<br />
(basic), 2. VOLLKORN (whole wheat), 3. FRAN-<br />
ZÖSISCH (french), 4. SCHNELL (quick), 5. SÜSS<br />
(sweet), and 9. ULTRASCHNELL (ultra fast).<br />
750 g bread mix<br />
If you use a 750 g bread mix, select 1000 g<br />
(18) with the GRÖSSE (loaf size) button for a<br />
successful bread every time!<br />
If your bread is a bit too dark, reduce the colour<br />
adjustment by pressing FARBE (colour) or<br />
stop the program about 5 – 10 minutes before<br />
the program ends by pressing the START<br />
/ STOPP (start / stop) button.<br />
Tips & Tricks<br />
25
GB<br />
GB<br />
Tips & Tricks<br />
26<br />
Loaf size 1400 g<br />
Please work your way slowly up to this size. Begin<br />
by testing bread recipes for 1200 g.<br />
Due to the rising process, there is a risk, particularly<br />
with doughs that rise significantly (e.g.<br />
white bread, sweet bread), that the dough will<br />
overflow the bread pan.<br />
If there is still space in the pan after baking,<br />
you can gradually increase the quantity of ingredients.<br />
Thank you for your understanding!<br />
LICHT (light)<br />
Press the button once to turn on the lamp and<br />
monitor the baking process.<br />
Press the button again to turn off the light. The<br />
light switches off automatically if you do not<br />
press the button within one minute.<br />
ZEIT (time)<br />
Use this button to set a later start time for the baking<br />
program.<br />
To set the delay time:<br />
1. Select your program (17), loaf size (18) and<br />
crust colour (20).<br />
2. Select your program (time) button. The delay<br />
time should include the operation time for<br />
the selected program.<br />
Example: It is 8:30 pm and you want the bread<br />
to be ready to serve at 7:00 am on the next<br />
day. You should set the delay time to 10 hours<br />
and 30 minutes by pressing the ZEIT (time)<br />
button until 10:30 appear on the display (19).<br />
The increment for each press is 10 minutes.<br />
3. Press the START / STOPP (start / stop) button to<br />
activate this delay program. The colon in the<br />
time indicator will blink, and the LCD will count<br />
down the remaining time.<br />
NOTE: The maximum delay time is 13 hours. Do<br />
not use any perishable ingredients (e.g. eggs, fresh<br />
milk, fruits, onions) when using the delay feature.<br />
PROZESS (cycle)<br />
Use this button to set up your own baking program<br />
for number 12 – HAUSGEMACHT (homemade).<br />
PAUSE (pause)<br />
When the program is running, you can press the<br />
PAUSE (pause) button for approximately 1.5 seconds<br />
at any time to interrupt the baking process.<br />
The program will be paused, but the setting will<br />
be memorized, and the remaining time will flash<br />
on the LCD.<br />
Press the PAUSE (pause) button again to resume<br />
the program.<br />
Keep Warm<br />
Bread can be automatically kept warm for 1<br />
hour after baking. During this warming time,<br />
“WARMHALTEN” (15) will be shown on diplay.<br />
If you would like to remove the bread, switch<br />
the program off by pressing the START / STOPP<br />
(start / stop) button.<br />
Memory<br />
If the power supply is interrupted while the program<br />
is running, bread-making program will<br />
resume automatically within 10 minutes, even<br />
without pressing the START / STOPP (start / stop)<br />
button.<br />
If the interruption time exceeds 10 minutes, the<br />
program will not resume, and you must discard<br />
the ingredients in the bread pan and add the ingredients<br />
again before restarting the program.<br />
However, if the dough has not entered the rising<br />
phase when the power supply is interrupted, you<br />
can press the START / STOPP (start / stop) button<br />
when the power comes back on to repeat the<br />
program from the beginning.<br />
TIME SETTING TABLE<br />
Program-No.<br />
Options<br />
GRÖSSE (lof size)<br />
Options<br />
FARBE (colour)<br />
KNETEN 1<br />
(knead 1)<br />
AUFGEHEN 1<br />
(rise 1)<br />
KNETEN 2<br />
(knead 2)<br />
AUFGEHEN 2<br />
(rise 2)<br />
AUFGEHEN 3<br />
(rise 3)<br />
BACKEN<br />
(bake)<br />
Total Program<br />
Time of Process<br />
Signal for Adding<br />
Ingredients at<br />
1 1400 g light, 10 min. 20 min. 15 min. 25 min. 45 min. 65 min. 3:00 2:20<br />
1200 g medium, 10 min. 20 min. 15 min. 25 min. 45 min. 60 min. 2:55 2:15 ✓<br />
1000 g dark 10 min. 20 min. 12 min. 25 min. 48 min. 55 min. 2:50 2:13<br />
2 1400 g light, 10 min. 25 min. 20 min. 35 min. 65 min. 65 min. 3:40 2:55<br />
1200 g medium, 8 min. 25 min. 18 min. 35 min. 65 min. 60 min. 3:32 2:50 ✓<br />
1000 g dark 8 min. 25 min. 16 min. 35 min. 70 min. 55 min. 3:30 2:50<br />
3 1400 g light, 18 min. 40 min. 22 min. 30 min. 50 min. 70 min. 3:50 2:40<br />
1200 g medium, 16 min. 40 min. 19 min. 30 min. 50 min. 65 min. 3:40 2:35 ✓<br />
1000 g dark 13 min. 40 min. 17 min. 30 min. 50 min. 60 min. 3:30 2:30<br />
4 1400 g light, 10 min. 10 min. 10 min. — 30 min. 70 min. 2:10 1:45<br />
1200 g medium, 10 min. 10 min. 10 min. — 30 min. 65 min. 2:05 1:40 ✓<br />
1000 g dark 10 min. 10 min. 10 min. — 30 min. 60 min. 2:00 1:35<br />
5 1400 g light, 10 min. 5 min. 20 min. 33 min. 40 min. 62 min. 2:50 2:25<br />
1200 g medium, 10 min. 5 min. 20 min. 32 min. 40 min. 58 min. 2:45 2:20 ✓<br />
1000 g dark 10 min. 5 min. 15 min. 32 min. 47 min. 53 min. 2:42 2:22<br />
6<br />
light,<br />
— medium, 6 min. 5 min. 10 min. 9 min. — 80 min. 1:50 1:34 ✓<br />
dark<br />
7 — — — 15 min. — — 45 min. 20 min. 1:20 — —<br />
8 — — 20 min. — — 30 min. 40 min. — 1:30 — —<br />
9 1400 g light, 10 min. — 5 min. — 33 min. 60 min. 1:48 1:38<br />
1200 g medium, 10 min. — 5 min. — 28 min. 55 min. 1:38 1:28 ✓<br />
1000 g dark 10 min. — 5 min. — 28 min. 52 min. 1:35 1:25<br />
10<br />
light,<br />
10 min. 0:10<br />
— medium,<br />
dark<br />
— — — — — to<br />
60 min.<br />
to<br />
1:00<br />
— ✓<br />
11<br />
12<br />
—<br />
—<br />
light,<br />
medium,<br />
dark<br />
light,<br />
medium,<br />
dark<br />
13 min. — — — 25 min. 60 min. 1:38 — ✓<br />
6 min.<br />
to<br />
14 min.<br />
20 min.<br />
to<br />
60 min.<br />
5 min.<br />
to<br />
20 min.<br />
5 min.<br />
to<br />
120 min.<br />
0 min.<br />
to<br />
120 min.<br />
0 min.<br />
to<br />
80 min.<br />
0:36<br />
to<br />
7:54<br />
during<br />
KNETEN 2<br />
(knead 2)<br />
Keep Warm<br />
✓<br />
27
GB<br />
GB<br />
28<br />
Control Panel Lock Function<br />
You can lock the control panel by pressing the<br />
PROZESS (cycle) key and then pressing the FARBE<br />
(colour) key. When the control panel is locked<br />
(16), all of the control keys except PROZESS<br />
(cycle ) and FARBE (colour) are inactive. This feature<br />
helps prevent unintentional disruption of<br />
the program and unsupervised use of the unit<br />
by children.<br />
You can unlock the control panel by pressing the<br />
PROZESS (cycle ) key and then the FARBE (colour )<br />
key. If you do not set the control keys lock function,<br />
the control keys will be automatically<br />
locked after five minutes. You must unlock (16)<br />
the control panel to operate the bread maker.<br />
Environment<br />
The machine can function effectively in a wide<br />
range of temperatures, but temperature differences<br />
may cause variations in the loaf size.<br />
We recommend a room temperature between<br />
15-34°C.<br />
Warning Display<br />
• If the display (19) shows “H HH” after the<br />
program has been started, the temperature<br />
inside is too high. The program must be<br />
stopped. Then open the lid and let the machine<br />
cool down for 10 to 20 minutes.<br />
• If the display (19) shows “E E0” or “E E1”<br />
after you press START / STOPP (start / stop),<br />
the temperature sensor is malfunctioning.<br />
Please have the sensor checked by a qualified<br />
technician.<br />
HOW TO MAKE BREAD<br />
1. Place the bread pans (6 / 8) in position and<br />
press down until they click into place. Attach<br />
the kneading blades (7 / 9) to the drive<br />
shaft. We recommend filling the hole with<br />
heat-resisting margarine prior to attaching<br />
the blades to prevent the dough from sticking.<br />
This also makes it easier to remove the<br />
bread.<br />
2. Place the ingredients in the bread pan (6 / 8).<br />
Please follow the sequence described in the<br />
recipe. Usually, the water or liquid substance<br />
is added first, followed by sugar, salt and flour,<br />
and always finishing with the yeast or baking<br />
powder as the last ingredient.<br />
Note: See recipes for details on how much<br />
flour and rising agent to use.<br />
3. Make a small indentation in the top of the flour<br />
with a finger and add the yeast in this indentation.<br />
Make sure it does not come into contact<br />
with the liquid or salt.<br />
Yeast or soda<br />
Dry ingredients<br />
Water or liquid<br />
4. Close the lid (2) gently and insert the power<br />
plug into a wall outlet.<br />
5. Press the MENÜ (menu) button to select your<br />
desired program (17).<br />
6. Press the GRÖSSE (loaf) button to select the<br />
desired size (18).<br />
7. Press the FARBE (colour) button to select the<br />
desired crust colour (20).<br />
8. Set the delay time (19) by pressing ZEIT (time)<br />
button. Skip this step if you want the bread<br />
maker to start working immediately.<br />
9. Press the START / STOPP (start / stop) button for<br />
approximately 1.5 seconds to start the program.<br />
10. The unit will beep during the following<br />
programs to prompt you to add<br />
ingredients: 1. NORMAL (basic), 2. VOLL-<br />
KORN (whole wheat), 3. FRANZÖSISCH (french),<br />
4. SCHNELL (quick), 5. SÜSS (sweet), 6. KUCHEN<br />
(cake), 9. ULTRASCHNELL (ultra fast) and 12. HAUS-<br />
GEMACHT (homemade). Open the lid (2) and<br />
add the necessary ingredients.<br />
Tips & Tricks<br />
Tip<br />
With smaller quantities, the dough often<br />
cannot disperse evenly into the bread pan and<br />
builds up on one side, which results in an uneven<br />
baking process.<br />
To get a beautiful loaf of bread, you should<br />
spread the dough into the pan with a dough<br />
scraper (13) after the completion of the second<br />
kneading process KNETEN 2 (knead 2) (15).<br />
If the dough sticks to the scraper (13), dip it<br />
briefly in flour.<br />
11. The length of the baking process depends<br />
on the program (17), loaf size (18) and colour<br />
(20). To check the baking process, press the<br />
LICHT (light) button and look through the<br />
view windows (3) – do not open the lid (2)!<br />
Note: Steam may escape through the vent in<br />
the lid during baking. This is normal.<br />
Not sure if your bread is baked thoroughly?<br />
Insert a wooden skewer into the bread. If the<br />
bread doesn’t stick to it, it is ready!<br />
12. The bread maker will beep when the program<br />
is finished. Press the START / STOPP (start / stop)<br />
button for approximately 1.5 seconds to stop<br />
the process and take out the bread. Open the<br />
lid (2) and use oven mitts to remove the bread<br />
pan (6 / 8).<br />
Caution: The bread pan and bread may be<br />
very hot! Always handle with care.<br />
13. Let the bread pan (6 / 8) cool down before<br />
removing the bread. Then, use the dough<br />
scraper (13) to gently loosen the sides of the<br />
bread from the pan.<br />
14. Turn the bread pan (6 / 8) upside down over<br />
a wire cooling rack or clean cooking surface<br />
and shake gently until the bread falls out.<br />
15. Let the bread cool for about 20 minutes before<br />
slicing.<br />
Note: It is recommended to slice the bread<br />
with an electric cutter; if you use a fruit knife<br />
or kitchen knife, the bread may be subject to<br />
deformation.<br />
16. If you are out of the room or if you do not<br />
press the START / STOPP (start / stop) button<br />
at the end of the program, the bread will be<br />
kept warm automatically for 1 hour. When<br />
WARMHALTEN (keep warm) is finished, the<br />
appliance will beep 10 times.<br />
17. When the appliance is not in use, unplug the<br />
power cord.<br />
Note: Before slicing the loaf, use the hook (12) to<br />
remove the kneading blades (7 / 9) hidden on the<br />
bottom of loaf. The loaf is hot; never remove the<br />
kneading blade with your hands.<br />
Note: If bread has not been completely eaten up,<br />
advise you to store the remained bread in sealed<br />
plastic bag or vessel.<br />
Bread can be stored at room temperature for<br />
about three days.<br />
To store the bread for a longer time, put it in a<br />
sealed plastic bag or vessel and place it in the<br />
refrigerator (maximum storage time = 10 days).<br />
Since homemade bread contains no preservatives,<br />
the storage time is generally no longer than<br />
that of bakery bread.<br />
SPECIAL INTRODUCTION<br />
For quick (4. SCHNELL) AND <br />
ULTRA FAST (9. ULTRA SCHNELL) BREADS<br />
Quick breads are made with baking powder or<br />
baking soda that is activated by moisture and<br />
heat. For perfect quick breads, all liquids should<br />
be placed in the bottom of the bread pan (6 / 8),<br />
and dry ingredients should be placed on top.<br />
During the initial mixing of quick breads, dry ingredients<br />
may collect in the corners of the pan.<br />
It is necessary to help the machine mix in order<br />
to avoid flour clumps.<br />
About ultra fast program <br />
(9. ULTRASCHNELL)<br />
The bread maker can bake a loaf within 1 hour<br />
38 minutes with the rapid program. Please note<br />
that it should be hot water of 48 – 50°C; you must<br />
use a cooking thermometer to measure the temperature.<br />
29
GB<br />
GB<br />
30<br />
Temperature has a critical influence on the baking<br />
performance. If the water temperature is too<br />
low, the bread will not rise to the expected size.<br />
If the water temperature is too high, the fungus<br />
in the yeast will be killed before rising, which will<br />
also affect the baking performance.<br />
For the double bread pan (8)<br />
Note: To achieve proper loaf size (18), the maximum<br />
capacity of each side of the bread pan is 500 g.<br />
The double bread pan (8) can be used in two<br />
different ways:<br />
• Making two breads with the same flavour at the<br />
same time.<br />
• Making two breads with different flavours on<br />
any one program at the same time.<br />
Note: Suggest loaf size setting = 1000 g.<br />
CLEANING AND MAINTENANCE<br />
Disconnect the appliance from the power outlet<br />
and let it cool down before cleaning.<br />
Both the bread pan (6 / 8) and kneading blades<br />
(7 / 9) are dishwasher safe components.<br />
Bread pan (6) and <br />
double bread pan (8)<br />
Remove the bread pan (6 / 8) by pulling the<br />
handle, wipe inside and outside of the pan with<br />
damp cloth.<br />
To protect the non-stick coating, do not use any<br />
sharp or abrasive agents. The pan (6 / 8) must be<br />
dried completely before installing.<br />
Note: Insert the bread pan (6 / 8) and press down<br />
until it snaps into the correct position.<br />
If it cannot be inserted, realign the pan gently until<br />
it is in the correct position and can be pressed<br />
down.<br />
Kneading blades (7/ 9)<br />
If the kneading blades (7 / 9) are difficult to remove<br />
from the bread, use the hook (12).<br />
Wipe the blades (7 / 9) care fully with a dump cotton<br />
cloth.<br />
To protect the non-stick coating, do not use<br />
any sharp or abrasive agents.<br />
Lid (2) and windows (3)<br />
Clean the inside and outside of the lid (2) with a<br />
slightly damp cloth.<br />
To avoid damaging the highly polished surfaces,<br />
do not use any abrasive cleaner.<br />
Housing (5)<br />
Gently wipe the outer surface of the housing (5)<br />
with a damp cloth.<br />
To avoid damaging the stainless steel surfaces,<br />
do not use any abrasive cleaner. Never immerse<br />
the housing (5) To avoid damaging the stainless<br />
steel surfaces, do not use any abrasive cleaner.<br />
Never immerse the housing.<br />
Before storage<br />
Before the bread maker is packed for storage, ensure<br />
that it has completely cooled down, clean it<br />
and dry it. The lid (2) should be closed.<br />
A LITTLE FOOD SCIENCE<br />
Flour<br />
Flour is the most important ingredient of your<br />
bread.<br />
• Bread flour, also called high-gluten flour, has a<br />
large amount of gluten and protein. It has good<br />
elasticity and can keep the bread from collapsing<br />
after it rises. Since the gluten content is<br />
higher than in common flour, it can be used to<br />
make large breads with better inner fibre. Bread<br />
flour is particularly suitable for making bread.<br />
• Plain flour is a mixture of soft and durum<br />
wheat. It is suitable for making cookies or quick<br />
breads.<br />
• Whole-wheat flour is ground from grain. It<br />
contains wheat skin and gluten. Whole-wheat<br />
flour is heavier and contains more nutrients<br />
than common flour.<br />
Since breads made with whole-wheat flour are<br />
usually smaller, many recipes combine wholewheat<br />
flour with bread flour to achieve the best<br />
result.<br />
• Black wheat flour, also called “rough flour”, is a<br />
kind of high-fibre flour that is similar to wholewheat<br />
flour. To achieve large size after rising,<br />
it must be used in combination with a high<br />
amount of bread flour.<br />
• Self-rising flour contains baking powder. It is<br />
used to make cakes, in particular.<br />
• Corn flour and oatmeal flour are ground from<br />
corn and oatmeal separately. These ingredients<br />
are added when making rough bread to enhance<br />
the flavour and texture.<br />
Sugar<br />
Sugar is a very important ingredient that increases<br />
the sweet taste and colour of bread. It is also<br />
considered nourishment in yeast bread. White<br />
sugar is widely used. Brown sugar, powder sugar,<br />
cotton sugar, syrup or honey may be called for in<br />
special instances.<br />
Note: Use only fine sugar. Gross grained sugar<br />
can damage the anti-adhesive layer of your bread<br />
pan.<br />
Note: Breads made without sugar will be smaller.<br />
Salt<br />
Salt is necessary to improve the flavour and crust<br />
colour. However, salt can also inhibit the rising of<br />
the yeast. Never use too much salt in a recipe.<br />
Note: Breads made without salt would be larger.<br />
Grease, butter and vegetable oil<br />
Grease can make bread softer and extend storage<br />
life. Butter should be melted or chopped to small<br />
pieces before using.<br />
Yeast<br />
After the rising process, the yeast will produce<br />
carbon dioxide. The carbon dioxide expands the<br />
bread and makes the inner fibre soften. However,<br />
fast breeding yeast needs the carbohydrates in<br />
sugar and flour as nourishment.<br />
1 tsp. active dry yeast = ¾ tsp. instant yeast<br />
1.5 tsp. active dry yeast = 1 tsp. instant yeast<br />
2 tsp. active dry yeast = 1.5 tsp. instant yeast<br />
Fresh yeast must be stored in the refrigerator, as<br />
the fungus in it will be killed at high temperature.<br />
Before using, check the production date and storage<br />
life of your yeast. Put it back in the refrigerator<br />
as soon as possible after each use.<br />
Note: When breads failt to rise, it is usually due<br />
to bad yeast.<br />
Follow the steps below to check if your yeast is<br />
fresh and active.<br />
1. Pour ½ cup warm water (45 – 50°C) into a<br />
measuring cup.<br />
2. Put 1 tsp. white sugar into the cup and stir;<br />
then sprinkle 2 tsp. yeast over the water.<br />
3. Place the measuring cup in a warm place for<br />
about 10 min. Do not stir the water.<br />
4. The mixture should foam up to 1 cup. Otherwise<br />
the yeast is dead or inactive.<br />
Baking powder<br />
Baking powder is used as a rising agent for UL-<br />
TRASCHNELL (ultra fast) breads and cakes. It does<br />
not need rise time, and it can produce air. Due to<br />
chemical processes, the air forms bubbles that<br />
soften the texture of the bread.<br />
31
GB<br />
GB<br />
BAKING SODA<br />
It is similar to baking powder. It can also be used in<br />
combination with baking powder.<br />
Measuring Spoon (11):<br />
Equals 1 Tablespoon<br />
TROUBLESHOOTING GUIDE<br />
No. Problem Cause Solution<br />
WATER AND OTHER LIQUIDS<br />
Water is an essential ingredient for making bread.<br />
Generally speaking, water between 20°C and 25°C<br />
is the best.<br />
The water may be substituted with fresh milk or<br />
water mixed with 2 % milk powder, which may<br />
enhance bread flavour and improve crust colour.<br />
Some recipes may call for juice to enhance the flavour<br />
(e. g. apple juice, orange juice, lemon juice).<br />
EggS<br />
Eggs can improve bread texture, make the bread<br />
more nourishing and increase the size. The egg<br />
must be cracked open and then stirred evenly.<br />
MEASURING INGREDIENTS<br />
The most important thing for making good bread<br />
is to use the proper amounts of ingredients. It is<br />
strongly recommended to use measuring cups<br />
(10) or measuring spoons (11) to obtain accurate<br />
amounts. Failure to use accurate amounts can<br />
have a significant influence on the quality of the<br />
bread.<br />
MEASURING LIQUID INGREDIENTS<br />
Water, fresh milk or milk powder solution should<br />
be measured with measuring cups (10).<br />
Check the level of the cup with your eyes on a<br />
horizontal plane to the surface of the liquid.<br />
When you measure cooking oil or other ingredients,<br />
clean the measuring cup (10) thoroughly.<br />
Equals 1 Teaspoon<br />
SEQUENCE OF INGREDIENTS<br />
Generally speaking, the ingredients should be<br />
added as follows:<br />
Liquid ingredient, eggs, salt and milk powder etc.<br />
When adding the ingredients, do not completely<br />
wet the flour. The yeast can only be placed on the<br />
dry flour. And yeast should not come into contact<br />
with the salt.<br />
After the flour has been kneaded for some time,<br />
a beep will prompt you to put fruit ingredients<br />
into the mixture. If the fruit ingredients are added<br />
too early, the flavour will be diminished during the<br />
long mixing time. When you use the delay function<br />
for a long time, never add perishable ingredients<br />
(e.g. eggs, fruit).<br />
1 Smoke from ventilation<br />
hole when baking.<br />
2 Bread bottom crust is too<br />
thick.<br />
3 It is very difficult to remove<br />
the bread.<br />
4 Ingredients not evenly<br />
stirred and bake poorly.<br />
5 The bread ends up dry, with<br />
no brown crust colour.<br />
6 Display “H HH” after<br />
pressing START / STOPP<br />
(start / stop) button.<br />
Some ingredients are sticking<br />
to the heater element or<br />
nearby.<br />
For the initial use, oil<br />
remained on the surface of<br />
heat element.<br />
The warm bread is left in<br />
the pan for too long, and<br />
thereby loses too much<br />
water.<br />
Kneading blades sticking to<br />
the shaft in the bread pan.<br />
Incorrect program selected.<br />
Too much resistance, so<br />
kneading blades can’t<br />
rotate and stir adequately.<br />
The cover was opened several<br />
times during operation.<br />
The temperature in the<br />
bread maker is too high to<br />
make bread.<br />
Unplug the bread maker<br />
and clean the heater element,<br />
but be careful not to<br />
burn yourself!<br />
During the first use, dry -operating<br />
and open the lid.<br />
Take bread out quickly,<br />
without using the warming<br />
function.<br />
After removing the bread,<br />
put hot water into bread<br />
pan and -immerge kneading<br />
blade for 10 minutes.<br />
Then take it out and clean.<br />
Select the correct program.<br />
Check kneading blades<br />
hole; then take bread pan<br />
out and operate without<br />
the pans.<br />
If not normal, contact an<br />
authorized service facility.<br />
Don’t open cover during<br />
operation – especially during<br />
the final rise.<br />
Press START / STOPP<br />
(start / stop) button and<br />
unplug bread maker.<br />
Then, remove bread pan<br />
and open cover until the<br />
bread maker cools down.<br />
32<br />
Dry measurements<br />
Dry measuring must be done by gently spooning<br />
ingredients into the measuring cup (10).<br />
When measuring small amounts of dry ingredients,<br />
use measuring spoons (11).<br />
Measurements must be level and not heaped, as<br />
this small difference could throw off the critical balance<br />
of the recipe.<br />
7 The control panel cannot<br />
be unlocked by pressing<br />
PROZESS (cycle) and FARBE<br />
(colour) (during program or<br />
after finishing).<br />
Technical failure.<br />
Disconnect the machine<br />
from the power outlet,<br />
then plug the bread maker<br />
into the socket again. Your<br />
program will be interrupted<br />
for only a few seconds and<br />
will resume automatically<br />
(cf. Memory).<br />
33
GB<br />
GB<br />
No. Problem Cause Solution<br />
No. Problem Cause Solution<br />
8 Hear the motor noise, but<br />
dough isn’t stirred.<br />
9 Bread is so large that it<br />
forces the cover open.<br />
10 Bread size is too small or<br />
bread does not rise.<br />
11 Dough is so large it overflows<br />
the bread pan.<br />
Bread pan is inserted<br />
improperly or dough is<br />
too large to be stirred.<br />
Too much yeast, flour or<br />
water.<br />
Ambient temperature is<br />
too high (ideal: 15°C – 34°C).<br />
No yeast or not enough<br />
yeast.<br />
Poor yeast activity<br />
because the water is too<br />
hot, the yeast has mixed<br />
with salt, or the ambient<br />
temperature is too low.<br />
Excessive liquids make<br />
dough soft and excessive<br />
yeast.<br />
Check if bread pan is<br />
inserted properly.<br />
Also, check whether the<br />
dough has been made<br />
according to recipe and<br />
the ingredients have been<br />
accurately weighed.<br />
Check these factors.<br />
Reduce the amounts to<br />
the correct levels.<br />
Check the amount and<br />
perfor-mance of yeast;<br />
increase the ambient temperature<br />
if necessary.<br />
Reduce the amount of liquids<br />
and improve dough<br />
rigidity.<br />
14 Middle is hollow when<br />
bread is cut.<br />
15 Bread surface sticks to dry<br />
powder.<br />
16 Crust is too thick and baking<br />
colour is too dark when<br />
making cakes or food with<br />
much sugar.<br />
Excessive water or yeast or<br />
no salt.<br />
Water temperature is too<br />
high.<br />
There are high-glutin ingredients<br />
in bread.<br />
Inadequate stirring or not<br />
enough water.<br />
Different recipes or ingredients<br />
have a significant<br />
impact on bread making.<br />
Baking colour will be very<br />
dark because of high sugar<br />
content.<br />
Reduce water or yeast and<br />
check salt content.<br />
Check water temperature.<br />
Do not add strong glutinosity<br />
ingredients into bread.<br />
Check water and mechanical<br />
function of bread maker.<br />
If baking colour is too dark<br />
for the recipe with excessive<br />
sugar, touch START / STOPP<br />
(start / stop) to interrupt the<br />
program 5 – 10 minutes<br />
before the planned completion<br />
time.<br />
Before removing, leave the<br />
bread or cake in bread pan<br />
for about 20 minutes with<br />
cover closed.<br />
12 Bread collapses in the<br />
middle during baking.<br />
Flour used is not strong<br />
enough to make dough<br />
rise.<br />
Use bread flour or strong<br />
powder.<br />
Yeast rate is too rapid or<br />
yeast temperature is too<br />
high.<br />
Yeast is used under room<br />
temperature.<br />
Excessive water makes<br />
dough too wet and soft.<br />
Based on the water<br />
absorption potential,<br />
adjust water prescribed by<br />
recipe.<br />
13 Bread is too heavy and<br />
dense.<br />
Too much flour or too<br />
little water.<br />
Too many fruit ingredients<br />
or too much whole wheat<br />
flour.<br />
Reduce flour or increase<br />
water.<br />
Reduce the amount of<br />
corresponding ingredients<br />
and add more yeast.<br />
ENVIRONMENTALLY FRIENDLY DISPOSAL<br />
We urge you to follow the correct disposal procedure for your product and packaging<br />
materials. This will help conserve natural recourses and ensure that it is recycled in<br />
a manner that protects health and the environment. When the product is no longer<br />
usable, the product and its accessories must be disposed of separately from household<br />
waste. The product and, if applicable, its batteries should be taken to your local<br />
collection point for recycling. Some collection points accept products free of charge.<br />
34<br />
35
GB<br />
GB<br />
Tips & Tricks<br />
RECIPES – APPROPRIATE FOR THE PROGRAMS<br />
The following recipes are only for reference. You may adjust them depending on ingredients, your own<br />
taste and experiments.<br />
1 cup = 250 ml • 1 tbsp = 3 tsp • 1 tbsp = 15 ml • 1 tsp = 5 ml<br />
• Butter / Margarine: Depending on your<br />
taste, you can also use other fats (e.g. olive<br />
oil, lard, pork fat).<br />
• Dry milk: You can substitute dry milk in<br />
recipes with fresh milk. In this case, decrease<br />
the water added by the amount of<br />
milk that is added.<br />
• Water: Sparkling mineral water makes<br />
breads lighter and airier. It’s ideal for heavy<br />
flour.<br />
Farmhouse Bread<br />
<br />
Ingredient<br />
Loaf Size<br />
1400 g /<br />
3 LB<br />
1200 g /<br />
2,5 LB<br />
1000 g /<br />
2 LB<br />
Buttermilk 530 ml 490 ml 370 ml<br />
Butter / Margarine 1 ¾ tbsp 1 ½ tbsp 1 tbsp<br />
Salt 1 ¾ tsp 1 ½ tsp 1 tsp<br />
Sugar 1 ¾ tbsp 1 ½ tbsp 1 tbsp<br />
Plain Flour 455 g 420 g 315 g<br />
Whole Rye Flour 455 g 420 g 315 g<br />
Dry Yeast 1 ¾ tsp 1 ½ tsp 1 tsp<br />
Program: NORMAL (basic)<br />
French Crunch Bread<br />
<br />
Ingredient<br />
Loaf Size<br />
1400 g /<br />
3 LB<br />
1200 g /<br />
2,5 LB<br />
1000 g /<br />
2 LB<br />
Water 500 ml 460 ml 350 ml<br />
Butter / Margarine 3 tbsp 2 ¼ tbsp 1 ½ tbsp<br />
Dry Milk 2 tbsp 1 ½ tbsp 1 tbsp<br />
Sugar 3 ½ tbsp 3 tbsp 2 tbsp<br />
Salt 1 ¾ tsp 1 ½ tsp 1 tsp<br />
Plain Flour 910 g 840 g 630 g<br />
Dry Yeast 1 ¾ tsp 1 ½ tsp 1 tsp<br />
Program: FRANZÖSISCH (french)<br />
Quick Corn Bread<br />
<br />
Ingredient<br />
Loaf Size<br />
1400 g /<br />
3 LB<br />
1200 g /<br />
2,5 LB<br />
1000 g /<br />
2 LB<br />
Milk 530 ml 490 ml 370 ml<br />
Butter / Margarine 3 ½ tbsp 3 tbsp 2 tbsp<br />
Dry Milk 1 ¾ tsp 1 ½ tsp 1 tsp<br />
Sugar 2 tsp 1 ½ tsp 1 tsp<br />
Salt 2 tsp 1 ½ tsp 1 tsp<br />
Bread Flour 650 g 600 g 450 g<br />
Corn Flour 260 g 240 g 180 g<br />
Baking Powder 8 tsp 6 tsp 4 tsp<br />
Program: SCHNELL (quick)<br />
Cakes<br />
Pound Cake<br />
Ingredients 1. Put eggs, butter, sugar and vanilla sugar in<br />
container and stir the mixture by hand mixer<br />
Eggs 3<br />
to produce foam.<br />
Sugar<br />
125 g<br />
2. Add flour and baking powder to the mixture<br />
Butter / Margarine<br />
125 g and continue to stir.<br />
Vanilla Sugar<br />
1 package<br />
3. Hone the dough with milk.<br />
Milk<br />
up to ¼ cup<br />
4. Pour dough into bread pan coated with butter<br />
Plain Flour<br />
300 g or oil; use KUCHEN (cake) program to make<br />
Baking Powder<br />
1 package cake.<br />
5. If desired, add chocolate sprinkles or similar ingredients<br />
to the bread pan. The bread maker<br />
will stir them in.<br />
Red Wine Cake<br />
Ingredients 1. Mix eggs, butter, sugar, vanilla sugar and salt<br />
together in a contianer using a hand mixer.<br />
Eggs 3<br />
2. Add flour, baking powder, cocoa and cinnamon<br />
and continue to stir.<br />
Sugar<br />
150 g<br />
Butter / Margarine<br />
250 g<br />
3. Pour red wine into the mixture and stir evenly<br />
Plain Flour<br />
250 g<br />
by hand.<br />
Baking Powder<br />
1 package<br />
4. Pour dough into bread pan coated with butter<br />
or oil and add chocolate sprinkles. Then use<br />
Cocoa<br />
1 ½ tbsp<br />
Cinnamon<br />
2 tsp KUCHEN (cake) program to make cake.<br />
Salt<br />
1 pinch<br />
Chocolate Sprinkles<br />
100 g<br />
Red Wine<br />
up to 1⁄8 l<br />
36<br />
Whole Wheat Bread<br />
<br />
Ingredient<br />
Loaf Size<br />
1400 g /<br />
3 LB<br />
1200 g /<br />
2,5 LB<br />
1000 g /<br />
2 LB<br />
Water 500 ml 460 ml 350 ml<br />
Butter / Margarine 1 ¾ tbsp 1 ½ tbsp 1 tbsp<br />
Salt 1 ¾ tsp 1 ½ tsp 1 tsp<br />
Sugar 1 ¾ tsp 1 ½ tsp 1 tsp<br />
Bread Flour 190 g 150 g 110 g<br />
Multi Corn Flour 720 g 690 g 520 g<br />
Dry Yeast 3 ½ tsp 3 tsp 2 tsp<br />
Program: VOLLKORN (whole wheat)<br />
Cake Bread<br />
<br />
Ingredient<br />
Loaf Size<br />
1400 g /<br />
3 LB<br />
1200 g /<br />
2,5 LB<br />
1000 g /<br />
2 LB<br />
Milk 530 ml 490 ml 370 ml<br />
Butter / Margarine 90 g 75 g 50 g<br />
Eggs 4 pcs 4 pcs 3 pcs<br />
Sugar 90 g 75 g 50 g<br />
Salt 1 ¾ tsp 1 ½ tsp 1 tsp<br />
Plain Flour 910 g 840 g 630 g<br />
Dry Yeast 1 ¾ tsp 1 ½ tsp 1 tsp<br />
Program: SÜSS (sweet)<br />
Rum Crunch Cake<br />
Ingredients 1. Put eggs, butter, sugar, vanilla sugar and salt<br />
in container and stir the mixture with a hand<br />
Eggs 4<br />
mixer to produce foam.<br />
Sugar<br />
100 g<br />
2. Then add flour and baking powder to the<br />
Butter / Margarine<br />
75 g mixture and continue stirring. During stirring,<br />
Vanilla Sugar<br />
1 package mix the rum into the dough.<br />
Salt<br />
1 pinch 3. Pour dough into bread pan coated with butter<br />
Rum<br />
4 tbsp or oil and add chopped rum crunch chocolate.<br />
Plain Flour<br />
150<br />
Then use KUCHEN (cake) program to make<br />
g<br />
cake.<br />
Baking Powder<br />
1 package<br />
Chopped Rum Crunch Chocolate 50 g<br />
37
GB<br />
GB<br />
Tips & Tricks<br />
38<br />
Jams<br />
Orange Marmalade<br />
Ingredients<br />
Orange Juice<br />
Cut Orange<br />
Lemon Juice<br />
Preserving Sugar (3 plus 1)<br />
Program: MARMELADE (jam)<br />
Forest Berries Jam<br />
Ingredients<br />
Grated Forest Berries<br />
1 l<br />
1 pcs<br />
50 ml<br />
500 g<br />
1 kg<br />
Lemon Juice (only for very sweet fruits)up to 100 ml<br />
Preserving Sugar (2 plus 1)<br />
Program: MARMELADE (jam)<br />
500 g<br />
• Want to test the consistency of your marmelade,<br />
jelly or jam? Remove some of the<br />
hot mass with a spoon and place it on a cold<br />
porcelain plate. This test amount will cool<br />
within a few minutes and you can check the<br />
consistency.<br />
• Is your jam, etc. too liquid? Add some citric<br />
acid. This makes the mass more gelatinous.<br />
• Is your jam, etc. too thick? Add some water<br />
or fruit juice to make it less gelatinous.<br />
Buttermilk Dough for Bread Rolls, etc.<br />
Size<br />
Ingredient<br />
1400 g /<br />
3 LB<br />
1200 g /<br />
2,5 LB<br />
1000 g /<br />
2 LB<br />
Buttermilk 450 ml 420 ml 310 ml<br />
Eggs 2 pcs 1 pcs 1 pcs<br />
Salt 2 tsp 1 ½ tsp 1 tsp<br />
Whole Wheat Flour 320 g 300 g 220 g<br />
Plain Flour 490 g 450 g 340 g<br />
Dry Yeast 2 tsp 1 ½ tsp 1 tsp<br />
Program: TEIG (dough)<br />
Ultra Fast Wheat Germ Bread<br />
<br />
Ingredient<br />
Loaf Size<br />
1400 g /<br />
3 LB<br />
1200 g /<br />
2,5 LB<br />
1000 g /<br />
2 LB<br />
Water (48°C) 490 ml 450 ml 340 ml<br />
Caraway 2 tsp 1 ½ tsp 1 tsp<br />
Olive Oil 2 tbsp 1 ½ tbsp 1 tbsp<br />
Honey 2 tbsp 1 ½ tbsp 1 tbsp<br />
Salt 2 tsp 1 ½ tsp 1 tsp<br />
Wheat Germs 100 g 90 g 70 g<br />
Plain Flour 810 g 750 g 560 g<br />
Dry Yeast 2 ½ tsp 2 tsp 1 ½ tsp<br />
Program: ULTRASCHNELL (ultra fast)<br />
Bake<br />
Unfortunately, we cannot offer you a recipe for the<br />
BACKEN (bake) program.<br />
Dessert<br />
Apple Crisp<br />
Ingredients<br />
Medium Cooking Apples<br />
Lemon Juice<br />
6 pcs<br />
1 tsp<br />
Egg 1<br />
Soft Sugar<br />
All-purpose Flour<br />
Quick cooking Oats<br />
Butter / Margarine (softened)<br />
Program: DESSERT (dessert)<br />
Rice Pudding<br />
Ingredients<br />
½ cup<br />
1 cup<br />
¹⁄3 cup<br />
3 ½ tbsp<br />
Slightly Beaten Eggs 4<br />
Milk<br />
Cooked Rice<br />
Sugar<br />
Raisin (optional)<br />
Vanilla<br />
Cinnamon<br />
Program: DESSERT (dessert)<br />
1 ¾ cups<br />
3 cups<br />
½ cup<br />
1 cup<br />
1 tsp<br />
2 tsp<br />
WARRANTY<br />
In the EU and Switzerland, the following conditions apply for the warranty, which begins on the<br />
date of purchase of the product:<br />
1. Warranty period: 2 years<br />
2. Conditions of warranty:<br />
a) Parts which exhibit defects in material and/or<br />
workmanship after our inspection will either<br />
be repaired or replaced at our discretion.<br />
b) The warranty will only be honoured upon<br />
presentation of this warranty card and<br />
purchase receipt. This warranty is only valid<br />
if it is filled out on the date of sale and in a<br />
complete and appropriate manner.<br />
c) This warranty is only valid for the first owner<br />
of the device.<br />
d) No replacement or repair of parts performed<br />
within the warranty period shall provide<br />
grounds for any extension of the original<br />
warranty period.<br />
e) Any transportation costs shall be borne by<br />
the purchaser (this shall not apply during the<br />
first 6 months of the warranty).<br />
f) Within the first 6 months after the purchase/<br />
delivery of the device, if the damage or defect<br />
cannot be eliminated, if we refuse to<br />
repair the defect, or in the event of a delay<br />
in our repairing of the device, then the end<br />
user can choose from one of three options:<br />
the device will be replaced free of charge, its<br />
value will be reimbursed, or the device will<br />
be taken back with a refund of the original<br />
purchase price which shall not exceed the<br />
usual market price.<br />
3. The warranty does not apply to:<br />
• spots and scratches on the device<br />
• control lamps and lights<br />
• motor brushes<br />
• easily breakable parts (e. g. bakelite, plastic,<br />
glass), even in the case of defects in material<br />
as recognized by us<br />
• damage due to improper installation or<br />
improper repair<br />
• damage caused by an inappropriate voltage<br />
supply or an inappropriate electricity<br />
network<br />
• improper or inappropriate use of the equipment<br />
• unsatisfactory care<br />
• damage caused by incompetent or insufficient<br />
maintenance<br />
• damage caused by dropping the equipment<br />
or part thereof<br />
• improper transportation or insufficient packaging<br />
during transportation<br />
4. The warranty shall be deemed void:<br />
• in the case of use or application of the device<br />
for something other than its intended use for<br />
household purposes.<br />
• in the case of any servicing or repairing of the<br />
device performed by third parties that have<br />
not been authorized for such purpose by our<br />
company.<br />
A 2-year warranty is provided for damage caused by defects in material or workmanship. The<br />
warranty period shall begin on the day of delivery or on the day the buyer takes possession<br />
of the item, and the warranty will only be honoured upon presentation of the warranty card<br />
and the purchase receipt. No further claims shall be granted.<br />
Model:<br />
Stamp and signature of salesperson<br />
Important! Please write down the FD-code<br />
located on the rating plate here:<br />
Date of sale<br />
39
F<br />
F<br />
40<br />
IMPORTANTS!<br />
VEUILLEZ LIRE ATTENTIVEMENT LE MODE<br />
D‘EMPLOI AVANT DE METTRE L‘APPAREIL EN<br />
SERVICE. CONSERVEZ CE MODE D’EMPLOI.<br />
CONSIGNES DE SÉCURITÉ<br />
IMPORTANTES<br />
Lors de l‘utilisation d‘appareils électriques, il<br />
convient de respecter les mesures de sécurité<br />
suivantes, afin d‘éviter tout risque de décharge<br />
électrique, de blessure ou d‘incendie.<br />
• Cet appareil convient uniquement pour une<br />
utilisation ménagère, et non pour une utilisation<br />
professionnelle.<br />
• Avant de le brancher sur le secteur électrique,<br />
veuillez vous assurer que la tension du secteur<br />
correspond à celle indiquée sur la plaque signalétique<br />
de l‘appareil.<br />
• Cet appareil est équipé d‘une fiche de prise<br />
de courant de sécurité, et ne doit être branché<br />
qu‘à une prise de courant de sécurité installée<br />
conformément aux consignes.<br />
• N‘employez l‘appareil que pour les utilisations<br />
pour lesquelles il a été conçu.<br />
• N‘employez pas l‘appareil à l‘extérieur.<br />
• Ne plus employer l‘appareil si:<br />
– son câble de branchement au secteur<br />
ou sa prise sont endommagés,<br />
– il ne fonctionne pas correctement,<br />
– il est tombé,<br />
– il présente des détériorations.<br />
Dans les cas sus-mentionnés, il faut renvoyer<br />
l‘appareil au fabricant ou au SAV afin qu‘il soit<br />
soumis à un contrôle, à une réparation ou à ce<br />
qu‘il soit ajusté32.<br />
• N‘utilisez que les accessoires conseillés par le<br />
fabricant. L‘utilisation d‘autres accessoires peut<br />
détériorer l‘appareil, voire même provoquer des<br />
blessures sur les personnes.<br />
• Ne démarrez jamais l‘appareil avant que le moule<br />
ne soit correctement positionné et rempli des<br />
ingrédients nécessaires.<br />
• Pour retirer le pain, ne frappez jamais sur les<br />
angles ni sur la partie supérieure du moule. Cela<br />
risquerait de l‘abîmer.<br />
• Afin d‘éviter toute décharge électrique, ne mettez<br />
jamais le câble, la prise ou le boîtier dans<br />
l‘eau ou dans tout autre liquide.<br />
• Après chaque utilisation, débranchez l‘appareil.<br />
Faites-en de même avant d‘installer ou de retirer<br />
des accessoires, ou avant de nettoyer<br />
l‘appareil.<br />
• Avant de débrancher l‘appareil, stoppez tous<br />
les programmes en cours.<br />
• Veillez à ce que le câble ne pende pas de la table<br />
ou du plan de travail. Protégez le câble des<br />
surfaces chaudes.<br />
• Ne posez pas le câble sur ou à proximité des<br />
plaques de cuisson ni sur un four chaud.<br />
• Ne mettez jamais de films métalliques ou autres<br />
matériaux dans la machine à pain. Cela<br />
risquerait de provoquer un incendie ou un<br />
court-circuit.<br />
• Assurez-vous que l‘appareil n‘entre pas en<br />
contact avec des matériaux facilement inflammables<br />
(par ex. rideaux, textiles, murs, etc.),<br />
et qu‘il ne soit pas recouvert. Si la chaleur et<br />
la vapeur générées par la machine à pain ne<br />
peuvent pas s‘évacuer correctement, il y a un<br />
risque d‘incendie.<br />
• Pendant le fonctionnement, l‘appareil chauffe.<br />
Par conséquent, ne touchez pas les surfaces<br />
chaudes: utilisez des poignées et les interrupteurs.<br />
• Ne touchez jamais les parties rotatives.<br />
• Ne transportez pas l‘appareil s‘il contient des<br />
liquides chauds (par ex. de la confiture).<br />
• L‘appareil ne doit pas être utilisé par des personnes<br />
dont les facultés mentales / physiques<br />
sont limitées, ni par les enfants. Ceux-ci ne<br />
sont pas conscients du danger existant lors<br />
de l‘utilisation d‘appareils électriques. C‘est<br />
pourquoi il est impératif de ne jamais laisser<br />
d‘enfants utiliser cet appareil électrique sans<br />
surveillance. En présence d‘enfants, veuillez<br />
faire preuve d‘une très grande vigilance.<br />
• Il convient de toujours surveiller les enfants,<br />
afin de s‘assurer qu‘ils ne se servent pas de<br />
l‘appareil comme d‘un jouet.<br />
AVANT LA PREMIERE UTILISATION<br />
1. Assurez-vous que toutes les pièces et tous les<br />
accessoires sont complets et en bon état.<br />
2. Nettoyez toutes les pièces comme décrit au<br />
paragraphe „Nettoyage et entretien“.<br />
3. Mettez en mode cuisson BACKEN (cuisson),<br />
et préchauffez pendant environ 10 minutes.<br />
Laissez refroidir l‘appareil, retirez les pièces, et<br />
nettoyez-les à nouveau.<br />
4. Séchez bien toutes les pièces, et replacez-les.<br />
L‘appareil est désormais prêt à l‘utilisation.<br />
REMARQUES SUR LE PANNEAU<br />
DE COMMANDE *<br />
14<br />
15<br />
16<br />
17<br />
18<br />
1. Normal<br />
2. Vollkorn<br />
3. Französisch<br />
4. Schnell<br />
5. SÜSS<br />
6. Kuchen<br />
Kneten 1 AUFGEHEN 1 KneTEN 2 AUFGEHEN 2<br />
AUFGEHEN 3 BaCkeN WarmHALTEN<br />
1000g 1200g 1400g<br />
PAUSE<br />
ZEIT<br />
GRÖSSE<br />
MENÜ<br />
14 Programmes au choix<br />
15 Partie de programme<br />
16 Blocage des touches<br />
17 Programme sélectionné<br />
7. Marmelade<br />
8. Teig<br />
9. Ultraschnell<br />
10. Backen<br />
11. Dessert<br />
12. Hausgemacht<br />
HELL MITTEL DUNKEL<br />
PROZESS<br />
LICHT<br />
FARBE<br />
START<br />
STOPP<br />
19<br />
20<br />
18 Taille du pain<br />
19 Durée du programme<br />
20 Degré de brunissement<br />
* Le fabricant se réserve le droit de procéder à des modifications<br />
du panneau de commande, et ce sans notification<br />
préalable.<br />
APRES LE BRANCHEMENT SUR LE SECTEUR<br />
Dès que vous branchez l‘appareil sur le secteur, un<br />
bip retentit, et il apparaît sur l‘écran „1 2:55, 1200g<br />
MITTEL (intermédiaire) “. Mais les deux points entre<br />
les chiffres „2“ et „55“ (19) ) ne clignote pas.<br />
Le chiffre „1“ indique le programme pré-réglé (17).<br />
Le poids de „1200 g“ (18) et le degré de brunisage<br />
„MITTEL (intermédiaire)“ (20) sont les valeurs réglées<br />
en usine.<br />
START/SToPP (démarrage / fin)<br />
Cette touche permet de mettre en marche ou<br />
d‘arrêter le programme choisi. Pour démarrer<br />
le programme, laissez la touche START / STOPP<br />
(démarrage / fin) appuyée pendant 1,5 secondes.<br />
Retentit alors un bref bip, puis les deux points de<br />
l‘heure se mettent à clignoter : le programme se<br />
met en marche.<br />
Une fois que le programme a démarré, à part les<br />
touches START / STOPP (démarrage / fin), LICHT<br />
(lumière) et PAUSE (pause), aucune autre touche<br />
ne fonctionne.<br />
Pour arrêter le programme, laissez la touche START<br />
/ STOPP (démarrage / fin) appuyée pendant environ<br />
1,5 secondes. Un bip confirme alors l‘arrêt du<br />
programme. Cette fonction permet d‘empêcher<br />
une interruption involontaire de la cuisson.<br />
MENÜ (menu)<br />
Sélectionnez le programme souhaité en utilisant<br />
la touche MENÜ (menu). Après chaque pression<br />
sur les touches (accompagnée par un signal sonore),<br />
l‘affichage du programme change (17). Les<br />
fonctions des 12 différents programmes (14) sont<br />
expliquées ci-après.<br />
1. Normal (normal): Pétrissage simple, laisser<br />
lever la pâte, et cuisson de pain normal. Pour améliorer<br />
le goût, ajoutez des ingrédients.<br />
2. VOLLKORN (pain complet): Pétrissage, laisser<br />
lever la pâte, et cuisson de pain à base de farine<br />
complète. Il n‘est pas conseillé d‘utiliser la fonction<br />
„Retarder“, car le résultat n‘est pas particulièrement<br />
bon.<br />
3. FRANZÖSISCH (français): Pétrissage, laisser<br />
lever la pâte, et cuisson de pain avec durée prolongée.<br />
Le pain a une croûte croustillante et une<br />
structure légère.<br />
41
F<br />
F<br />
42<br />
4. SCHNELL (rapide): Pétrissage, laisser lever la<br />
pâte et cuisson de pain plus rapidement qu‘en<br />
programme NORMAL (normal). Le pain fabriqué<br />
ainsi est généralement plus petit et plus dense<br />
que le pain normal.<br />
5. Süss (sucre): Pétrissage, laisser lever la pâte, et<br />
cuisson de biscuits sucrés. Pour améliorer l‘arôme,<br />
vous pouvez ajouter des ingrédients.<br />
6. Kuchen (gateau): Pétrissage, laisser lever la pâte<br />
et cuisson. La phase de levage de la pâte se fait à<br />
l‘aide de levure ou de soda.<br />
7. Marmelade (confiture): Faire bouillir de la<br />
confiture tout en remuant sans discontinuer. Avant<br />
de mettre des fruits ou des légumes dans le moule,<br />
il convient de les couper en petits morceaux.<br />
8. Teig (pate): Pétrissage et laisser lever la pâte sans<br />
cuisson. Retirez la pâte et utilisez-la pour faire des<br />
pizzas, des petits pains, des pâtes vapeur, etc.<br />
9. Ultraschnell (ultra-rapide): Pétrissage, laisser<br />
lever la pâte et faire cuire en un temps record. Le<br />
pain obtenu est épais.<br />
10. Backen (cuisson): Cuisson seule, sans pétrissage<br />
ni levage de la pâte. Utilisez cette fonction<br />
pour prolonger le temps de cuisson des autres<br />
programmes.<br />
Le temps de cuisson se règle en appuyant sur le<br />
bouton ZEIT (horloge). Si vous le maintenez appuyé,<br />
le temps s‘écoule plus rapidement.<br />
11. Dessert (dessert): Pétrissage, laisser lever la<br />
pâte, et cuisson de desserts.<br />
12. Hausgemacht (fait maison): Ici, vous pouvez<br />
saisir votre propre programme, en saisissant<br />
vous-même le temps nécessaire à chaque étape.<br />
Vous pouvez définir vous-même les temps de<br />
pétrissage, de levage de la pâte, de cuisson et de<br />
maintient au chaud afin de créer votre pain préféré.<br />
La durée possible pour chaque phase (15) est prévue<br />
comme suit:<br />
KNETEN 1 (pétrissage 1)<br />
6 – 14 min.<br />
AUFGEHEN 1 (laisser lever la pâte 1) 20 – 60 min.<br />
KNETEN 2 (pétrissage 2)<br />
5 – 20 min.<br />
AUFGEHEN 2 (laisser lever la pâte 2) 5 – 120 min.<br />
AUFGEHEN 3 (laisser lever la pâte 3) 0 – 120 min.<br />
BACKEN (cuisson)<br />
0 – 80 min.<br />
WARMHALTEN (maintenir au chaud) 0 – 60 min.<br />
Dans le menu HAUSGEMACHT (fait maison):<br />
1. Appuyez une fois sur la touche PROZESS<br />
(travailler). Il apparaît KNETEN 1 (pétrir 1) (15)<br />
sur l‘écran. Activez ensuite la touche horloge<br />
pour saisir la durée (19) en minutes. Le temps<br />
passe plus vite si vous avez activé la touche<br />
ZEIT (horloge). Pour confirmer votre sélection<br />
pour la première étape, appuyez sur la touche<br />
PROZESS (travailler).<br />
2. Pour accéder à l‘étape suivante, appuyez sur<br />
la touche PROZESS (travailler). AUFGEHEN 1<br />
(lever la pâte 1) (15) apparaît sur l‘écran. Appuyez<br />
sur la touche ZEIT (horloge) afin de (19)<br />
régler le temps, et confirmez votre choix en<br />
ré-appuyant sur la touche PROZESS (travail).<br />
3. Procédez de la même manière pour régler les<br />
étapes suivantes. Pour quitter le mode programmation,<br />
appuyez sur START / STOPP (démarrage<br />
/ fin).<br />
4. Pour démarrer le programme, appuyez<br />
à nouveau sur la touche START / STOPP<br />
(démarrage / fin).<br />
Remarque: Le réglage s‘enregistre pour la prochaine<br />
utilisation.<br />
FARBE (couleur)<br />
Utilisez cette touche pour définir le degré de<br />
brunissement de la croûte du pain: HELL (clair);<br />
MITTEL (intermédiaire); ou DUNKEL (foncé) (20).<br />
GRÖSSE (taille)<br />
Appuyez sur cette touche pour définir le poids du<br />
pain: 1000 g, 1200 g ou 1400 g. votre choix apparaît<br />
sur (18) l‘écran. Veuillez garder à l‘esprit que le<br />
temps de cuisson varie selon le poids du pain.<br />
Farines mixtes pour pains de 750 g<br />
Si vous utilisez ces farines, réglez votre machine<br />
à pain sur (18) 1000 g. Vos pains seront alors<br />
réussis à tous les coups!<br />
Si votre pain devient trop foncé, réduisez le degré<br />
de brunissage ou stoppez le programme env.<br />
5 à 10 minutes avant la fin du programme, en<br />
appuyant sur la touche START / STOP (démarrage<br />
/ fin).<br />
CONSEILS ET ASTUCES<br />
CONSEILS ET ASTUCES<br />
La GRÖSSE (taille) ne peut être choisie que pour<br />
les programmes suivants: 1. NORMAL (normal), 2.<br />
VOLLKORN (complet), 3. FRANZÖSISCH (francais), 4.<br />
SCHNELL (rapide), 5. SÜSS (sucré et), 9. ULTRASCHNELL<br />
(ultra-rapide).<br />
Réglage du poids 1400 g<br />
Testez la quantité petit à petit! Commencez à<br />
tester votre recette avec 1200 g.<br />
Lors des phases de levage, certaines pâtes (par<br />
ex. le pain blanc, le pain sucré) risquent de déborder<br />
du moule.<br />
S‘il reste de la place après la cuisson, vous pourrez<br />
augmenter la quantité petit à petit.<br />
Merci de votre comprehension!<br />
LICHT (lumière)<br />
En activant cette touche, vous allumez l‘éclairage.<br />
C‘est pratique pour contrôler la cuisson.<br />
En ré-appuyant sur la touche dans la minute qui<br />
suit, la lumière s‘éteint. Si vous n‘appuyez pas sur<br />
la touche dans la minute qui suit, la lumière s‘éteint<br />
automatiquement.<br />
ZEIT (durée)<br />
Si vous ne souhaitez pas que la cuisson commence<br />
immédiatement, cette touche vous permettra<br />
d‘indiquer l‘heure à laquelle vous souhaitez qu‘elle<br />
commence.<br />
Voici comment régler le retardement:<br />
1. Sélectionnez le programme souhaité (17), le<br />
poids du pain (18) et le brunissage (20).<br />
2. Vous définirez le temps de décalage en activant<br />
la touche ZEIT (horloge). L‘heure indiquée sur<br />
l‘écran (19) est celle de la fin du programme<br />
sélectionné.<br />
Supposons qu‘il est 20h30 et que vous voulez<br />
que votre pain soit prêt demain à 7 heures.<br />
Dans ce cas, la durée totale est de 10 heures<br />
et 30 minutes. Appuyez sur la touche ZEIT (horloge)<br />
jusqu‘à ce qu‘il apparaisse 10h30 (19) sur<br />
l‘écran. Le temps au choix augmente par tranches<br />
de 10 minutes.<br />
3. Pour démarrer le programme de démarrage<br />
en différé, appuyez sur la touche START<br />
/ STOPP (démarrage / fin). Les doubles points<br />
de l‘horaire commencent alors à clignoter. Le<br />
temps indiqué est le temps restant.<br />
À noter : le décalage maximal est de 13 heures.<br />
N‘utilisez pas d‘ingrédients périssables tels que lait,<br />
œufs, fruits ou oignons en mode „début différé.<br />
PROZESS (travailler)<br />
Cette touche vous permet, sous le MENÜ (menu) 12<br />
HAUSGEMACHT (fait maison), de régler votre propre<br />
programme de cuisson personnel.<br />
PAUSE (pause)<br />
Une fois que le programme a commencé, vous<br />
pouvez l‘interrompre à tout moment au moyen<br />
de la touche PAUSE (pause). Appuyez sur la touche<br />
pendant environ 1,5 secondes : le programme est<br />
stoppé, mais le réglage reste enregistré. Le temps<br />
restant clignote sur l‘écran.<br />
Le programme est poursuivi dès que vous appuyez<br />
à nouveau sur le bouton PAUSE (pause).<br />
FONCTION DE MAINTIEN AU CHAUD<br />
Le pain est maintenu au chaud automatiquement<br />
jusqu’à une heure après la cuisson (15). Si<br />
vous souhaitez retirer le pain pendant la phase de<br />
maintien au chaud, stoppez le programme au moyen<br />
de la touche START / STOPP (démarrage / fin).<br />
FONCTION MEMOIRE<br />
Si l‘alimentation électrique est interrompue pendant<br />
la cuisson du pain, la procédure peut être<br />
poursuivie dans les 10 minutes sans qu‘il soit nécessaire<br />
d‘activer la touche START / STOPP (démarrage<br />
/ fin).<br />
Si l‘interruption dure plus de 10 minutes, la machine<br />
ne peut pas enregistrer le programme. Retirez<br />
les ingrédients du moule, jetez-les à la poubelle,<br />
et remplissez le moule de nouveaux ingrédients.<br />
Redémarrez la machine. Si, lors de la coupure<br />
d‘électricité, le pain était en phase de pétrissage<br />
et qu‘il n‘avait pas encore atteint la phase<br />
de levage, vous pouvez alors activer la touche<br />
START / STOPP (démarrage / fin) et redémarrer le<br />
programme.<br />
43
F<br />
F<br />
44<br />
TABLEAU DES PHASES<br />
N° de programme<br />
Réglages<br />
TAILLE<br />
Réglages<br />
COULEUR<br />
PÉTRISSAGE 1<br />
LEVAGE DE LA<br />
PÂTE 1<br />
PÉTRISSAGE 2<br />
LEVAGE DE LA<br />
PÂTE 2<br />
LEVAGE DE LA<br />
PÂTE 3<br />
CUISSON<br />
Durée totale du<br />
programme<br />
Signal pour ajouter<br />
des ingrédients en<br />
mode maintient<br />
au chaud<br />
1 1400 g CLAIR; 10 min. 20 min. 15 min. 25 min. 45 min. 65 min. 3:00 2:20<br />
1200 g<br />
INTERMÉ-<br />
DIARE;<br />
10 min. 20 min. 15 min. 25 min. 45 min. 60 min. 2:55 2:15 ✓<br />
1000 g SOMBRE 10 min. 20 min. 12 min. 25 min. 48 min. 55 min. 2:50 2:13<br />
2 1400 g CLAIR; 10 min. 25 min. 20 min. 35 min. 65 min. 65 min. 3:40 2:55<br />
1200 g<br />
INTERMÉ-<br />
DIARE;<br />
8 min. 25 min. 18 min. 35 min. 65 min. 60 min. 3:32 2:50 ✓<br />
1000 g SOMBRE 8 min. 25 min. 16 min. 35 min. 70 min. 55 min. 3:30 2:50<br />
3 1400 g CLAIR; 18 min. 40 min. 22 min. 30 min. 50 min. 70 min. 3:50 2:40<br />
1200 g<br />
INTERMÉ-<br />
DIARE;<br />
16 min. 40 min. 19 min. 30 min. 50 min. 65 min. 3:40 2:35 ✓<br />
1000 g SOMBRE 13 min. 40 min. 17 min. 30 min. 50 min. 60 min. 3:30 2:30<br />
4 1400 g CLAIR; 10 min. 10 min. 10 min. — 30 min. 70 min. 2:10 1:45<br />
1200 g<br />
INTERMÉ-<br />
DIARE;<br />
10 min. 10 min. 10 min. — 30 min. 65 min. 2:05 1:40 ✓<br />
1000 g SOMBRE 10 min. 10 min. 10 min. — 30 min. 60 min. 2:00 1:35<br />
5 1400 g CLAIR; 10 min. 5 min. 20 min. 33 min. 40 min. 62 min. 2:50 2:25<br />
1200 g<br />
INTERMÉ-<br />
DIARE;<br />
10 min. 5 min. 20 min. 32 min. 40 min. 58 min. 2:45 2:20 ✓<br />
1000 g SOMBRE 10 min. 5 min. 15 min. 32 min. 47 min. 53 min. 2:42 2:22<br />
6<br />
CLAIR;<br />
INTERMÉ-<br />
—<br />
DIARE;<br />
6 min. 5 min. 10 min. 9 min. — 80 min. 1:50 1:34 ✓<br />
SOMBRE<br />
7 — — — 15 min. — — 45 min. 20 min. 1:20 — —<br />
8 — — 20 min. — — 30 min. 40 min. — 1:30 — —<br />
9 1400 g CLAIR; 10 min. — 5 min. — 33 min. 60 min. 1:48 1:38<br />
1200 g<br />
INTERMÉ-<br />
DIARE;<br />
10 min. — 5 min. — 28 min. 55 min. 1:38 1:28 ✓<br />
1000 g SOMBRE 10 min. — 5 min. — 28 min. 52 min. 1:35 1:25<br />
10<br />
CLAIR;<br />
10 min. 0:10<br />
INTERMÉ-<br />
—<br />
— — — — — à à<br />
DIARE;<br />
SOMBRE<br />
60 min. 1:00<br />
— ✓<br />
11<br />
12<br />
—<br />
—<br />
CLAIR;<br />
INTERMÉ-<br />
DIARE;<br />
SOMBRE<br />
CLAIR;<br />
INTERMÉ-<br />
DIARE;<br />
SOMBRE<br />
13 min. — — — 25 min.<br />
6 min.<br />
à<br />
14 min.<br />
20 min.<br />
à<br />
60 min.<br />
5 min.<br />
à<br />
20 min.<br />
5 min.<br />
à<br />
120 min.<br />
0 min.<br />
à<br />
120 min.<br />
60<br />
min.<br />
0 min.<br />
bis<br />
80 à.<br />
1:38 — ✓<br />
0:36<br />
bis<br />
7:54<br />
pendant<br />
PÉTRIS-<br />
SAGE<br />
✓<br />
BLOCAGE DU PANNEAU<br />
DE COMMANDE<br />
Afin d‘empêcher une utilisation involontaire, il est<br />
possible (16) de bloquer les touches du panneau<br />
de commande. Dans un premier temps, activez<br />
la touche PROZESS (travailler), puis la touche FAR-<br />
BE (couleur). Le panneau de commande est alors<br />
bloqué, à l‘exception des touches PROZESS (travailler)<br />
et FARBE (couleur). Cette fonction permet<br />
d‘empêcher les interruptions involontaires dues à<br />
une activation non voulue des touches.<br />
Annulez le blocage des touches en appuyant<br />
d‘abord sur la touche PROZESS (travailler), puis<br />
sur la touche FARBE (couleur). Si vous n‘activez<br />
pas le blocage des touches, celles-ci seront automatiquement<br />
bloquées 5 minutes après le début<br />
du programme. Le blocage des touches (16) doit<br />
être supprimé pour que vous puissiez procéder à<br />
d‘autres réglages de l‘appareil.<br />
ENVIRONNEMENT<br />
La machine à pain peut s‘employer à différentes<br />
températures ambiantes. Néanmoins, la taille du<br />
pain peut alors varier, selon qu‘il a été cuit dans<br />
un endroit plus ou moins chaud. Nous conseillons<br />
une température ambiante entre 15°C et 34°C.<br />
AVERTISSEMENT<br />
• S‘il apparaît (19) „H HH“ après le début du programme,<br />
cela signifie que la température dans<br />
la chambre de cuisson est encore trop élevée.<br />
Stopper le programme. Ouvrez le couvercle et<br />
laissez l‘appareil entièrement refroidir (10 à 20<br />
minutes) avant de l‘utiliser.<br />
• S‘il apparaît (19) „E E0“ ou „E E1“ après que vous<br />
avez appuyé sur „START / STOPP (démarrage /<br />
fin)“, cela signifie que le capteur thermique est<br />
endommagé. Il faut alors qu‘il soit contrôlé par<br />
un SAV qualifié.<br />
VOILA COMMENT FAIRE<br />
CUIRE LE PAIN<br />
1. Positionnez correctement le moule à pain (6 / 8) et<br />
pressez-le vers le bas jusqu‘à ce qu‘il s‘insère en faisant<br />
clic. Insérez les crochets de pétrissage (7 / 9)<br />
sur l‘arbre d‘entraînement. Au préalable,<br />
graissez les arbres d‘entraînement et les crochets<br />
de pétrissage, par ex. avec de la margarine,<br />
afin de pouvoir les détacher facilement.<br />
2. Mettez les ingrédients dans le moule (6 / 8). Veillez<br />
à respecter l‘ordre indiqué dans la recette.<br />
Normalement, vous mettez d‘abord l‘eau ou les<br />
autres liquides, puis le sucre, le sel et la farine.<br />
Ajoutez toujours la levure en dernier.<br />
Remarque: Veuillez respecter les quantités indiquées<br />
pour le levain et la farine dans chaque<br />
recette.<br />
3. Avec les doigts, faites un petit trou dans la farine,<br />
et ajoutez-y la levure. Assurez-vous que celle-ci<br />
n‘entre pas en contact avec des liquides ni du sel.<br />
Levure<br />
Ingrédients secs<br />
Eau ou autres liquides<br />
4. Fermez le couvercle (2) et branchez l‘appareil.<br />
5. Appuyez sur la touche MENÜ (menu) jusqu‘à<br />
avoir choisi (17) le programme souhaité.<br />
6. Sélectionnez le poids souhaité pour votre pain<br />
(18) en activant la touche GRÖSSE (taille).<br />
7. Pour définir la coloration de la croûte (20), appuyez<br />
sur la touche FARBE (couleur).<br />
8. Réglez le démarrage en différé (19) au moyen<br />
de la touche ZEIT (horloge). Si vous voulez que<br />
la machine à pain démarre immédiatement,<br />
vous pouvez passer cette étape.<br />
9. Pour démarrer le programme, maintenez appuyée<br />
la touche START / STOPP (démarrage / fin)<br />
pendant 1,5 secondes.<br />
10. Si le programme 1. NORMAL (normal), 2. VOLL-<br />
KORN (complet), 3. FRANZÖSISCH (francais), 4.<br />
SCHNELL (rapide), 5. SÜSS (sucré), 6. KUCHEN<br />
(gâteau), 9. ULTRASCHNELL (ultra-rapide) ou<br />
12. HAUSGEMACHT (fait maison) est préprogrammé,<br />
un signal sonore retentit pendant<br />
la marche. Vous pouvez maintenant ajouter<br />
d‘autres ingrédients. Ouvrez le couvercle (2)<br />
et mettez les ingrédients.<br />
45
F<br />
F<br />
CONSEILS ET ASTUCES<br />
CONSEILS<br />
46<br />
Lorsque les quantités sont faibles, il se peut<br />
que la pâte ne se répartisse pas uniformément<br />
dans le moule – mais qu‘elle s‘accumule au<br />
contraire d‘un seul côté. Cela provoque plus<br />
tard, lors de la cuisson, un résultat non homogène.<br />
Pour obtenir un pain de jolie forme, aplanissez<br />
la pâte dans le moule au moyen d‘une spatule<br />
(13) après la deuxième phase de pétrissage<br />
KNETEN 2 (pétrissage 2) (15).<br />
Si la pate colle beaucoup a la spatule, (13) mettez<br />
celle-ci brievement dans la farine.<br />
11. La durée de la cuisson dépend du programme<br />
choisi (17), de la taille du pain (18) et de sa<br />
(20) coloration. Pour contrôler la cuisson, appuyez<br />
sur la touche LICHT (lumière) et regardez<br />
à travers la lucarne de contrôle. N‘ouvrez<br />
pas le couvercle (2)!<br />
Remarque: Il est possible que pendant la cuisson,<br />
de la vapeur s‘échappe par les rainures<br />
d‘aération du couvercle. C‘est normal.<br />
Vous ne savez pas si votre pain est bien cuit?<br />
Plantez une broche en bois dans le pain. S‘il n‘y<br />
a pas de pâte qui y reste collée, alors votre pain<br />
est prêt!<br />
12. Une fois que la cuisson est terminée, un bip<br />
retentit. Appuyez sur la touche START / STOPP<br />
(démarrage / fin) pendant env. 1,5 secondes afin<br />
de terminer le programme. Vous pouvez alors<br />
retirer le pain. Pour ce faire, ouvrez le couverc<br />
(2) avec des gants de four, et retirez le moule en<br />
le (6 / 8) soulevant vers le haut.<br />
Attention: Le moule et le pain peuvent être très<br />
chauds. Soyez prudent.<br />
13. Laissez refroidir le moule (6 / 8) avant de retirer<br />
le pain. Pour détacher le pain sur les côtés,<br />
utilisez la spatule (13) Pour ce faire, n‘utilisez<br />
jamais de couteau, cela abîmerait le film antiadhésif<br />
du moulen.<br />
14. Renversez le moule (6 / 8), tenez-le au-dessus<br />
d‘une grille ou d‘une plaque de four et agitez<br />
doucement le moule jusqu‘à ce que le pain en<br />
tombe.<br />
15. Laissez refroidir le pain pendant env. 20 minutes<br />
avant de le couper en tranches.<br />
Remarque: Nous conseillons de couper le pain au<br />
moyen d‘un couteau électrique ou d‘un couteau<br />
à dents. N‘utilisez pas de petit couteau de cuisine<br />
! Celui-ci ne convient pas et couperait le pain de<br />
manière irrégulière.<br />
16. Si vous n‘êtes pas à côté ou qu‘à la fin de la<br />
cuisson vous n‘avez pas appuyé sur la touche<br />
START / STOPP (démarrage / fin), le pain sera automatiquement<br />
maintenu au chaud pendant<br />
une heure. La fin de la fonction de maintient<br />
au chaud est annoncée par 10 bips.<br />
17. Après utilisation, ou en cas de non utilisation,<br />
débranchez l‘appareil.<br />
Attention: Avant de couper le pain en tranches,<br />
retirez du pain, au moyen de l‘outil joint (12) les<br />
crochets de pétrissage (7 / 9) Ceux-ci sont dans la<br />
partie inférieure du pain. Le pain est encore chaud,<br />
donc ne tirez pas sur les crochets avec vos doigts.<br />
Remarque: Si vous ne mangez pas le pain en entier,<br />
conservez-le dans une poche plastique hermétique<br />
ou dans tout autre récipient hermétique.<br />
Vous pouvez conserver le pain à température ambiante<br />
pendant env. 3 jours.<br />
Si vous souhaitez conserver le pain plus<br />
longtemps, emballez-le dans un sachet plastique<br />
hermétique et mettez-le au réfrigérateur. Vous<br />
pouvez le conserver pendant 10 jours.<br />
Étant donné que le pain fait maison ne contient<br />
pas de conservateurs, il ne se conserve pas plus<br />
longtemps que les pains achetés en boulangerie.<br />
CONSIGNES SPECIALES<br />
PAINS RAPIDES MENÜ 4 (menu 4) SCHNELL<br />
(rapide) ET MENÜ 9 (menu 9) ULTRASCHNELL<br />
(ultra-rapide)<br />
Les pains à fabrication rapide se préparent à base<br />
de levure ou de soda qui s‘activent au contact de liquides<br />
ou de chaleur. Pour obtenir de bons résultats,<br />
mettez en premier le liquide dans le moule (6 / 8),<br />
puis les ingrédients secs dans la partie supérieure.<br />
Pendant la première phase de pétrissage, il peut<br />
arriver que les ingrédients secs s‘accumulent dans<br />
les angles du moule. Il faut alors les mélanger, afin<br />
d‘éviter que cela ne forme des grumeaux. Utilisez<br />
pour cela uniquement des ustensiles en bois, et<br />
avant d‘ouvrir le couvercle, appuyez sur la touche<br />
PAUSE (pause).<br />
LE PROGRAMME ULTRASCHNELL<br />
(ultra-rapide), MENÜ 9 (menu 9)<br />
Avec le programme ultra-rapide, la machine à pain<br />
peut faire du pain en une heure et 38 minutes.<br />
Pour ce faire, il faut que la température de l‘eau<br />
soit de 48 à 50°C: pour bien la mesurer, utilisez un<br />
thermomètre. La température joue un rôle important<br />
et a une grande influence sur le résultat de<br />
la cuissons.<br />
Si la température de l‘eau est trop basse, le pain ne<br />
se lèvera pas et n‘atteindra pas la taille souhaitée.<br />
Si la température est trop élevée, la levure sera<br />
tuée avant qu‘elle ait eu le temps d‘agir. Le pain<br />
ne gonflera donc pas non plus, et le résultat sera<br />
médiocre.<br />
LE MOULE DOUBLE (8)<br />
Pour le réglage de la taille du pain, pensez à<br />
respecter la capacité maximale de chaque moule.<br />
Celle-ci est de 500 g.<br />
Le moule double (8) peut s‘employer pour les<br />
deux utilisations suivantes:<br />
• Pour la fabrication simultanée de deux pains de<br />
la même sorte.<br />
• Pour la fabrication simultanée de deux pains<br />
différents avec un programme.<br />
Remarque: La taille du pain doit être réglée à<br />
1000 g.<br />
NETTOYAGE ET ENTRETIEN<br />
Avant le nettoyage, débranchez l‘appareil et laissez-le<br />
refroidir entièrement.<br />
Le moule (6 / 8) et les crochets de pétrissage (7 / 9)<br />
sont prévus pour un lavage en machine.<br />
MOULE (6) ET MOULE DOUBLE (8)<br />
Retirez le moule (6 / 8) en tirant sur la poignée.<br />
Essuyez l‘intérieur et l‘extérieur du moule (6 / 8) au<br />
moyen d‘un tissu humide.<br />
N‘utilisez pas de nettoyant coupant ou agressif,<br />
afin de ne pas abîmer le film anti-dérapant. Le<br />
moule (6 / 8) doit être entièrement sec avant d‘être<br />
replacédans la machine.<br />
Remarque: Pour insérer le moule (6 / 8), pressez-le<br />
légèrement vers le bas jusqu‘à ce qu‘il soit dans la<br />
bonne position.<br />
S‘il n‘est pas possible de le presser vers le bas,<br />
changez la position jusqu‘à ce qu‘il soit fixe, puis<br />
pressez vers le bas.<br />
CROCHETS DE PÉTRISSAGE (7/ 9)<br />
S‘il est difficile de retirer du pain les crochets de<br />
pétrissage (7 / 9) utilisez alors le retire-crochets<br />
(12).<br />
Essuyez les crochets (7 / 9) au moyen d‘un chiffon<br />
humide en coton.<br />
N‘utilisez pas de nettoyant coupant ou agressif,<br />
afin de ne pas abîmer le film anti-dérapant.<br />
COUVERCLE (2) A LUCARNES (3)<br />
Essuyez l‘intérieur et l‘extérieur du couvercle (2)<br />
avec un chiffon humide.<br />
N‘utilisez pas de nettoyant coupant ou agressif,<br />
cela abîmerait la surface ultra-brillante.<br />
BOÎTIER (5)<br />
Essuyez la partie extérieure du boîtier (5) au moyen<br />
d‘un chiffon humide.<br />
N‘utilisez pas de nettoyant coupant ou agressif,<br />
cela abîmerait la surface en acier de la machine.<br />
Pour le nettoyer, ne mettez jamais le boîtier (5)<br />
dans l‘eau.<br />
AVANT DE RANGER LA MACHINE POUR<br />
LONGTEMPS<br />
Avant d‘emballer la machine pour la ranger,<br />
assurez-vous qu‘elle soit entièrement refroidie,<br />
propre et sèche. Le couvercle (2) doit être fermé.<br />
PETITE INTRODUCTION<br />
AUX ALIMENTS<br />
FARINE<br />
La farine est le principal ingrédient de votre pain.<br />
• La farine pour pain, également nommée farine<br />
de gluten ou farine d‘amidon, est certainement<br />
moulue à partir de blé dur. Elle comporte une<br />
partie importante de gluten et de protéines.<br />
Ces produits naturels confèrent à la pâte la capacité<br />
de conserver leur forme et le dioxyde de<br />
carbone produit par la levure. Ainsi, cette farine<br />
convient tout à fait à la cuisson du pain.<br />
47
F<br />
F<br />
48<br />
• La farine fine est un mélange de blés durs et de<br />
blés mous, et convient bien pour une cuisson<br />
rapide ou pour des biscuits.<br />
• La farine complète contient tous les composants<br />
du grain de blé: notamment le son, qui<br />
est la peau extérieure dure du blé. Celle-ci est<br />
une source idéale de fibres.<br />
Si vous utilisez cette farine, veillez à ce qu‘elle<br />
soit très fine. Le son contenu empêche la libération<br />
de gluten, de sorte que les pains<br />
fabriqués avec cette farine sont plus petits et<br />
plus lourds que ceux à base de farine blanche<br />
et fine. C‘est pourquoi, afin d‘obtenir pains plus<br />
légers, cette farine est souvent mélangée avec<br />
d‘autres sortes de farine.<br />
• La farine de blé sombre, également nommée<br />
farine noire ou farine grosse, est riche en fibres.<br />
Elle est semblable à la farine complète. Pour<br />
obtenir une bonne taille après la cuisson, il faut<br />
qu‘elle soit mélangée avec de grandes quantités<br />
d‘autres sortes de farine.<br />
• La farine avec levure contient déjà, comme son<br />
nom l‘indique, de la levure, et convient très<br />
bien pour la fabrication de gâteaux.<br />
• L8a farine de mais et la farine d‘avoine sont<br />
à base de mais et d‘avoine. Elles s‘emploient<br />
comme additifs pour la fabrication du pain noir.<br />
La farine d‘avoine intensifie le goût et améliore<br />
la qualité de votre pain.<br />
SUCRE<br />
Le sucre est un ingrédient important. Il aide à la<br />
fermentation de la levure. De plus, le sucre donne<br />
un goût plus doux au pain, accroît les propriétés<br />
nutritives et prolonge sa durée de vie. On emploie<br />
généralement du sucre blanc. Selon les<br />
goûts, il est également possible d‘employer du<br />
sucre roux, du sucre en poudre, du sirop ou du<br />
miel.<br />
Attention: Utilisez uniquement du sucre en<br />
poudre. Du sucre en gros grains risquerait<br />
d‘abîmer le film anti-adhésif de votre moule<br />
Remarque: Mais vous pouvez également renoncer<br />
au sucre. Dans ce cas, le pain gonfle moins.<br />
SEL<br />
Bien entendu, le sel contribue à intensifier le goût<br />
et la coloration de la croûte du pain. Il peut également<br />
être employé pour freiner une levure particulièrement<br />
active. C‘est pourquoi il ne faut pas<br />
augmenter la quantité indiquée dans les recettes.<br />
Remarque: Si vous renoncez au sel pour des raisons<br />
de santé, il se peut que votre pain monte plus<br />
que d‘habitude.<br />
MATIERES GRASSES, BEURRE ET<br />
HUILE VEGETALE<br />
Les matières grasses ramollissent le pain tout en prolongeant<br />
sa durée de vie. Avant d‘ajouter le beurre,<br />
il faut le faire fondre ou le découper en morceaux.<br />
LEVURE<br />
Pendant la phase de levage, la levure libère du<br />
dioxyde de carbone, qui fait gonfler le pain et<br />
ramollit la structure interne. Pour gonfler, la levure<br />
a besoin de sucre et de farine.<br />
1 cc de levure sèche active = ¾ cc de levure<br />
instantanée<br />
1,5 TL cc de levure sèche active = 1 cc de levure<br />
instantanée<br />
2 TL cc de levure sèche active = 2 TL cc de levure<br />
sèche active<br />
La levure fraîche doit être conservée au réfrigérateur,<br />
car le champignon meurt dès que la température<br />
est un peu élevée.<br />
Lors de l‘achat, vérifiez la date de production et<br />
la date de péremption de la levure. Après chaque<br />
utilisation, stockez la levure aussi vite que possible<br />
dans le réfrigérateur.<br />
Remarque: Si le pain gonfle peu, c‘est généralement<br />
en raison d‘une levure de faible qualité.<br />
Si le pain gonfle peu, c‘est généralement en raison<br />
d‘une levure de faible qualité:<br />
1. Versez un demi-verre d‘eau chaude (45 - 50°C)<br />
dans une mesure.<br />
2. Ajoutez-y une cuillère à café de sucre blanc, et<br />
remuez. Puis versez deux cuillères à café de levure<br />
sur l‘eau.<br />
3. Placez la mesure pendant 10 minutes dans un<br />
endroit chaud. Ne mélangez pas.<br />
4. La mousse produite devrait alors donner environ<br />
une tasse, faute de quoi la levure est inactive.<br />
LEVURE DE CUISSON<br />
La levure de cuisson s‘emploie pour fabriquer<br />
pains et gâteaux en mode ULTRASCHNELL (ultrarapide).<br />
Elle n‘a pas besoin de phase de levage et<br />
produit des gaz qui, sous forme de petites bulles,<br />
agissent sur la texture du pain.<br />
Soda<br />
Le soda est très proche de la levure de cuisson. Il<br />
peut également s‘employer en combinaison avec<br />
la levure de cuisson.<br />
EAU ET AUTRES LIQUIDES<br />
L‘eau est un ingrédient essentiel lors de la fabrication<br />
du pain. Une température entre 20 et 25°C<br />
est optimale. Il est également possible de remplacer<br />
l‘eau, par ex. par du lait frais ou de l‘eau<br />
mélangée avec 2 % de lait en poudre. Cela permet<br />
d‘améliorer l‘arôme du pain et la couleur de la<br />
croûte. Pour améliorer le goût, certaines recettes<br />
emploient également du jus de citron, de pomme<br />
ou d‘orange.<br />
ŒUFS<br />
Les œufs peuvent améliorer la qualité du pain : ils<br />
le rendent nourrissant et plus gros. Dans un premier<br />
temps, il faut sortir les oeufs de leur coquille,<br />
puis les mélanger uniformément.<br />
MESURE DES INGREDIENTS<br />
La principale étape lors de l‘utilisation de la machine<br />
à pain est celle qui consiste à mesurer précisément<br />
chacun des ingrédients au moyen d‘un<br />
verre gradué (10) et d‘une mesurette (11). Mesurez<br />
très précisément chaque liquide ainsi que les<br />
ingrédients secs, faute de quoi le résultat de vos<br />
efforts sera difficilement acceptable.<br />
MESURE DES LIQUIDES<br />
Il convient de mesurer l‘eau, le lait frais et les mélanges<br />
à base de lait en poudre au moyen d‘un<br />
verre gradué (10). Pendant que vous mesurez les<br />
liquides, tenez le verre droit. Si vous mesurez la<br />
quantité d‘huile alimentaire ou d‘autres aliments,<br />
après la mesure, nettoyez le verre gradué (10).<br />
INGREDIENTS SECS<br />
Les ingrédients secs doivent être versés dans le verre<br />
gradué (10) sans être tassés. Les ingrédients ne doivent<br />
pas être pressés car un excès, aussi faible qu‘il<br />
soit, risquerait de modifier l‘équilibre de la recette.<br />
Si vous ne mesurez que de petites quantités des<br />
ingrédients secs, utilisez alors une mesurette (11).<br />
Les cuillères mesurettes indiquées sont graduées.<br />
Mesurette (11):<br />
correspond à<br />
1 cuillère à soupe<br />
correspond à 1<br />
cuillère à café<br />
ORDRE DES INGREDIENTS<br />
Il est important de respecter l‘ordre d‘ajout des<br />
ingrédients. Voici l‘ordre qu‘il convient généralement<br />
de respecter:<br />
Ingrédient liquide, œufs, sel, lait en poudre, etc.<br />
Lorsque vous ajoutez la farine, il ne faut pas que<br />
celle-ci se mélange entièrement au liquide. La levure<br />
ne doit être ajoutée que sur la farine sèche, et<br />
ne doit pas entrer en contact avec le sel.<br />
Un signal retentit après le pétrissage de la pâte.<br />
Maintenant, vous pouvez ajouter les fruits ou autres.<br />
Si vous ajoutez les fruits trop tôt, le pétrissage<br />
nuira à l‘arôme et à la consistance.<br />
Si vous utilisez la fonction de démarrage différé,<br />
n‘utilisez jamais d‘ingrédients périssables tels<br />
qu‘oeufs ou fruits.<br />
49
F<br />
F<br />
REPARATION DES DEFAILLANCES<br />
Nr. Panne Raison Solution<br />
Nr. Panne Raison Solution<br />
1 De la fumée fuit des ouvertures<br />
d‘aération pendant la<br />
cuisson.<br />
2 La croûte se trouvant au bas<br />
du pain est trop épaisse.<br />
3 Il est très difficile de détacher<br />
le pain du moule.<br />
4 Les ingrédients ne sont pas<br />
uniformément mélangés.<br />
Certains ingrédients collent<br />
aux éléments de chauffe ou<br />
en sont trop près.<br />
Si vous utilisez l‘appareil pour<br />
la première fois, il se peut que<br />
l‘huile colle aux éléments de<br />
chauffe.<br />
Vous avez laissé le pain trop<br />
longtemps au chaud et trop<br />
longtemps dans le moule,<br />
et la perte d‘eau a été trop<br />
importante.<br />
Les crochets de pétrissage<br />
sont accrochés à l‘arbre<br />
d‘entraînement.<br />
Le programme sélectionné<br />
ne convient pas.<br />
Débranchez la machine,<br />
laissez refroidir l‘appareil et<br />
nettoyez les éléments chauffants.<br />
Pour éviter les brûlures,<br />
soyez prudent.<br />
Si vous utilisez l‘appareil pour<br />
la première fois, laissez-le<br />
tourner à vide, et ouvrez le<br />
couvercle.<br />
Retirez le pain dès que possible<br />
et ne le maintenez pas<br />
au chaud.<br />
Une fois que vous avez retiré<br />
le pain, versez de l‘eau chaude<br />
dans le moule, de sorte que<br />
les crochets de pétrissage<br />
soient recouverts. Retirez-les<br />
au bout d‘environ 10 minutes,<br />
et nettoyez-les. Avant la<br />
prochaine utilisation, graissez<br />
l‘arbre d‘entraînement.<br />
Sélectionnez le bon programme.<br />
7 Le blocage des touches<br />
ne se débloque plus en<br />
appuyant sur les touches<br />
PROZESS (travailler) et<br />
FARBE (couleur) (pendant le<br />
fonctionnement ou après la<br />
cuisson).<br />
8 Vous entendez le moteur<br />
fonctionner mais la pâte n‘est<br />
pas pétrie<br />
9 Le pain est si gros qu‘il<br />
appuie sur le couvercle.<br />
10 Le pain est trop petit ou n‘a<br />
pas gonflé.<br />
Erreur technique.<br />
Soit le moule n‘est pas bien<br />
fixé, soit la quantité de pâte<br />
est trop importante pour<br />
pouvoir être pétrie.<br />
Trop de levure, d‘eau ou de<br />
farine.<br />
Il se peut que la température<br />
ambiante soit trop élevée<br />
(idéalement : 15°C – 34°C).<br />
Pas ou pas assez de levure.<br />
Il se peut que la levure soit<br />
vieille, et donc inactive.<br />
Un autre raison possible:<br />
l‘eau trop chaude, la température<br />
ambiante trop faible,<br />
ou trop de sel.<br />
Débranchez l‘appareil,<br />
attendez quelques instants,<br />
et rebranchez-le.<br />
Le programme en cours est<br />
brièvement interrompu,<br />
puis se remet en marche<br />
tout seul.<br />
Assurez-vous que le moule<br />
est bien fixé.<br />
Assurez-vous que la pâte a<br />
bien été préparée conformément<br />
à la recette, et que<br />
les ingrédients ont bien été<br />
dosés.<br />
Contrôlez les facteurs cités.<br />
Le cas échéant, réduisez les<br />
quantités.<br />
Contrôlez la quantité et<br />
l‘activité de la levure.<br />
Le cas échéant, augmentez<br />
la température ambiante.<br />
5 Après la cuisson, le pain<br />
est sec et n‘a pas de croûte<br />
brune.<br />
La résistance de rotation est<br />
trop importante, de sorte<br />
que les crochets de pétrissage<br />
peuvent difficilement<br />
tourner.<br />
Le couvercle a été ouvert<br />
plusieurs fois.<br />
Choix du mauvais programme.<br />
Contrôlez la fixation des crochets<br />
de pétrissage. Retirez<br />
le moule et faites tourner<br />
l‘appareil à vide.<br />
En cas de dysfonctionnement,<br />
veuillez contacter le<br />
service d‘assistance.<br />
Pendant le fonctionnement,<br />
n‘ouvrez pas le couvercle.<br />
Renseignez-vous sur le bon<br />
programme à choisir (p. 9).<br />
11 La pâte est si grosse qu‘elle<br />
déborde du moule.<br />
12 Lors de la cuisson, le pain<br />
s‘effondre en son milieu.<br />
Vous avez peut-être employé<br />
trop de liquide, de sorte que<br />
la pâte est trop fluide. Il se<br />
peut que vous ayez employé<br />
trop de levure.<br />
La farine n‘est pas assez forte<br />
pour permettre à la pâte de<br />
gonfler.<br />
La levure agit trop vite ou la<br />
température est trop élevée.<br />
Réduisez la quantité de<br />
liquide et améliorez la<br />
consistance de la pâte.<br />
Utilisez de la farine pour<br />
pain, ou de la farine<br />
d‘amidon.<br />
Utilisez la levure à température<br />
ambiante.<br />
50<br />
6 L‘écran indique „ H HH“ après<br />
que vous avez appuyé sur<br />
la touche START / STOPP<br />
(démarrage / fin).<br />
La température à l‘intérieur<br />
de la machine à pain est trop<br />
élevée pour pouvoir faire du<br />
pain.<br />
Appuyez à nouveau sur<br />
la touche START / STOPP<br />
(démarrage / fin) et débranchez<br />
l‘appareil.<br />
Retirez le moule et laissez le<br />
couvercle ouvert jusqu‘à ce<br />
que la machine soit refroidie.<br />
Trop d‘eau rend la pâte trop<br />
lourde et trop fluide.<br />
Si nécessaire, adaptez la<br />
quantité d‘eau.<br />
51
F<br />
F<br />
Nr. Panne Raison Solution<br />
13 Le pain est très lourd, et sa<br />
structure très dense.<br />
Vous avez employé trop de<br />
farine et pas assez d‘eau.<br />
Vous avez utilisé trop de fruits<br />
ou de farine complète.<br />
14 Le centre du pain est creux. Vous avez utilisé trop d‘eau<br />
ou de levure, ou pas de sel.<br />
15 Il y a encore de la poudre à la<br />
surface du pain.<br />
16 La croûte est trop épaisse et<br />
la couleur trop sombre lors<br />
de la cuisson de gâteaux ou<br />
d‘aliments contenant beaucoup<br />
de sucre.<br />
L‘eau est trop chaude.<br />
Le pain contient des ingrédients<br />
très riches en gluten.<br />
Le pain a été insuffisamment<br />
pétri car il n‘y a pas assez<br />
d‘eau.<br />
Les différentes recettes ont<br />
une grande influence sur la<br />
fabrication du pain. Lorsque<br />
vous mettez beaucoup de<br />
sucre, la couleur devient très<br />
sombre.<br />
Utilisez moins de farine et<br />
plus d‘eau.<br />
Réduisez la quantité des<br />
ingrédients cités, et prenez<br />
plus de levure.<br />
Réduisez la quantité d‘eau et<br />
de levure, et ajoutez un peu<br />
de sel.<br />
Contrôlez la température de<br />
l‘eau.<br />
Mettez moins d‘ingrédients<br />
riches en gluten, ou pas du tout.<br />
Contrôlez la quantité d‘eau et<br />
le fonctionnement mécanique<br />
de la machine à pain.<br />
Si, pour une recette avec<br />
beaucoup de sucre, la couleur<br />
est trop sombre, interrompez<br />
la cuisson 5 à 10 minutes<br />
avant la fin en appuyant sur<br />
la touche START / STOPP<br />
(démarrage / fin).<br />
Avant de retirer le gâteau ou<br />
le pain, laissez le couvercle<br />
encore fermé pendant 20<br />
minutes.<br />
CONSEILS ET ASTUCES<br />
RECETTES - ADAPTÉES AUX PROGRAMMES<br />
Les quantités de farine de pain et de levure indiquées dans les recettes correspondent au maximum<br />
autorisé.<br />
1 Tasse = 250 ml • 1 CàS = 3 Càc • 1 CàS = 15 ml • 1 Càc = 5 ml<br />
PAIN FRANCAIS CROUSTILLANT<br />
• Beurre / Margarine: Selon vos goûts,<br />
vous pouvez également employer d‘autres<br />
matières grasses : huile d‘olive, saindoux ou<br />
graisse de porc etc.<br />
• Lait en poudre: Vous pouvez remplacer le<br />
lait en poudre par du lait frais. Dans ce cas,<br />
réduisez la quantité d‘eau à la quantité de<br />
lait.<br />
• Eau: L‘eau minérale rend tous les pains plus<br />
léger et plus aérien. Idéal pour les farines<br />
lourdes.<br />
PAIN DE CAMPAGNE<br />
Taille<br />
du pain<br />
Ingrédient<br />
1400 g /<br />
3 LB<br />
1200 g /<br />
2,5 LB<br />
1000 g /<br />
2 LB<br />
Babeurre 530 ml 490 ml 370 ml<br />
Beurre / Margarine 1 ¾ CàS 1 ½ CàS 1 CàS<br />
Sel 1 ¾ CàC 1 ½ CàC 1 CàC<br />
Sucre 1 ¾ CàS 1 ½ CàS 1 CàS<br />
Farine blanche fine 455 g 420 g 315 g<br />
Farine complète au 455 g 420 g 315 g<br />
seigle<br />
Levure sèche 1 ¾ CàC 1 ½ CàC 1 CàC<br />
Programme: NORMAL (normal)<br />
Taille<br />
du pain<br />
Ingrédient<br />
1400 g /<br />
3 LB<br />
1200 g /<br />
2,5 LB<br />
1000 g /<br />
2 LB<br />
Eau 500 ml 460 ml 350 ml<br />
Beurre / Margarine 3 CàS 2 ¼ CàS 1 ½ CàS<br />
Lait en poudre 2 CàS 1 ½ CàS 1 CàS<br />
Sucre 3 ½ CàS 3 CàS 2 CàS<br />
Sel 1 ¾ CàC 1 ½ CàC 1 CàC<br />
Farine blanche fine 910 g 840 g 630 g<br />
Levure sèche 1 ¾ CàC 1 ½ CàC 1 CàC<br />
Programme: FRANZÖSISCH (francais)<br />
PAIN AU MAIS RAPIDE<br />
Taille<br />
du pain<br />
Ingrédient<br />
1400 g /<br />
3 LB<br />
1200 g /<br />
2,5 LB<br />
1000 g /<br />
2 LB<br />
Lait 530 ml 490 ml 370 ml<br />
Beurre / Margarine 3 ½ CàS 3 CàS 2 CàS<br />
Lait en poudre 1 ¾ CàC 1 ½ CàC 1 CàC<br />
Sucre 2 CàC 1 ½ CàC 1 CàC<br />
Sel 2 CàC 1 ½ CàC 1 CàC<br />
Farine pour pain 650 g 600 g 450 g<br />
Farine de mais 260 g 240 g 180 g<br />
Levure de cuisson 8 CàC 6 CàC 4 CàC<br />
Programme: SCHNELL (rapide)<br />
52<br />
ÉLIMINATION CORRECTE DE CE PRODUIT<br />
Au sein de l‘UE, ce symbole signifie qu‘il est interdit de jeter ce produit aux ordures<br />
ménagères. Les appareils usagés contiennent des matériaux recyclables qu‘il convient<br />
de réutiliser afin de préserver l‘environnement et la santé humaine en évitant des déchets<br />
excessifs. C‘est pourquoi vous devez jeter les appareils usagés par le biais de<br />
systèmes de collecte appropriés, ou renvoyer l‘appareil à l‘endroit où vous l‘avez acheté.<br />
Le point de vente se chargera de son recyclage.<br />
PAIN COMPLET<br />
Taille 1400 g / 1200 g / 1000 g /<br />
du pain<br />
Ingrédient<br />
3 LB 2,5 LB 2 LB<br />
Eau 500 ml 460 ml 350 ml<br />
Beurre / Margarine 1 ¾ CàS 1 ½ CàS 1 CàS<br />
Sel 1 ¾ CàC 1 ½ CàC 1 CàC<br />
Sucre 1 ¾ CàC 1 ½ CàC 1 CàC<br />
Farine pour pain 190 g 150 g 110 g<br />
Farine multi-céréales 720 g 690 g 520 g<br />
Levure sèche 3 ½ CàC 3 CàC 2 CàC<br />
Programme: VOLLKORN (pain complet)<br />
PAIN POUR GÂTEAU<br />
Taille<br />
du pain<br />
Ingrédient<br />
1400 g /<br />
3 LB<br />
1200 g /<br />
2,5 LB<br />
1000 g /<br />
2 LB<br />
Lait 530 ml 490 ml 370 ml<br />
Beurre / Margarine 90 g 75 g 50 g<br />
Œufs 4 St 4 St 3 St<br />
Sucre 90 g 75 g 50 g<br />
Sel 1 ¾ CàC 1 ½ CàC 1 CàC<br />
Farine blanche fine 910 g 840 g 630 g<br />
Levure sèche 1 ¾ CàC 1 ½ CàC 1 CàC<br />
Programme: SÜSS (sucré et)<br />
53
F<br />
F<br />
GÂTEAU<br />
Quatre-quarts<br />
Ingrédients 1. Mettez des œufs, du beurre, du sucre et du<br />
sucre vanillé dans un bol et mélangez avec un<br />
Œufs<br />
3 Pc<br />
mixeur jusqu‘à obtenir de la mousse.<br />
Sucre<br />
125 g<br />
2. Ajoutez ensuite la farine et la levure de cuisson<br />
au mélange, et remuez le tout jusqu’à<br />
Beurre / Margarine<br />
125 g<br />
Sucre vanillé<br />
1 sachet obtenir un mélange uniforme.<br />
Lait<br />
max ¼ de tasse 3. Affinez votre pâte avec un peu de lait.<br />
Farine blanche fine<br />
300 g 4. Mettez la pâte dans le moule graissé au beurre<br />
Levure de cuisson<br />
1 sachet ou à l‘huile, et démarrez le programme KU-<br />
CHEN (gateau).<br />
5. Mettez la pâte dans le moule graissé au beurre<br />
ou à l‘huile, et démarrez le programme.<br />
CONFITURES<br />
Gelée d‘orange<br />
Ingrédients<br />
Jus d‘orange<br />
orange coupée en petits<br />
morceaux<br />
Jus de citron<br />
Sucre gélifiant (3 + 1)<br />
Programme: MARMELADE (confiture)<br />
Confiture aux fruits des bois<br />
Ingrédients<br />
fruits des bois écrasés<br />
1 L<br />
1 Pc<br />
50 ml<br />
500 g<br />
1 kg<br />
PAIN ULTRA-RAPIDE AUX GERMES DE BLÉ<br />
Taille<br />
du pain<br />
Ingrédient<br />
1400 g /<br />
3 LB<br />
1200 g /<br />
2,5 LB<br />
1000 g /<br />
2 LB<br />
Eau (48°C) 490 ml 450 ml 340 ml<br />
Kummel 2 CàC 1 ½ CàC 1 CàC<br />
Huile d‘olive 2 CàS 1 ½ CàS 1 CàS<br />
Miel 2 CàS 1 ½ CàS 1 CàS<br />
Sel 2 CàC 1 ½ CàC 1 CàC<br />
Germes de blé 100 g 90 g 70 g<br />
Farine blanche 810 g 750 g 560 g<br />
fine<br />
Levure sèche 2 ½ CàC 2 CàC 1 ½ CàC<br />
Programme: ULTRASCHNELL (ultra-rapide)<br />
54<br />
Gâteau au vin rouge<br />
Ingrédients 1. Dans un bol, mélangez œufs, beurre, sucre et<br />
sel au moyen d‘un mixeur, jusqu‘à obtenir une<br />
Œufs<br />
3 Pc<br />
mousse.<br />
Sucre<br />
150 g<br />
2. Ensuite, ajoutez farine, levure de cuisson, cacao<br />
et cannelle, et mélangez bien le tout.<br />
Beurre / Margarine<br />
250 g<br />
Farine blanche fine<br />
250 g<br />
3. Ajoutez ensuite du vin rouge, jusqu‘à ce que la<br />
Levure de cuisson<br />
1 sachet pâte se déchire.<br />
Cacao<br />
1 ½ CàS 4. Mettez la pâte dans le moule graissé au beurre<br />
Cannelle<br />
2 CàC ou à l‘huile, et répandez les copeaux de chocolat<br />
sur le mélange. Démarrez alors le pro-<br />
Sel<br />
1 pincée<br />
gramme KUCHEN (gateau).<br />
Copeaux de chocolat<br />
100 g<br />
Vin rouge<br />
max 1⁄8 L<br />
Gâteau croustillant au rhum<br />
Ingrédients 1. Dans un bol, mélangez œufs, beurre, sucre,<br />
sucre vanillé et sel au moyen d‘un mixeur,<br />
Œufs<br />
4 Pc<br />
jusqu‘à obtenir une mousse.<br />
Sucre<br />
100 g<br />
2. Ajoutez ensuite la farine et la levure de cuisson<br />
au mélange. Mélangez le tout uniformé-<br />
Beurre / Margarine<br />
75 g<br />
Sucre vanillé<br />
1 sachet ment et en y ajoutant du rhum petit à petit.<br />
Sel<br />
1 pincée 3. Mettez la pâte dans le moule graissé au beurre<br />
Rhum<br />
4 CàS ou à l‘huile, et répandez les copeaux de chocolat<br />
sur le mélange. Démarrez le programme<br />
Farine blanche fine<br />
150 g<br />
KUCHEN (gateau).<br />
Levure de cuisson<br />
1 sachet<br />
Copeaux de chocolat<br />
50 g<br />
CONSEILS ET ASTUCES<br />
jus de citron (pour des fruits très sucrés)max 100 ml<br />
Sucre gélifiant (2 + 1)<br />
500 g<br />
Programme: MARMELADE (confiture)<br />
• Vous souhaitez voir à quel point votre<br />
confiture ou votre gelée s‘épaissit? Retirez<br />
un peu de pâte chaude au moyen d‘une<br />
cuillère, et posez-la sur une assiette froide<br />
en porcelaine. La pâte refroidit en quelques<br />
minutes, vous pouvez alors en contrôler la<br />
fermeté.<br />
• La confiture ou autre est-elle trop fluide?<br />
Ajoutez un peu d‘acide citrique. Celui-ci fera<br />
s‘épaissir un peu plus la pâte.<br />
• La confiture ou autre est-elle trop<br />
épaisse? Ajoutez un peu d‘eau ou de jus de<br />
fruit. Cela permet de diluer le gélifiant.<br />
PATE AU BABEURRE pour petits pains ou<br />
autres.<br />
Poids<br />
Ingrédients<br />
1400 g /<br />
3 LB<br />
1200 g /<br />
2,5 LB<br />
1000 g /<br />
2 LB<br />
Babeurre 450 ml 420 ml 310 ml<br />
Œufs 2 Pc 1 Pc 1 Pc<br />
Sel 2 CàC 1 ½ CàC 1 CàC<br />
Farine de blé 320 g 300 g 220 g<br />
complet<br />
Farine blanche fine 490 g 450 g 340 g<br />
Levure sèche 2 CàC 1 ½ CàC 1 CàC<br />
Programme: TEIG (pate)<br />
Dessert<br />
Tranches de pomme<br />
Ingrédients<br />
Pommes demi-dures<br />
Jus de citron<br />
Œufs<br />
Sucre roux<br />
Farine universelle<br />
Flocons d‘avoine<br />
Beurre / Margarine (molle)<br />
Programme: DESSERT (dessert)<br />
Pudding au riz<br />
Ingrédients<br />
Œufs brouillés<br />
Lait<br />
Riz bouilli<br />
Sucre<br />
Raisins secs (facultatif)<br />
Vanille<br />
Cannelle<br />
Programme: DESSERT (dessert)<br />
6 Pc<br />
1 CàC<br />
1 Pc<br />
½ Tasse<br />
1 Tasse<br />
¹⁄3 Tasse<br />
3 ½ CàS<br />
4 Pc<br />
1 ¾ tasse<br />
3 Tasses<br />
½ Tasse<br />
1 Tasse<br />
1 CàC<br />
2 CàC<br />
55
F<br />
I<br />
GARANTIE<br />
Pour la garantie prenant effet le jour de l'achat, sur les territoires de l’UE et de la Suisse, s'appliquent<br />
les conditions suivantes.<br />
1. Durée de la garantie: 2 ans<br />
2. Prestations de garantie:<br />
a) A notre discrétion, réparation ou échange de<br />
pièces qui présentent un défaut de matériau ou<br />
de fabrication après vérification par nos soins.<br />
b) La garantie ne sera effectuée que sur présentation<br />
de cette carte de garantie et de la<br />
facture de l’achat. La carte n’est valable que<br />
si elle a été remplie intégralement au jour de<br />
l’achat.<br />
c) La prestation de garantie n’est applicable<br />
qu’au premier utilisateur.<br />
d) La période initiale de garantie n’est ni prolongée<br />
ni renouvelée du fait de la réparation ou<br />
de l’échange de pièce pendant la durée de la<br />
garantie.<br />
e) Les frais de transport sont à la charge de<br />
l’acheteur (ne s’applique pas pendant les 6<br />
premiers mois de la garantie).<br />
f) Dans la mesure où le dommage ou le défaut<br />
ne peut pas être supprimé ou si l’amélioration<br />
a été refusée par nos soins ou si elle est retardée<br />
de manière non raisonnable, il sera<br />
procédé dans les 6 mois à partir de la date de<br />
l’achat/de livraison à un remplacement gratuit<br />
où la valeur minimale sera remboursée ou<br />
l’appareil sera repris contre remboursement<br />
du prix d’achat, mais toutefois à hauteur du<br />
prix courant du marché au maximum.<br />
Modèle:<br />
3. La garantie n’est pas applicable:<br />
• aux rayures et taches sur l’appareil.<br />
• aux lampes d’éclairage et de contrôle.<br />
• aux brosses motorisées.<br />
• aux parties fragiles en bakélite, verre, plastique,<br />
etc. à moins qu’il ne s’agisse d’un défaut dans le<br />
matériau et qu’il ait été reconnu en tant que tel<br />
par nos soins.<br />
• aux dommages qui ont été causés par une installation<br />
ou une fixation inappropriée.<br />
• lorsque l’appareil est raccordé à un réseau électrique<br />
dont la tension est supérieure à celle indiquée<br />
sur l’appareil.<br />
• en cas de mauvaise utilisation ou d’usage inapproprié.<br />
• en cas d’absence de soins.<br />
• en cas d’entretien insuffisant ou inapproprié.<br />
• en cas de chute de l’appareil ou de pièces individuelles.<br />
• en cas de transport inapproprié ou d’emballage<br />
insuffisant en cas de transport.<br />
4. La garantie est caduque:<br />
• lorsque l’appareil a été utilisé à d’autres fins<br />
qu’un usage domestique.<br />
• lorsque des personnes qui n’ont pas été<br />
agréées par notre entreprise exécutent des<br />
réparations ou des modifications sur l’appareil.<br />
Nous accordons une garantie de 2 ans sur cet appareil pour les défauts découlant de défauts dans<br />
la fabrication ou les matériaux. La durée de la garantie commence au jour de la remise et elle n’est<br />
applicable que sur présentation de la carte de garantie et de la facture de l’achat. Toute autre prétention<br />
complémentaire est nulle.<br />
Important! Veuillez noter ici le code FD<br />
se trouvant sur le panneau de type de<br />
l’appareil:<br />
IMPORTANTE!<br />
PRIMA DI UTILIZZARE L’ APPARECCHIO<br />
LEGGERE ATTENTAMENTE LE SEGUENTI<br />
ISTRUZIONI E CONSERVARLE PER OGNI<br />
ULTERIORE CONSULTAZIONE.<br />
AVVERTENZE IMPORTANTI<br />
PER LA SICUREZZA<br />
In caso di uso di apparecchiature elettriche bisogna<br />
osservare le seguenti misure di sicurezza fondamentali<br />
per prevenire scosse elettriche, incendi<br />
ed incidenti.<br />
• Quest’apparecchio è destinato al solo uso domestico<br />
e non per scopi commerciali.<br />
• Prima di collegare l’apparecchio, verificare che<br />
la tensione di rete utilizzata corrisponda a quella<br />
indicata sulla targhetta dell’apparecchio.<br />
• Prima di collegare l’apparecchio, verificare<br />
che la tensione di rete utilizzata corrisponda<br />
a quella indicata sulla targhetta<br />
dell’apparecchio.<br />
• Utilizzare l’apparecchio unicamente per l’uso<br />
previsto nelle presenti istruzioni.<br />
• Non usare l’apparecchio all’aperto.<br />
• Non utilizzare un apparecchio che:<br />
– presenti un cavo difettoso o<br />
danneggiato,<br />
– presenti anomalie di funzionamento,<br />
– sia caduto,<br />
– presenti qualsiasi altro difetto.<br />
In ciascuno dei casi elencati, restituirlo al centro<br />
assistenza autorizzato più vicino per controlli,<br />
riparazioni o regolazioni meccaniche o elettriche.<br />
• Utilizzare solo accessori consigliati dal produttore.<br />
L’uso di altri accessori può provocare danni<br />
all’apparecchio o incidenti.<br />
• Non avviare mai l’apparecchio finché il recipiente<br />
del pane non sia stato collocato correttamente e<br />
vi siano stati introdotti gli ingredienti necessari.<br />
• Non forzare mai gli angoli o il bordo del recipiente<br />
per estrarre il pane, ciò potrebbe danneggiarlo.<br />
• Per evitare scosse elettriche, non immergere<br />
mai il cavo, la spina o il corpo dell’apparecchio<br />
nell’acqua o in altri liquidi.<br />
• Scollegare l’apparecchio prima di inserire o<br />
togliere gli accessori e prima di procedere alla<br />
pulizia.<br />
• Fermare tutti i programmi in corso, prima di<br />
staccare la spina dalla presa.<br />
• Evitare che il cavo resti appeso al bordo di un<br />
tavolo o di un banco e che venga a contatto<br />
con superfici molto calde.<br />
• Tenere l‘apparecchio lontano da fornelli sia a<br />
gas che elettrici e da forni.<br />
• Non introdurre mai fogli di metallo o altro<br />
materiale nella macchina del pane. Pericolo<br />
d’incendio o cortocircuito.<br />
• Assicurarsi che l’apparecchio non venga a contatto<br />
o sia coperto da materiali facilmente infiammabili<br />
(per es. tende, stoffa, pareti e altro).<br />
Se il calore e il vapore non escono liberamente<br />
dall’apparecchio, possono verificarsi incendi.<br />
• La macchina si riscalda durante il funzionamento.<br />
Non toccare quindi le superfici calde, usare<br />
soltanto manici e interruttori.<br />
• Non toccare mai le parti rotanti.<br />
• Non trasportare l’apparecchio se contiene liquidi<br />
caldi (per es. marmellata).<br />
• Non consentire l’uso dell’apparecchio a persone<br />
con ridotte capacità psico-fisico-sensoriali<br />
o ai bambini. Questi non riconoscono i pericoli<br />
che possono derivare dalle apparecchiature<br />
elettriche. Non lasciare quindi che i bambini<br />
maneggino l’apparecchio elettrico senza<br />
sorveglianza e fare molta attenzione alla loro<br />
presenza.<br />
• È opportuno sorvegliare i bambini per assicurarsi<br />
che non giochino con l’apparecchio.<br />
56<br />
Timbre et signature du vendeur<br />
Date de la vente<br />
57
I<br />
I<br />
58<br />
PRIMA DEL PRIMO UTILIZZO<br />
1. Verificare che tutte le parti e gli accessori siano<br />
integri e non presentino difetti.<br />
2. Lavare tutte le parti come indicato nel paragrafo<br />
„Pulizia e manutenzione”.<br />
3. Selezionare il programma BACKEN (cottura) ed<br />
eseguire una cottura a vuoto per ca. 10 minuti.<br />
Lasciare raffreddare l’apparecchio, estrarne le<br />
parti e pulirle nuovamente.<br />
4. Asciugare bene tutte le parti e rimontarle.<br />
L’apparecchio adesso è pronto per l’uso.<br />
INDICAZIONI PER IL<br />
PANNELLO COMANDI *<br />
14<br />
15<br />
16<br />
17<br />
18<br />
1. Normal<br />
2. Vollkorn<br />
3. Französisch<br />
4. Schnell<br />
5. SÜSS<br />
6. Kuchen<br />
Kneten 1 AUFGEHEN 1 KneTEN 2 AUFGEHEN 2<br />
AUFGEHEN 3 BaCkeN WarmHALTEN<br />
1000g 1200g 1400g<br />
PAUSE<br />
ZEIT<br />
GRÖSSE<br />
MENÜ<br />
14 Programmi a scelta<br />
15 Fase in cui si trova il<br />
programma avviato<br />
16 Blocco tasti<br />
17 Numero del programma<br />
scelto<br />
7. Marmelade<br />
8. Teig<br />
9. Ultraschnell<br />
10. Backen<br />
11. Dessert<br />
12. Hausgemacht<br />
HELL MITTEL DUNKEL<br />
PROZESS<br />
LICHT<br />
FARBE<br />
START<br />
STOPP<br />
19<br />
20<br />
18 Peso della pagnotta<br />
19 Durata del<br />
programma<br />
20 Grado di doratura<br />
della crosta<br />
* Il produttore si riserva il diritto di apportare modifiche<br />
al pannello comandi senza previo avviso.<br />
DOPO LA CONNESSIONE ALLA<br />
RETE ELETTRICA<br />
Non appena l’apparecchio è collegato alla rete<br />
elettrica, emette un segnale acustico e sul display<br />
compare la scritta „1 2:55, 1200 g, MITTEL (media)”.<br />
Tuttavia non lampeggia il doppio punto tra le cifre<br />
„2” e „55” (19).<br />
La cifra “1” indica il numero del programma preselezionato<br />
(17). Il peso di „1200 g” (18) e il grado di<br />
doratura della crosta „MITTEL (media)” (20) sono i<br />
valori impostati di fabbrica.<br />
START / STOPP (start/stop)<br />
Con questo tasto si può avviare o fermare il programma<br />
di cottura scelto. Premere per 1,5 secondi<br />
il tasto START / STOPP (start / stop) per avviare il<br />
programma. Dopo un breve segnale acustico, i<br />
due punti lampeggiano – il programma è avviato.<br />
Dopo l’avvio del programma sono in funzione solamente<br />
i tasti START / STOPP (start / stop), LICHT<br />
(luce) e PAUSE (pausa).<br />
Per fermare il programma premere nuovamente<br />
il tasto START / STOPP (start / stop) per ca. 1,5<br />
secondi. Dopo un segnale acustico, il programma<br />
si spegne. Questa funzione serve a evitare<br />
un’interruzione involontaria del processo di cottura.<br />
MENÜ (menu)<br />
Questo pulsante consente di scegliere uno dei<br />
programmi da 1 a 12. A ogni pressione del tasto<br />
(accompagnata da un segnale acustico) la cifra<br />
che indica il numero di programma (17) avanza<br />
di un’unità. Le funzioni dei dodici programmi (14)<br />
sono spiegate qui di seguito.<br />
1. Normal (classico): impasto semplice, lievitazione<br />
e cottura di pane classico. Aggiungere gli<br />
ingredienti per migliorarne il sapore.<br />
2. Vollkorn (integrale): impasto, lievitazione e<br />
cottura di pane integrale. In questo caso, si sconsiglia<br />
di utilizzare il timer di ritardo, in quanto può<br />
dare risultati insoddisfacenti.<br />
3. Französisch (francese): impasto, lievitazione<br />
e cottura di pane con tempi più lunghi di lievitazione.<br />
Il pane ottenuto ha una crosta più croccante<br />
e una consistenza soffice.<br />
4. Schnell (veloce): impasto, lievitazione e<br />
cottura di pane in tempi più brevi rispetto al<br />
programma NORMAL (classico). Il pane preparato<br />
con questa impostazione è solitamente più<br />
piccolo e presenta una consistenza densa.<br />
5. Süss (pane dolce): impasto, lievitazione e cottura<br />
di pane dolce. Si possono aggiungere degli<br />
ingredienti per migliorare l’aroma.<br />
6. Kuchen (dolci e torte): impasto, lievitazione e<br />
cottura. Si presta alla preparazione di dolci e torte<br />
con l’aggiunta di lievito chimico o bicarbonato di<br />
sodio.<br />
7. Marmelade (marmellata): consente di preparare<br />
marmellate e confetture mescolandole di<br />
continuo. Tagliare la frutta o la verdura a pezzettini<br />
prima di inserirle nel recipiente.<br />
8. Teig (impasto): impasto e lievitazione senza cottura.<br />
L’impasto ottenuto è adatto ad essere modellato<br />
per ottenere pizza, panini, brioche al vapore, ecc.<br />
9. Ultraschnell (ultraveloce): impasto e cottura<br />
in tempi molto brevi. Il pane ottenuto ha una consistenza<br />
densa.<br />
10. Backen (cottura): Solo cottura, niente impasto<br />
o lievitazione. Questa funzione si presta anche<br />
a prolungare il tempo di cottura di altri programmi.<br />
E’ possibile modificare il tempo di cottura con il tasto<br />
ZEIT (tempo). Tenerlo premuto per fare scorrere<br />
i minuti più velocemente.<br />
11. Dessert (dessert): impasto, lievitazione e<br />
cottura di dolci.<br />
12. Hausgemacht (personalizzato): con questa<br />
funzione è possibile impostare un programma<br />
di cottura personalizzato, stabilendone i tempi<br />
di ogni fase. I margini di tempo per ogni fase di<br />
programma (15) - impasto, lievitazione, cottura e<br />
mantenimento in caldo - per creare il proprio pane<br />
preferito, sono indicati qui di seguito:<br />
KNETEN 1 (impasto 1)<br />
6 – 14 min.<br />
AUFGEHEN 1 (lievitazione 1) 20 – 60 min.<br />
KNETEN 2 (impasto 2)<br />
5 – 20 min.<br />
AUFGEHEN 2 (lievitazione 2) 5 – 120 min.<br />
AUFGEHEN 3 (lievitazione 3) 0 – 120 min.<br />
BACKEN (cottura)<br />
0 – 80 min.<br />
WARMHALTEN (mantenimento in caldo) 0 – 60 min.<br />
Nel menu HAUSGEMACHT (personalizzato):<br />
1. Premere il tasto PROZESS (procedimento).<br />
Sull’indicatore LCD compare la fase KNETEN 1<br />
(impasto 1) (15). Premere quindi il tasto ZEIT<br />
(tempo) e impostare il tempo in minuti (19).<br />
Tenere premuto il tasto ZEIT (tempo) per fare<br />
scorrere i minuti più velocemente. Premere<br />
di nuovo il tasto PROZESS (procedimento) per<br />
confermare la scelta del primo passo.<br />
2. Premere nuovamente il tasto PROZESS (procedimento)<br />
per passare alla seconda fase.<br />
Sull’indicatore LCD compare AUFGEHEN 1<br />
(lievitazione 1) (15). Premere il tasto ZEIT (tempo)<br />
per impostare il tempo (19), quindi confermare<br />
la propria scelta, premendo un’altra<br />
volta il tasto PROZESS (procedimento).<br />
3. Con lo stesso procedimento impostare le fasi<br />
seguenti. Premere il tasto START / STOPP (start<br />
/ stop) per salvare le impostazioni e abbandonare<br />
la modalità di programma.<br />
4. Premere nuovamente il tasto START / STOPP<br />
(start / stop) per avviare il programma.<br />
Avvertenza: L’impostazione rimane memorizzata<br />
per il prossimo uso.<br />
FARBE (doratura)<br />
Con questo tasto è possibile scegliere il grado di<br />
doratura della crosta: HELL (chiara), MITTEL (media)<br />
o DUNKEL (scura) (20).<br />
GRÖSSE (peso / dimensione)<br />
Premere questo tasto per impostare il peso e quindi<br />
la grandezza del pane: 1000 g, 1200 g oder 1400 g. La<br />
scelta è indicata sul display (18). Si prega di osservare<br />
che il tempo di cottura varia in base al peso del pane.<br />
Miscele per pagnotte da 750 g<br />
Se si utilizzano queste miscele per pane già<br />
pronte, selezionare l’impostazione 1000 g (18).<br />
Con questa impostazione le vostre pagnotte<br />
riescono senz’altro!<br />
Se il pane diventa troppo scuro, diminuire il<br />
grado di doratura della crosta oppure fermare<br />
il programma 5 – 10 prima della fine premendo<br />
il tasto START / STOPP (start / stop).<br />
TRUCCHI & SUGGERIMENTI<br />
59
I<br />
I<br />
TRUCCHI & SUGGERIMENTI<br />
60<br />
L’opzione GRÖSSE (peso / dimensione) è disponibile<br />
solo per i seguenti programmi: 1. NORMAL<br />
(classico), 2. VOLLKORN (integrale), 3. FRANZÖSISCH<br />
(francese), 4. SCHELL (veloce), 5. SÜSS (pane dolce) e<br />
9. ULTRASCHNELL (ultraveloce).<br />
Impostazione di peso 1400 g<br />
Si prega di testare questa quantità progressivamente!<br />
Iniziare a testare la propria ricetta di pane<br />
con 1200 g.<br />
Durante la fase di lievitazione c’è il pericolo, soprattutto<br />
per impasti che lievitano molto (per es. pane<br />
bianco, pane dolce) che l’impasto non trovi più<br />
spazio nella teglia.<br />
Se dopo la fase di cottura nella teglia rimane ancora spazio,<br />
è possibile aumentare a poco a poco la quantità.<br />
Si ringrazia per la comprensione!<br />
LICHT (luce)<br />
Azionando questo tasto si accende la luce<br />
all’interno della macchina per controllare il processo<br />
di cottura del pane.<br />
Per lo spegnimento manuale premere nuovamente<br />
il tasto. La luce si spegne automaticamente<br />
dopo un minuto.<br />
ZEIT (tempo)<br />
Se non si vuole avviare la macchina immediatamente<br />
e si vuole posticipare la cottura del pane, è<br />
possibile farlo con la funzione di partenza ritardata.<br />
Impostare la partenza ritardata come segue:<br />
1. Selezionare il programma desiderato (17),<br />
Selezionare il programma desiderato (18) e la<br />
doratura (20).<br />
2. Selezionare il ritardo, premendo il tasto ZEIT<br />
(tempo). Il tempo che compare sul display (19)<br />
comprende anche la durata necessaria per realizzare<br />
il programma selezionaton.<br />
Ammettiamo che adesso sono le ore 20:30 e<br />
desiderate che il pane sia pronto alle ore 7 del<br />
mattino. In questo caso la durata intera è di 10<br />
ore e 30 minuti. Premere il tasto ZEIT (tempo)<br />
fino a far comparire sul display 10:30 (19). tempo<br />
incrementa o diminuisce di 10 minuti.<br />
3. Premere il tasto START / STOPP (start / stop) per<br />
avviare il programma di partenza ritardata. I<br />
due punti del timer lampeggiano. Inizia il conto<br />
alla rovescia, il pane sarà pronto nelle ore e<br />
nei minuti visualizzati.<br />
Si prega di osservare che il ritardo massimo consentito<br />
è di 13 ore. Non utilizzare questa funzione<br />
con le ricette che impiegano ingredienti deperibili<br />
come uova, latte fresco, frutta o cipolle.<br />
PROZESS (procedimento)<br />
Con l’aiuto di questo tasto nel Menu 12 (Personalizzato)<br />
è possibile impostare il proprio programma di<br />
cottura del pane.<br />
PAUSE (pausa)<br />
Dopo aver avviato un programma, è possibile sospenderlo<br />
premendo questo pulsante per 1,5 secondi – il<br />
programma s’interrompe, le impostazioni vengono<br />
salvate. Il tempo rimanente lampeggerà sul display.<br />
Per ripristinare il programma premere di nuovo<br />
PAUSE (pausa).<br />
FUNZIONE DI MANTENIMENTO<br />
IN CALDO<br />
Il pane è mantenuto in caldo automaticamente<br />
fino ad un’ora dopo la cottura (15). Se si vuole<br />
estrarre il pane durante la fase del mantenimento<br />
in caldo, basta spegnere il programma premendo<br />
START / STOPP (start / stop).<br />
FUNZIONE DI MEMORIA<br />
Se l’alimentazione elettrica viene interrotta durante<br />
il funzionamento della macchina del pane,<br />
la macchina conserverà la memoria per 10 minuti e<br />
riprenderà il processo in corso una volta ripristinata<br />
la corrente, anche senza premere il tasto START<br />
/ STOPP (start / stop).<br />
Se l’interruzione ha una durata superiore ai 10 minuti,<br />
la macchina non riesce a tenere in memoria<br />
il programma in corso. Bisogna gettare gli ingredienti,<br />
dopo averli estratti dalla teglia, e ricominciare<br />
daccapo. Se il pane si trova non oltre la prima<br />
fase d’impasto e la lievitazione non è ancora cominciata,<br />
si può semplicemente riprendere il ciclo<br />
dall’inizio premendo START / STOPP (start / stop).<br />
TABELLA CON LE FASI DI TEMPO<br />
N. di programma<br />
Impostazioni<br />
PESO<br />
Impostazioni<br />
DORATURA<br />
IMPASTO 1<br />
LIEVITAZIONE 1<br />
IMPASTO 2<br />
LIEVITAZIONE 2<br />
LIEVITAZIONE 3<br />
COTTURA<br />
Durata intera del<br />
programma<br />
Segnale per inserire<br />
gli ingredienti<br />
Mantenimento in<br />
caldo<br />
1 1400 g CHIARA, 10 min. 20 min. 15 min. 25 min. 45 min. 65 min. 3:00 2:20<br />
1200 g MEDIA, 10 min. 20 min. 15 min. 25 min. 45 min. 60 min. 2:55 2:15 ✓<br />
1000 g SCURA 10 min. 20 min. 12 min. 25 min. 48 min. 55 min. 2:50 2:13<br />
2 1400 g CHIARA, 10 min. 25 min. 20 min. 35 min. 65 min. 65 min. 3:40 2:55<br />
1200 g MEDIA, 8 min. 25 min. 18 min. 35 min. 65 min. 60 min. 3:32 2:50 ✓<br />
1000 g SCURA 8 min. 25 min. 16 min. 35 min. 70 min. 55 min. 3:30 2:50<br />
3 1400 g CHIARA, 18 min. 40 min. 22 min. 30 min. 50 min. 70 min. 3:50 2:40<br />
1200 g MEDIA, 16 min. 40 min. 19 min. 30 min. 50 min. 65 min. 3:40 2:35 ✓<br />
1000 g SCURA 13 min. 40 min. 17 min. 30 min. 50 min. 60 min. 3:30 2:30<br />
4 1400 g CHIARA, 10 min. 10 min. 10 min. — 30 min. 70 min. 2:10 1:45<br />
1200 g MEDIA, 10 min. 10 min. 10 min. — 30 min. 65 min. 2:05 1:40 ✓<br />
1000 g SCURA 10 min. 10 min. 10 min. — 30 min. 60 min. 2:00 1:35<br />
5 1400 g CHIARA, 10 min. 5 min. 20 min. 33 min. 40 min. 62 min. 2:50 2:25<br />
1200 g MEDIA, 10 min. 5 min. 20 min. 32 min. 40 min. 58 min. 2:45 2:20 ✓<br />
1000 g SCURA 10 min. 5 min. 15 min. 32 min. 47 min. 53 min. 2:42 2:22<br />
6<br />
CHIARA,<br />
— MEDIA, 6 min. 5 min. 10 min. 9 min. — 80 min. 1:50 1:34 ✓<br />
SCURA<br />
7 — — — 15 min. — — 45 min. 20 min. 1:20 — —<br />
8 — — 20 min. — — 30 min. 40 min. — 1:30 — —<br />
9 1400 g CHIARA, 10 min. — 5 min. — 33 min. 60 min. 1:48 1:38<br />
1200 g MEDIA, 10 min. — 5 min. — 28 min. 55 min. 1:38 1:28 ✓<br />
1000 g SCURA 10 min. — 5 min. — 28 min. 52 min. 1:35 1:25<br />
10<br />
CHIARA,<br />
10 min. 0:10<br />
— MEDIA,<br />
SCURA<br />
— — — — — fino<br />
60 min.<br />
fino<br />
1:00<br />
— ✓<br />
11<br />
12<br />
—<br />
—<br />
CHIARA,<br />
MEDIA,<br />
SCURA<br />
CHIARA,<br />
MEDIA,<br />
SCURA<br />
13 min. — — — 25 min. 60 min. 1:38 — ✓<br />
6 min.<br />
fino<br />
14 min.<br />
20 min.<br />
fino<br />
60 min.<br />
5 min.<br />
fino<br />
20 min.<br />
5 min.<br />
fino<br />
120 min.<br />
0 min.<br />
fino<br />
120 min.<br />
0 min.<br />
fino<br />
80 min.<br />
0:36<br />
fino<br />
7:54<br />
durante<br />
IMPA-<br />
STO 2<br />
✓<br />
61
I<br />
I<br />
BLOCCO DEL PANNELLO COMANDI<br />
Per evitare di selezionare comandi involontariamente,<br />
il pannello controlli è dotato di un sistema<br />
di blocco-tasti (16). Premere prima il tasto PRO-<br />
ZESS (procedimento) e poi FARBE (doratura). Il pannello<br />
controlli ad eccezione dei tasti PROZESS (procedimento)<br />
e FARBE (doratura) è adesso bloccato.<br />
Per disattivare il blocco-tasti premere il tasto<br />
PROZESS (procedimento) e poi FARBE (doratura). Il<br />
blocco- tasti funziona anche automaticamente e<br />
si attiva 5 minuti dopo l’inizio di ogni programma.<br />
Bisogna disattivare il blocco-tasti (16), prima<br />
di inserire nuove impostazioni nell’apparecchio.<br />
AMBIENTE<br />
La macchina del pane può essere utilizzata a differenti<br />
temperature. Tuttavia in base alla temperatura<br />
può variare la grandezza del pane. Consigliamo<br />
una temperatura ambiente tra i 15°C e i 34°C.<br />
2. Aggiungere gli ingredienti richiesti nel recipiente<br />
(6 / 8), seguendo l’ordine indicato. In genere<br />
si comincia con l’acqua o un altro liquido,<br />
si aggiungono poi zucchero, sale e farina. Il<br />
lievito sia quello naturale che quello chimico<br />
in polvere va aggiunto sempre per ultimo.<br />
Avvertenza: Si prega di fare attenzione alle<br />
quantità delle sostanze fermentanti e della farina<br />
indicate di volta in volta nelle ricette.<br />
3. Creare con le dita un solco al centro della farina<br />
ed infilarvi il lievito. Assicurarsi che non entri a<br />
contatto con i liquidi o con il sale.<br />
Lievito o Lievito in<br />
polvere<br />
Ingredienti solidi<br />
Acqua o altri liquidi<br />
4. Chiudere il coperchio (2) ed infilare la spina<br />
nella presa di corrente.<br />
TRUCCHI & SUGGERIMENTI<br />
In caso di piccole dosi la pasta spesso non si<br />
distribuisce in modo uniforme all’interno della<br />
teglia – si accumula solo da una parte. Ciò porta<br />
ad un risultato di cottura irregolare.<br />
Per ottenere una bella pagnotta, livellare la pasta<br />
all’interno della teglia con l’aiuto della spatola<br />
(13) alla fine della seconda fase d’impasto<br />
KNETEN 2 (impasto 2) (15).<br />
Se la pasta si attacca troppo alla spatola (15),<br />
immergerla brevemente nella farina.<br />
11. La durata del processo di cottura dipende dal<br />
programma scelto (17), dalla grandezza della<br />
pagnotta (18) e dalla doratura (20). Per controllare<br />
il processo di cottura, premere il tasto<br />
LICHT (luce) e guardare attraverso l’oblò – non<br />
aprire il coperchio (2)!<br />
Avvertenza: Durante la cottura può esservi<br />
una fuoriuscita di vapore dalle aperture di<br />
aerazione del coperchio, fenomeno del tutto<br />
normale.<br />
Avvertenza: Consigliamo di tagliare il pane con<br />
un coltello elettrico o dentellato. Evitare i coltelli<br />
da cucina! Non sono adatti e tagliano il pane in<br />
maniera irregolare.<br />
16. Se non siete vicini alla macchina o alla fine del<br />
ciclo di cottura non premete il tasto START /<br />
STOPP (start / stop), il pane si mantiene in caldo<br />
per un’ora. Al termine della fase di mantenimento<br />
in caldo, verranno emessi 10 beep.<br />
17. Se dopo l’uso l’apparecchio non serve più,<br />
spegnerlo staccando la spina dalla presa di<br />
corrente elettrica.<br />
Attenzione: Prima di tagliare la pagnotta a fette,<br />
rimuovere le lame impastatrici (7 / 9) dal pane con<br />
il gancio (12). La pagnotta è ancora calda, evitare<br />
quindi di tirare le lame con le dita.<br />
Avvertenza: Se non si mangia tutto il pane, conservarlo<br />
in una busta di plastica chiusa o in un<br />
contenitore ermetico richiudibile. Il pane si mantiene<br />
per ca. 3 giorni a temperatura ambiente.<br />
Se si vuole conservare il pane più a lungo, metterlo<br />
in una busta di plastica e tenerlo in frigorifero. Così<br />
si conserverà fino a 10 giorni.<br />
Il pane fatto in casa non contiene conservanti e per<br />
questo motivo non si mantiene fresco più a lungo<br />
di quello del panettiere.<br />
62<br />
AVVERTENZE DI PERICOLO<br />
• Se una volta avviato un programma sul display<br />
(19) appare la scritta „H HH“, significa che<br />
la temperatura all’interno della macchina è<br />
troppo elevata. Spegnere la macchina, aprire il<br />
coperchio e lasciare raffreddare l’apparecchio<br />
per 10 – 20 minuti.<br />
• Se una volta premuto il tasto START / STOPP<br />
(start / stop) sul display (19) appare la scritta „E<br />
E0” o „E E1”, significa che il sensore di misurazione<br />
della temperatura è danneggiato, in tal<br />
caso è opportuno far controllare la macchina<br />
da un tecnico autorizzato.<br />
COSÌ SI FA IL PANE<br />
1. Collocare il recipiente per il pane (6 / 8) nella camera<br />
di cottura, pressandola fino a bloccarla nella corretta<br />
posizione. Fissare le lame impastatrici (7 / 9)<br />
sugli alberi girevoli. Ungere gli alberi e le lame<br />
per esempio con margarina, in modo che poi si<br />
stacchino facilmente.<br />
5. Premere il tasto MENÜ (menu) fino a scegliere<br />
il programma desiderato (17).<br />
6. Premere il tasto GRÖSSE (peso / dimensione) (18)<br />
per scegliere il peso della propria pagnotta.<br />
7. Scegliere il grado di doratura desiderato per la<br />
crosta (20) premendo il tasto FARBE (doratura).<br />
8. Impostare la partenza ritardata (19) con il<br />
tasto ZEIT (tempo), se si desidera che il pane<br />
sia pronto più tardi. Saltare questo passo se si<br />
vuole mettere subito in funzione la macchina<br />
del pane.<br />
9. Premere per 1,5 secondi il tasto START / STOPP<br />
(start / stop) per avviare il programma.<br />
10. Se è stato impostato uno sei seguenti programmi<br />
1. NORMAL (classico), 2. VOLLKORN (integrale),<br />
3. FRANZÖSISCH (francese), 4. SCHNELL<br />
(veloce), 5. SÜSS (pane dolce), 6. KUCHEN (dolci<br />
e torte), 9. ULTRASCHNELL (ultraveloce) o 12.<br />
HAUSGEMACHT (personalizzato), vengono<br />
emessi alcuni segnali acustici che avvertono<br />
che è possibile aggiungere altri ingredienti.<br />
Aprire il coperchio (2) e aggiungerli.<br />
TRUCCHI<br />
Non siete sicuri che il vostro pane sia cotto al<br />
punto giusto? Infilate nel pane uno stecchino di<br />
legno. Se esce asciutto il pane è pronto!<br />
12. Quando il programma è stato completato e il<br />
pane è cotto, viene emesso un segnale acustico.<br />
Premere il tasto START / STOPP (start / stop)<br />
per ca. 1,5 secondi per arrestare il programma.<br />
Adesso si può prendere il pane. Aprire il<br />
coperchio (2) e con delle presine isolanti estrarre<br />
il recipiente (6 / 8) dalla camera di cottura,<br />
sollevandolo.<br />
Attenzione: il recipiente e il pane possono essere<br />
molto caldi. Fare quindi molta attenzione.<br />
13. Lasciare raffreddare il recipiente (6 / 8) prima di<br />
estrarre il pane. Se necessario, usare la spatola<br />
di plastica (13) per staccare delicatamente il<br />
pane dai lati del recipiente. Non utilizzare mai<br />
un coltello, perché potrebbe danneggiarne lo<br />
strato antiaderente.<br />
14. Capovolgere il recipiente (6 / 8), tenerlo su una<br />
griglia o una teglia da forno e scuoterlo delicatamente<br />
finché esce il pane.<br />
15. Fate raffreddare il pane per ca. 20 minuti prima<br />
di tagliarlo a fette.<br />
FUNZIONI SPECIALI<br />
PANINI VELOCI: MENÜ 4 (menu 4) SCHNELL<br />
(veloce) E MENÜ 9 (menu 9) ULTRASCHNELL<br />
(ultraveloce)<br />
Panini veloci sono prodotti con lievito in polvere o<br />
bicarbonato di sodio, attivati tramite liquido e calore.<br />
Per ottenere dei buoni risultati inserire nel recipiente<br />
prima il liquido (6 / 8), poi gli ingredienti solidi.<br />
Nella prima fase d’impasto può accadere che gli<br />
ingredienti solidi si raccolgono agli angoli del recipiente.<br />
Adesso è necessario, aiutare gli ingredienti<br />
ad amalgamarsi per evitare che si creino dei grumi.<br />
Utilizzare esclusivamente utensili da cucina di<br />
legno e premere il tasto PAUSE prima di aprire il<br />
coperchio.<br />
IL PROGRAMMA ULTRAVELOCE, MENU 9<br />
Con il programma ULTRASCHNELL (ultraveloce) la<br />
macchina del pane può preparare una pagnotta<br />
63
I<br />
I<br />
in un’ora e 38 minuti. Si prega di osservare che in<br />
questo caso la temperatura dell’acqua deve essere<br />
di 48 – 50°C, si prega di utilizzare un termometro<br />
per misurare esattamente la temperatura.<br />
L’influsso della temperatura è fondamentale per il<br />
buon risultato della cottura.<br />
Se la temperatura dell’acqua è troppo bassa, il<br />
pane non lievita e non si raggiunge la grandezza<br />
desiderata. Se la temperatura è troppo alta, il lievito<br />
è messo fuori uso, prima ancora che cominci<br />
il processo di lievitazione. Anche in questo caso il<br />
pane non lieviterà in modo corretto e il risultato<br />
della cottura sarà negativo.<br />
IL RECIPIENTE DEL PANE<br />
A DUE SCOMPARTI (8)<br />
Si prega di osservare nell’impostazione del peso<br />
che la capacità dei recipienti è di 500 g ciascuno.<br />
Il recipiente del pane a due scomparti (8) può<br />
essere adoperato per i seguenti due scopi:<br />
• Per preparare contemporaneamente due pagnotte<br />
dello stesso tipo.<br />
• Per preparare contemporaneamente due pagnotte<br />
di diverso tipo con un solo programma.<br />
Avvertenza: Scegliere l’impostazione di peso<br />
1000 g.<br />
nella corretta posizione.<br />
Se non trova subito l’alloggio, variare leggermente<br />
la posizione finché non trova quella giusta e poi<br />
pressare.<br />
LAME IMPASTRATRICI (7/ 9)<br />
Se le lame impastatrici (7 / 9) non si rimuovono<br />
facilmente dal pane utilizzare il gancio (12).<br />
Pulire le lame (7 / 9) con attenzione con un panno<br />
di cotone umido.<br />
Evitare prodotti di pulizia corrosivi o aggressivi<br />
per non danneggiare lo strato antiaderente.<br />
COPERCHIO (2) CON OBLO’ (3)<br />
Pulire il coperchio (2) all’esterno e all’interno con<br />
un panno umido.<br />
Evitare prodotti di pulizia aggressivi per non<br />
danneggiare le superfici lucide.<br />
CORPO MACCHINA (5)<br />
Pulire l’esterno del corpo della macchina (5) con<br />
un panno umido.<br />
Evitare prodotti di pulizia aggressivi per non<br />
danneggiare le superfici di acciaio inossidabile<br />
della macchina. Non immergere mai il corpo della<br />
macchina (5) per pulirlo in acqua.<br />
• Farina bianca, è una miscela di varietà di grano<br />
tenero e grano duro, adatta per una cottura rapida<br />
del pane o per fare biscotti.<br />
• Farina integrale, contiene tutte le sostanze del<br />
chicco di grano originale – anche la crusca, il<br />
rivestimento duro del grano che è fonte ideale<br />
di fibre.<br />
Si tratta di una farina macinata molto finemente.<br />
La crusca contenuta impedisce la produzione<br />
di glutine, per cui il pane prodotto con<br />
questo tipo di farina è più piccolo e più pesante.<br />
Per ottenere una consistenza più leggera viene<br />
spesso miscelata con altre varietà di farina.<br />
• Farina scura di frumento, chiamata anche farina<br />
nera o farina grezza, è una farina ricca di<br />
fibre, simile alla farina integrale. Per ottenere<br />
una buona pagnotta dopo la cottura, deve essere<br />
miscelata a grosse quantità di altre varietà<br />
di farina.<br />
• Farina con aggiunta di lievito in polvere contiene<br />
– come si evince facilmente dal nome -<br />
lievito in polvere molto adatto alla produzione<br />
di torte e dolci.<br />
• Farina di granoturco e farina di avena macinate<br />
da granoturco e avena. Aggiunte per produrre<br />
pane nero. La farina di avena, aumenta il<br />
sapore e migliora la consistenza del pane.<br />
Avvertenza: Eliminando il sale per motivi si salute,<br />
il pane lieviterà di più.<br />
GRASSI, BURRO E OLI VEGETALI<br />
Il grasso rende il pane morbido e ne prolunga la durata.<br />
Il burro va sciolto o tagliato a pezzettini prima<br />
di essere aggiunto.<br />
LIEVITO<br />
Durante la fermentazione il lievito libera anidride<br />
carbonica che permette all’impasto di<br />
crescere, rendendo morbida la struttura interna<br />
del pane. Per fermentare il lievito ha bisogno di<br />
alimentarsi di sostanze nutritive come lo zucchero<br />
e la farina.<br />
1 ts di lievito secco attivo = ¾ ts di lievito istantaneo<br />
1,5 ts di lievito secco attivo = 1 ts di lievito istantaneo<br />
2 ts di lievito secco attivo = 1,5 ts di lievito istantaneo<br />
(tbs = cucchiaio, ts = cucchiaino)<br />
Il lievito fresco va conservato in frigorifero, perché<br />
il microorganismo ad alte temperature muore.<br />
Acquistando il lievito controllare la data di produzione<br />
e di scadenza. Riporre immediatamente il<br />
lievito in frigorifero dopo averlo usato.<br />
Avvertenza: Se il lievito non è più fresco, il pane<br />
non lievita bene.<br />
64<br />
PULIZIA E MANUTENZIONE<br />
Prima di pulire l’apparecchio, staccare la spina dalla<br />
presa e lasciarlo raffreddare completamente.<br />
Sia il recipiente (6 / 8) che le lame impastatrici (7 / 9)<br />
sono resistenti alla lavastoviglie.<br />
RECIPIENTE (6) E RECIPIENTE A DOPPIO<br />
SCOMPARTO (8)<br />
Estrarre il recipiente (6 / 8) tirandolo dal manico.<br />
Pulire il recipiente (6 / 8) all’interno e all’esterno<br />
con un panno umido.<br />
Evitare prodotti di pulizia corrosivi o aggressivi per<br />
non danneggiare lo strato antiaderente. La teglia<br />
(6 / 8) deve essere completamente asciutta prima<br />
di essere rimessa nell’apparecchio.<br />
Avvertenza: Collocare la teglia del pane (6 / 8) nella<br />
camera di cottura, pressandola fino a bloccarla<br />
Stoccaggio<br />
Prima di riporre l’apparecchio, assicurarsi che si<br />
sia completamente raffreddato, pulito e asciutto.<br />
Tenere il coperchio chiuso (2).<br />
PICCOLO MANUALE DI CUCINA<br />
FARINA<br />
La farina è l’ingrediente base più importante del<br />
pane.<br />
• Farina per pane, detta anche di glutine o farina<br />
forte, è prodotta dalla macinazione di grano<br />
duro. Presenta un alto contenuto di glutine e<br />
proteine, agenti naturali che conferiscono alla<br />
pasta la sua capacità di conservare la forma e<br />
di mantenere l’anidride carbonica, prodotta dal<br />
lievito. Per questo motivo è molto adatta a fare<br />
il pane.<br />
ZUCCHERO<br />
Lo zucchero è un ingrediente molto importante.<br />
Aiuta il lievito a fermentare. Dà inoltre al pane un<br />
sapore più morbido, ne aumenta il valore nutrizionale<br />
e ne prolunga la conservabilità. Di solito si<br />
utilizza zucchero bianco, ma si possono utilizzare<br />
anche zucchero bruno, zucchero a velo, sciroppo<br />
o miele.<br />
Attenzione: Usare esclusivamente zucchero fine.<br />
Lo zucchero grossolano può danneggiare la superficie<br />
antiaderente della teglia.<br />
Avvertenza: Si può evitare l’uso di zucchero. In<br />
questo caso il pane lievita di meno.<br />
SALE<br />
Il sale insaporisce il pane e contribuisce alla doratura<br />
della crosta – regola inoltre l’attività del lievito.<br />
In quantità eccessive però ostacola la lievitazione,<br />
va dosato quindi correttamente.<br />
Con una semplice operazione è possibile verificare<br />
se il lievito è ancora fresco:<br />
1. Versare mezzo bicchiere di acqua calda (45 –<br />
50°C) nella tazza graduata.<br />
2. Aggiungervi un cucchiaino di zucchero bianco<br />
e mescolare. Sciogliere due cucchiaini di lievito<br />
nell’acqua.<br />
3. Mettere la tazza per 10 minuti in un luogo caldo.<br />
Non mescolare.<br />
4. La schiuma che si viene a formare dovrebbe<br />
corrispondere ad una tazza, in caso contrario<br />
il lievito non è più attivo.<br />
65
I<br />
I<br />
LIEVITO IN POLVERE<br />
Il lievito in polvere è utilizzato per pane e torte o<br />
dolci nel ciclo di cottura ULTRASCHNELL (ultraveloce).<br />
Non ha bisogno di fermentare e produce<br />
gas che in forma di piccole bolle influenza la consistenza<br />
del pane.<br />
Soda<br />
Il bicarbonato di sodio è molto simile al lievito in<br />
polvere. Può essere utilizzato anche in combinazione<br />
con il lievito in polvere.<br />
ACQUA E ALTRI INGREDIENTI LIQUIDI<br />
L’acqua è un ingrediente essenziale per fare il<br />
pane. Ottimale è una temperatura di 20 – 25°C. Si<br />
può sostituire l’acqua con latte fresco oppure si<br />
può mescolare all’acqua un 2 % di latte in polvere.<br />
Serve a migliorare l’aroma del pane e il colore della<br />
crosta. Alcune ricette richiedono anche succo di<br />
limone, mela o arancia per migliorare il sapore.<br />
UOVA<br />
Le uova possono migliorare la consistenza del<br />
pane, accrescerne il valore nutrizionale e la grandezza.<br />
Liberarle subito dal guscio e sbatterle in<br />
maniera uniforme.<br />
DOSAGGIO DEGLI INGREDIENTI<br />
Il passo più importante nell’uso della macchina del<br />
pane consiste nel pesare esattamente i singoli ingredienti<br />
con l’aiuto del bicchiere graduato (10) e<br />
del misurino (11). Ogni ingrediente sia liquido che<br />
solido va misurato esattamente oppure il risultato<br />
del vostro sforzo sarà misero e inaccettabile.<br />
DOSAGGIO DI LIQUIDI<br />
Acqua, latticello o latte in polvere vanno misurati<br />
con il bicchiere graduato (10). Tenere il bicchiere<br />
diritto mentre si misura il liquido. Per misurare<br />
olio o altri ingredienti pulire a fondo il bicchiere<br />
graduato (10).<br />
INGREDIENTI SOLIDI<br />
Gli ingredienti solidi vanno misurati nel bicchiere<br />
(10) senza essere pressati, poiché un “troppo” anche<br />
se si tratta di poca cosa, può influenzare l’equilibrio<br />
della ricetta.<br />
Per misurare piccole quantità utilizzare il misurino<br />
(11). Si tratta sempre di cucchiai rasi.<br />
Misurino (11):<br />
<br />
corrisponde a un<br />
cucchiaio da tavola<br />
corrisponde a un<br />
cucchiaino<br />
ORDINE DEGLI INGREDIENTI<br />
L’ordine in cui vanno aggiunti gli ingredienti deve<br />
essere mantenuto scrupolosamente. In linea di<br />
massima l’ordine è il seguente:<br />
Ingrediente liquido, uova, sale e latte in polvere,<br />
ecc.<br />
La farina, quando è aggiunta, non deve essere del<br />
tutto immersa nel liquido. Il lievito va messo solo<br />
sulla farina asciutta e non deve entrare direttamente<br />
in contatto con il sale.<br />
Dopo che la massa è stata impastata per un po’,<br />
la macchina emette un segnale acustico. Adesso<br />
è possibile aggiungere frutta o simili. Se la frutta<br />
si aggiunge troppo presto, l’aroma e la consistenza<br />
si perdono a causa della lunga operazione<br />
d’impasto.<br />
In caso di partenza ritardata, non si devono mai<br />
utilizzate ingredienti deperibili come uova o<br />
frutta.<br />
RISOLUZIONE DEI PROBLEMI<br />
n. Problema Causa Soluzione<br />
1 Durante la cottura fuoriesce<br />
fumo dalle griglie di aerazione.<br />
2 La crosta nel fondo del pane<br />
è troppo spessa.<br />
3 E’ difficile estrarre il pane dal<br />
recipiente.<br />
4 Gli ingredienti sono miscelati<br />
in maniera non uniforme.<br />
5 Dopo la cottura, il pane è<br />
asciutto e non ha una crosta<br />
dorata.<br />
6 Il display mostra „H HH“ dopo<br />
aver premuto il tasto START /<br />
-STOPP (start / stop).<br />
Residui di ingredienti si sono<br />
accumulati sulla resistenza o<br />
vicino a questa.<br />
Quando utilizzate<br />
l’apparecchio per la prima<br />
volta dell’olio può aderire alla<br />
resistenza.<br />
Il pane è stato mantenuto in<br />
caldo nel recipiente per troppo<br />
tempo, la perdita d’acqua è<br />
stata quindi troppo elevata.<br />
Le lame impastatrici sono<br />
attaccate all’albero.<br />
Il programma scelto non è<br />
adatto.<br />
La resistenza è troppo forte<br />
così che le lame non riescono<br />
a girare.<br />
Il coperchio è stato aperto<br />
più volte.<br />
Il programma è sbagliato.<br />
La temperatura della macchina<br />
del pane è troppo elevata.<br />
Staccare la spina dalla presa<br />
di corrente. Lasciare raffreddare<br />
l’apparecchio e pulire la<br />
resistenza. Fare attenzione<br />
per evitare ustioni.<br />
Quando si usa l’apparecchio<br />
per la prima volta, farlo<br />
funzionare a vuoto e aprire il<br />
coperchio.<br />
Estrarre il pane il più presto<br />
possibile e non tenerlo in<br />
caldo.<br />
Dopo aver estratto il pane,<br />
versare dell’acqua calda nel<br />
recipiente, in modo che le<br />
lame impastatrici siano coperte.<br />
Estrarle dopo ca. 10 min.<br />
e pulirle. Prima del prossimo<br />
uso della macchina ungere<br />
l’albero girevole.<br />
Selezionare il programma<br />
giusto.<br />
Controllare l’alloggio delle<br />
lame. Estrarre il recipiente e<br />
avviare l’apparecchio a vuoto.<br />
In caso di funzionamento<br />
difettoso rivolgersi al centro<br />
di assistenza.<br />
Non aprire il coperchio<br />
quando il programma è in<br />
funzione.<br />
Leggere le istruzioni sui<br />
programmi.<br />
Premere il tasto START /STOPP<br />
(start / stop) e staccare la spina<br />
dalla presa di corrente.<br />
Estrarre il recipiente e lasciare<br />
il coperchio aperto fino a<br />
quando la macchina non si sia<br />
raffreddata.<br />
66<br />
67
I<br />
I<br />
n. Problema Causa Soluzione<br />
n. Problema Causa Soluzione<br />
7 Il blocco tasti non si sblocca<br />
premendo PROZESS e poi<br />
FARBE (durante il processo e<br />
alla fine).<br />
8 Si sente che il motore lavora,<br />
ma la macchina non impasta<br />
il pane.<br />
9 La pagnotta è talmente<br />
grossa che preme contro il<br />
coperchio.<br />
10 Il pane è troppo piccolo e<br />
non è lievitato.<br />
Difetti tecnici.<br />
Il recipiente non è fissato<br />
bene o la quantità d’impasto<br />
è troppo grande.<br />
Troppo lievito, acqua o farina.<br />
E’ anche possibile che l’ambiente<br />
circostante sia troppo caldo<br />
(ideale: dai 15°C ai 34°C).<br />
Niente lievito o troppo poco.<br />
Il lievito può anche essere<br />
vecchio e quindi non più<br />
attivo.<br />
Altre cause possono essere:<br />
acqua a temperatura troppo<br />
elevata, temperatura ambiente<br />
troppo fredda oppure<br />
troppo sale.<br />
Staccare la spina dalla presa,<br />
attendere un po’, quindi’<br />
riattaccarla.<br />
Il programma in corso<br />
viene interrotto per pochi<br />
minuti, quindi riprende<br />
automaticamente<br />
(vedi “Funzione di memoria”).<br />
Verificare se il recipiente è<br />
fissato bene nell’alloggio.<br />
Assicurarsi che l’impasto sia<br />
stato prodotto seguendo la<br />
ricetta e che gli ingredienti<br />
siano stati dosati correttamente.<br />
Verificare i fattori menzionati.<br />
Diminuire le quantità.<br />
Verificare la quantità e<br />
l’attività del lievito.<br />
Casomai aumentare la temperatura<br />
dell’ambienter.<br />
13 Il pane è troppo pesante e la<br />
consistenza troppo densa.<br />
Troppa farina e troppo poca<br />
acqua.<br />
Troppa frutta o troppa farina<br />
integrale.<br />
14 Il centro del pane è vuoto. Troppa acqua o lievito e/o<br />
niente sale.<br />
15 Sulla superficie del pane è<br />
attaccata ancora polvere.<br />
16 La crosta è troppo spessa e il<br />
colore troppo scuro quando<br />
si fanno torte o alimenti con<br />
molto zucchero.<br />
La temperatura dell’acqua è<br />
troppo elevata.<br />
Nel pane sono contenute<br />
molte sostanze che contengono<br />
glucosio.<br />
Il pane è stato impastato abbastanza<br />
perché conteneva<br />
poca acqua.<br />
Le diverse ricette hanno<br />
grande influsso nella fabbricazione<br />
del pane. Il colore è<br />
molto scuro se si usa molto<br />
zucchero.<br />
Usare meno farina o più<br />
acqua.<br />
Ridurre la quantità degli<br />
ingredienti nominati e<br />
prendere più lievito.<br />
Ridurre la quantità di acqua e<br />
lievito e usare più sale.<br />
Verificare la temperatura<br />
dell’acqua.<br />
Mettere nel pane nessuna o<br />
poche sostanze che contengono<br />
glucosio.<br />
Verificare la quantità di<br />
acqua e la meccanica della<br />
macchina.<br />
Se il colore per una ricetta<br />
con molto zucchero è troppo<br />
scuro, interrompere il ciclo<br />
di cottura 5 – 10 prima della<br />
fine, premendo il tasto START<br />
/ STOPP (start / stop).<br />
Prima di estrarre il dolce o<br />
il pane, lasciare il coperchio<br />
chiuso ancora per 20 minuti.<br />
11 L’impasto è talmente grande<br />
che fuoriesce dal bordo del<br />
recipiente.<br />
E’ stata usata troppa acqua,<br />
così che l’impasto è troppo liquido.<br />
Eventualmente è stato<br />
usato troppo lievito.<br />
Ridurre la quantità di liquido<br />
e migliorare la consistenza<br />
dell’impasto.<br />
12 Il pane si spezza a metà<br />
durante la fase di cottura.<br />
La farina non è abbastanza<br />
forte da far lievitare l’impasto.<br />
Utilizzare farina per pane o<br />
farina forte.<br />
68<br />
Il lievito agisce troppo presto<br />
o la temperatura è troppo<br />
elevata.<br />
Troppa acqua rende l’impasto<br />
troppo pesante e troppo<br />
liquido.<br />
Utilizzare il lievito a temperatura<br />
ambiente.<br />
Adattare la quantità di<br />
acqua.<br />
CORRETTO SMALTIMENTO DEL PRODOTTO<br />
Il simbolo qui riportato indica all’interno dell’Unione europea che il prodotto non deve<br />
essere considerato come un normale rifiuto domestico, ma deve essere portato nel<br />
punto di raccolta appropriato per il riciclaggio di apparecchiature elettriche ed elettroniche.<br />
Provvedendo a smaltire questo prodotto in modo appropriato, si contribuisce ad<br />
evitare potenziali conseguenze negative per l‘ambiente e per la salute, che potrebbero<br />
derivare da uno smaltimento inadeguato del prodotto. Per informazioni più dettagliate<br />
sul riciclaggio di questo prodotto, contattare l‘amministrazione comunale, il servizio<br />
locale di smaltimento rifiuti o il negozio in cui è stato acquistato il prodotto.<br />
69
I<br />
I<br />
TRUCCHI & SUGGERIMENTI<br />
RICETTE - ADATTE AI PROGRAMMI<br />
Le quantità di farina e lievito indicate nelle ricette corrispondono al massimo.<br />
1 tazza = 250 ml • 1 tbs = 3 ts • 1 tbs = 15 ml • 1 ts = 5 ml<br />
(tbs = cucchiaio, ts = cucchiaino)<br />
• Burro / Margarina: a piacere si possono utilizzare<br />
anche altri grassi: olio d’oliva, strutto,<br />
lardo, ecc.<br />
• Latte in polvere: si può sostituire il latte<br />
in polvere con il latte fresco. In questo caso<br />
diminuire la quantità di acqua in modo proporzionale<br />
al latte aggiunto.<br />
• Acqua: l’acqua minerale rende il pane più<br />
leggero e più soffice. Ideale con varietà di<br />
farina pesanti.<br />
PANE CONTADINO<br />
Peso<br />
Ingrediente<br />
1400 g /<br />
3 LB<br />
1200 g /<br />
2,5 LB<br />
1000 g /<br />
2 LB<br />
Latticello 530 ml 490 ml 370 ml<br />
Burro /Margarina 1 ¾ tbs 1 ½ tbs 1 tbs<br />
Sale 1 ¾ ts 1 ½ ts 1 ts<br />
Zucchero 1 ¾ tbs 1 ½ tbs 1 tbs<br />
Farina bianca 455 g 420 g 315 g<br />
Farina intera di segale 455 g 420 g 315 g<br />
Lievito secco 1 ¾ ts 1 ½ ts 1 ts<br />
Programma: NORMAL (normale)<br />
PANE FRANCESE CROCCANTE<br />
Peso<br />
Ingredienti<br />
1400 g /<br />
3 LB<br />
1200 g /<br />
2,5 LB<br />
1000 g /<br />
2 LB<br />
Acqua 500 ml 460 ml 350 ml<br />
Burro / Margarina 3 tbs 2 ¼ tbs 1 ½ tbs<br />
Latte in polvere 2 tbs 1 ½ tbs 1 tbs<br />
Zucchero 3 ½ tbs 3 tbs 2 tbs<br />
Sale 1 ¾ ts 1 ½ ts 1 ts<br />
Farina bianca 910 g 840 g 630 g<br />
Lievito secco 1 ¾ ts 1 ½ ts 1 ts<br />
Programma: FRANZÖSISCH (francese)<br />
PANE VELOCE DI FARINA DI GRANOTURCO<br />
Peso<br />
Ingredienti<br />
1400 g /<br />
3 LB<br />
1200 g /<br />
2,5 LB<br />
1000 g /<br />
2 LB<br />
Latte 530 ml 490 ml 370 ml<br />
Burro / Margarina 3 ½ tbs 3 tbs 2 tbs<br />
Latte in polvere 1 ¾ ts 1 ½ ts 1 ts<br />
Zucchero 2 ts 1 ½ ts 1 ts<br />
Sale 2 ts 1 ½ ts 1 ts<br />
Farina per pane 650 g 600 g 450 g<br />
Farina di granoturco 260 g 240 g 180 g<br />
Lievito in polvere 8 ts 6 ts 4 ts<br />
DOLCI<br />
Quattro Quarti<br />
Ingredienti 1. Mettere uova, burro, zucchero e zucchero vanigliato<br />
in una terrina e sbattere il tutto con<br />
Uova<br />
3 pz<br />
una frusta elettrica fino a formare una massa<br />
Zucchero<br />
Burro / Margarina<br />
Zucchero vanigliato<br />
125 g<br />
125 g<br />
1 bustina<br />
schiumosa.<br />
2. Inserire farina e lievito in polvere alla massa e<br />
mescolare in maniera uniforme.<br />
Latte<br />
Farina bianca<br />
Lievito in polvere<br />
Dolce al vino rosso<br />
fino ¼ di tazza<br />
300 g<br />
1 bustina<br />
3. Migliorare l’impasto con un po’ di latte.<br />
4. Mettere l’impasto nel recipiente della macchina<br />
del pane dopo averlo unto con burro o olio e<br />
avviare il programma KUCHEN (dolci e torte).<br />
5. Volete aggiungere codette di cioccolata o altro?<br />
Fatelo adesso. La macchina del pane le mescola<br />
insieme al tutto.<br />
Ingredienti 1. Mettere uova, burro, zucchero e sale in una<br />
terrina e sbattere il tutto con una frusta elettrica<br />
fino a formare una massa schiumosa.<br />
Uova<br />
3 pz<br />
Zucchero<br />
150 g<br />
2. Aggiungere farina, lievito in polvere, cacao e<br />
Burro / Margarina<br />
250 g cannella alla massa e mescolare gli ingredienti<br />
Farina bianca<br />
250 g in maniera uniforme.<br />
Lievito in polvere<br />
Cacao<br />
Cannella<br />
Sala<br />
Scaglie di cioccolato<br />
Vino rosso<br />
1 bustina<br />
1 ½ tbs<br />
2 ts<br />
1 pizzico<br />
100 g<br />
fino 1⁄8 l<br />
3. Versarvi il vino rosso e amalgamarlo al tutto.<br />
4. Mettere l’impasto nel recipiente della macchina<br />
unto con burro o olio e mescolarvi le scaglie<br />
di cioccolato. Avviare il programma KUCHEN<br />
(dolci e torte).<br />
Programma: SCHNELL (veloce)<br />
70<br />
PANE INTEGRALE<br />
Peso<br />
Ingrediente<br />
1400 g /<br />
3 LB<br />
1200 g /<br />
2,5 LB<br />
1000 g /<br />
2 LB<br />
Acqua 500 ml 460 ml 350 ml<br />
Burro /Margarina 1 ¾ tbs 1 ½ tbs 1 tbs<br />
Sale 1 ¾ ts 1 ½ ts 1 ts<br />
Zucchero 1 ¾ ts 1 ½ ts 1 ts<br />
Farina per pane 190 g 150 g 110 g<br />
Farina multi cereali 720 g 690 g 520 g<br />
Lievito secco 3 ½ ts 3 ts 2 ts<br />
Programma: VOLLKORN (integrale)<br />
PANETTO DOLCE<br />
Peso<br />
Ingredienti<br />
1400 g /<br />
3 LB<br />
1200 g /<br />
2,5 LB<br />
1000 g /<br />
2 LB<br />
Latte 530 ml 490 ml 370 ml<br />
Burro / Margarina 90 g 75 g 50 g<br />
Uova 4 St 4 St 3 St<br />
Zucchero 90 g 75 g 50 g<br />
Sale 1 ¾ ts 1 ½ ts 1 ts<br />
Farina bianca 910 g 840 g 630 g<br />
Lievito secco 1 ¾ ts 1 ½ ts 1 ts<br />
Programma: SÜSS (pane dolce)<br />
Dolce croccante al rum<br />
Ingredienti 1. Mettere uova, burro, zucchero, zucchero vanigliato<br />
e sale in una terrina e sbattere il tutto<br />
Uova<br />
4 pz<br />
con una frusta elettrica fino a formare una<br />
Zucchero<br />
100 g massa schiumosa.<br />
Burro / Margarina<br />
75 g 2. Aggiungere farina e lievito in polvere alla<br />
Zucchero vanigliato<br />
1 bustina massa. Mescolare il tutto in maniera uniforme<br />
Sala<br />
1 pizzico e man mano versare il rum.<br />
Rum<br />
4 tbs 3. Mettere l’impasto nel recipiente della macchina<br />
unto con burro o olio e mescolarvi dentro<br />
Farina bianca<br />
150 g<br />
le scaglie di cioccolato. Avviare il programma<br />
Lievito in polvere<br />
1 bustina KUCHEN (dolci e torte).<br />
Scaglie di cioccolato<br />
50 g<br />
71
I<br />
I<br />
TRUCCHI & SUGGERIMENTI<br />
MARMELLATA<br />
Gelatina d’arancia<br />
Ingredienti<br />
Succo d’arancia<br />
Piccola arancia tagliata<br />
Succo di limone<br />
Gelatina (3 più 1)<br />
Programma: MARMELADE (marmellata)<br />
Confettura di frutti di bosco<br />
Ingredienti<br />
Frutti di bosco schiacciati<br />
Succo di limone (per frutti molto dolci)<br />
Zucchero gelificante (2 più 1)<br />
Programma: MARMELADE (marmellata)<br />
1 l<br />
1 pz<br />
50 ml<br />
500 g<br />
1 kg<br />
fino a 100 ml<br />
500 g<br />
• Per sapere se marmellate, confetture o<br />
gelatine si sono addensate al punto giusto:<br />
Prendere un po’ della massa calda con<br />
un cucchiaio e metterla su un piatto caldo<br />
di porcellana. Si raffredda nel giro di pochi<br />
minuti e così è possibile verificare se sono<br />
dense al punto giusto.<br />
• La marmellata è troppo liquida? Aggiungere<br />
un po’ di acido citrico. Serve a far addensare<br />
la massa.<br />
• La marmella è troppo densa? Aggiungere<br />
acqua o succo di frutta. In questo modo la<br />
gelatina si diluisce.<br />
IMPASTO DI LATTICELLO per panini e simili<br />
Peso<br />
Ingredienti<br />
1400 g /<br />
3 LB<br />
1200 g /<br />
2,5 LB<br />
1000 g /<br />
2 LB<br />
Latticello 450 ml 420 ml 310 ml<br />
Uova 2 pz 1 pz 1 pz<br />
Sale 2 ts 1 ½ ts 1 ts<br />
Farina di frumento<br />
integrale<br />
320 g 300 g 220 g<br />
PANE ULTRAVELOCE AI GERMI DI GRANO<br />
Peso<br />
Ingredienti<br />
1400 g /<br />
3 LB<br />
1200 g /<br />
2,5 LB<br />
1000 g /<br />
2 LB<br />
Acqua (48°C) 490 ml 450 ml 340 ml<br />
Carvi 2 ts 1 ½ ts 1 ts<br />
Olio d’oliva 2 tbs 1 ½ tbs 1 tbs<br />
Miele 2 tbs 1 ½ tbs 1 tbs<br />
Sale 2 ts 1 ½ ts 1 ts<br />
Germe di grano 100 g 90 g 70 g<br />
Farina bianca 810 g 750 g 560 g<br />
Lievito secco 2 ½ ts 2 ts 1 ½ ts<br />
Programma: ULTRASCHNELL (ultraveloce)<br />
Dessert<br />
Dolce alla mela<br />
Ingredienti<br />
Mele cotte<br />
Succo di limone<br />
Uova<br />
Zucchero bruno<br />
Farina per tutti gli usi<br />
Fiocchi di avena<br />
Burro / Margarina (molle)<br />
Programma: DESSERT (dessert)<br />
Budino di riso<br />
Ingredienti<br />
Uova leggermente sbattute<br />
Latte<br />
Riso cotto<br />
Zucchero<br />
Uva sultanina (opzione)<br />
Vaniglia<br />
Cannella<br />
Programma: DESSERT (dessert)<br />
6 pz<br />
1 ts<br />
1 pz<br />
½ tazza<br />
1 tazza<br />
¹⁄3 tazza<br />
3 ½ tbs<br />
4 pz<br />
1 ¾ tazza<br />
3 tazze<br />
½ tazza<br />
1 tazza<br />
1 ts<br />
2 ts<br />
GARANZIA<br />
Le seguenti disposizioni di garanzia decorrono dalla data di acquisto e sono valide all’interno<br />
dell’UE e della Svizzera.<br />
1. Periodo di garanzia: 2 anni<br />
2. Prestazioni di garanzia:<br />
a) Riparazione o sostituzione, a nostro esclusivo<br />
giudizio e dopo accurata verifica, di pezzi che<br />
presentano difetti di materiale o di fabbricazione.<br />
b) La garanzia è valida solo su presentazione di<br />
questo certificato di garanzia, che a sua volta<br />
è valido solo se compilato in ogni sua parte<br />
nel giorno dell’acquisto.<br />
c) La garanzia è valida solo per il primo utente.<br />
d) Il periodo di garanzia non sarà rinnovato o prolungato<br />
a seguito di successiva riparazione o<br />
sostituzione di pezzi.<br />
e) I costi di trasporto sono a carico dell’acquirente<br />
(non vale per i primi 6 mesi di garanzia).<br />
f) In caso di guasto o difetto irreparabile, qualora<br />
la riparazione venisse da noi respinta o<br />
gli interventi necessari non fossero eseguiti<br />
entro un termine adeguato, si provvederà - a<br />
scelta dell’utente entro 6 mesi dalla data di<br />
acquisto/fornitura - alla sostituzione gratuita<br />
dell’apparecchio o al rimborso del valore minimo<br />
o alla riconsegna dell’apparecchio dietro<br />
rimborso del prezzo d’acquisto, tuttavia non<br />
del prezzo corrente sul mercato.<br />
3. La garanzia non è valida:<br />
• per graffi o macchie sull’apparecchio.<br />
• per graffi o macchie sull’apparecchio.<br />
• per le spazzole del motore.<br />
• per parti leggermente fragili in bachelite, vetro,<br />
plastica e simili, eccetto che si tratti di difetti di<br />
costruzione riconosciuti da noi come tali.<br />
• per danni causati da errata installazione o fissaggio.<br />
• se l’apparecchio è collegato ad una rete elettrica<br />
di tensione maggiore rispetto a quella<br />
indicata sull’apparecchio.<br />
• in caso di uso errato o inadeguato.<br />
• in caso di scarsa cura.<br />
• in caso di manutenzione errata o insufficiente.<br />
• in caso di manutenzione errata o insufficiente.<br />
• in caso di trasporto inadeguato o di imballaggio<br />
inadeguato per il trasporto.<br />
4. La garanzia decade:<br />
• se l’apparecchio è utilizzato per scopi diversi da<br />
quelli domestici.<br />
• se le riparazioni e le modifiche sono eseguite<br />
da personale non autorizzato dalla nostra azienda.<br />
Garantiamo questo apparecchio per un periodo<br />
di 2 anni per guasti dovuti a difetti di materiale o di fabbricazione. La garanzia decorre dal giorno della<br />
fornitura del prodotto ed è valida solo su presentazione del certificato di garanzia e della ricevuta<br />
fiscale di pagamento. Ulteriori pretese di garanzia sono escluse.<br />
Modello:<br />
Importante! Si prega di annotare l’FD- Code<br />
apposto sulla targhetta dell’apparecchio:<br />
Farina bianca 490 g 450 g 340 g<br />
Lievito secco 2 ts 1 ½ ts 1 ts<br />
72<br />
Programma: TEIG (impasto)<br />
Timbro e firma del Rivenditore<br />
Data dell’acquisto<br />
73
CZ<br />
CZ<br />
74<br />
DŮLEŽITÉ!<br />
NEŽ ZAČNETE PŘÍSTROJ POUŽÍVAT,<br />
DŮKLADNĚ SI PŘEČTĚTE TENTO NÁVOD K<br />
POUŽITÍ A PEČLIVĚ HO USCHOVEJTE.<br />
DŮLEŽITÉ BEZPEČNOSTNÍ<br />
POKYNY<br />
Při používání elektrických spotřebičů je nutné<br />
dodržovat následující bezpečnostní opatření.<br />
• Tento přístroj je určený pouze pro domácí<br />
účely, není vhodný pro účely podnikatelské.<br />
• Před připojením k elektrické síti zkontrolujte,<br />
jestli síťové napětí souhlasí s údajem na<br />
typovém štítku přístroje.<br />
• Tento přístroj je vybaven vidlicí s ochranným<br />
kontaktem a může být připojen pouze k zásuvce<br />
s ochranným kontaktem přesně podle<br />
předpisu.<br />
• Přístroj používejte pouze k účelům tomu určeným.<br />
• Nepoužívejte přístroj venku.<br />
• Přístroj nesmí být používán, pokud:<br />
– je poškozen síťový přívod nebo zástrčka,<br />
– dokonale nefunguje,<br />
– spadl na zem,<br />
– vykazuje nějaká poškození.<br />
V těchto případech musí být přístroj vrácen<br />
výrobci nebo příslušné servisní službě k přezkoušení,<br />
opravě nebo novému nastavení.<br />
• Používejte pouze příslušenství doporučené<br />
výrobcem, jinak může dojít k poškození přístroje<br />
nebo dokonce i ke zranění.<br />
• Nikdy přístroj nezapínejte, dokud není pečící<br />
forma dokonale nasazena a naplněna správnými<br />
přísadami.<br />
• Když chcete chleb vyklopit z formy, nikdy<br />
neklepejte na její rohy nebo svrchní stranu,<br />
mohlo by dojít k jejímu poškození.<br />
• Nenamáčejte kabel, zástrčku nebo kryt pekárny<br />
do vody nebo jiné tekutiny. Předejdete<br />
tím úrazu elektrickým proudem.<br />
• Přístroj vypněte a vytáhněte ze zásuvky po<br />
každém použití, když připevňujete, nebo vyndaváte<br />
jeho části, nebo když ho čistíte.<br />
• Dbejte na to, aby přívodní kabel nevisel z<br />
pracovní plochy nebo ze stolu dolů. Chraňte<br />
ho před kontaktem s horkými plochami.<br />
• Nestavte přístroj na horký plynový nebo<br />
elektrický sporák (nebo do jejich blízkosti)<br />
a do rozpálené trouby.<br />
• Do pekárny nedávejte hliníkové folie nebo<br />
jiné materiály. Předejdete riziku požáru nebo<br />
elektrického zkratu.<br />
• Přístroj by neměl přijít do kontaktu s lehce<br />
vznětlivými materiály (např. se závěsy, textiliemi,<br />
stěnami aj.) Pokud nemůže pára a horký vzduch<br />
volně unikat, vzniká nebezpečí požáru.<br />
• Během pečení se přístroj rozpálí. Nedotýkejte<br />
se horkých povrchů, použijte jen úchyty a<br />
vypínače.<br />
• Nikdy se nedotýkejte rotujících částí.<br />
• Pokud přístroj obsahuje horký olej nebo jiné<br />
horké tekutiny, přepravujte ho se zvýšenou<br />
opatrností.<br />
• Přístroj není určen osobám s omezenými<br />
schopnostmi (psychickými / duševními) nebo<br />
dětem. Nerozpoznají nebezpečí, které při<br />
zacházení s elektrickými přístroji může vzniknout.<br />
Proto nikdy nenechávejte děti manipulovat<br />
s přístrojem bez dozoru. V dnešní době<br />
věnujte dětem mimořádnou pozornost.<br />
• Děti by měly být stále pod vaším dohledem,<br />
aby zjistily, že si s přístrojem nemohou hrát.<br />
PŘED PRVNÍM POUŽITÍM<br />
1. Zkontrolujte prosím, jestli jsou všechny části a<br />
příslušenství přístroje úplné a nepoškozené.<br />
2. Vyčistěte všechny části, jak je uvedeno v<br />
článku „Čištění a údržba“.<br />
3. Nastavte režim BACKEN (pečení) a pečte<br />
naprázdno asi 10 minut. Nechte přístroj vychladnout,<br />
jednotlivé části vyndejte a znovu<br />
je vyčistěte.<br />
4. Všechny části dobře osušte a znovu je sestavte.<br />
Přístroj je nyní připraven.<br />
POKYNY K OVLÁDACÍMU PANELU *<br />
14<br />
15<br />
16<br />
17<br />
18<br />
1. Normal<br />
2. Vollkorn<br />
3. Französisch<br />
4. Schnell<br />
5. SÜSS<br />
6. Kuchen<br />
Kneten 1 AUFGEHEN 1 KneTEN 2 AUFGEHEN 2<br />
AUFGEHEN 3 BaCkeN WarmHALTEN<br />
1000g 1200g 1400g<br />
PAUSE<br />
ZEIT<br />
GRÖSSE<br />
MENÜ<br />
14 volitelné programy<br />
15 část programu<br />
16 blokovací mechanismus<br />
tlačítek<br />
17 zvolený program<br />
7. Marmelade<br />
8. Teig<br />
9. Ultraschnell<br />
10. Backen<br />
11. Dessert<br />
12. Hausgemacht<br />
HELL MITTEL DUNKEL<br />
PROZESS<br />
LICHT<br />
FARBE<br />
START<br />
STOPP<br />
19<br />
20<br />
18 velikost chleba<br />
19 trvání programu<br />
20 zvolený program<br />
* Výrobce si vyhrazuje provést změny na kontrolním poli<br />
bez předchozího oznámení.<br />
PO PŘIPOJENÍ K SÍTI<br />
Jakmile přístroj zapojíte do sítě, zazní signál<br />
a na displeji se objeví „1 2:55, 1200g, MITTEL<br />
(střední)“. Ale dvojtečka mezi čísly „2“ a „55“<br />
(19) nebliká.<br />
Číslo „1“ ukazuje nastavený program (17). Hmotnost<br />
„1200 g“ (18) a stupeň zbarvení kůrky „MI-<br />
TTEL“ (střední) (20) jsou údaje již nastavené z<br />
výroby.<br />
START / STOPP (start / stop)<br />
Tímto tlačítkem se zapne nebo vypne zvolený<br />
program. Když chcete program spustit, stiskněte<br />
tlačítko asi na 1,5 sekundy. Uslyšíte signál a<br />
oba body časového údaje začnou blikat – program<br />
startuje.<br />
Po spuštění programu nejsou žádná jiná tlačítka<br />
kromě tlačítek START / STOPP (start / stop),<br />
LICHT (osvětlení) a PAUSE (přestávka) provozuschopná.<br />
Když chcete program zastavit, stiskněte asi na<br />
1,5 sekundy tlačítko START / STOPP (start / stop).<br />
Zazní signál, který potvrzuje, že je program<br />
vypnutý. Tato funkce slouží k tom, aby se předešlo<br />
neúmyslnému přerušení celého procesu<br />
pečení.<br />
MENÜ (menu)<br />
Tlačítkem MENÜ (menu) si můžete vybrat program.<br />
Po každém zmáčknutí tlačítka (je doprovázené<br />
akustickým signálem) se mění číselné zobrazení<br />
programu (17). Funkce všech 12 programů<br />
(14) jsou vysvětleny níže.<br />
1. Normal (normální): Jednoduché hnětení,<br />
kynutí a pečení normálního chleba. Pro zlepšení<br />
chuti můžete přidat další přísady.<br />
2. Vollkorn (celozrnný): Jednoduché hnětení,<br />
kynutí a pečení normálního chleba. Pro zlepšení<br />
chuti můžete přidat další přísady.<br />
3. Französisch (francouzský): Hnětení, kynutí<br />
a pečení chleba s delší dobou kynutí. Chléb<br />
má křupavou kůrku a vzdušnou strukturu.<br />
4. Schnell (rychlý): Hnětení, kynutí a pečení<br />
chleba v kratší době než v normálním (¬NOR-<br />
MAL) programu. Hotový chléb je většinou menší<br />
a hutnější než normální chléb.<br />
75
CZ<br />
CZ<br />
76<br />
5. Süss (sladký): Hnětení, kynutí a pečení sladkého<br />
pečiva. Když chcete zlepšit aroma, můžete<br />
přidat různé přísady.<br />
6. Kuchen (koláče): Hnětení, kynutí a pečení.<br />
Těsto kyne pomocí prášku do pečiva nebo sody.<br />
7. Marmelade (marmeláda): Vaření marmelády<br />
nebo džemu za stálého míchání. Než vložíte<br />
ovoce nebo zeleninu do formy, musí se nakrájet<br />
na malé kousky.<br />
8. Teig (těsto): Hnětení a kynutí bez pečení.<br />
Hotové těsto vyndejte z formy a udělejte z něj<br />
pizzu, housky, nudle atd.<br />
9. Ultraschnell (velmi rychlý): Hnětení, kynutí<br />
a pečení v co nejkratší době. Hotový chléb je<br />
velmi hutný.<br />
10. Backen (pečení): Pouze pečení, bez hnětení<br />
a kynutí. Tuto funkci můžete také využít k prodloužení<br />
doby pečení u některých programů.<br />
Pro nastavení doby pečení stiskněte tlačítko<br />
ZEIT (čas). Když jej podržíte, proběhne čas<br />
rychleji.<br />
11. Dessert (deserty): Hnětení, kynutí a pečení<br />
zákusků.<br />
12. HausgemachT (vlastní chléb): Zde můžete<br />
zadat svůj vlastní program, ve kterém si určíte<br />
dobu pro každý krok sami. Můžete nastavit níže<br />
uvedené údaje pro hnětení, kynutí, pečení a<br />
udržení teplého chleba tak, abyste si upekli váš<br />
oblíbený chléb.<br />
Časový rozsah jednotlivých fází programu (15):<br />
KNETEN 1 (hnětení 1) 6 – 14 minut<br />
AUFGEHEN 1 (kynutí 1) 20 – 60 minut<br />
KNETEN 2 (hnětení 2) 5 – 20 minut<br />
AUFGEHEN 2 (kynutí 2) 5 – 120 minut<br />
AUFGEHEN 3 (kynutí 3) 0 – 120 minut<br />
BACKEN (pečení) 0 – 80 minut<br />
WARMHALTEN (udržení teploty) 0 – 60 minut<br />
Menu HAUSGEMACHT (vlastní chléb):<br />
1. Stiskněte jednou tlačítko PROZESS (proces).<br />
Na displeji se objeví KNETEN 1 (hnětení) (15).<br />
Stiskněte tlačítko ZEIT (čas), tím nastavíte dobu<br />
(19) v minutách. Čas ubíhá rychleji, když<br />
tlačítko ZEIT (čas) podržíte. Pak stiskněte tlačítko<br />
PROZESS (proces), tím potvrdíte svoji<br />
volbu prvního kroku.<br />
2. Pro další krok znovu stiskněte tlačítko PROZESS<br />
(proces). Na displeji se objeví AUFGEHEN 1 (kynutí<br />
1) (15). Stiskněte tlačítko ZEIT (čas), abyste<br />
nastavili dobu (19), a potvrďte svoji volbu opětovným<br />
stisknutím tlačítka PROZESS (proces).<br />
3. Stejným způsobem postupujte u zbývajících<br />
kroků. Až budete chtít opustit režim programování,<br />
stiskněte tlačítko START / STOPP<br />
(start / stop).<br />
4. Program zahájíte tak, že znovu stisknete tlačítko<br />
START / STOPP (start / stop).<br />
Upozornění: Nastavení zůstane uloženo až<br />
do dalšího použití.<br />
FARBE (zbarvení)<br />
Tímto tlačítkem zvolíte stupeň zbarvení kůrky:<br />
HELL (světlý), MITTEL (střední) nebo DUNKEL<br />
(tmavý) (20).<br />
GRÖSSE (velikost)<br />
Stiskněte tlačítko GRÖSSE (velikost) a nastavíte si<br />
tak velikost chleba: 1000 g, 1200g nebo 1400g.<br />
Vaše volba se objeví na displeji (18). Mějte prosím<br />
na paměti, že doba pečení se mění s různými<br />
velikostmi chleba.<br />
Tato funkce platí pro následující programy:<br />
1. NORMAL (normální), 2. VOLLKORN (celozrnný),<br />
3. FRANZÖSISCH (francouzský), 4. SCHNELL<br />
(rychlý), 5. SÜSS (sladký) a 9. ULTRASCHNELL<br />
(velmi rychlý).<br />
Chlebové směsi na chléb o <br />
hmotnosti 750 g<br />
Pokud tyto směsi používáte, nastavte si na<br />
pekárně hmotnost 1000g (18).<br />
S tímto nastavením se vám chléb jistě povede!<br />
Když se vám chléb upekl moc, snižte stupeň<br />
zbarvení nebo program zastavte 5 – 10 minut<br />
před dopečením pomocí tlačítka START/<br />
STOPP (start / stop).<br />
Tipy & Triky<br />
Tipy & Triky<br />
Nastavení hmotnosti 1400 g<br />
Vyzkoušejte si prosím tento objem náplně!<br />
Začněte testovat svůj recept při celkové hmotnosti<br />
1200g.<br />
U rychle kynoucích těst (např. bílý chléb, sladký<br />
chléb) může dojít k tomu, že v době kynutí<br />
může těsto vyběhnout z formy.<br />
Pokud je po fázi pečení ve formě ještě místo,<br />
můžete množství postupně zvyšovat.<br />
Děkujeme za pochopení!<br />
LICHT (osvětlení)<br />
Pokud stisknete toto tlačítko, světlo se rozsvítí.<br />
To slouží ke kontrole průběhu pečení.<br />
Pokud do jedné minuty stisknete tlačítko znovu,<br />
světlo zhasnete. Když tlačítko do minuty<br />
nezmáčknete, světlo se automaticky vypne.<br />
ZEIT (čas)<br />
Když si budete přát, aby přístroj nezačal ihned<br />
péct, můžete pomocí tohoto tlačítka zadat časový<br />
posun začátku pečení.<br />
Takto nastavíte časové posunutí:<br />
1. Zvolte menu (17), velikost (18) a zbarvení<br />
kůrky (20).<br />
2. Zvolte si časové posunutí tím, že zmáčknete<br />
tlačítko ZEIT (čas). Posunutá doba zapnutí by<br />
měla zahrnout dobu pečení požadovaného<br />
menu.<br />
Představte si, že je právě 20:30 hodin a vy<br />
si přejete mít čerstvě upečený chléb ráno v<br />
7 hodin. V tomto případě činí posunutá doba<br />
10 hodin a 30 minut. Mačkejte tlačítko ZEIT<br />
(čas) tak dlouho, dokud se na displeji (19)<br />
neobjeví 10:30. Čas přidáváte v desetiminutových<br />
intervalech.<br />
3. Stiskněte tlačítko START / STOPP (start / stop),<br />
tak zapnete posunutý program. Dvojtečka<br />
časového údaje začne blikat. Na displeji se<br />
bude zobrazovat zbývající čas.<br />
Dbejte na to, aby maximální časové posunutí<br />
činilo 13 hodin. Nepoužívejte žádné rychle se<br />
kazící potraviny (vejce, čerstvé mléko, ovoce<br />
nebo cibuli).<br />
PROZESS (proces)<br />
Pomocí tohoto tlačítka si můžete naprogramovat<br />
svoje osobní menu – menu 12 HAUS-<br />
GEMACHT (vlastní chléb).<br />
PAUSE (přerušení)<br />
Po zahájení programu může být proces pečení<br />
kdykoli přerušen, a to pomocí tlačítka PAUSE (přerušení).<br />
Stiskněte tlačítko asi na 1,5 sekundy – program<br />
se zastaví, původní nastavení zůstane a na<br />
displeji bude blikat zbývající čas do konce pečení.<br />
Program bude pokračovat, jakmile opět stisknete<br />
tlačítko PAUSE (přestávka).<br />
funkce udržování teploty<br />
Chléb lze udržet až hodinu teplý (WARM-<br />
HALTEN) (15). Pokud chleb během této doby<br />
chcete vyndat, vypněte program pomocí<br />
tlačítka START / STOPP (start / stop).<br />
PAMĚŤOVÁ FUNKCE<br />
Pokud se stane, že během pečení bude přerušena<br />
dodávka elektrického proudu, může program<br />
po dobu deseti minut pokračovat dál,<br />
aniž byste museli zmáčknout tlačítko<br />
START / STOPP (start / stop).<br />
Když trvá přerušení déle než 10 minut, automat<br />
nemůže program uložit do paměti. Vyndejte<br />
přísady ven z formy, zlikvidujte a do<br />
formy dejte nové. Znovu automat zapněte.<br />
Jestliže bylo těsto při výpadku proudu teprve<br />
ve fázi hnětení a fáze kynutí ještě nezačala,<br />
můžete znovu stisknout tlačítko START / STOPP<br />
(start / stop) a program běží od začátku.<br />
77
CZ<br />
CZ<br />
78<br />
TABULKA ČASOVÉHO ROZVRŽENÍ JEDNOTLIVÝCH FÁZÍ<br />
Program č.<br />
Nastavení GRÖS-<br />
SE (velikosti)<br />
Nastavení FARBE<br />
(zbarvení)<br />
KNETEN 1<br />
(hnětení 1)<br />
AUFGEHEN 1<br />
(kynutí 1)<br />
KNETEN 2<br />
(hnětení 2)<br />
AUFGEHEN 2<br />
(kynutí 2)<br />
AUFGEHEN 3<br />
(kynutí 3)<br />
BACKEN<br />
(pečení)<br />
Celková doba<br />
trvání programu<br />
Signál pro přidání<br />
dalších přísad<br />
1 1400 g SVĚTLÉ, 10 min. 20 min. 15 min. 25 min. 45 min. 65 min. 3:00 2:20<br />
1200 g STŘEDNÍ, 10 min. 20 min. 15 min. 25 min. 45 min. 60 min. 2:55 2:15 ✓<br />
1000 g TMAVÉ 10 min. 20 min. 12 min. 25 min. 48 min. 55 min. 2:50 2:13<br />
2 1400 g SVĚTLÉ, 10 min. 25 min. 20 min. 35 min. 65 min. 65 min. 3:40 2:55<br />
1200 g STŘEDNÍ, 8 min. 25 min. 18 min. 35 min. 65 min. 60 min. 3:32 2:50 ✓<br />
1000 g TMAVÉ 8 min. 25 min. 16 min. 35 min. 70 min. 55 min. 3:30 2:50<br />
3 1400 g SVĚTLÉ, 18 min. 40 min. 22 min. 30 min. 50 min. 70 min. 3:50 2:40<br />
1200 g STŘEDNÍ, 16 min. 40 min. 19 min. 30 min. 50 min. 65 min. 3:40 2:35 ✓<br />
1000 g TMAVÉ 13 min. 40 min. 17 min. 30 min. 50 60 min. 3:30 2:30<br />
4 1400 g SVĚTLÉ, 10 min. 10 min. 10 min. — 30 min. 70 min. 2:10 1:45<br />
1200 g STŘEDNÍ, 10 min. 10 min. 10 min. — 30 min. 65 min. 2:05 1:40 ✓<br />
1000 g TMAVÉ 10 min. 10 min. 10 min. — 30 min. 60 min. 2:00 1:35<br />
5 1400 g SVĚTLÉ, 10 min. 5 min. 20 min. 33 min. 40 min. 62 min. 2:50 2:25<br />
1200 g STŘEDNÍ, 10 min. 5 min. 20 min. 32 min. 40 min. 58 min. 2:45 2:20 ✓<br />
1000 g TMAVÉ 10 min. 5 min. 15 min. 32 min. 47 min. 53 min. 2:42 2:22<br />
6<br />
SVĚTLÉ,<br />
— STŘEDNÍ, 6 min. 5 min. 10 min. 9 min. — 80 min. 1:50 1:34 ✓<br />
TMAVÉ<br />
7<br />
— — — 15 min. — — 45 min. 20 min. 1:20 — —<br />
8<br />
— — 20 min. — — 30 min. 40 min. — 1:30 — —<br />
9 1400 g SVĚTLÉ, 10 min. — 5 min. — 33 min. 60 min. 1:48 1:38<br />
1200 g STŘEDNÍ, 10 min. — 5 min. — 28 min. 55 min. 1:38 1:28 ✓<br />
1000 g TMAVÉ 10 min. — 5 min. — 28 min. 52 min. 1:35 1:25<br />
10<br />
SVĚTLÉ,<br />
10 min. 0:10<br />
— STŘEDNÍ, — — — — — až až — ✓<br />
TMAVÉ<br />
60 min. 1:00<br />
11<br />
SVĚTLÉ,<br />
— STŘEDNÍ,<br />
TMAVÉ<br />
13 min. — — — 25 min. 60 min. 1:38 — ✓<br />
12<br />
—<br />
SVĚTLÉ,<br />
STŘEDNÍ,<br />
TMAVÉ<br />
6 min.<br />
až<br />
14 min.<br />
20 min.<br />
až<br />
60 min.<br />
5 min.<br />
až<br />
20 min.<br />
5 min.<br />
až<br />
120 min.<br />
0 min.<br />
až<br />
120 min.<br />
0 min.<br />
až<br />
80 min.<br />
0:36<br />
až<br />
7:54<br />
během<br />
KNETEN 2<br />
(hnětení 2)<br />
Udržení teploty<br />
✓<br />
ZABLOKOVÁNÍ OVLÁDACÍHO<br />
PANELU<br />
Ovládací panel můžete chránit před nechtěnou<br />
manipulací pomocí blokovacího mechanismu<br />
tlačítek (16). Nejprve stiskněte tlačítko PROZE-<br />
SS (proces) a potom tlačítko FARBE (zbarvení).<br />
S výjimkou těchto dvou tlačítek je celý ovládací<br />
panel zablokován. Tato funkce slouží k tomu,<br />
aby se předešlo nechtěnému přerušení programu<br />
zmáčknutím některých tlačítek.<br />
Zablokování tlačítek zrušíte tím, že zmáčknete<br />
tlačítko PROZESS (proces) a potom tlačítko FARBE<br />
(zbarvení). Pokud blokovací mechanismus nezapnete<br />
sami, jsou tlačítka pět minut po začátku<br />
programu automaticky zablokována. Než budete<br />
chtít nastavit nový program, musí být blokovací<br />
mechanismus (16) tlačítek zrušen.<br />
PROSTŘEDÍ<br />
Pekárna chleba pracuje v širokém rozpětí teplot.<br />
Mohou se ale vyskytnout rozdíly ve velikosti<br />
chleba podle toho, jestli jej pečete na<br />
chladném, nebo teplém místě. Doporučujeme<br />
teplotu v místnosti mezi 15 °C a 34 °C.<br />
VÝSTRAŽNÁ DOPORUČENÍ<br />
• Ukazuje-li displej (19) po začátku programu<br />
„H HH“, je teplota ve formě na pečení<br />
ještě příliš vysoká. Program musí být ukončen.<br />
Otevřete víko a nechte přístroj úplně<br />
vychladnout (ca. 15 – 20 minut). Pak ho teprve<br />
můžete použít znovu.<br />
• Ukazuje-li displej (19) po zmáčknutí tlačítka<br />
START / STOPP (start / stop) „E E0“ nebo<br />
„E E1“, je snímač teploty poškozen a musí<br />
být zkontrolován v kvalifikovaném servisu.<br />
CHLÉB UPEČETE<br />
NÁSLEDUJÍCÍM ZPŮSOBEM<br />
1. Dejte formu na pečení (6 / 8) do správné polohy,<br />
zatlačte ji směrem dolů, až slyšitelně<br />
zaklapne.Nasaďte hnětací hák (7 / 9) na hnací<br />
hřídel. Namažte hnětací hák a hnací hřídel margarínem,<br />
aby tam nezůstaly zbytky těsta.<br />
2. Vložte přísady do formy (6 / 8). Respektujte<br />
prosím jejich pořadí tak, jak je uvedeno v<br />
receptu. Normálně dejte do formy nejprve<br />
vodu nebo jinou tekutinu, potom, cukr, sůl<br />
a mouku. Droždí nebo prášek do pečiva přidávejte<br />
vždy až poslední.<br />
Upozornění: věnujte v příslušném receptu<br />
pozornost údajům množství hlavně u mouky,<br />
droždí a prášku do pečiva.<br />
3. V mouce udělejte malý důlek a do něj dejte<br />
droždí. Dbejte na to, aby droždí nepřišlo do<br />
styku s tekutinami nebo solí.<br />
Droždí nebo<br />
prášek do pečiva<br />
Sypké přísady<br />
Voda nebo jiné<br />
tekutiny<br />
4. Zavřete víko (2) a zapojte přístroj do zásuvky.<br />
5. Opakovaně tiskněte tlačítko MENÜ (menu),<br />
dokud nevyberete požadovaný program<br />
(17).<br />
6. Tlačítkem GRÖSSE (velikost) zvolte hmotnost<br />
(18) vašeho chleba.<br />
7. Pomocí tlačítka FARBE (zbarvení) nastavíte<br />
zbarvení kůrky (20).<br />
8. Nastavte časové posunutí (19) tlačítkem<br />
ZEIT (čas). Tento krok můžete vynechat, jestliže<br />
si přejete, aby pekárna začala pracovat<br />
ihned.<br />
9. Tlačítko START / STOPP (start / stop) podržte<br />
1,5 sekundy, aby program začal pracovat.<br />
10. Když je nastaven program 1. NOMRAL (normalní),<br />
2. VOLLKORN (celozrnný), 3. FRAN-<br />
ZöSISCH (francouzský), 4. SCHNELL (rychlý),<br />
5. SÜSS (sladký), 6. KUCHEN (koláče), 9. ULTRA-<br />
SCHNELL (velmi rychlý) nebo 12. HAUSGE-<br />
MACHT ( vlastní chléb), zazní během pečení<br />
signál. Poté můžete přidat další přísady. Otevřete<br />
víko (2) a vložte přísady dovnitř.<br />
79
CZ<br />
CZ<br />
Tipy & Triky<br />
Tip<br />
80<br />
Při menším množství se těsto ne vždy<br />
rovnoměrně rozprostře ve formě – nahromadí<br />
se pouze na jedné straně. To může<br />
později vést při pečení k nestejnoměrnému<br />
výsledku.<br />
Abyste dosáhli pravidelného bochníku, urovnejte<br />
těsto po ukončení druhé hnětací fáze<br />
KNETEN 2 (hnětení 2) (15) stěrkou (13).<br />
Pokud se těsto na stěrku (13) lepí, ponořte ji<br />
krátce do mouky.<br />
11. Délka pečení závisí na zvoleném programu<br />
(17), velikosti bochníku (18) a stupni<br />
zbarvení (20). Pokud byste chtěli zkontrolovat<br />
průběh pečení, stiskněte tlačítko<br />
LICHT (osvětlení) a podívejte se dovnitř<br />
průhledovým okénkem – víko (12) ale<br />
neotvírejte!<br />
Upozornění: Je možné, že během pečení<br />
uniká ventilovou štěrbinou pára. To je<br />
normální.<br />
Nejste si jistí, jestli je chléb propečený?<br />
Píchněte do chleba dřevěnou špejlí. Když<br />
se na ni nenalepí žádné těsto, je váš chléb<br />
hotový!<br />
12. Stisknete tlačítko START / STOPP (start / stop),<br />
na ca. 1,5 sekundy, abyste ukončili program.<br />
Nyní můžete chléb vyndat. Otevřete chňapkou<br />
víko (2) a vytáhněte formu (6 / 8) z přístroje<br />
ven.<br />
Pozor: Forma na pečení i chléb mohou být<br />
horké. Buďte proto velmi opatrní!<br />
13. Nechte formu (6 / 8) vychladnout, pak teprve<br />
bochník vytáhněte. Použijte stěrku (13),<br />
abyste bochník po stranách opatrně uvolnili.<br />
Nikdy nepoužívejte nůž. Poškodili byste tím<br />
nepřilnavý povrch formy na pečení.<br />
14. Formu otočte dnem vzhůru, držte ji nad roštem<br />
nebo nad čistým plechem na pečení,<br />
opatrně s ní zatřeste, až chléb vypadne ven.<br />
15. Než chléb budete krájet, nechte ho asi<br />
20 mi nut vychladnout.<br />
Upozornění: Doporučujeme krájet chléb na<br />
elektrickém kráječi nebo zubatým nožem.<br />
Nepoužívejte malé kuchyňské nože. Jsou<br />
nevhodné a chleba ukrojí nesymetricky.<br />
16. Když nejste nablízku nebo na konci pečení<br />
nezmáčknete tlačítko START / STOPP<br />
(start / stop), chléb se automaticky udrží hodinu<br />
teplý. Konec funkce udržování teploty<br />
je signalizován deseti tóny.<br />
17. Bezprostředně po ukončení pečení nebo<br />
když pekárnu nepoužíváte, vytáhněte zástrčku<br />
ze zásuvky.<br />
Pozor: Dříve než bochník rozkrájíte na<br />
plátky, odstraňte přiloženým háčkem (12)<br />
z chleba hnětací hák (7 / 9). Ten zůstal ve<br />
spodní části chleba. Bochník je ještě horký ,<br />
proto se hnětacího háku nedotýkejte rukama.<br />
Upozornění: Když chleba nesníte celý,<br />
uschovejte ho v uzavřeném plastikovém<br />
sáčku nebo vzduchotěsné uzavíratelné<br />
nádobě. Chléb můžete uchovat 3 dny při<br />
pokojové teplotě.<br />
Pokud chcete chléb uskladnit na delší<br />
dobu, zabalte jej do plastikového sáčku a<br />
uložte do ledničky. Tak ho můžete uchovat<br />
až 10 dní.<br />
Doma upečený chleba neobsahuje žádné<br />
konzervační látky, proto jeho trvanlivost<br />
není delší než u chleba od pekaře.<br />
SPECIÁLNÍ INSTRUKCE<br />
RYCHLÉ (4. SCHNELL) A <br />
VELMI RYCHLÝ (9. ULTRA SCHNELL)<br />
CHLEBY<br />
Rychlé chleby jsou vyráběny pomocí prášku<br />
do pečiva nebo sody, které jsou aktivovány<br />
tekutinou a teplem. Aby bylo dosaženo dobrého<br />
výsledku, dejte do formy na pečení (6 / 8)<br />
nejprve tekutinu a pak teprve sypké přísady do<br />
vrchní části.<br />
V první hnětací fázi může dojít k tomu, že se<br />
sypké přísady nahromadí v rozích formy. Je<br />
proto nutné jim pomoci a promíchat je, aby<br />
se zabránilo hrudkovitosti. Používejte pouze<br />
kuchyňské nářadí ze dřeva a stiskněte tlačítko<br />
PAUSE (přestávka) než otevřete víko.<br />
VELMI RYCHLÝ PROGRAM <br />
(9. ULTRASCHNELL)<br />
Pekárna upeče pomocí tohoto programu chleba<br />
za jednu hodinu a 38 minut. Dbejte prosím<br />
na to, aby teplota vody činila 48 – 50°C. Použijte<br />
prosím teploměr, musíte změřit teplotu<br />
přesně. Vliv teploty je podstatný a projeví<br />
se pak na výsledku pečení.<br />
Když je teplota vody příliš nízká, chleba<br />
nevykyne a nedosáhne požadované velikosti.<br />
Když je teplota příliš vysoká, zničí se<br />
kvasinky ještě před fází kynutí. Pak chleba<br />
správně nevykyne a negativně ovlivní výsledek<br />
pečení.<br />
DĚLENÁ FORMA NA PEČENÍ (8)<br />
Při nastavování velikosti chleba dávejte prosím<br />
pozor na maximální obsahové možnosti každé<br />
z částí formy. To činí nejvýše 500g.<br />
Dělená forma na pečení (8) může být použita<br />
jen k následujícím dvěma účelům:<br />
• K pečení dvou chlebů stejného druhu ve stejném<br />
čase.<br />
• K současnému pečení dvou rozdílných chlebů<br />
pomocí jednoho programu.<br />
Upozornění: Velikost chleba je třeba v MENU nastavit<br />
na 1000g.<br />
ČIŠTĚNÍ A ÚDRŽBA<br />
Před čištěním pekárny vytáhněte zástrčku ze<br />
zásuvky a nechte nechte pekárnu úplně vychladnout.<br />
Formu na pečení (7) i hnětací hák (6) můžete<br />
mýt v myčce.<br />
VELKÁ FORMA NA PEČENÍ (6) <br />
A DĚLENÁ FORMA NA PEČENÍ (8)<br />
Vyndejte formu (6 / 8) za úchyt. Vytřete vnitřní<br />
i vnější stranu formy (6 / 8) vlhkým hadrem.<br />
Nepoužívejte žádné ostré, ani agresivní čistící<br />
prostředky, aby se nepoškodila nepřilnavá vrstva.<br />
Než formu vložíte zpátky do přístroje, musí<br />
být úplně suchá.<br />
Upozornění: Formu (6 / 8) nasadíte tak, že ji<br />
stlačíte lehce směrem dolů, až bude dokonale<br />
sedět ve správné pozici.<br />
Když nebude možné stlačení směrem dolů, lehce<br />
změňte polohu, až bude dokonale sedět a<br />
stiskněte ji dolů.<br />
HNĚTACÍ HÁKY (7 / 9)<br />
Když nejdou hnětací háky z upečeného chleba<br />
odstranit, použijte přiložený háček (12).<br />
Opatrně je (7 / 9) otřete vlhkou bavlněnou utěrkou.<br />
Nepoužívejte žádné ostré, ani agresivní čistící<br />
prostředky, aby se nepoškodila nepřilnavá<br />
vrstva.<br />
VÍKO (2) S PRŮHLEDOVÝMI OKÉNKY (3)<br />
Otřete víko z vnitřní i vnější strany vlhkým hadrem.<br />
Nepoužívejte agresivní čistící prostředky, poškodily<br />
by vysoce lesklý povrch.<br />
KRYT (5)<br />
Otřete opatrně vnější stranu krytu (5) vlhkým<br />
hadrem.<br />
Nepoužívejte agresivní čistící prostředky, poškodily<br />
by povrch přístroje z ušlechtilé oceli. Nikdy<br />
ho neponořujte do vody.<br />
PŘED DELŠÍM USKLADNĚNÍM<br />
Před uskladněním pekárny se přesvědčte, že je<br />
úplně vychladlý, čistý a suchý. Víko (2) musí být<br />
zavřené.<br />
POTRAVINY<br />
MOUKA<br />
Mouka je nejdůležitější základní ingredience<br />
vašeho chleba.<br />
81
CZ<br />
CZ<br />
82<br />
• Chlebová mouka, nazývaná též lepková<br />
či silná, je semletá pravděpodobně z tvrdé<br />
pšenice. Má vysoký podíl lepku (lepková<br />
bílkovina) a bílkovin. Tyto přírodní prostředky<br />
propůjčují těstu zachovat tvar a kysličník<br />
uhličitý vznikající při kvašení. Proto je tato<br />
mouka obzvláště vhodná pro pečení chleba.<br />
• Bílá mouka se skládá ze směsi vybraných<br />
druhů měkké a tvrdé pšenice a je vhodná<br />
pro rychlé pečení nebo pečení keksů.<br />
• Celozrnná mouka obsahuje všechny látky<br />
obilného zrna- také otruby, pevnou vnější<br />
slupku pšenice. Ta představuje ideální zdroj<br />
pro balastní látky.<br />
Pokud používáte tuto mouku, dbejte na to,<br />
aby byla jemně semletá. V ní obsažené otruby<br />
zabraňují odvodu lepku, takže chleby z<br />
tohoto druhu mouky jsou menší a těžší než<br />
chleby z bílé mouky. Proto se tato mouka<br />
často míchá s jinými druhy mouky, aby bylo<br />
dosaženo lehčí struktury.<br />
• Tmavá pšeničná mouka, také nazývaná černá<br />
nebo hrubá mouka, je bohatá na balastní<br />
látky. Je podobná celozrnné mouce. Pokud<br />
chceme upéci velký bochník chleba, musí se<br />
smíchat s velkým množstvím jiného druhu<br />
mouky.<br />
• Mouka s přídavkem prášku do pečiva obsahuje<br />
– jak už vyplývá z názvu – prášek do<br />
pečiva a je vhodná k pečení koláčů.<br />
• Kukuřičná a ovesná mouka je umletá z kukuřice,<br />
popř.ovsa. Přidávají se do těsta, pokud<br />
pečeme černý chleba. Ovesná mouka<br />
zvýrazňuje chuť a zlepšuje strukturu vašeho<br />
chleba.<br />
CUKR<br />
Cukr je důležitá přísada. Podporuje kvašení.<br />
Kromě toho zjemňuje chuť chleba, zvyšuje jeho<br />
nutriční hodnotu a prodlužuje trvanlivost.<br />
Většinou se používá bílý cukr. Podle chuti se také<br />
může přidávat hnědý nebo moučkový cukr,<br />
sirup nebo med.<br />
Pozor: Používejte výhradně jemný cukr. Hrubý<br />
krystalový cukr by mohl poškodit povrch formy<br />
na pečení.<br />
Upozornění: Můžete také cukr úplně vynechat.<br />
V tomto případě chleba méně vykyne.<br />
SŮL<br />
Sůl přispívá k chuti a zbarvení kůrky. Je možné<br />
ho také použít ke zpomalení příliš aktivního<br />
droždí. Proto nezvyšujte její množství uvedené<br />
v receptu.<br />
Upozornění: Pokud musíte např. ze zdravotních<br />
důvodů sůl vynechat, může chleba více vykynout<br />
než normálně..<br />
TUK, MÁSLO A ROSTLINNÝ OLEJ<br />
Tuk chleba změkčuje a prodlužuje trvanlivost.<br />
Máslo by mělo být rozpuštěné nebo nakrájené<br />
na malé kousky, pak ho teprve můžete přidat.<br />
DROŽDÍ<br />
Během kynutí uvolňuje droždí kysličník uhličitý,<br />
který podporuje kynutí a změkčuje vnitřní<br />
strukturu. Droždí potřebuje ke kynutí jako živinu<br />
cukr a mouku.<br />
1 KL aktivního = ¾ KL instantního<br />
sušeného droždí<br />
droždí<br />
1½ KL aktivního = 1 KL instantního<br />
sušeného droždí droždí<br />
2 KL aktivního = 1½ KL instantního<br />
sušeného droždí<br />
droždí<br />
<br />
(KL = kávová lžička)<br />
Čerstvé droždí musí být uloženo v ledničce,<br />
protože kvasinky by se při vysokých teplotách<br />
zničily.<br />
Při nákupu droždí vždy zkontrolujte datum výroby<br />
a minimální trvanlivosti. Po každém použití<br />
droždí co nejrychleji uložte do ledničky.<br />
Upozornění: Nedostatečné vykynutí může způsobit<br />
špatná kvalita droždí.<br />
Jak zjistíte, že droždí není čerstvé:<br />
1. Nalijte do odměrky půl kelímku teplé vody<br />
(45° – 50°C)<br />
2. Přidejte kávovou lžičku bílého cukru a promíchejte.<br />
Pak na to rozmělněte dvě kávové<br />
lžičky droždí.<br />
3. Odměrku nechte stát asi 10 minut na teplém<br />
místě. Nemíchejte.<br />
4. Vzniklá pěna by měla zaplnit asi jeden šálek,<br />
jinak je droždí neaktivní.<br />
PRÁŠEK DO PEČIVA<br />
Prášek do pečiva se používá, když se peče<br />
chleba nebo koláče ve ULTRASCHNELL (velmi<br />
rychlém) režimu. Nepotřebuje fázi kynutí, produkuje<br />
plyny, které ve formě malých dutinek<br />
ovlivňují texturu chleba.<br />
Soda<br />
Soda je velmi podobná prášku do pečiva. Může<br />
být použita i v kombinaci s práškem do pečiva.<br />
VODA A OSTATNÍ TEKUTINY<br />
Voda je hlavní přísada při výrobě chleba. Její<br />
optimální teplota je 20º – 25ºC. Vodu lze nahradit<br />
i jinou tekutinou, např. čerstvým mlékem<br />
nebo vodou, která je smíchána se 2% mléčného<br />
prášku. To zlepšuje vůni chleba a barvu<br />
kůrky. Některé recepty vyžadují také citrónovou,<br />
jablečnou nebo pomerančovou šťávu,<br />
tím se chuť chleba vylepší.<br />
VEJCE<br />
Vejce mohou také vylepšit vlastnosti chleba, je<br />
pak výživný a větší. Vejce se musí rozklepnout<br />
do hrnku a pak stejnoměrně rozmíchat.<br />
ODMĚŘENÍ PŘÍSAD<br />
Nejdůležitější krok při používání pekárny chleba<br />
je přesné odměřování jednotlivých přísad<br />
pomocí velké (10) a malé odměrky (11). Vždy<br />
odměřujte každou tekutinu i sypké přísady velmi<br />
přesně, jinak bude výsledek vašeho snažení<br />
nedostatečný.<br />
ODMĚŘENÍ TEKUTIN<br />
Voda, čerstvé mléko nebo rozpuštěné sušené<br />
mléko by se měly odměřit pomocí velké odměrky<br />
(10). Držte ji během nalévání rovně a<br />
tekutinu odměřte. Když odměřujete olej nebo<br />
jiné přísady, odměrku (10) důkladně vyčistěte.<br />
SYPKÉ PŘÍSADY<br />
Tyto přísady se musí lehce nasypat do velké<br />
měrky (10). Nesmí se stlačit, protože jejich<br />
množství může ovlivnit vyváženost receptu.<br />
Pokud odměřujete jen malé množství sypkých<br />
přísad, použijte malou odměrku (11). V údajích<br />
na receptu se jedná o zarovnanou lžíci, ne o<br />
vrchovatou.<br />
Malá odměrka (11):<br />
<br />
Odpovídá 1 polévkové lžíci<br />
Odpovídá 1 kávové lžičce<br />
POŘADÍ PŘÍSAD<br />
Pořadí, ve které mají být přidávány přísady, musí<br />
být dodržováno. Obecně platí toto pořadí:<br />
tekutá přísada, vejce, sůl a sušené mléko atd.<br />
Moukou nesmí úplně prosáknout tekutina.<br />
Droždí se přidává pouze na suchou mouku a<br />
nesmí přijít do styku se solí.<br />
Po chvíli, kdy se těsto mísí, zazní signál. Nyní<br />
můžete přidat např. ovoce. Kdybyste přidali<br />
ovoce příliš brzy,naruší se dlouhým hnětením<br />
vůně i konsistence<br />
Pokud používáte časové posunutí, nesmíte nikdy<br />
přidávat rychle se kazící přísady, např. vejce<br />
nebo ovoce.<br />
83
CZ<br />
CZ<br />
ODSTRANĚNÍ PROBLÉMŮ<br />
č. Problém / porucha Příčina Pomoc<br />
č. Problém / porucha Příčina Pomoc<br />
1 Během pečení uniká z<br />
větracího otvoru kouř.<br />
2 Kůrka ve spodní části<br />
chleba je moc silná.<br />
3 Chléb jde velmi obtížně<br />
vyklopit z formy.<br />
4 Přísady jsou nerovnoměrně<br />
promíchané.<br />
5 Po upečení je chleba<br />
vysušený a nemá hnědou<br />
kůrku.<br />
Některé přísady se<br />
přichytily na topných<br />
tělesech nebo se nachází<br />
příliš blízko.<br />
Když používáte přístroj<br />
poprvé, může se na<br />
topných tělesech olej<br />
přichytit.<br />
Udržovali jste chleba příliš<br />
dlouho teplý a nechali jste<br />
ho dlouho ve formě, a tak<br />
ztráta vlhkosti byla velká.<br />
Hnětací hák drží pevně na<br />
hnětací hřídeli .<br />
Zvolený program není<br />
vhodný.<br />
Otočný odpor je příliš<br />
vysoký, takže hnětací hák<br />
se nemůže točit.<br />
Víko bylo několikrát<br />
otevřeno.<br />
Nevhodný program.<br />
Vytáhněte zástrčku ze<br />
zásuvky , nechte přístroj<br />
vychladnout a vyčistěte<br />
topná tělesa. Buďte ale<br />
opatrní, jen tak se vyvarujete<br />
spálenin.<br />
Když používáte přístroj<br />
poprvé, nechte ho běžet<br />
naprázdno a otevřete<br />
víko.<br />
Chleba vyndejte co<br />
nejdříve a neudržujte ho<br />
teplý.<br />
Po vyklopení chleba<br />
nalijte do formy horkou<br />
vodu, tak aby hnětací<br />
háky byly ponořeny.<br />
Vytáhněte je po 10 minutách<br />
a vyčistěte je.<br />
Před příštím pečením<br />
namažte hnětací hřídel<br />
např. margarínem.<br />
Zvolte správný program.<br />
Zkontrolujte otvor, ve<br />
kterém je hnětací hák<br />
upevněn. Vyndejte formu<br />
ven z přístroje a nechte<br />
ho běžet naprázdno.<br />
Při chybné funkci kontaktujte<br />
servisní službu.<br />
Během pečení víko<br />
neotvírejte.<br />
Zvolte správný program<br />
(str. 45).<br />
6 Po stisknutí tlačítka<br />
START / STOPP (start / stop)<br />
ukazuje displej „H HH“.<br />
7 Blokovací mechanismus<br />
kláves se už nedá zrušit<br />
(během nebo na konci<br />
pečení).<br />
8 Motor slyšíte běžet, ale<br />
těsto není proděláváno.<br />
9 Chléb je tak velký, že<br />
odspodu tlačí na víko.<br />
10 Chléb je malý a není<br />
vykynutý.<br />
11 Těsto je tak objemné, že<br />
přetéká přes okraj formy.<br />
Teplota uvnitř pekárny<br />
je na pečení chleba příliš<br />
vysoká.<br />
Technická chyba.<br />
Forma na pečení není<br />
dobře upevněna nebo je<br />
množství těsta příliš veliké<br />
a nelze ho prodělávat.<br />
Příliš mnoho droždí, vody<br />
nebo moukyTeplota v<br />
místnosti může být příliš<br />
vysoká (ideální: 15º – 34ºC)<br />
Žádné nebo málo droždí.<br />
Droždí může být také<br />
staré, a tím i neúčinné.<br />
Dalším důvodem může<br />
být vysoká teplota vody,<br />
nízká teplota v místnosti<br />
nebo příliš mnoho soli.<br />
Možná jste použili příliš<br />
mnoho tekutiny, takže je<br />
těsto řídké.<br />
Eventuelně jste přidali<br />
mnoho droždí.<br />
Stiskněte znovu tlačítko<br />
START / STOPP (start / stop)<br />
a vytáhněte zástrčku ze<br />
zásuvky.<br />
Vyndejte formu z pekárny<br />
ven a nechte víko<br />
otevřené, dokud pekárna<br />
nevychladne.<br />
Vytáhněte zástrčku ze<br />
zásuvky, po krátké chvíli<br />
ji zastrčte zase zpátky.<br />
Váš program bude jen<br />
nakrátko přerušen a<br />
sám začne pracovat<br />
znovu (srovnej paměťová<br />
funkce).<br />
Zkontrolujte, zda je forma<br />
řádně upevněná.<br />
Ujistěte se, že se těsto<br />
dělá podle receptu a obsahuje<br />
správné množství<br />
přísad.<br />
Zkontrolujte zde zmíněné<br />
faktory.<br />
Popřípadě snižte<br />
množství.<br />
Zkontrolujte množství a<br />
účinnost droždí. Případně<br />
zvyšte teplotu v místnosti.<br />
Snižte množství tekutin a<br />
zlepšíte tím hutnost těsta.<br />
84<br />
85
CZ<br />
CZ<br />
č. Problém / porucha Příčina Pomoc<br />
RECEPTY – VHODNÉ K JEDNOTLIVÝM PROGRAMŮM<br />
12 Při pečení se chléb ve<br />
středu propadá.<br />
Mouka není dost silná, aby<br />
nechala těsto vykynout.<br />
Použijte chlebovou nebo<br />
silnou mouku.<br />
Údaje množství v receptech pro chlebovou mouku a droždí odpovídají maximu.<br />
1 šálek = 250 ml • 1 PL = 3 KL • 1 PL = 15 ml • 1 KL = 5 ml<br />
86<br />
13 Chléb je velmi těžký a<br />
struktura hutná.<br />
Droždí působí příliš rychle<br />
nebo je teplota vysoká.<br />
Těsto je těžké a moc řídké,<br />
obsahuje moc vody.<br />
Použili jste mnoho mouky<br />
a málo vody.<br />
Použili jste mnoho ovoce<br />
nebo mnoho celozrnné<br />
mouky.<br />
14 Střed chleba je dutý. Použili jste moc vody<br />
nebo droždí, popř.<br />
žádnou sůl.<br />
15 Na povrchu chleba je<br />
ještě trochu prášku.<br />
16 Kůrka je příliš silná a tmavá,<br />
při pečení koláčů nebo<br />
jiných potravin s vysokým<br />
obsahem cukru.<br />
EKOLOGICKY VHODNÁ LIKVIDACE<br />
Teplota vody je vysoká,<br />
V chlebu se nachází<br />
mnoho látek obsahujících<br />
lepek.<br />
Chléb nemohl být<br />
dostatečně prodělán,<br />
protože obsahuje málo<br />
vody.<br />
Různé recepty mají velký<br />
vliv na pečení chleba.<br />
Barva je velmi tmavá,<br />
použijete-li mnoho cukru.<br />
Droždí používejte při<br />
pokojové teplotě.<br />
V daném případě upravte<br />
množství vody.<br />
Vezměte méně mouky<br />
nebo více vody.<br />
Snižte množství jmenovaných<br />
přísad a vezměte<br />
více droždí.<br />
Snižte množství vody a<br />
droždí a použijte trochu<br />
soli.<br />
Zkontrolujte teplotu<br />
vody.<br />
Nedávejte žádné nebo<br />
méně látek obsahujících<br />
lepek.<br />
Zkontrolujte množství vody<br />
a mechaniku pekárny.<br />
Pokud je barva chleba<br />
tmavá (pro recept<br />
s větším množstvím<br />
cukru), přerušte pečení<br />
5 – 10 minut před koncem<br />
stisknutím tlačítka START/<br />
STOPP (start / stop).<br />
Než koláč nebo chleba<br />
vyndáte, nechte víko ještě<br />
20 minut zavřené.<br />
Uvnitř EU odkazuje tento symbol na to, že přístroj nesmí být vyhozen do<br />
domácího odpadu. Staré přístroje obsahují cenné materiály vhodné k recyklaci,<br />
které by měly být k recyklaci dodány, aby nekontrolovanou likvidací neškodily<br />
životnímu prostředí, popř. lidskému zdraví. Odstraňujte prosím staré přístroje<br />
prostřednictvím vhodných sběrných systémů, nebo pošlete přístroj k likvidaci<br />
na místo, kde jste jej koupili. Tam jej pak dopraví k materiálnímu využití.<br />
Tipy & Triky<br />
• Máslo / Margarín: Podle chuti můžete použít<br />
i jiné tuky: olivový olej, margarín nebo<br />
vepřové sádlo pro labužníky atd.<br />
• Sušené mléko: Sušené mléko můžete<br />
nahradit čerstvým. V tom případě snižte<br />
množství vody o stejné množství přidávaného<br />
mléka.<br />
• Voda: Minerální voda každý chléb zlehčuje<br />
a provzdušní. Ideální u těžkých druhů<br />
mouky.<br />
SELSKÝ CHLÉB<br />
Velikost<br />
Surovinychleba<br />
1400 g /<br />
3 LB<br />
1200 g /<br />
2,5 LB<br />
1000 g /<br />
2 LB<br />
Podmáslí 530 ml 490 ml 370 ml<br />
Máslo / Margarín 1 ¾ PL 1 ½ PL 1 PL<br />
Sůl 1 ¾ KL 1 ½ KL 1 KL<br />
Cukr 1 ¾ PL 1 ½ PL 1 PL<br />
Bílá mouka 455 g 420 g 315 g<br />
Celozrnná<br />
455 g 420 g 315 g<br />
žitná mouka<br />
Sušené droždí 1 ¾ KL 1 ½ KL 1 KL<br />
Program: NORMAL (normální)<br />
CELOZRNNÝ CHLÉB<br />
Velikost<br />
Surovinychleba<br />
1400 g /<br />
3 LB<br />
1200 g /<br />
2,5 LB<br />
1000 g /<br />
2 LB<br />
Voda 500 ml 460 ml 350 ml<br />
Máslo / Margarín 1 ¾ PL 1 ½ PL 1 PL<br />
Sůl 1 ¾ KL 1 ½ KL 1 KL<br />
Cukr 1 ¾ KL 1 ½ KL 1 KL<br />
Chlebová mouka 190 g 150 g 110 g<br />
Vícezrnná<br />
720 g 690 g 520 g<br />
žitná mouka<br />
Sušené droždí 3 ½ KL 3 KL 2 KL<br />
Program: VOLLKORN (celozrnný)<br />
FRANCOUZSKÝ KŘUPAVÝ CHLÉB<br />
Velikost<br />
Surovinychleba<br />
1400 g /<br />
3 LB<br />
1200 g /<br />
2,5 LB<br />
1000 g /<br />
2 LB<br />
Voda 500 ml 460 ml 350 ml<br />
Máslo / Margarín 3 PL 2 ¼ PL 1 ½ PL<br />
Sušené mléko 2 PL 1 ½ PL 1 PL<br />
Cukr 3 ½ PL 3 PL 2 PL<br />
Sůl 1 ¾ KL 1 ½ KL 1 KL<br />
Bílá mouka 910 g 840 g 630 g<br />
Sušené droždí 1 ¾ KL 1 ½ KL 1 KL<br />
Program: FRANZÖSISCH (francouzský)<br />
RYCHLÝ KUKUŘIČNÝ CHLÉB<br />
Velikost<br />
Surovinychleba<br />
1400 g /<br />
3 LB<br />
1200 g /<br />
2,5 LB<br />
1000 g /<br />
2 LB<br />
Mléko 530 ml 490 ml 370 ml<br />
Máslo / Margarín 3 ½ PL 3 PL 2 PL<br />
Sušené mléko 1 ¾ KL 1 ½ KL 1 KL<br />
Cukr 2 KL 1 ½ KL 1 KL<br />
Sůl 2 KL 1 ½ KL 1 KL<br />
Chlebová mouka 650 g 600 g 450 g<br />
Kukuřičná mouka 260 g 240 g 180 g<br />
Prášek do pečiva 8 KL 6 KL 4 KL<br />
Program: SCHNELL (rychlý)<br />
KOLÁČOVÝ CHLÉB<br />
Velikost<br />
Surovinychleba<br />
1400 g /<br />
3 LB<br />
1200 g /<br />
2,5 LB<br />
1000 g /<br />
2 LB<br />
Mléko 530 ml 490 ml 370 ml<br />
Máslo / Margarín 90 g 75 g 50 g<br />
Vejce 4 Ks 4 Ks 3 Ks<br />
Cukr 90 g 75 g 50 g<br />
Sůl 1 ¾ KL 1 ½ KL 1 KL<br />
Bílá mouka 910 g 840 g 630 g<br />
Sušené droždí 1 ¾ KL 1 ½ KL 1 KL<br />
Program: SÜSS (sladký)<br />
87
CZ<br />
CZ<br />
KOLÁČE<br />
MARMELÁDY<br />
VELMI RYCHLÝ CHLÉB S PŠENIČNÝMI KLÍČKY<br />
88<br />
Třený koláč<br />
Přísady 1. Do mísy dejte vejce, máslo, cukr a vanilkový<br />
cukr a vymíchejte ručním mixerem do pěny.<br />
Vejce<br />
3 ks<br />
2. Smíchejte mouku s práškem do pečiva a zamíchejte<br />
do vaječné směsi.<br />
Cukr<br />
125 g<br />
Máslo / Margarín<br />
125 g<br />
3. Zjemněte těsto trochou mléka.<br />
Vanilkový cukr<br />
1 balíček<br />
4. Formu na pečení vymažte máslem nebo olejem,<br />
vlijte těsto a zapněte program KUCHEN<br />
Mléko<br />
až ¼ šálku<br />
Bílá mouka<br />
300 g (koláče).<br />
Prášek do pečiva<br />
1 balíček<br />
5. Chcete přidat strouhanou čokoládu? Pak ji<br />
tedy přidejte. Pekárna ji zamíchá do těsta.<br />
Koláč s červeným vínem<br />
Přísady 1. V míse vymíchejte vejce, máslo, cukr, vanilkový<br />
cukr a sůl ručním šlehačem do pěny.<br />
Vejce<br />
3 ks<br />
2. Pak přidejte mouku, prášek do pečiva, kakao,<br />
Cukr<br />
150 g<br />
skořici a všechno smíchejte dohromady.<br />
Máslo / Margarín<br />
250 g<br />
3. Přilévejte červené víno až se těsto začne trhat.<br />
Bílá mouka<br />
250 g<br />
Prášek do pečiva<br />
1 balíček<br />
4. Formu na pečení vymažte máslem nebo<br />
Kakao<br />
1 ½ PL olejem, vlijte těsto a posypejte strouhanou<br />
Skořice<br />
2 KL čokoládou. Zapněte program KUCHEN (koláče).<br />
Sůl<br />
1 špetka<br />
Strouhaná čokoláda<br />
Červené víno<br />
Křupavý rumový koláč<br />
100 g<br />
až 1⁄8 litru<br />
Přísady 1. V míse vymíchejte vejce, máslo, cukr, vanilkový<br />
cukr a sůl ručním šlehačem do pěny.<br />
Vejce<br />
4 ks<br />
2. Smíchejte mouku s práškem do pečiva. Vše<br />
Cukr<br />
100 g<br />
stejnoměrně promíchejte a zároveň nalijte<br />
Máslo / Margarín<br />
75 g do směsi rum.<br />
Vanilkový cukr<br />
1 balíček<br />
3. Formu na pečení vymažte máslem nebo olejem,<br />
Sůl<br />
1 Prise<br />
vlijte těsto a posypejte nasekanou čoko-<br />
Rum<br />
4 PL ládou. Zapněte program KUCHEN (koláče).<br />
Bílá mouka<br />
Prášek do pečiva<br />
Nasekaná rumová čokoláda<br />
150 g<br />
1 balíček<br />
50 g<br />
Tipy & Triky<br />
Pomerančové želé<br />
Přísady<br />
Pomerančová šťáva<br />
Na kousky nakrájený pomeranč<br />
Citrónová šťáva<br />
Želírovací cukr (3 plus 1)<br />
Program: MARMELADE (marmelády)<br />
Džem z lesního ovoce<br />
Přísady<br />
Rozmačkané lesní plody<br />
Citrónová šťáva (u velmi sladkého ovoce)<br />
Želírovací cukr (2 plus 1)<br />
Program: MARMELADE (marmelády)<br />
1 litr<br />
1 ks<br />
50 ml<br />
500 g<br />
1 kg<br />
až 100 ml<br />
500 g<br />
• Chcete vyzkoušet, jak vaše marmeláda,<br />
džem nebo želé zhoustly? Odeberte<br />
lžící trochu horké hmoty na studený porcelánový<br />
talíř. Během pár minut vychladne<br />
a pak můžete pevnost zkusit.<br />
• Je marmeláda řídká? Přidejte trochu<br />
kyseliny citrónové. Hmota lépe želíruje.<br />
• Je marmeláda hustá? Přidejte trochu<br />
vody nebo ovocné šťávy. Hmota je pak<br />
řidší.<br />
PODMÁSLOVÉ TĚSTO na housky<br />
Hmotnost<br />
Suroviny<br />
1400 g /<br />
3 LB<br />
1200 g /<br />
2,5 LB<br />
1000 g /<br />
2 LB<br />
Podmáslí 450 ml 420 ml 310 ml<br />
Vejce 2 Ks 1 Ks 1 Ks<br />
Sůl 2 KL 1 ½ KL 1 KL<br />
Celozrnná 320 g 300 g 220 g<br />
pšeničná mouka<br />
Bíla mouka 490 g 450 g 340 g<br />
Sušené droždí 2 KL 1 ½ KL 1 KL<br />
Program: TEIG (těsto)<br />
Velikost<br />
Surovinychleba<br />
1400 g /<br />
3 LB<br />
1200 g /<br />
2,5 LB<br />
1000 g /<br />
2 LB<br />
Voda (48°C) 490 ml 450 ml 340 ml<br />
Kmín 2 KL 1 ½ KL 1 KL<br />
Olivový olej 2 PL 1 ½ PL 1 PL<br />
Med 2 PL 1 ½ PL 1 PL<br />
Sůl 2 KL 1 ½ KL 1 KL<br />
Pšeničné klíčky 100 g 90 g 70 g<br />
Bíla mouka 810 g 750 g 560 g<br />
Sušené droždí 2 ½ KL 2 KL 1 ½ KL<br />
Program: ULTRASCHNELL (velmi rychlý)<br />
BACKEN (pečení)<br />
K tomuto programu vám bohužel nemůžeme<br />
nabídnout žádné návrhy receptů.<br />
DEZERTY<br />
Jablkové řezy<br />
Přísady<br />
Bílá mouka<br />
Citrónová šťáva<br />
Vejce<br />
Hnědý cukr<br />
Mouka<br />
Ovesné vločky<br />
Máslo / Margarín (změklý)<br />
Program: DESSERT (dezerty)<br />
Rýžový pudink<br />
Přísady<br />
Lehce rozmíchaná vejce<br />
Mléko<br />
Uvařená rýže<br />
Cukr<br />
Rozinky (opce)<br />
Vanilka<br />
Skořice<br />
Program: DESSERT (dezerty)<br />
6 Ks<br />
1 KL<br />
1 Ks<br />
½ šálku<br />
1 šálek<br />
¹⁄3 šálek<br />
3 ½ PL<br />
4 Ks<br />
1 ¾ šálku<br />
3 šálky<br />
½ šálku<br />
1 šálek<br />
1 KL<br />
2 KL<br />
89
CZ<br />
<strong>BHG</strong> <strong>395</strong><br />
ZÁRUČNÍ LIST<br />
D Notizen • GB Notes • F Notes • I Note • CZ Poznámky<br />
Pro záruku začínající dnem prodeje spotřebiče platí pro země EU (i Českou republiku) a<br />
Švýcarsko tyto podmínky:<br />
1. Trvání záruky: 2 roky<br />
2. Poskytování záruky:<br />
a) záruční opravu provedeme podle našeho<br />
zvážení opravou nebo výměnou vadných<br />
dílů, jestliže tyto závady vznikly prokazatelně<br />
vadou materiálu nebo chybou při výrobě.<br />
b) záruční oprava bude provedena jen při<br />
předložení tohoto záručního listu a dokladu<br />
o zaplacení.<br />
c) záruku mohou uplatnit pouze první majitelé<br />
spotřebiče.<br />
d) jestliže dojde k opravě nebo výměně<br />
spotřebiče v záruční době, záruční doba<br />
se prodlouží.<br />
e) poplatky za dopravu hradí kupující.<br />
f) v případě, že se závada nebo škoda nedá<br />
odstranit, nebo se překročí doba servisního<br />
zásahu (30 dnů), bude spotřebič vyměněn<br />
za nový, nebo vráceny peníze v prodejně,<br />
kde byl spotřebič zakoupen.<br />
3. Záruka se nevztahuje na případy:<br />
• poškrábání nebo fleky na spotřebiči a na<br />
světelné kontrolky nebo žárovky a na motorové<br />
kartáče.<br />
• na lehce rozbitné díly z bakelitu, skla, plastů<br />
apod., pokud se nejedná o chybu materiálu.<br />
• poškození jako následek chybné instalace<br />
nebo upevnění.<br />
• kdy je spotřebič zapojen do sítě s vyšším<br />
napětím než je na spotřebiči uvedeno.<br />
• chybného nebo neodpovídajícího použití.<br />
• nedbalosti při používání.<br />
• upadnutí spotřebiče nebo jeho jednotlivých<br />
částí.<br />
• nevhodného transportu nebo nedostatečného<br />
zabalení.<br />
4. Záruka zaniká:<br />
• při použití spotřebiče jinak než v domácnosti.<br />
• při provádění opravy nebo změny na spotřebiči<br />
osobou jinou než pověřenou naším<br />
servisem.<br />
Na tento spotřebič poskytujeme 2 roky záruku na nedostatky, které jsou označeny jako<br />
výrobní chyby nebo chyby materiálu. Záruční doba začíná dnem prodeje a je uznána po<br />
předložení záručního listu a dokladu o zaplacení. Jiné nároky neuznáváme.<br />
Model:<br />
Důležité ! Prosím, napište si FD kód, který je<br />
umístěný na štítku:<br />
90<br />
razítko a podpis prodávajícího<br />
datum prodeje<br />
91
<strong>Bielmeier</strong> Hausgeräte GmbH<br />
Gnaglbergstraße 6<br />
D-94267 Prackenbach<br />
Tel.: +49 (0) 9942 94 88 93-0<br />
Fax: +49 (0) 9942 94 88 93-22<br />
E-Mail: info@bielmeier-hausgeraete.de<br />
Internet: www.bielmeier-hausgeraete.com<br />
<strong>Bielmeier</strong> Hausgeräte s.r.o.<br />
Bořice 25<br />
CZ-34401 Domažlice<br />
Tel.: +420 - 379 768 010<br />
Fax: +420 - 379 768 020<br />
E-Mail: bielmeierhausgeraete@iol.cz<br />
Internet: www.bielmeier.cz