Installation Instructions
Installation Instructions
Installation Instructions

Create successful ePaper yourself
Turn your PDF publications into a flip-book with our unique Google optimized e-Paper software.
<strong>Installation</strong> <strong>Instructions</strong><br />
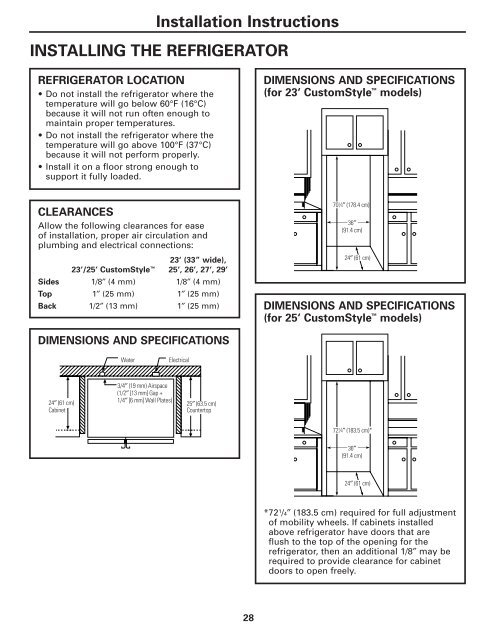
INSTALLING THE REFRIGERATOR<br />
REFRIGERATOR LOCATION<br />
• Do not install the refrigerator where the<br />
temperature will go below 60°F (16°C)<br />
because it will not run often enough to<br />
maintain proper temperatures.<br />
• Do not install the refrigerator where the<br />
temperature will go above 100°F (37°C)<br />
because it will not perform properly.<br />
• Install it on a floor strong enough to<br />
support it fully loaded.<br />
DIMENSIONS AND SPECIFICATIONS<br />
(for 23‘ CustomStyle models)<br />
CLEARANCES<br />
Allow the following clearances for ease<br />
of installation, proper air circulation and<br />
plumbing and electrical connections:<br />
23‘ (33” wide),<br />
23‘/25‘ CustomStyle 25‘, 26‘, 27‘, 29‘<br />
Sides 1/8″ (4 mm) 1/8″ (4 mm)<br />
Top 1″ (25 mm) 1″ (25 mm)<br />
Back 1/2″ (13 mm) 1″ (25 mm)<br />
70 1 ⁄4″ (178.4 cm)<br />
36″<br />
(91.4 cm)<br />
24″ (61 cm)<br />
DIMENSIONS AND SPECIFICATIONS<br />
(for 25‘ CustomStyle models)<br />
DIMENSIONS AND SPECIFICATIONS<br />
Water<br />
Electrical<br />
24″ (61 cm)<br />
Cabinet<br />
3/4″ (19 mm) Airspace<br />
(1/2″ [13 mm] Gap +<br />
1/4″ [6 mm] Wall Plates)<br />
25″ (63.5 cm)<br />
Countertop<br />
72 1 ⁄4″ (183.5 cm)*<br />
36″<br />
(91.4 cm)<br />
24″ (61 cm)<br />
*72 1 /4″ (183.5 cm) required for full adjustment<br />
of mobility wheels. If cabinets installed<br />
above refrigerator have doors that are<br />
flush to the top of the opening for the<br />
refrigerator, then an additional 1/8″ may be<br />
required to provide clearance for cabinet<br />
doors to open freely.<br />
28