Installation Instructions
Installation Instructions
Installation Instructions

Create successful ePaper yourself
Turn your PDF publications into a flip-book with our unique Google optimized e-Paper software.
<strong>Installation</strong> <strong>Instructions</strong><br />
INSTALLING THE WATER LINE (CONT.)<br />
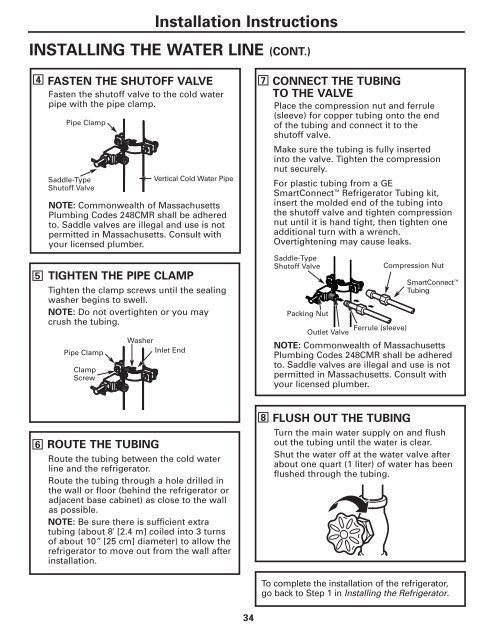
4<br />
FASTEN THE SHUTOFF VALVE<br />
Fasten the shutoff valve to the cold water<br />
pipe with the pipe clamp.<br />
Pipe Clamp<br />
7<br />
CONNECT THE TUBING<br />
TO THE VALVE<br />
Place the compression nut and ferrule<br />
(sleeve) for copper tubing onto the end<br />
of the tubing and connect it to the<br />
shutoff valve.<br />
Saddle-Type<br />
Shutoff Valve<br />
Vertical Cold Water Pipe<br />
NOTE: Commonwealth of Massachusetts<br />
Plumbing Codes 248CMR shall be adhered<br />
to. Saddle valves are illegal and use is not<br />
permitted in Massachusetts. Consult with<br />
your licensed plumber.<br />
Make sure the tubing is fully inserted<br />
into the valve. Tighten the compression<br />
nut securely.<br />
For plastic tubing from a GE<br />
SmartConnect Refrigerator Tubing kit,<br />
insert the molded end of the tubing into<br />
the shutoff valve and tighten compression<br />
nut until it is hand tight, then tighten one<br />
additional turn with a wrench.<br />
Overtightening may cause leaks.<br />
5<br />
TIGHTEN THE PIPE CLAMP<br />
Tighten the clamp screws until the sealing<br />
washer begins to swell.<br />
NOTE: Do not overtighten or you may<br />
crush the tubing.<br />
Pipe Clamp<br />
Clamp<br />
Screw<br />
Washer<br />
Inlet End<br />
Saddle-Type<br />
Shutoff Valve<br />
Packing Nut<br />
Outlet Valve<br />
Ferrule (sleeve)<br />
Compression Nut<br />
SmartConnect <br />
Tubing<br />
NOTE: Commonwealth of Massachusetts<br />
Plumbing Codes 248CMR shall be adhered<br />
to. Saddle valves are illegal and use is not<br />
permitted in Massachusetts. Consult with<br />
your licensed plumber.<br />
6<br />
ROUTE THE TUBING<br />
Route the tubing between the cold water<br />
line and the refrigerator.<br />
Route the tubing through a hole drilled in<br />
the wall or floor (behind the refrigerator or<br />
adjacent base cabinet) as close to the wall<br />
as possible.<br />
NOTE: Be sure there is sufficient extra<br />
tubing (about 8′ [2.4 m] coiled into 3 turns<br />
of about 10″ [25 cm] diameter) to allow the<br />
refrigerator to move out from the wall after<br />
installation.<br />
8<br />
FLUSH OUT THE TUBING<br />
Turn the main water supply on and flush<br />
out the tubing until the water is clear.<br />
Shut the water off at the water valve after<br />
about one quart (1 liter) of water has been<br />
flushed through the tubing.<br />
To complete the installation of the refrigerator,<br />
go back to Step 1 in Installing the Refrigerator.<br />
34