Die-Cast Programmable Espresso Machine - Breville
Die-Cast Programmable Espresso Machine - Breville
Die-Cast Programmable Espresso Machine - Breville

Create successful ePaper yourself
Turn your PDF publications into a flip-book with our unique Google optimized e-Paper software.
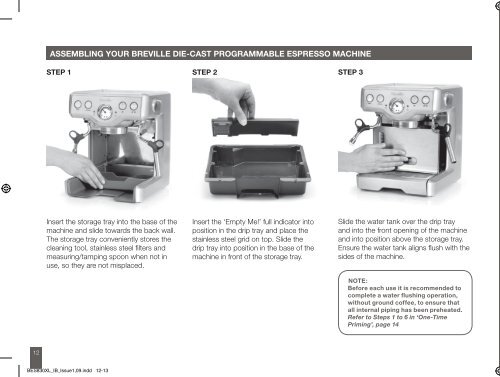
ASSEMBLING YOUR BREVILLE DIE-CAST PROGRAMMABLE ESPRESSO MACHINE<br />
STEP 1<br />
STEP 2<br />
STEP 3<br />
New photo of machine showing<br />
water tank being removed<br />
Insert the storage tray into the base of the<br />
machine and slide towards the back wall.<br />
The storage tray conveniently stores the<br />
cleaning tool, stainless steel fi lters and<br />
measuring/tamping spoon when not in<br />
use, so they are not misplaced.<br />
Insert the ‘Empty Me!’ full indicator into<br />
position in the drip tray and place the<br />
stainless steel grid on top. Slide the<br />
drip tray into position in the base of the<br />
machine in front of the storage tray.<br />
Slide the water tank over the drip tray<br />
and into the front opening of the machine<br />
and into position above the storage tray.<br />
Ensure the water tank aligns fl ush with the<br />
sides of the machine.<br />
NOTE:<br />
Before each use it is recommended to<br />
complete a water flushing operation,<br />
without ground coffee, to ensure that<br />
all internal piping has been preheated.<br />
Refer to Steps 1 to 6 in ‘One-Time<br />
Priming’, page 14<br />
Operating<br />
12 13<br />
BES830XL_IB_Issue1,09.indd 12-13<br />
4/1/10 11:02:41 AM