Die-Cast Programmable Espresso Machine - Breville
Die-Cast Programmable Espresso Machine - Breville
Die-Cast Programmable Espresso Machine - Breville

Create successful ePaper yourself
Turn your PDF publications into a flip-book with our unique Google optimized e-Paper software.
PROGRAMMING YOUR BREVILLE DIE-CAST PROGRAMMABLE ESPRESSO MACHINE<br />
THE ART OF TEXTURING MILK<br />
RESETTING DEFAULT VOLUMES<br />
To reset the machine to the default one<br />
and two cup pour quantities, press and<br />
hold the ‘PROGRAM’ button, until the<br />
machine beeps three times. Release<br />
button. This indicates the machine has<br />
returned to its original default settings.<br />
NOTE:<br />
Default settings: one cup<br />
approximately 1 oz. Two cups<br />
is approximately 2 oz.<br />
MANUAL ESPRESSO<br />
pour is<br />
The Manual function over-rides the preset<br />
shot size for one time only. It does not<br />
save the shot size like in programming<br />
mode.<br />
Press and hold the single<br />
two cup button. Release the button<br />
once suffi cient espresso has fl owed into<br />
the cup.<br />
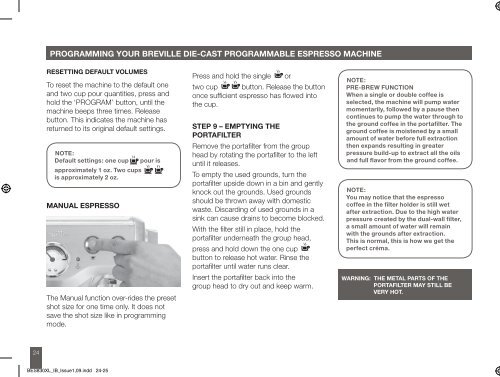
STEP 9 – EMPTYING THE<br />
PORTAFILTER<br />
Remove the portafi lter from the group<br />
head by rotating the portafi lter to the left<br />
until it releases.<br />
To empty the used grounds, turn the<br />
portafi lter upside down in a bin and gently<br />
knock out the grounds. Used grounds<br />
should be thrown away with domestic<br />
waste. Discarding of used grounds in a<br />
sink can cause drains to become blocked.<br />
or<br />
With the fi lter still in place, hold the<br />
portafi lter underneath the group head,<br />
press and hold down the one cup<br />
button to release hot water. Rinse the<br />
portafi lter until water runs clear.<br />
Insert the portafi lter back into the<br />
group head to dry out and keep warm.<br />
NOTE:<br />
PRE-BREW FUNCTION<br />
When a single or double coffee is<br />
selected, the machine will pump water<br />
momentarily, followed by a pause then<br />
continues to pump the water through to<br />
the ground coffee in the portafilter. The<br />
ground coffee is moistened by a small<br />
amount of water before full extraction<br />
then expands resulting in greater<br />
pressure build-up to extract all the oils<br />
and full flavor from the ground coffee.<br />
NOTE:<br />
You may notice that the espresso<br />
coffee in the filter holder is still wet<br />
after extraction. Due to the high water<br />
pressure created by the dual-wall filter,<br />
a small amount of water will remain<br />
with the grounds after extraction.<br />
This is normal, this is how we get the<br />
perfect créma.<br />
WARNING: THE METAL PARTS OF THE<br />
PORTAFILTER MAY STILL BE<br />
VERY HOT.<br />
The <strong>Die</strong>-<strong>Cast</strong> <strong>Programmable</strong> <strong>Espresso</strong><br />
<strong>Machine</strong> comes complete with a<br />
Commercial Style Swivel Steam Wand<br />
and Stainless Steel Frothing Attachment.<br />
When using the frothing attachment on<br />
the steam wand a large amount of froth is<br />
easily created.<br />
If less froth is required, remove the frothing<br />
attachment from the steam wand and<br />
steam the milk using the steam wand. To<br />
remove the frothing attachment, ensure it<br />
is cool then simply pull down and remove.<br />
The frothing attachment can be stored in<br />
the storage tray inside the machine if not<br />
used regularly.<br />
To refi t the frothing attachment ensure it is<br />
securely attached to the steam wand by<br />
inserting it, from either opening, onto the<br />
steam wand and pushing fi rmly upwards<br />
onto the rubber surround.<br />
• Fill the stainless steel frothing jug<br />
maximum ½ full with cold, fresh milk.<br />
• Turn the Steam selector dial to the<br />
‘Steam’ position. The red steam light<br />
will start to fl ash indicating that the<br />
machine is heating to create steam.<br />
• When the steam light stops fl ashing it<br />
is ready to use.<br />
• Before inserting the wand into the milk,<br />
pause the steam by returning the dial<br />
back to the ‘STAND BY’ position. This<br />
will avoid splashing the milk out of the<br />
jug (this pause function lasts for 6<br />
seconds before exiting steam mode).<br />
• Insert the wand into the milk and return<br />
the Steam dial back to ‘Steam’.<br />
• To stop, return the steam dial to the<br />
‘STAND BY’ position and remove<br />
the jug.<br />
NOTE:<br />
When the espresso machine creates<br />
steam, a pumping noise can be heard.<br />
This is the normal operation of the<br />
15 Bar pump.<br />
NOTE:<br />
If steam starts coming from the<br />
steam wand before it is immersed in the<br />
milk, pause the steam by turning the<br />
Selector Control back to the ‘Standby’<br />
position. This will avoid the steam<br />
pressure blowing milk out of the jug.<br />
WARNING: MILK SHOULD NOT BE ALLOWED TO RUN OVER THE TOP OF THE FROTHING<br />
ATTACHMENT, OTHERWISE IT WILL NOT FUNCTION PROPERLY. TO AVOID<br />
SPLATTERING OF HOT MILK, DO NOT LIFT THE END OF THE FROTHING ATTACHMENT<br />
ABOVE THE SURFACE OF THE MILK WHILE FROTHING. ENSURE THE STEAM DIAL IS<br />
IN THE ‘STAND BY’ POSITION BEFORE REMOVING THE FROTHING JUG.<br />
24 25<br />
BES830XL_IB_Issue1,09.indd 24-25<br />
4/1/10 11:02:44 AM