

GM-X944 - Service.pioneer-eur.com - Pioneer
GM-X944 - Service.pioneer-eur.com - Pioneer
GM-X944 - Service.pioneer-eur.com - Pioneer

Create successful ePaper yourself
Turn your PDF publications into a flip-book with our unique Google optimized e-Paper software.
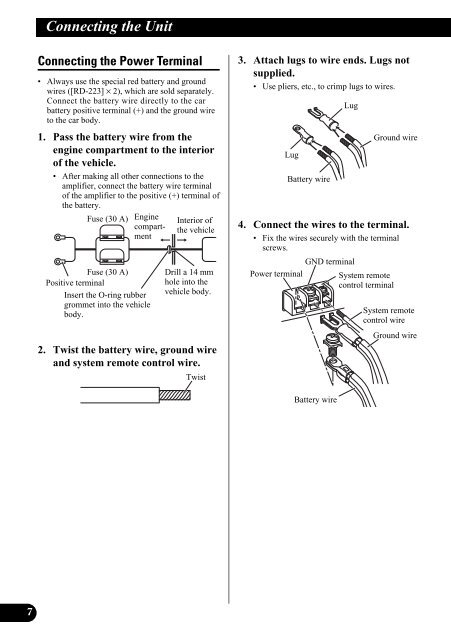
Connecting the Unit<br />
Connecting the Power Terminal<br />
• Always use the special red battery and ground<br />
wires ([RD-223] × 2), which are sold separately.<br />
Connect the battery wire directly to the car<br />
battery positive terminal (+) and the ground wire<br />
to the car body.<br />
1. Pass the battery wire from the<br />
engine <strong>com</strong>partment to the interior<br />
of the vehicle.<br />
• After making all other connections to the<br />
amplifier, connect the battery wire terminal<br />
of the amplifier to the positive (+) terminal of<br />
the battery.<br />
Fuse (30 A)<br />
Engine<br />
<strong>com</strong>partment<br />
Fuse (30 A)<br />
Positive terminal<br />
Insert the O-ring rubber<br />
grommet into the vehicle<br />
body.<br />
Interior of<br />
the vehicle<br />
Drill a 14 mm<br />
hole into the<br />
vehicle body.<br />
2. Twist the battery wire, ground wire<br />
and system remote control wire.<br />
Twist<br />
3. Attach lugs to wire ends. Lugs not<br />
supplied.<br />
• Use pliers, etc., to crimp lugs to wires.<br />
Lug<br />
Battery wire<br />
Lug<br />
Ground wire<br />
4. Connect the wires to the terminal.<br />
• Fix the wires securely with the terminal<br />
screws.<br />
GND terminal<br />
Power terminal System remote<br />
control terminal<br />
System remote<br />
control wire<br />
Ground wire<br />
Battery wire<br />
7


