Manual de instrucciones - Triton Tools
Manual de instrucciones - Triton Tools
Manual de instrucciones - Triton Tools

You also want an ePaper? Increase the reach of your titles
YUMPU automatically turns print PDFs into web optimized ePapers that Google loves.
GB<br />
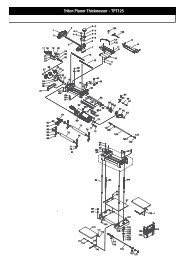
Fit the other end of the fixed fence to the brace<br />
using the Brace Spacer (21) (keys engaging in<br />
the short slot), by feeding an M6 x 16 Coach<br />
Bolt into the Brace Spacer (21) then fitting a<br />
Washer (19) and M6 Nyloc Nut (20).<br />
Tap the Tube Closures (25) into the ends of the<br />
outer brace.<br />
Step 3<br />
(Use fasteners from Fastener Bag 3) -<br />
Sli<strong>de</strong> two M6 x 50 Coach Bolts (27) and one<br />
M6 x 12 Coach Bolt (28) into the channel in the<br />
top of each fence. Note: It will be necessary<br />
to temporarily remove one of the round knobs<br />
from the adjustable fence. The or<strong>de</strong>r of the<br />
bolts is long - short - long.<br />
Fit a Fence Clamp (29) and M6 Flange Nut (15)<br />
onto each long bolt.<br />
Sli<strong>de</strong> each clamp approximately 100mm from<br />
the fence ends, positioning their bases level<br />
with the front of the fences. Tighten the flange<br />
nuts and loosely fit the Round Knobs (24).<br />
Place the MDF Fence Faces (6) onto the<br />
bottom lip of each fence and slip un<strong>de</strong>r the<br />
clamps. Secure by tightening the round knobs.<br />
Fit the Stop Supports (30) to the short bolts<br />
and tighten approximately in the middle of each<br />
fence with M6 Flange Nuts (15). The correct<br />
position will be <strong>de</strong>termined later.<br />
Screw a Right-han<strong>de</strong>d Fence Cap (7) and a<br />
Left-han<strong>de</strong>d Fence Cap (8) onto each end of<br />
the Link Hose (9). Note the hose has a lefthand<br />
thread - screw anti-clockwise.<br />
Locate the fence caps, with hose fitted, into<br />
the ends of the fences closest to the sli<strong>de</strong>r,<br />
using the orientation. Gently tap them in<br />
completly with a mallet or similar. Note: It may<br />
be necessary to temporarily loosen the nyloc<br />
nut at the end of the fixed fence and the round<br />
knob at the end of the adjustable fence while<br />
fitting the caps.<br />
Fit the remaining fence caps to the other fence<br />
ends.<br />
Insert three M6 x 12 Coach Bolts (28) down the<br />
rear channel of the fixed fence.<br />
Fit the plastic Finger Spacer (31) and 1 ⁄2” or<br />
1<br />
⁄4” Finger (32 or 33 <strong>de</strong>pending on which size<br />
finger joints you wish to make) to the centre<br />
bolt using a Washer (19) and Hex Nut (12).<br />
Position it approximately 25mm past the cutter<br />
opening in the fence, toward the outer brace.<br />
Fit a Finger Stop (34), to each of the outer bolts<br />
using Washers (19) and M6 Hex Nuts (12) The<br />
correct position will be <strong>de</strong>termined later.<br />
Step 4<br />
(Use fasteners from Fastener Bag 3) - Push<br />
an M4 Nyloc Nut (35) into the hexagonal<br />
<strong>de</strong>pression on each Cutter Surround 'A' & 'B'<br />
(36). Screw an M4 x 10 Screw (37) into each.<br />
Leave a 3mm gap un<strong>de</strong>r the head of the screw,<br />
and fit them to the fences as follows.<br />
To set up for 1 ⁄2” finger joints fit Cutter<br />
Surround 'A' to the fixed fence and 'B' to the<br />
adjustable fence.<br />
For 1 ⁄4” cuts fit 'B' to the fixed fence and 'A' to<br />
the adjustable fence. Turn the unit upsi<strong>de</strong> down<br />
and drop the cutter surround into the opening<br />
on the fence base. Sli<strong>de</strong> it back until the screw<br />
locates fully into the slot. Tighten the screw to<br />
lock each surround in place.<br />
Dust Extraction<br />
The Finger Jointer has been <strong>de</strong>signed for use<br />
with a vacuum cleaner for chip extraction.<br />
Screw the vacuum hose, supplied with your<br />
Router Table, into the dust port on the fixed<br />
fence (left-hand thread) and plug the wand of<br />
your vacuum cleaner into the hose adaptor.<br />
The end of the adjustable fence remains open<br />
to provi<strong>de</strong> a through-flow of air, for effective<br />
extraction.<br />
For a larger collection capacity, consi<strong>de</strong>r<br />
fitting a <strong>Triton</strong> Dust Collector (DCA300) to your<br />
vacuum.<br />
If not connected for dust extraction it will be<br />
necessary to stop work at intervals and clear<br />
the shavings from insi<strong>de</strong> the fences. Shavings<br />
will also need to be removed from beneath<br />
the workpiece using a bristle brush (eg. paint<br />
brush or similar). WARNING: Always switch the<br />
machine off at the mains power socket before<br />
carrying out any cleaning or maintenance<br />
procedures.<br />
WARRANTY<br />
To register your guarantee visit our web site at<br />
www.tritontools.com* and enter your <strong>de</strong>tails.<br />
Your <strong>de</strong>tails will be inclu<strong>de</strong>d on our mailing list<br />
(unless indicated otherwise) for information on<br />
future releases. Details provi<strong>de</strong>d will not<br />
be ma<strong>de</strong> available to any third party.<br />
PURCHASE RECORD<br />
Date of Purchase:<br />
Mo<strong>de</strong>l: FJA300<br />
___ / ___ / ____<br />
Retain your receipt as proof of purchase<br />
<strong>Triton</strong> Precision Power <strong>Tools</strong> guarantees<br />
to the purchaser of this product that if<br />
any part proves to be <strong>de</strong>fective due to<br />
faulty materials or workmanship within<br />
12 MONTHS from the date of original<br />
purchase, <strong>Triton</strong> will repair, or at its<br />
discretion replace, the faulty part free of<br />
charge.<br />
This guarantee does not apply to<br />
commercial use nor does it extend to<br />
normal wear and tear or damage as a<br />
result of acci<strong>de</strong>nt, abuse or misuse.<br />
* Register online within 30 days.<br />
Terms & conditions apply.<br />
This does not affect your statutory rights<br />
GB<br />
6 Assembly / Warranty<br />
7