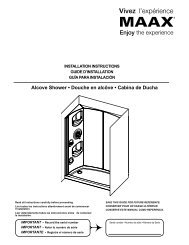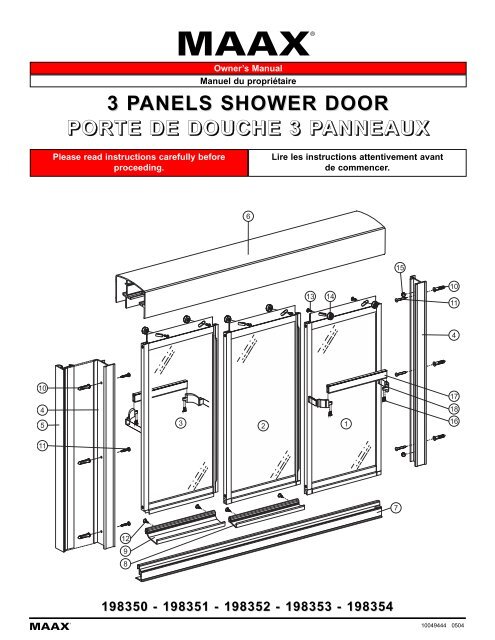
3 panels shower door porte de douche 3 panneaux - Maax
3 panels shower door porte de douche 3 panneaux - Maax
3 panels shower door porte de douche 3 panneaux - Maax

You also want an ePaper? Increase the reach of your titles
YUMPU automatically turns print PDFs into web optimized ePapers that Google loves.
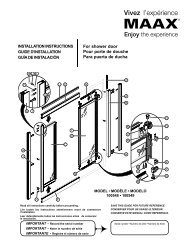
Owner’s Manual<br />
Manuel du propriétaire<br />
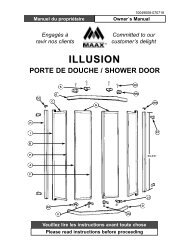
3 PANELS P<br />
SHOWER DOOR<br />
PORTE DE DOUCHE 3 PANNEAUX<br />
Please read instructions carefully before<br />
proceeding.<br />
Lire les instructions attentivement avant<br />
<strong>de</strong> commencer.<br />
6<br />
15<br />
13 14<br />
10<br />
11<br />
4<br />
10<br />
4<br />
5<br />
3 2<br />
1<br />
17<br />
18<br />
16<br />
11<br />
7<br />
12<br />
9<br />
8<br />
198350 - 198351 - 198352 - 198353 - 198354<br />
10049444 0504
Item n°<br />
N° <strong>de</strong><br />
repère<br />
Description<br />
Description<br />
Parts Description<br />
Description <strong>de</strong>s pièces<br />
198350 198351 198352 198353 198354<br />
1 Outsi<strong>de</strong> <strong>door</strong> assembly Porte extérieure 10012562-XXX-XXX 10012574-970-084 10012571-965-084 10012565-970-128 10012568-970-128 1<br />
2 Middle <strong>door</strong> assembly Porte centrale 10012563-XXX-XXX 10012575-970-084 10012572-965-084 10012566-970-128 10012569-970-128 1<br />
3 Insi<strong>de</strong> <strong>door</strong> assembly Porte intérieure 10012564-XXX-XXX 10012576-970-084 10012573-965-084 10012567-970-128 10012570-970-128 1<br />
4 Wall jamb Montant mural 10041061-XXX-601 10041061-084-601 10041061-084-604 10041061-128-604 10041061-128-601 2<br />
5 Wall jamb gasket Profilé du montant mural 10048793-092-001 10048793-092-001 10048793-092-002 10048793-092-002 10048793-092-001 1<br />
6 Hea<strong>de</strong>r Rail supérieur 10041186-XXX-001 10041186-084-001 10041186-084-001 10041186-128-001 10041186-128-001 1<br />
7 Bottom track Rail du bas 10041063-XXX-601 10041063-084-601 10041063-084-601 10041063-128-601 10041063-128-601 1<br />
8 Retainer #1 Étrier (Gui<strong>de</strong>) #1 10048769-092-608 10048769-092-608 10048769-092-608 10048769-092-608 10048769-092-608 1<br />
9 Retainer #2 Étrier (Gui<strong>de</strong>) #2 10048770-092-605 10048770-092-605 10048770-092-605 10048770-092-605 10048770-092-605 1<br />
*10 Wall anchor Cheville d'ancrage 10014404 10014404 10014404 10014404 10014404 6<br />
*11<br />
#8 x 1 1/2" (38 mm) screw Vis #8 x 1 1/2" (38 mm)<br />
PAN QUAD<br />
PAN QUAD<br />
10047011 10047011 10047011 10047011 10047011 6<br />
*12<br />
#6 x 3/8" (10 mm) screw Vis #6 x 3/8" (10 mm)<br />
"A" QUAD<br />
"A" QUAD<br />
10012535 10012535 10012535 10012535 10012535 4<br />
*13<br />
#8-32 x 3/8" (10 mm) screw Vis #8-32 x 3/8" (10 mm)<br />
TRU PHI MS SS 18-8 TRU PHI MS SS 18-8<br />
10014401 10014401 10014401 10014401 10014401 6<br />
*14 Roller Roulette 10048199 10048199 10048199 10048199 10048199 6<br />
*15 Bumper Coussinet 10014160-092 10014160-092 10014160-092 10014160-092 10014160-092 2<br />
*16<br />
#6 x 3/4" (19 mm) screw Vis #6 x 3/4" (19 mm)<br />
PAN QUAD<br />
PAN QUAD<br />
10047060 10047060 10047060 10047060 10047060 8<br />
17 Towel bar Barre à serviette 10041235-XXX-609 10041235-084-611 10041235-084-602 10041235-128-611 10041235-128-608 2<br />
*18 Towel bar bracket Support <strong>de</strong> barre à serviette 10048763-XXX 10048763-084 10048763-084 10048763-128-601 10048763-128-601 4<br />
Hardware bag Sac <strong>de</strong> quincaillerie 10049444-XXX-601 10049444-084-601 10049444-084-601 10049444-128-601 10049444-128-601 1<br />
Hardware bag (screw) Sac <strong>de</strong> quincaillerie (vis) 10012578 10012578 10012578 10012578 1002578 1<br />
*Items inclu<strong>de</strong>d with hardware bag / Articles inclus dans le sac <strong>de</strong> quincaillerie.<br />
Illustration of Components<br />
Illustration <strong>de</strong>s pièces<br />
Part no / No. <strong>de</strong> pièce<br />
Qty<br />
Qté<br />
4 10041061-XXX-XXX<br />
5 10048793-092-XXX<br />
6 10041186-XXX-001<br />
7 10041063-XXX-601<br />
8 10048769-092-608<br />
9 10048770-092-605<br />
10 *10014404<br />
11 *10047011<br />
12 *10012535<br />
13 *10014401<br />
14 *10048199<br />
15 *10014160-092<br />
DRAWINGS NOT TO SCALE<br />
DESSINS NON À L’ÉCHELLE<br />
16 *10047060 17 *10041235-XXX-XXX<br />
18 *10048763-XXX<br />
PRODUCT SPECIFICATIONS ARE SUBJECT TO CHANGE WITHOUT NOTICE.<br />
USE OWNER’S MANUAL INSTRUCTIONS SUPPLIED WITH PRODUCT.<br />
DES CHANGEMENTS PEUVENT ÊTRE APPORTÉS AU PRODUIT SANS<br />
PRÉAVIS. VEUILLEZ UTILISER LE MANUEL FOURNI AVEC LE PRODUIT.<br />
WHEN ORDERING REPLACEMENT PARTS, PLEASE REFER TO PART<br />
NUMBER, DESCRIPTION, DIMENSIONS AND COLOUR.<br />
LES COMMANDES POUR PIÈCES DE REMPLACEMENT DOIVENT<br />
INCLURE LEUR NUMÉRO, DESCRIPTION, DIMENSIONS ET COULEUR.<br />
2 10049444 0504
Before starting<br />
Avant <strong>de</strong> débuter<br />
Upon receipt, make sure your <strong>shower</strong> <strong>door</strong> is in good condition and<br />
that all parts are inclu<strong>de</strong>d in the hardware bag. If you have a<br />
problem, please contact your distributor immediately.<br />
Lors <strong>de</strong> la réception, vérifiez si votre <strong>porte</strong> <strong>de</strong> <strong>douche</strong> est en bonne<br />
condition et si toutes les pièces sont incluses dans le sac <strong>de</strong> quincaillerie.<br />
S’il y a un problème, signalez-le immédiatement à votre distributeur.<br />
Required equipment:<br />
! Metal saw<br />
! File<br />
! Square or Phillips screwdriver #1 and #2<br />
! Electric drill<br />
! Drill bit 7/32” (6mm) or 3/16” (5mm) (according to wall)<br />
! Level<br />
! Measuring tape<br />
! Pencil<br />
! Clear silicone caulking<br />
! Masking tape<br />
Équipement requis:<br />
! Scie à métaux<br />
! Lime<br />
! Tournevis carré ou étoile #1 et #2<br />
! Perceuse électrique<br />
! Mèche 7/32” (6mm) ou 3/16” (5mm) (selon le mur)<br />
! Niveau<br />
! Gallon à mesurer<br />
! Crayon<br />
! Calfeutrant au silicone clair<br />
! Ruban à masquer<br />
WARNING:<br />
• It is essential that this product be installed by an experienced person.<br />
• The wearing of security glasses is highly recommen<strong>de</strong>d to avoid<br />
injury.<br />
• The For optimum operation, it is important that the bath <strong>door</strong> be<br />
installed levelled on walls that are also leveled.<br />
• Manipulate metal parts with care.<br />
IMPORTANT<br />
ATTENTION:<br />
• Il est impératif que ce produit soit installé par une personne expérimentée.<br />
• Veuillez <strong>porte</strong>r <strong>de</strong>s lunettes <strong>de</strong> sécurité lors <strong>de</strong> l’installation <strong>de</strong> la <strong>porte</strong>.<br />
• Pour un fonctionnement optimal, il est important que la <strong>porte</strong> <strong>de</strong> bain<br />
soit installée <strong>de</strong> niveau sur <strong>de</strong>s murs également <strong>de</strong> niveau.<br />
• Manipulez les pièces <strong>de</strong> métal avec soin.<br />
IMPORTANT<br />
! Fiberglass or plastic structure may not be of sufficient strength<br />
to support your <strong>shower</strong> <strong>door</strong>. To provi<strong>de</strong> for a more secure<br />
mounting of this <strong>door</strong>, it is important that you use wood framing<br />
behind the face edge of your stall.<br />
! Les structures <strong>de</strong> fibre <strong>de</strong> verre ou <strong>de</strong> plastique peuvent ne pas avoir<br />
la résistance nécessaire pour sup<strong>porte</strong>r votre <strong>porte</strong> <strong>de</strong> <strong>douche</strong>. Pour<br />
une installation sécuritaire <strong>de</strong> votre <strong>porte</strong>, il est important d’ultiliser un<br />
cadrage <strong>de</strong> bois <strong>de</strong>rrière le rebord <strong>de</strong> l’enclos.<br />
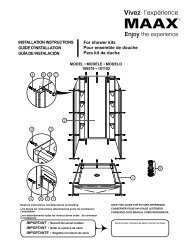
Installation Instructions<br />
Gui<strong>de</strong> d’installation<br />
STEP 1 -<br />
i. Measure the opening (X) along the tub rim.<br />
ii. Use a fine hacksaw to cut the bottom track (7) 11/16” (17 mm) short of this dimension<br />
(X).<br />
ATTENTION : Cut the opposite si<strong>de</strong> of the drainage notch.<br />
Shower head<br />
Pomme <strong>de</strong> <strong>douche</strong><br />
Cut this end<br />
Coupez cette<br />
extrémité 7<br />
X - 11/16" (17 mm)<br />
ÉTAPE 1 -<br />
i. Mesurez l’ouverture (X) sur le rebord du bain.<br />
ii. Utilisez une scie à métaux pour couper le rail du bas (7) 11/16” (17 mm) plus court<br />
que l’ouverture (X).<br />
ATTENTION : Vous <strong>de</strong>vez couper l’extrémité du rail (5) opposée à l’ouverture<br />
d’évacuation d’eau.<br />
Opening (X)<br />
Ouverture (X)<br />
Do not cut the drainage notch end<br />
Ne pas couper l’extrémité du côté<br />
<strong>de</strong> l’ouverture d’évacuation d’eau<br />
3 10049444 0504
STEP 2 -<br />
i. Temporarily place the bottom track (7) on the tub or the <strong>shower</strong> base rim near as<br />
possible of the <strong>shower</strong> base exterior edge.<br />
ii. Mount and veritcaly level both wall jambs (4).<br />
iii. With a pencil, mark the position of the bottom track (7) for future reference.<br />
4<br />
7<br />
ÉTAPE 2 -<br />
i. Placez temporairement le rail du bas (7) sur le rebord du bain ou <strong>de</strong> la base <strong>de</strong><br />
<strong>douche</strong>, le plus près possible du rebord extérieur.<br />
ii. Placez et alignez les montants muraux (4) à l’ai<strong>de</strong> d’un niveau.<br />
iii. Marquez au crayon l’emplacement du rail (7) pour référence ultérieure.<br />
INTERIOR<br />
INTÉRIEUR<br />
STEP 3 -<br />
i. Mark and drill the holes in wall jamb (4).<br />
Drill bit: -ceramic tile wall: 7/32” (5.5mm) carbi<strong>de</strong> bit.<br />
-Dry wall: 3/16” (4.8mm)<br />
ii. Repeat for other wall jamb (4).<br />
iii. Remove all parts.<br />
ÉTAPE 3 -<br />
i. Nivelez le montant mural (4). Marquez et percez les trous.<br />
Mèche: -Pour céramique: 7/32” (5.5mm) carbi<strong>de</strong> bit.<br />
-”Gypse”: 3/16” (4.8mm).<br />
ii Répétez cette opération pour l’autre montant mural (4).<br />
iii. Enlevez toutes les pièces.<br />
4<br />
7<br />
STEP 4 -<br />
i. Apply caulking un<strong>de</strong>r the bottom track (7) along its full length.<br />
ii. Place track in its correct position, using the reference mark ma<strong>de</strong> in Step 2.<br />
iii. Apply masking tape to allow silicone to dry.<br />
iv. Wipe away excess silicone.<br />
7<br />
7<br />
Silicone<br />
ÉTAPE 4 -<br />
i. Appliquez du silicone à pleine longueur sous le rail du bas (7).<br />
ii.<br />
iii.<br />
iv.<br />
Replacez le rail du bas (7) sur le bain en vous référant aux marques tracées à<br />
l’étape 2.<br />
Appliquez du ruban à masquer pour permettre au silicone <strong>de</strong> sécher.<br />
Essuyez l’excédant <strong>de</strong> silicone.<br />
STEP 5 -<br />
i. Insert the wall jamb gasket (5) on the inner si<strong>de</strong> of the wall jamb (4) located on the<br />
si<strong>de</strong> closest to the <strong>shower</strong> head.<br />
ii. Insert wall anchors (10) and place wall jamb (4) on bottom track (7)<br />
iii. Fasten each wall jamb (4) with screws #8 x 1 1/2” (11).<br />
Shower<br />
head<br />
Pomme<br />
<strong>de</strong> <strong>douche</strong><br />
5<br />
4<br />
ÉTAPE 5 -<br />
i. Insérez le profilé du montant mural (5) sur le côté intérieur du montant mural (4) du<br />
côté <strong>de</strong> la pomme <strong>de</strong> <strong>douche</strong>.<br />
ii. Insérez les chevilles <strong>de</strong> plastique (10) et placez les montants muraux (4) sur le rail<br />
du bas (7).<br />
iii. Vissez chaque montant mural (4) avec les vis #8 x 1 1/2” (11).<br />
7<br />
10<br />
11<br />
4<br />
4 10049444 0504
STEP 6 -<br />
i. Measure the opening (Y) along the top of the wall jambs (4).<br />
ii. Cut the hea<strong>de</strong>r (6) 1/16” (2mm) shorter than the opening (Y) over the wall jambs (4).<br />
iii. Install the hea<strong>de</strong>r (6) over the wall jambs (4).<br />
ÉTAPE 6 -<br />
i. Mesurez l’ouverture (Y) en haut <strong>de</strong>s montants muraux (4).<br />
ii. Coupez le rail supérieur (6) 1/16” (2mm) plus court que l’ouverture (Y) en haut <strong>de</strong>s<br />
montants muraux (4).<br />
iii. Insérez le rail supérieur (6) au <strong>de</strong>ssus <strong>de</strong>s montants muraux (4).<br />
6<br />
4<br />
5<br />
Y - 1/16" (2 mm)<br />
Opening (Y)<br />
Ouverture (Y)<br />
STEP 7 -<br />
i. Fasten the rollers (14) to the <strong>door</strong>s (1, 2 and 3) with screw #8-32 x 3/8” (13). Fig. A.<br />
ii. It is suggested to place the rollers in the center of the holes.<br />
iii. To adjust panel, move rollers in the upper or lower grooves.<br />
Note: Notches in the <strong>door</strong>s bottom frame must face the tub. Fig. B.<br />
14 13<br />
Adjustment<br />
Ajustement<br />
ÉTAPE 7 -<br />
i. Vissez les roulettes (14) au haut <strong>de</strong>s <strong>porte</strong>s (1, 2 et 3) à l’ai<strong>de</strong> <strong>de</strong>s vis #8-32 x 3/8”<br />
(13). Fig. A.<br />
ii. Il est conseillé <strong>de</strong> positionner les roulettes au centre <strong>de</strong>s trous.<br />
iii. Pour ajuster l’équerrage <strong>de</strong>s <strong>panneaux</strong> il suffit <strong>de</strong> déplacer les roulettes vers le haut<br />
ou le bas.<br />
Note: les fentes au bas <strong>de</strong>s <strong>porte</strong>s doivent être dirigées vers l’intérieur <strong>de</strong> la<br />
baignoire. Fig. B.<br />
Fig. A<br />
Notches<br />
Fentes<br />
Fig. B<br />
INTERIOR<br />
INTÉRIEUR<br />
STEP 8 -<br />
NOTE: If necessary, cut the hook retainer (8 and 9) 5/16” (8mm) shorter than the bottom<br />
frame of <strong>door</strong>s.<br />
i. Place the middle panel (2) on a flat surface, notches up.<br />
ii. By applying pressure, install retainer (8) below the bottom frame of the middle <strong>door</strong> (2).<br />
iii. Fasten with #6 x 3/8” screws (12).<br />
iv. Repeat theses steps for the interior panel (3), using retainer #2 (9).<br />
ÉTAPE 8 -<br />
12<br />
3<br />
9<br />
Position #1<br />
Position #2<br />
NOTE: Au besoin, coupez les étriers (8 et 9) 5/16” (8mm) plus court que le cadre<br />
du bas <strong>de</strong>s <strong>porte</strong>s.<br />
i. Déposez le panneau central (2) à plat, les encoches vers le haut.<br />
ii. Installez l’étrier (8) par pression dans le cadre du bas du panneau central (2).<br />
iii. Fixez à l’ai<strong>de</strong> <strong>de</strong>s vis #6 x 3/8” (12).<br />
iv. Répétez ces opérations pour le panneau intérieur (3) en utilisant l’étrier #2 (9).<br />
12<br />
2<br />
8<br />
5 10049444 0504
STEP 9 -<br />
Note: The interior panel (3) must be on <strong>shower</strong> head’s si<strong>de</strong>. Fig. A.<br />
Shower head<br />
Pomme <strong>de</strong> <strong>douche</strong><br />
i. Begin with the exterior panel (1).<br />
ii. From insi<strong>de</strong> the tub, hang the exterior panel (1) so that its rollers rest in the hea<strong>de</strong>r<br />
(6) groove. Raise the panel slightly to position it onto the bottom track (7). Fig. B.<br />
iii. Place the middle panel (2) in the hea<strong>de</strong>r (6) without hooking it up.<br />
3 2 1<br />
Interior panel<br />
iv. Place the retainer #1 (8) into upper channel of bottom track (7), and then, push up Panneau intérieur<br />
the panel so that the rollers rest in the hea<strong>de</strong>r grooves (6) (as shown).<br />
Fig. A<br />
v. Be sure that the panel is secure.<br />
EXTERIOR<br />
vi. Repeat the operation with the interior panel (3), placing retainer #2 (9) in the lower XTÉRIEUR<br />
channel of the bottom track (7).<br />
vii. If required, adjust rolling of <strong>panels</strong> by repositioning the rollers as mentioned earlier<br />
in step 7.<br />
6<br />
ÉTAPE 9 -<br />
Exterior panel<br />
Panneau extérieur<br />
INTERIOR<br />
INTÉRIEUR<br />
Note: Le panneau intérieur (3) doit être du côté <strong>de</strong> la pomme <strong>de</strong> <strong>douche</strong>. Fig. A.<br />
i. Commencez par installer le panneau extérieur (1).<br />
3<br />
ii. De l’intérieur du bain, accrochez le panneau extérieur (1) sur le rail du haut (6), puis<br />
déposez-le <strong>de</strong> façon à ce qu’il soit à cheval sur le rail du bas (7). Fig. B.<br />
iii. Introduire le panneau central (2) dans le rail du haut (6) sans l’accrocher.<br />
iv. Placez l’étrier #1 (8) dans la voie supérieure du rail du bas (7), puis, soulevez le<br />
panneau pour accrocher les roulettes sur le rail du haut (6) (tel qu’illustré).<br />
v. Assurez-vous que le panneau est bien accroché.<br />
vi. Répétez l’opération avec le panneau intérieur (3) en placant l’étrier #2 (9) dans la<br />
voie inférieure du rail du bas (7).<br />
vii. Ajustez l’équerrage et le roulement <strong>de</strong>s <strong>panneaux</strong> si requis, à l’ai<strong>de</strong> <strong>de</strong>s roulettes,<br />
tel que mentionné à l’étape 7.<br />
1<br />
7<br />
Fig. B<br />
8 9<br />
2<br />
STEP 10<br />
NOTE: The towel bars should be installed on interior (3) and exterior (1) <strong>panels</strong>.<br />
i. Insert the tab of one of the towel bar supports (18) into the notch of the <strong>door</strong> si<strong>de</strong><br />
frame and rotate the towel bar support until it clicks into place. Fig. A.<br />
ii Repeat with the other towel bar supports (18).<br />
iii. Sli<strong>de</strong> the towel bar (17) in the supports (18) and secure with the #6 x 3/4” screws<br />
(16). Fig. B.<br />
iv. Repeat with the other towel bar.<br />
Fig. A<br />
18<br />
ÉTAPE 10<br />
NOTE: Vous <strong>de</strong>vez installer les barres à serviettes sur les <strong>panneaux</strong> intérieur (3)<br />
et extérieur (1).<br />
i. Installez un support <strong>de</strong> barre à serviettes (18) en insérant l'extrémité dans la fente<br />
se trouvant sur le cadre <strong>de</strong> côté <strong>de</strong> la <strong>porte</strong> et en effectuant ensuite un mouvement<br />
<strong>de</strong> rotation jusqu'à ce qu'un "click" se fasse entendre. Fig. A.<br />
ii Répétez les opérations avec l’autre support <strong>de</strong> barre à serviettes (18).<br />
iii. Faites glisser ensuite la barre à serviette (17) sur les supports (18) et fixez en place<br />
avec les vis #6 x 3/4” (16) fournies à cet effet. Fig. B.<br />
iv. Répétez les opérations pour l’autre barre à serviettes.<br />
17<br />
18<br />
16<br />
Fig. B<br />
6 10049444 0504
STEP 11 -<br />
i. Peel the sticker on the back si<strong>de</strong> of the bumpers (15).<br />
ii. Fix two bumpers (15) to the top and bottom of wall jamb (3) on the opposite si<strong>de</strong> of<br />
the <strong>shower</strong> head, so as to face the <strong>door</strong> panel (1) as shown.<br />
ÉTAPE 11 -<br />
i. Retirer la pellicule du ruban adhésif <strong>de</strong>rrière les coussinets (15).<br />
ii. Collez <strong>de</strong>ux coussinets (15) dans le haut et le bas du montant mural (3) opposé à la<br />
pomme <strong>de</strong> <strong>douche</strong>, vis-à-vis la <strong>porte</strong> (1) tel qu’illustré.<br />
4<br />
15<br />
Exterior panel (1)<br />
Panneau extérieur (1)<br />
15<br />
4<br />
15<br />
STEP 12 -<br />
i. Apply silicone to exterior of unit only. Do not apply caulking on the insi<strong>de</strong> of the<br />
<strong>shower</strong>, between the base and the <strong>shower</strong> <strong>door</strong>, that would cause the unit to leak.<br />
Do not obstruct the drainage notch on bottom track.<br />
ii. Allow 24 hours for silicone to cure before using.<br />
ÉTAPE 12 -<br />
i. Appliquez le silicone à l’extérieur seulement. N’appliquez pas <strong>de</strong> calfeutrant à<br />
l’intérieur <strong>de</strong> la <strong>douche</strong>, entre la base et la <strong>porte</strong> <strong>de</strong> <strong>douche</strong>, cela causerait <strong>de</strong>s<br />
fuites.<br />
Attention <strong>de</strong> ne pas boucher l’ouverture d’évacuation d’eau du rail du bas.<br />
ii. Laissez sécher le silicone pendant 24 heures.<br />
Drainage notch<br />
Ouverture<br />
d'évacuation<br />
d'eau<br />
4<br />
7<br />
TO CLEAN<br />
! Mild liquid household cleaners will keep the painted surface<br />
bright and clean (for example: LIQUID IVORY ®). Rinse well<br />
and dry with a clean cloth.<br />
CAUTION: pow<strong>de</strong>r <strong>de</strong>tergents and liquid abrasive cleaners<br />
may damage surfaces.<br />
! Do not allow the surface to come into contact with pro-ducts<br />
such as acetone (nail polish remover), dry clea-ning solution,<br />
lacquer thinner, gasoline, etc.<br />
! Remove dust with a soft, damp cloth.<br />
! Clean grease, oil, paint and ink with rubbing alcohol.<br />
! Acci<strong>de</strong>ntal scratches or water stains will rarely show, and if<br />
they do they can be easily removed with a liquid automobile<br />
polish.<br />
NETTOYAGE<br />
! Les nettoyeurs ménagers liqui<strong>de</strong>s doux sont suffisants pour gar<strong>de</strong>r<br />
la surface propre et brillante (par exemple: IVORY LIQUIDE ®).<br />
Rincez à fond et asséchez avec un chiffon propre.<br />
ATTENTION: les détergents en poudre ou liqui<strong>de</strong> abrasifs<br />
peuvent endommager les surfaces.<br />
! Ne jamais mettre une surface en contact avec <strong>de</strong>s produits<br />
contenant <strong>de</strong> l'acétone (nettoyant <strong>de</strong> polis à ongle), <strong>de</strong>s<br />
solvants, <strong>de</strong>s décapants, <strong>de</strong> l'essence, etc.<br />
! Enlevez la poussière grâce à un linge doux et humi<strong>de</strong>.<br />
! Utilisez <strong>de</strong> l'alcool à friction pour enlever les taches <strong>de</strong><br />
peinture, encre ou graisse.<br />
! Les égratignures et marques sont rarement visibles sur la<br />
surface et si elles <strong>de</strong>vaient paraître, il serait facile <strong>de</strong> les<br />
enlever grâce à un polisseur liqui<strong>de</strong> pour automobile.<br />
7 10049444 0504
Save this manual for future reference<br />
Conservez ce manuel pour usage ultérieur<br />
Conserve este manual como referencia<br />
MAAX Lachine<br />
160, boul.St-Joseph<br />
Lachine (Québec) Canada H8S 2L3<br />
After Sales Service / Service Après-Vente / Servicio Posventa<br />
Tel.: 1 888 304-4388<br />
www.maax.com<br />
Purchase date / Date d’achat / Date d’achat :<br />
KEEP THESE INFORMATIONS :<br />
CONSERVEZ CES INFORMATIONS :<br />
CONSERVE ESTAS INFORMATIONNES :<br />
Serial number / Numéro <strong>de</strong> série / Número <strong>de</strong> serie:<br />
© 2004 MAAX Inc. PRINTED IN CANADA / IMPRIMÉ AU CANADA / IMPRESO EN CANADA 0504 10049444