AR9110 PowerSafe User Guide AR9110 PowerSafe ...
AR9110 PowerSafe User Guide AR9110 PowerSafe ...
AR9110 PowerSafe User Guide AR9110 PowerSafe ...

Create successful ePaper yourself
Turn your PDF publications into a flip-book with our unique Google optimized e-Paper software.
EN<br />
Standard Range Testing<br />
Before each flying session, and especially with a new model, it’s important to<br />
perform a range check. All Spektrum aircraft transmitters incorporate a range<br />
testing system, which reduces the output power allowing a range check.<br />
Range Testing<br />
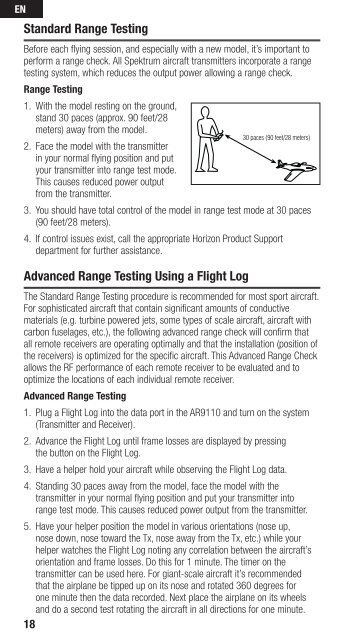
1. With the model resting on the ground,<br />
stand 30 paces (approx. 90 feet/28<br />
meters) away from the model.<br />
30 paces (90 feet/28 meters)<br />
2. Face the model with the transmitter<br />
in your normal flying position and put<br />
your transmitter into range test mode.<br />
This causes reduced power output<br />
from the transmitter.<br />
3. You should have total control of the model in range test mode at 30 paces<br />
(90 feet/28 meters).<br />
4. If control issues exist, call the appropriate Horizon Product Support<br />
department for further assistance.<br />
Advanced Range Testing Using a Flight Log<br />
The Standard Range Testing procedure is recommended for most sport aircraft.<br />
For sophisticated aircraft that contain significant amounts of conductive<br />
materials (e.g. turbine powered jets, some types of scale aircraft, aircraft with<br />
carbon fuselages, etc.), the following advanced range check will confirm that<br />
all remote receivers are operating optimally and that the installation (position of<br />
the receivers) is optimized for the specific aircraft. This Advanced Range Check<br />
allows the RF performance of each remote receiver to be evaluated and to<br />
optimize the locations of each individual remote receiver.<br />
Advanced Range Testing<br />
1. Plug a Flight Log into the data port in the <strong>AR9110</strong> and turn on the system<br />
(Transmitter and Receiver).<br />
2. Advance the Flight Log until frame losses are displayed by pressing<br />
the button on the Flight Log.<br />
3. Have a helper hold your aircraft while observing the Flight Log data.<br />
4. Standing 30 paces away from the model, face the model with the<br />
transmitter in your normal flying position and put your transmitter into<br />
range test mode. This causes reduced power output from the transmitter.<br />
5. Have your helper position the model in various orientations (nose up,<br />
nose down, nose toward the Tx, nose away from the Tx, etc.) while your<br />
helper watches the Flight Log noting any correlation between the aircraft’s<br />
orientation and frame losses. Do this for 1 minute. The timer on the<br />
transmitter can be used here. For giant-scale aircraft it’s recommended<br />
that the airplane be tipped up on its nose and rotated 360 degrees for<br />
one minute then the data recorded. Next place the airplane on its wheels<br />
and do a second test rotating the aircraft in all directions for one minute.<br />
18