INSTALLATION INSTRUCTIONS 30" (76.2 CM) GAS ... - Jenn-Air
INSTALLATION INSTRUCTIONS 30" (76.2 CM) GAS ... - Jenn-Air
INSTALLATION INSTRUCTIONS 30" (76.2 CM) GAS ... - Jenn-Air

You also want an ePaper? Increase the reach of your titles
YUMPU automatically turns print PDFs into web optimized ePapers that Google loves.
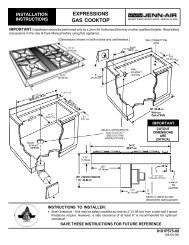
WARNING<br />
Tip Over Hazard<br />
A child or adult can tip the range and be killed.<br />
Install anti-tip bracket to floor or wall per installation instructions.<br />
Slide range back so rear range foot is engaged in the slot of the anti-tip bracket.<br />
Re-engage anti-tip bracket if range is moved.<br />
Do not operate range without anti-tip bracket installed and engaged.<br />
Failure to follow these instructions can result in death or serious burns to children and adults.<br />
Range Foot<br />
Anti-Tip<br />
Bracket<br />
To verify the anti-tip bracket is installed and engaged:<br />
• Slide range forward.<br />
• Look for the anti-tip bracket securely attached to floor or wall.<br />
• Slide range back so rear range foot is under anti-tip bracket.<br />
• See installation instructions for details.<br />
<strong>INSTALLATION</strong> REQUIREMENTS<br />
Gather the required tools and parts before starting installation.<br />
Read and follow the instructions provided with any tools listed<br />
here.<br />
Tools needed<br />
■<br />
■<br />
■<br />
■<br />
■<br />
■<br />
■<br />
■<br />
■<br />
■<br />
■<br />
■<br />
■<br />
Parts supplied<br />
Check that all parts are included.<br />
■ LP/Natural Gas Conversion Kit (taped behind access panel)<br />
■<br />
■<br />
■<br />
■<br />
Tape measure<br />
Phillips screwdriver<br />
Flat-blade screwdriver<br />
¹⁄₈" flat-blade screwdriver<br />
Saber or keyhole saw<br />
Level<br />
Drill<br />
Wrench or pliers<br />
Pipe wrench<br />
⁵⁄₁₆" nut driver<br />
¼" nut driver<br />
¹⁵⁄₁₆" combination wrench<br />
¹⁄₈" (3.2 mm) drill bit (for<br />
wood floors)<br />
4 or 5 - Burner caps (depending on model)<br />
2 - Burner grates<br />
2 or 3 - Oven racks (depending on model)<br />
Blower motor<br />
■ Marker or pencil<br />
■ Pipe-joint compound<br />
resistant to LP gas<br />
■ ³⁄₁₆" (4.8 mm) carbide-tipped<br />
masonry drill bit (for<br />
concrete/ceramic floors)<br />
■ Noncorrosive leak-detection<br />
solution<br />
For LP/Natural Gas<br />
Conversions<br />
■ ½" combination wrench<br />
■ ¼" (6 mm) nut driver<br />
■ ⁹⁄₃₂" (7 mm) nut driver<br />
■<br />
Masking tape<br />
Tools and Parts<br />
■<br />
■<br />
■<br />
■<br />
■<br />
■<br />
■<br />
2 - vent clamps<br />
Flexible vent<br />
Flow tester card<br />
Blower location template<br />
4 - #8 x ¾" screws (for mounting blower motor bracket)<br />
2 - #12 x 1⁵⁄₈" screws (for mounting anti-tip bracket)<br />
Anti-tip bracket (taped to package containing literature in<br />
oven cavity)<br />
Anti-tip bracket must be securely mounted to the back wall or<br />
floor. Thickness of flooring may require longer screws to<br />
anchor bracket to subfloor. Longer screws are available from<br />
your local hardware store.<br />
Parts needed<br />
■ One of the following <strong>Jenn</strong>-<strong>Air</strong> wall caps:<br />
<strong>Jenn</strong>-<strong>Air</strong> ® 5" (12.7 cm) Round Surface Wall Cap Damper<br />
Order Part Number A405<br />
<strong>Jenn</strong>-<strong>Air</strong> ® 6" (15.2 cm) Round Surface Wall Cap Damper<br />
Order Part Number A406<br />
<strong>Jenn</strong>-<strong>Air</strong> ® 3¼" x 10" (8.3 x 25.4 cm) Surface Wall Cap Damper<br />
Order Part Number A403<br />
To order, see the “Assistance or Service” section of the Use<br />
and Care Guide.<br />
■ Metal ducting<br />
■ Vent clamps<br />
■ Concrete anchors (for concrete floor mounting)<br />
Check local codes and consult gas supplier. Check existing gas<br />
supply and electrical supply. See “Electrical Requirements” and<br />
“Gas Supply Requirements” sections.<br />
3