
You also want an ePaper? Increase the reach of your titles
YUMPU automatically turns print PDFs into web optimized ePapers that Google loves.
Servicing the Fluid Section<br />
Use the following procedures to service the valves and repack<br />
the fluid section. Perform the following steps before performing<br />
any maintenance on the fluid section.<br />
1. Loosen and remove the four front cover screws. Remove<br />
the front cover.<br />
2. Stop the sprayer at the bottom of its stroke so that the<br />
piston is in its lowest position.<br />
3. Perform the Pressure Relief Procedure and unplug the<br />
sprayer.<br />
Before proceeding, follow the Pressure Relief<br />
Procedure outlined previously in this manual.<br />
Additionally, follow all other warnings to reduce the<br />
risk of an injection injury, injury from moving parts<br />
or electric shock. Always unplug the sprayer<br />
before servicing!<br />
4. Unscrew the return hose assembly from the pump block.<br />
Remove the retaining clip from the bottom of the foot valve<br />
housing. Remove the siphon assembly.<br />
5. Tilt the sprayer back for easy access to the fluid section.<br />
Servicing the Valves<br />
Pump<br />
The design of the fluid section allows<br />
block<br />
access to the foot valve and seat<br />
Bushing<br />
as well as the outlet valve and seat<br />
Foot valve<br />
without completely disassembling<br />
seal<br />
the fluid section. It is possible that<br />
Inlet cage<br />
the valves may not seat properly<br />
because of debris stuck in the foot<br />
Foot valve<br />
valve seat or outlet valve seat. Use<br />
ball<br />
the following instructions to clean the<br />
Foot valve<br />
valves and reverse or replace the<br />
seat<br />
seats.<br />
Teflon<br />
O-ring<br />
1. Remove the pusher stem clip<br />
and slide the pusher stem<br />
Foot valve<br />
housing from the foot valve<br />
housing.<br />
O-ring<br />
2. Using a wrench, loosen and<br />
remove the foot valve housing<br />
Pusher<br />
from the pump block.<br />
stem<br />
housing<br />
3. Clean out any debris in<br />
the foot valve housing and<br />
examine the valve housing and seat. If the seat is<br />
damaged, reverse or replace the seat.<br />
4. Using a 5/16” hex wrench, loosen and remove the outlet<br />
valve retainer from the piston rod.<br />
Piston rod<br />
NOTE: always service the outlet<br />
valve with the piston rod<br />
attached to the pump.<br />
This will prevent the<br />
piston rod from rotating<br />
during disassembly of<br />
the outlet valve.<br />
5. Clean out any debris and examine<br />
the outlet valve housing and seat.<br />
If the seat is damaged, reverse or<br />
replace the seat.<br />
6. Remove, clean, and inspect the outlet cage, crush<br />
Outlet cage<br />
Crush<br />
washer<br />
Outlet valve<br />
ball<br />
Outlet valve<br />
seat<br />
Outlet valve<br />
retainer<br />
washer, and outlet valve ball. Replace if they are worn or<br />
damaged.<br />
NOTE: The outlet cage always must be used with the<br />
crush washer. They are included together in the<br />
repacking kit as assembly P/N 704-642.<br />
7. Reassemble the valves by reversing the steps above.<br />
© Titan Tool Inc. All rights reserved. 11<br />
NOTE: During reassembly of the outlet valve, apply one<br />
drop of Loctite (included in the repacking kit) to<br />
the threads of the outlet valve retainer before<br />
threading it into the piston rod. Then, torque the<br />
retainer to 144 in./lbs. (12 ft./lbs.).<br />
Repacking the Fluid Section<br />
1. Remove the foot valve assembly using the steps in the<br />
“Servicing the Valves” procedure above.<br />
NOTE: The outlet valve does not need to be<br />
disassembled from the piston rod for this<br />
procedure.<br />
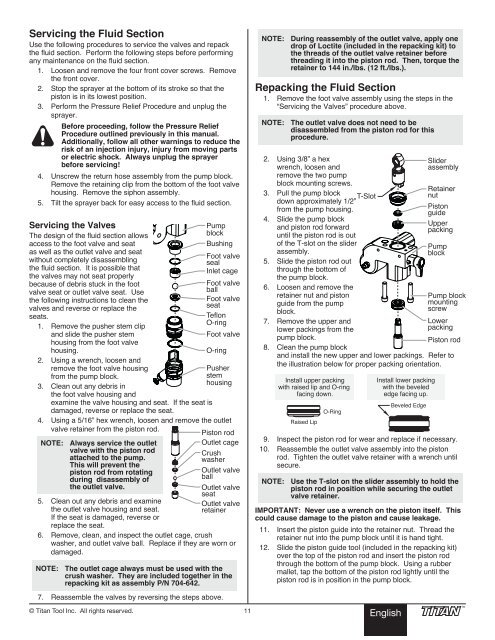
2. Using 3/8” a hex<br />
wrench, loosen and<br />
remove the two pump<br />
block mounting screws.<br />
3. Pull the pump block<br />
down approximately 1/2”<br />
from the pump housing.<br />
4. Slide the pump block<br />
and piston rod forward<br />
until the piston rod is out<br />
of the T-slot on the slider<br />
assembly.<br />
5. Slide the piston rod out<br />
through the bottom of<br />
the pump block.<br />
6. Loosen and remove the<br />
retainer nut and piston<br />
guide from the pump<br />
block.<br />
7. Remove the upper and<br />
lower packings from the<br />
pump block.<br />
8. Clean the pump block<br />
T-Slot<br />
English<br />
Slider<br />
assembly<br />
Retainer<br />
nut<br />
Piston<br />
guide<br />
Upper<br />
packing<br />
Pump<br />
block<br />
Pump block<br />
mounting<br />
screw<br />
Lower<br />
packing<br />
Piston rod<br />
and install the new upper and lower packings. Refer to<br />
the illustration below for proper packing orientation.<br />
Install upper packing<br />
with raised lip and O-ring<br />
facing down.<br />
Raised Lip<br />
O-Ring<br />
Install lower packing<br />
with the beveled<br />
edge facing up.<br />
Beveled Edge<br />
9. Inspect the piston rod for wear and replace if necessary.<br />
10. Reassemble the outlet valve assembly into the piston<br />
rod. Tighten the outlet valve retainer with a wrench until<br />
secure.<br />
NOTE: use the T-slot on the slider assembly to hold the<br />
piston rod in position while securing the outlet<br />
valve retainer.<br />
important: Never use a wrench on the piston itself. This<br />
could cause damage to the piston and cause leakage.<br />
11. Insert the piston guide into the retainer nut. Thread the<br />
retainer nut into the pump block until it is hand tight.<br />
12. Slide the piston guide tool (included in the repacking kit)<br />
over the top of the piston rod and insert the piston rod<br />
through the bottom of the pump block. Using a rubber<br />
mallet, tap the bottom of the piston rod lightly until the<br />
piston rod is in position in the pump block.