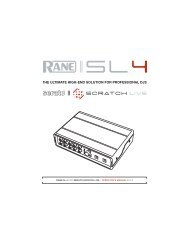
CA1 ⢠CA1T - Full Compass
CA1 ⢠CA1T - Full Compass
CA1 ⢠CA1T - Full Compass

You also want an ePaper? Increase the reach of your titles
YUMPU automatically turns print PDFs into web optimized ePapers that Google loves.
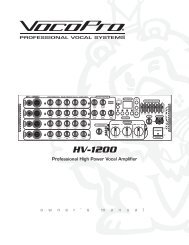
Individual zones can be selected by turning these switches on or off. All speakers<br />
connected to a specific zone may be turned on or off in this manner. The ALL switch<br />
overrides the individual switches and switches all zones on, regardless of whether<br />
or not the individual zone switch is on or off.<br />
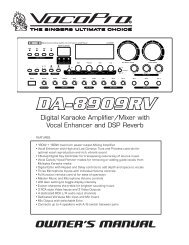
10. MASTER Volume Control<br />
The setting of this control determines the output level that is present at the loudspeaker<br />
OUTPUT. We recommend to generally adjust the MASTER and the input<br />
level controls at moderate settings. Extreme settings, when the MASTER is set to<br />
maximum output, and the input controls are nearly set to their minimum or vice versa<br />
are not recommended.<br />
11. Common TREBLE Control<br />
When turned clockwise this control enhances the high frequency reproduction, while<br />
turning it counter-clockwise attenuates the treble frequencies. If the control is set to its<br />
center position, the overall frequency response is not being altered.<br />
12. Common BASS Control<br />
When turned clockwise this control enhances the low frequency reproduction, while<br />
turning it counter-clockwise attenuates the bass frequencies. If the control is set to its<br />
center position, the overall frequency response is not being altered.<br />
13. Optional DTS AM/FM Tuner (Only CAIT)<br />
i. Radio ON/OFF and volume control (VOL) The radio can be operated if this knob<br />
is rotated clockwise and an indication appears on the display (ii). Rotate the volume<br />
control clockwise to increase the radio’s output signal level.<br />
ii. Display This display indicates the tuned frequency and memory number.<br />
When the display is off, the radio does not work.<br />
iii. AM/FM Radio Selection Button (AM/FM) Use this button to select the desired<br />
band. The band alternates between AM and FM with each depression of this button.<br />
iv. Tuning Button (UP/DOWN) Use this button to select the desired station. If the<br />
down button is pressed for longer than 1.5 seconds. The AM frequency automatically<br />
decreases at 10kHz intervals, while the FM frequency automatically decreases at<br />
0.1MHz intervals, till the radio is tuned in. To stop the selection manually, press the<br />
down key again during automatic tuning. Similarly, press the UP button will increase<br />
the AM frequency at 10kHz intervals and FM frequency at 0.1MHz intervals. The<br />
selection stops when radio is tuned in or the UP key is pressed again.<br />
v. MEMORY Button If the button is pressed, then press selection button (M1-M5),<br />
the frequency shown on the display is stored together with the memory number.<br />
Stored data is kept for about one week even when the power is not supplied.<br />
vi. Selection Button (MI-M5) Up to five of each of AM and FM stations can be<br />
stored. Press this button for shows the stored station frequency and memory number<br />
on the display (ii).<br />
Rear Panel<br />
iii<br />
ii<br />
PLL AM/FM RADIO<br />
iv<br />
AM/FM<br />
UP<br />
VOLUME<br />
DOWN<br />
MEMORY<br />
M5 M4 M3 M2 M1 POWER<br />
v<br />
vi<br />
i<br />
5