DA-8909RV Manual Text.indd - Sundial Micro, Inc.
DA-8909RV Manual Text.indd - Sundial Micro, Inc.
DA-8909RV Manual Text.indd - Sundial Micro, Inc.

You also want an ePaper? Increase the reach of your titles
YUMPU automatically turns print PDFs into web optimized ePapers that Google loves.
FCC INFORMATION (U.S.A.)1. IMPORTANT NOTICE: DO NOT MODIFY THISUNIT!: This product, when installed as indicated in theinstructions contained in this manual, meets FCCrequirements. Modifications not expressly approved byVocopro may void your authority, granted by the FCC, touse this product.2. IMPORTANT: When connecting this product toaccessories and/or another product use only highquality shielded cables. Cable(s) supplied with thisproduct MUST be used. Follow all installationinstructions. Failure to follow instructions could void yourFCC authorization to use this product in the U.S.A.3. NOTE: This product has been tested and found tocomply with the requirements listed in FCC Regulations,Part 15 for Class "B" digital devices. Compliance withthese requirements provides a reasonable level ofassurances that your use of this product in a residentialenvironment will not result in harmful interference withother electronic devices. This equipmentgenerates/uses radio frequencies and, if not installedand used according to the instructions found in theowner's manual, may cause interference harmful to theoperation of other electronic devices. Compliance withFCC regulations does not guarantee that interferencewill not occur in all installations. If this product is foundto be the source of interference, which can bedetermined by turning the unit "Off" and "On", please tryto eliminate the problem by using one of the followingmeasures:Relocate either this product or the device that is beingaffected by the interference.Use power outlets that are on different branch (circuitbreaker or fuse) circuits or install AC line filter(s).In the case of radio or TV interference, relocate/reorientthe antenna. If the antenna lead-in is 300-ohm ribbonlead, change the lead-in to coaxial type cable.If these corrective measures do not produce satisfactoryresults, please contact your local retailer authorized todistribute Vocopro products. If you can not locate theappropriate retailer, please contact Vocopro, 1728Curtiss Court, La Verne, CA 91750.CAUTIONThe apparatus is not disconnected from the AC powersource so long as it is connected to the wall outlet,even if the apparatus itself is turned off. To fully insurethat the apparatus is indeed fully void if residual power,leave unit disconnected from the AC outlet for at leastfifteen seconds.CAUTION:READ THIS BEFORE OPERATING YOUR UNIT1. To ensure the finest performance, please read thismanual carefully. Keep it in a safe place for future reference.2. Install your unit in a cool, dry, clean place - away fromwindows, heat sources, and too much vibration, dust,moisture or cold. Avoid sources of hum (transformers, vmotors). To prevent fire or electrical shock, do not expose torain and water.3. Do not operate the unit upside-down.4. Never open the cabinet. If a foreign object drops into theset, contact your dealer.5. Place the unit in a location with adequate air circulation.Do not interfere with its proper ventilation; this will cause theinternal temperature to rise and may result in a failure.6. Do not use force on switches, knobs or cords. Whenmoving the unit, first turn the unit off. Then gently disconnectthe power plug and the cords connecting to otherequipment. Never pull the cord itself.7. Do not attempt to clean the unit with chemical solvents:this might damage the finish. Use a clean, dry cloth.8. Be sure to read the "Troubleshooting" section on commonoperating errors before concluding that your unit is faulty.9. This unit consumes a fair amount of power even when thepower switch is turned off. We recommend that you unplugthe power cord from the wall outlet if the unit is not going tobe used for a long time. This will save electricity and helpprevent fire hazards. To disconnect the cord, pull it out bygrasping the plug. Never pull the cord itself.10. To prevent lightning damage, pull out the power cordand remove the antenna cable during an electrical storm.11. The general digital signals may interfere with otherequipment such as tuners or receivers. Move the systemfarther away from such equipment if interference isobserved.NOTE:Please check the copyright laws in your countrybefore recording from records, compact discs,radio, etc. Recording of copyrighted material mayinfringe copyright laws.Voltage Selector (General Model Only)Be sure to position the voltage selector to match thevoltage of your local power lines before installing theunit.220V110V2
Welcome.And Thank you for purchasing the <strong>DA</strong>-<strong>8909RV</strong> from VocoPro, your ultimate choice inKaraoke entertainment! With years of experience in the music entertainment business,VocoPro is a leading manufacturer of Karaoke equipment, and has been providingpatrons of bars, churches, schools, clubs and individual consumers the opportunity tosound like a star with full-scale club models, in-home systems and mobile units. All ourproducts offer solid performance and sound reliability, and to further strengthen ourcommitment to customer satisfaction, we have customer service and technical supportprofessionals ready to assist you with your needs. We have provided some contactinformation for you below.VocoPro1728 Curtiss CourtLa Verne, CA 91750Toll Free: 800-678-5348TEL: 909-593-8893FAX: 909-593-8890Customer Service & General Informationinfo@vocopro.comTech Supporttechsupport@vocopro.comRemember Our WebsiteBe sure to visit the VocoPro website www.vocopro.com for the latest information on newproducts, packages and promos. And while you’re there don’t forget to check out ourClub VocoPro for Karaoke news and events, chat rooms, club directories and even aService directory!We look forward to hearing you sound like a PRO, with VocoPro, your ultimate choice inKaraoke entertainment.FOR YOUR RECORDSPlease record the model number and serial number below, for easy reference, in case of loss or theft.These numbers are located on the rear panel of the unit. Space is also provided for other relevant informationModel Number .................................................................................................................................Serial Number ..................................................................................................................................Date of Purchase .............................................................................................................................Place of Purchase ...........................................................................................................................3
Listening For A LifetimeSelecting fine audio equipment such as the unit youve just purchased is only the start ofyour musical enjoyment. Now its time to consider how you can maximize the fun andexcitement your equipment offers. VocoPro and the Electronic Industries AssociationsConsumer Electronics Group want you to get the most out of your equipment by playing itat a safe level. One that lets the sound come through loud and clear without annoyingblaring or distortion and, most importantly, without affecting your sensitive hearing.Sound can be deceiving. Over time your hearing “comfort level” adapts to a higher volumeof sound. So what sounds “normal” can actually be loud and harmful to your hearing. Guardagainst this by setting your equipment at a safe level BEFORE your hearing adapts.To establish a safe level:• Start your volume control at a low setting.• Slowly increase the sound until you can hear it comfortably and clearly, and withoutdistortion.Once you have established a comfortable sound level:• Set the dial and leave it there.• Pay attention to the different levels in various recordings.Taking a minute to do this now will help to prevent hearing damage or loss in the future.After all, we want you listening for a lifetime.Used wisely, your new sound equipment will provide a lifetime of fun and enjoyment. Sincehearing damage from loud noise is often undetectable until it is too late, this manufacturerand the Electronic Industries Associations Consumer Electronics Group recommend youavoid prolonged exposure to excessive noise. This list of sound levels is included for yourprotection.Some common decibel ranges:LevelExample304050607080Quiet library, Soft whispersLiving room, Refrigerator, Bedroom away from trafficLight traffic, Normal ConversationAir Conditioner at 20 ft., Sewing machineVacuum cleaner, Hair dryer, Noisy RestaurantAverage city traffic, Garbage disposals, Alarm clock at 2 ft.The following noises can be dangerous under constant exposure:LevelExample90100120140180Subway, Motorcycle, Truck traffic, Lawn MowerGarbage truck, Chainsaw, Pneumatics drillRock band concert in front of speakersGunshot blast, Jet planeRocket launching pad-Information courtesy of the Deafness Research Foundation4
Before Getting StartedThank you for purchasing the <strong>DA</strong>-<strong>8909RV</strong> Digital Karaoke Amplifier/Mixer with Vocal Enhancer. The <strong>DA</strong>-<strong>8909RV</strong> will provide years of reliability and high quality entertainment for you if used properly. Pleaseread this manual carefully before using your <strong>DA</strong>-<strong>8909RV</strong> to ensure best performance.Unpacking the <strong>DA</strong>-<strong>8909RV</strong>Carefully remove the <strong>DA</strong>-<strong>8909RV</strong> from its carton. It is recommended that you store the original packagingmaterials in case you need to ship this equipment for any reason.Be sure you have the following parts and components included with your <strong>DA</strong>-<strong>8909RV</strong>: ITEMS:<strong>DA</strong>-<strong>8909RV</strong>Stereo RCA Patch CableRemote ControlAAA BatteriesAC Power CableRack Mount Ears (Pair)QUANTITY:1112115
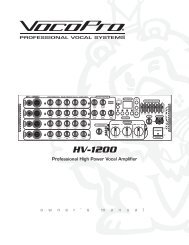
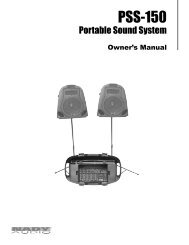
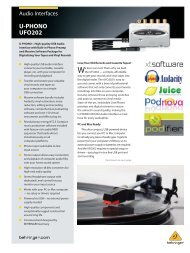
INAUDIBLE GAIN 30 27 24 21 18 15 12 9 6 4 2 1LEVEL -30 -20 -10 -6 -3 0 +3 +6INAUDIBLE GAIN 30 27 24 21 18 15 12 9 6 4 2 1LEVEL -30 -20 -10 -6 -3 0 +3 +6- +- +-20-102.5500.503-20-102.5500.503-35 -10-20 0-35 -10-20 0OUTOUTMANUALMONOMANUAL-500-30+10 1.58-500-30+10 1.58OFF+10-40 +2010.1 200.05 4 -20 +20OFF 6OFF+10-40 +2010.1 200.05 4 -20 +20OFF 6THRESHOLDTHRESHOLDRATIOATTACKRELEASE OUTPUTPROCESSTHRESHOLDTHRESHOLDRATIORELEASE OUTPUTdBdBN.1mSec AUTOSecdB INSTEREOdBdBM1msec AUTOSecdB INEXPANDER/GATECOMPRESSOR/LIMITERENHANCER MODE EXPANDER/GATECOMPRESSOR/LIMITERENHANCER MULTI-FORMATV I D E O Getting ConnectedConnecting input source players to the <strong>DA</strong>-<strong>8909RV</strong>The <strong>DA</strong>-<strong>8909RV</strong> has stereo paired RCA inputs labeled for RCA stereo audio ouptut from CD, CDG, AUXand DVD players and three VIDEO inputs for corresponding video signals from CDG, AUX and DVD players.Any other audio device with RCA stereo output such as a cassette player can be connected to theseinputs. also. The device associations are for reference only.1. Use paired RCA stereo cables to output audio signal from your players to the corresponding <strong>DA</strong>-<strong>8909RV</strong> CD, CDG, AUX and DVD AUDIO INPUTS. Any other audio device with RCA stereo output such asa cassette player can be connected to these inputs. also.2. Connect the video outputs from your respective players to the <strong>DA</strong>-<strong>8909RV</strong>’s CDG, AUX and DVD VIDEOINPUTS. Use RCA style video cables (usually coded in yellow) to carry the signal that will display Karaokegraphics and video to TVs or other monitor devices when output from the <strong>DA</strong>-<strong>8909RV</strong> (see ConnectingTVs/Monitors).UHF-6800Wireless Mic SystemCDR-1000 PROCD Recorder/PlayerCLG-600Compressor/Limiter VP-600Power AmpEffects ProcessorDVG-555KKaraoke ChangerDVG-888KMulti-Format PlayerDVG-808KDual Disc PlayerCDG-600RFCassette Player6
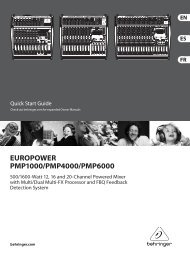
Getting Connected (continued)Connecting TVs/Monitors to the <strong>DA</strong>-<strong>8909RV</strong>The <strong>DA</strong>-<strong>8909RV</strong> has three VIDEO OUTPUT jacks which send video and/or decoded CD+G graphics patchedfrom your players to TVs and other video monitor devices. This enables multiple TV configurations forperformers to enjoy and KJs and VJs to program a set.1. Connect RCA style video cables from VIDEO OUTPUT jacks 1, 2 and 3 on the <strong>DA</strong>-<strong>8909RV</strong> to the VIDEOINPUT jack on your TV or other monitor. You may need to manually switch your TV to video mode, whilesome models automatically switch when a video signal is detected. On most TVs, the INPUT jack is labeledAUX or VIDEO.• If the TV does not have a VIDEO IN jack, you may be able to connect the video cable tothe VIDEO INPUT of a VCR or DVD player and connect the RF OUTPUT on the VCR or DVDplayer to the TV ANTENNA INPUT jack.• If you do not have a VCR or DVD player, you will need to use an RF Modulator to make theadaption between jacks. RF Modulators are easy to find in the electronics section of manystores. LTV-5LCD MonitorSD-55Rack Mount Dual LCD Monitor7
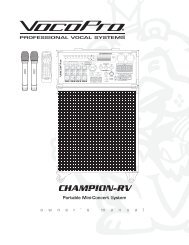
Front Panel Descriptions and Functions12 3 4 5 6 1. INPUT SELECTOR - These 4 buttons allow you to select between DVD, AUX, CDG and standard CDplayer output to the <strong>DA</strong>-<strong>8909RV</strong>. This allows the <strong>DA</strong>-<strong>8909RV</strong> to differentiate between all the relatedsource AUDIO INPUT options available on the back panel.2. KEY CONTROL - You can adjust the key of your source music in half-stepincrements to match the natural range of your voice using the KEY CONTROLbuttons. To flat (b) or lower the key, press the left KEY CONTROL button. Tosharp (#) or raise the key, press the right button. To return to the original keyof the music input source, press the center button. You will see the DIGITAL KEYDISPLAY reflect the number of steps you have increased or decreased displayedas numerals with +/-, or 0 for the original key.3. LED METER - The LED METER displays stereo output levels for the <strong>DA</strong>-2808VE mix. The optimal level fora clean, undistorted signal at high output is to show only occasional peaking in the red LED range. Lowerthe MUSIC VOLUME and MIC MASTER VOLUME if red LEDs are frequent.4. REMOTE SENSOR - When operating the <strong>DA</strong>-<strong>8909RV</strong> with the Remote Control, direct the Remotetowards this SENSOR within 23 feet. Maintain a line of sight between Remote and REMOTE SENSOR clearof obstacles to prevent signal deflection.5. MIC MASTER VOLUME - This control adjusts the mixed output level for MIC 1, MIC 2 and MIC 3. Turnclockwise to increase and counter-clockwise to decrease the MIC VOLUME.6. MUSIC VOLUME - This control adjusts the output level for whichever player connected to an AUDIOINPUT is assigned with the INPUT SELECTOR.8
Front Panel Descriptions and Functions 7 8 910 11 12 13 14 15167. SPEAKERS A/B - These buttons switch between 2 sets of SPEAKER OUTPUT.8. LED GAIN - Select between a HIGH or FLAT LED display mode for different effect and visibility.9. VOCAL CANCEL/VOCAL PARTNER - With Multiplex media, lead vocals and music are recorded in separate leftand right stereo channels. When VOCAL CANCEL is selected, the LED will illuminate and the lead vocal channel willbe removed, leaving only a duplicated instrumental track to left and right. When VOCAL PARTNER is pressed, LEDwill illuminate and the vocal track will only be activated while there is no microphone input. In other words, while theKaraoke singer is performing, the vocals will never drop entirely out, keeping the action going.VOCAL ENHANCER - Because the <strong>DA</strong>-<strong>8909RV</strong> allows you to “TUNE” the frequency and mix, or “PROCESS” of your microphoneoutput, it is a more powerful EQ tool than standard Bass and Treble controls.10. VOCAL ENHANCER ON/OFF - This button activates or deactivates the VOCAL ENHANCER processor feature.Try using this button to do an A/B comparison of a processed and unprocessed signal while someone sings into themicrophone. This is helpful for fine-tuning and system diagnostics.11. HIGH - Similar to a Treble control, this boosts the HIGH frequencies in your EQ, from 0 to 10.12. PROCESS - This control is similar to a Balance control for the EQ, where you can select between a mix predominantly“High end” mix and a bassier “Low end” mix.13. TUNE - This control allows you fine tune specific frequencies more precisely, by setting the lower cutoff frequencyof the high-pass filter between 1kHz and 8kHz. Fortunately, you can still use it without understanding what thatmeans. The best way to use this control is by adjusting it while someone is singing into the microphone to find that“sweet spot” where the EQ sounds clean (not harsh, without distortion) and well-balanced.14. LOW - Similar to a Bass control, this boosts the LOW frequencies in your EQ, from 0 to 10.15. LOUDNESS ON/OFF - For an instant Volume/Gain, the LOUDNESS button is an easy way to improve your mix whenyou need an extra boost. Perfect for varying volume controls between tracks or singers.MUSIC TONE controls16. BASS/TREBLE - The BASS control adjusts the low end of your source music and the TREBLEcontrol adjusts the high end.9
<strong>DA</strong>-<strong>8909RV</strong> MANUAL ©2006 VOCOPROWWW.VOCOPRO.COM