CHAMPION-RV AMPION - Full Compass
CHAMPION-RV AMPION - Full Compass
CHAMPION-RV AMPION - Full Compass
- No tags were found...

You also want an ePaper? Increase the reach of your titles
YUMPU automatically turns print PDFs into web optimized ePapers that Google loves.
<strong>CH<strong>AMPION</strong></strong>-<strong>RV</strong>Portable Mini-Concert Systemo w n e r ' s m a n u a l
Table of ContentsImportant Safety Instructions .................................... 4FCC Information ...................................................... 5Listening for a Lifetime ............................................. 6Welcome ............................................................... 7Features and Specs ................................................. 8Getting Started ....................................................... 9Getting Connected ............................................ 10-11Descriptions and FunctionsFront Panel ................................................... 12-15Rear Panel ........................................................ 16Remote Control ............................................. 17-18Basic Operations .............................................. 19-20Setup Menu .................................................... 21-22Troubleshooting .................................................... 233
Important Safety InstructionsCAUTION: To reduce the risk of electricshock, do not remove cover (or back). Nouser-serviceable parts inside. Only referservicing to qualified service personnel.Protect the power cord from being walked onor pinched particularly at the plugs,convenience receptacles, and at the pointwhere they exit from the apparatus.Only use attachments/accessories specifiedor provided by the manufacturer (such as theexclusive supply adapter, battery etc).The lightning flash & arrowheadsymbol, within an equilateral triangle,is intended to alert you to thepresence of danger.The exclamation point within anequilateral triangle is intended to alertyou to the presence of importantoperating and servicing instructions.To reduce the risk of fire or electric shock, donot expose this unit to rain or moisture.Read these instructions.Keep these instructions.Heed all warnings.Follow all instructions.Do not use this apparatus near water.Clean only with dry cloth.Do not block any ventilation openings. Installin accordance with the manufacture’sinstructions.Do not install near any heat sources such asradiators, heat registers, stoves, or otherapparatus (including amplifiers) that produceheat.Do not defeat the safety purpose of thepolarized or grounding plug. A polarized plughas two blades with one wider than the other.A grounding plug has two blades and a thirdgrounding prong. The wide blade or the thirdprong is provided for your safety. If theprovided plug does not fit into your outlet,consult an electrician for replacement of theobsolete outlet.4Use only with the cart, stand, tripod, bracket,or table specified by the manufacturer, or soldwith the apparatus. When a cart or rack isused, use caution when moving thecart/apparatus combination to avoid injuryfrom tip-over.Unplug the apparatus during lightning stormsor when unused for long periods of time.Refer all servicing to qualified personnel.Servicing is required when the apparatus hasbeen damaged in any way, such as powersupply cord or plug is damaged, liquid hasbeen spilled or objects have fallen into theapparatus has been exposed to rain ormoisture, does not operate normally, or hasbeen dropped.Please keep the unit in a good ventilationenvironment.To CATV system installer's (U.S.A.): This reminder isprovided to call the CATV system installer's attention toArticle 820-40 of the NEC that provides guidelines forproper grounding and, in particular, specifies that thecable ground shall be connected as close to the point ofcable entry as practical.
FCC Information This product, when installed as indicated in theinstructions contained in this manual, meets FCCrequirements. Modifications not expressly approved byVocopro may void your authority, granted by the FCC,to use this product. When connecting this product toaccessories and/or another product use only highquality shielded cables. Cable(s) supplied with thisproduct MUST be used. Follow all installationinstructions. Failure to follow instructions could void yourFCC authorization to use this product in the U.S.A. This product has been tested and found tocomply with the requirements listed in FCC Regulations,Part 15 for Class "B" digital devices. Compliance withthese requirements provides a reasonable level ofassurances that your use of this product in a residentialenvironment will not result in harmful interference withother electronic devices. This equipmentgenerates/uses radio frequencies and, if not installedand used according to the instructions found in theowner's manual, may cause interference harmful to theoperation of other electronic devices. Compliance withFCC regulations does not guarantee that interferencewill not occur in all installations. If this product is foundto be the source of interference, which can bedetermined by turning the unit "Off" and "On", please tryto eliminate the problem by using one of the followingmeasures:Relocate either this product or the device that is beingaffected by the interference.Use power outlets that are on different branch (circuitbreaker or fuse) circuits or install AC line filter(s).In the case of radio or TV interference, relocate/reorientthe antenna. If the antenna lead-in is 300-ohm ribbonlead, change the lead-in to coaxial type cable.If these corrective measures do not produce satisfactoryresults, please contact your local retailer authorized todistribute Vocopro products. If you can not locate theappropriate retailer, please contact Vocopro, 1728Curtiss Court, La Verne, CA 91750.The apparatus is not disconnected from the AC powersource so long as it is connected to the wall outlet,even if the apparatus itself is turned off. To fully ensurethat the apparatus is indeed fully void of residual power,leave unit disconnected from the AC outlet for at leastfifteen seconds. To ensure the finest performance, please read thismanual carefully. Keep it in a safe place for futurereference. Install your unit in a cool, dry, clean place - away fromwindows, heat sources, and too much vibration, dust,moisture or cold. Avoid sources of hum (transformers, vmotors). To prevent fire or electrical shock, do notexpose to rain and water. Do not operate the unit upside-down. Never open the cabinet. If a foreign object drops intothe set, contact your dealer. Place the unit in a location with adequate aircirculation. Do not interfere with its proper ventilation;this will cause the internal temperature to rise and mayresult in a failure. Do not use force on switches, knobs or cords. Whenmoving the unit, first turn the unit off. Then gentlydisconnect the power plug and the cords connecting toother equipment. Never pull the cord itself. Do not attempt to clean the unit with chemical solvents:this might damage the finish. Use a clean, dry cloth. Be sure to read the "Troubleshooting" section oncommon operating errors before concluding that yourunit is faulty. This unit consumes a fair amount of power even whenthe power switch is turned off. We recommend that youunplug the power cord from the wall outlet if the unit isnot going to be used for a long time. This will saveelectricity and help prevent fire hazards. To disconnectthe cord, pull it out by grasping the plug. Never pull thecord itself. To prevent lightning damage, pull out the power cordand remove the antenna cable during an electricalstorm. The general digital signals may interfere with otherequipment such as tuners or receivers. Move thesystem farther away from such equipment ifinterference is observed.Pleasecheck the copyright laws in your countrybefore recording from records, compact discs,radio, etc. Recording of copyrighted material mayinfringe copyright laws.Be sure to position the voltage selector to match thevoltage of your local power lines before installing theunit.120V240V5
Listening for a LifetimeSelecting fine audio equipment such as the unit youʼve just purchased is only the start of yourmusical enjoyment. Now itʼs time to consider how you can maximize the fun and excitement yourequipment offers. VocoPro and the Electronic Industries Associationʼs Consumer ElectronicsGroup want you to get the most out of your equipment by playing it at a safe level. One that letsthe sound come through loud and clear without annoying blaring or distortion and, mostimportantly, without affecting your sensitive hearing.Sound can be deceiving. Over time your hearing “comfort level” adapts to a higher volume ofsound. So what sounds “normal” can actually be loud and harmful to your hearing. Guardagainst this by setting your equipment at a safe level BEFORE your hearing adapts.To establish a safe level:• Start your volume control at a low setting.• Slowly increase the sound until you can hear it comfortably and clearly, and withoutdistortion.Once you have established a comfortable sound level:• Set the dial and leave it there.• Pay attention to the different levels in various recordings.Taking a minute to do this now will help to prevent hearing damage or loss in the future. After all,we want you listening for a lifetime.Used wisely, your new sound equipment will provide a lifetime of fun and enjoyment. Sincehearing damage from loud noise is often undetectable until it is too late, this manufacturer andthe Electronic Industries Associationʼs Consumer Electronics Group recommend you avoidprolonged exposure to excessive noise. This list of sound levels is included for your protection.Some common decibel ranges:LevelExample304050607080Quiet library, Soft whispersLiving room, Refrigerator, Bedroom away from trafficLight traffic, Normal ConversationAir Conditioner at 20 ft., Sewing machineVacuum cleaner, Hair dryer, Noisy RestaurantAverage city traffic, Garbage disposals, Alarm clock at 2 ft.The following noises can be dangerous under constant exposure:LevelExample90100120140180Subway, Motorcycle, Truck traffic, Lawn MowerGarbage truck, Chainsaw, Pneumatics drillRock band concert in front of speakersGunshot blast, Jet planeRocket launching pad-Information courtesy of the Deafness Research Foundation6
WelcomeAnd thank you for purchasing the <strong>CH<strong>AMPION</strong></strong>-<strong>RV</strong> from VocoPro, your ultimate choice inKaraoke entertainment! With years of experience in the music entertainment business,VocoPro is a leading manufacturer of Karaoke equipment, and has been providingpatrons of bars, churches, schools, clubs and individual consumers the opportunity tosound like a star with full-scale club models, in-home systems and mobile units. All ourproducts offer solid performance and sound reliability, and to reinforce our commitmentto customer satisfaction, we have customer service and technical support professionalsready to assist you with your needs. We have provided some contact information foryou below.VocoPro1728 Curtiss CourtLa Verne, CA 91750Toll Free: 800-678-5348TEL: 909-593-8893FAX: 909-593-8890VocoPro Company Email DirectoryCustomer Service & General Informationinfo@vocopro.comTech Supporttechsupport@vocopro.comRemember Our WebsiteBe sure to visit the VocoPro website www.vocopro.com for the latest information onnew products, packages and promos. And while you're there don't forget to check outour Club VocoPro for Karaoke news and events, chat rooms, club directories and evena KJ Service directory!We look forward to hearing you sound like a PRO, with VocoPro, the singer’s ultimatechoice.FOR YOUR RECORDSPlease record the model number and serial number below, for easy reference, in case of loss or theft. Thesenumbers are located on the rear panel of the unit. Space is also provided for other relevant informationModel NumberSerial NumberDate of PurchasePlace of Purchase7
Features and SpecificationsA Portable Mini-Concert System for the Road.Whether you are a traveling musician on the road, a vocalist that needs to do a gig, or an aspiring singerwho wants to practice at home, VocoPro has the perfect audio solution for you, the <strong>CH<strong>AMPION</strong></strong>-<strong>RV</strong> miniconcertsystem.It’s a compact two-piece system with a powerful 200W 6-speaker stereo system that sets up in seconds.Hosting pro-level features such as a 4 channel mic/line mixer with DSP Reverb, and Hiss Filtering, youcan count on your sound being top-notch. The included dual channel VHF wireless microphone modulefrees you from the hassle of cables. It’s also a perfect tool for singers and musicians who want to performor practice with band members, or play along with the music from the built-in player and media ports.Use this as the main stage system in a coffee shop, or connect to a house system for an outdoorconcert. Either way, you will have the built-in effects and monitor controls at your fingertips.So, if you are looking for a handy, portable mini-concert system that you can easily take on the go, try the<strong>CH<strong>AMPION</strong></strong>-<strong>RV</strong> and experience the sound quality and convenience of an awesome all-in-one sound system.• Two-Piece Design Pumps a Powerful 200W Through a 6-Speaker Cabinet• Dual Channel VHF Wireless Microphone Module and Two Wireless Mics Included• Remove Head for Easy Transport and Integration with House Systems• Speaker Cabinet Can Be Rotated to Face the Audience for Performances• Multi-Format Player Supports Standard CD, CD+G, DVD, VCD, Mp3, AVI, Photo-CD, and Most CD-R/CD-RW Formats• Four Professional ¼”/XLR Mic/Line Inputs with DSP Reverb & Effect On/Off Switches• USB Port and SD Card Slot for Accessing Your Favorite Tracks on USB jumpdrives and SD Cards• 7-Band Equalizer for Customizing the Sound of Your Music• Handy Front Panel A/V & 1/8” Laptop/Mp3 Input for the Ultimate Entertainment Experience• 13-Step Digital Key Control to Adjust the Key of Your Disc Audio• Two Wireless Receiver Slots on Rear Panel Support up to 2 Wireless Modules for a Total of 4 WirelessMicrophones**Additional wireless microphone module and wireless microphones sold separately.• <strong>Full</strong>-Function Remote Control• 120V/240V and NTSC/PAL Compatible for Worldwide Use8
Getting StartedThank you for purchasing the <strong>CH<strong>AMPION</strong></strong>-<strong>RV</strong>. Take a few moments to look through this manual. Before setting up,please make sure the following items are included.• <strong>CH<strong>AMPION</strong></strong>-<strong>RV</strong>• Remote Control• 2 Wireless Microphones• 2 Antennas• 2 Speaker Cables• RCA Cable• 1/8” Stereo Audio Cable• Power Cable Returns and WarrantyIn the unlikely event that the <strong>CH<strong>AMPION</strong></strong>-<strong>RV</strong> would need to be shipped for repair, it is recommended that you keep all theproduct packaging and receipt. For detailed warranty information, please visit www.vocopro.com/warranty_extended.html.To find a VocoPro Authorized Service Center near you, please visit www.vocopro.com/servicecenter.html9
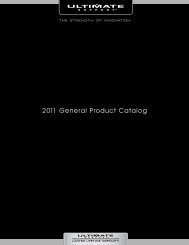
Getting ConnectedThe <strong>CH<strong>AMPION</strong></strong>-<strong>RV</strong> is an all-in-one unit, but has plenty of connections to incorporate it into any setup. The diagrambelow shows some connection options.10
Getting ConnectedThe <strong>CH<strong>AMPION</strong></strong>-<strong>RV</strong> can be connected to an Mp3 player or computer using the 1/8” input on the front panel. Toconnect an Mp3 player, see your Mp3 player instructions on connecting to a 1/8” input. To connect a computer,use a 1/8” to 1/8” inch cable to connect the computer line out to the <strong>CH<strong>AMPION</strong></strong>-<strong>RV</strong> 1/8” input. 11
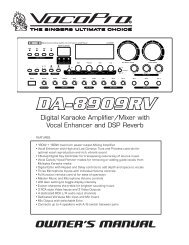
Descriptions and Functions Front Panel1. Direct Track Access Buttons - Use these buttons to jump directly to a track for playback.2. Mic/Line Tone, Bass/Treble Controls - Use these controls to boost or reduce the amount of bass and treble in theMicrophone/Line audio. These effects can be switched on and off each input individually using the EFFECT ON/OFFbuttons on the Mic/Line channels.3. Display - This screen displays information about the track time, current input, etc.4. Remote Control Infrared Receiver - This lens receives signals from the remote contol.5. Mic/Line Master Level Control - Use this knob to increase or decrease the volume of the Mic/Line channels.6. Music Master Level Control - Use this knob to increase or decrease the volume of the music.7. Disc Tray - Insert discs here for playback.8. Disc Control Buttons - See page 13 for more details.9. Graphic Equalizer - This GRAPHIC EQ is used to BOOST and/or CUT particular frequencies. Each slide faderprocesses a particular frequency range indicated by the number below it. Frequencies from 60Hz - 250Hzconstitute the very low to low range. Frequencies from 250Hz to 1kHz are the mid-range and frequencies from1kHz to 16kHz make up the high to very high range. To adjust, slide the fader up to boost the frequency presenceand down to cut the frequency presence.10. Mic/Line Inputs and Controls - See page 14 for more details.11. USB and SD CARD ports - Plug a USB jumpdrive or SD card in these ports for playback.12. Front Panel AV Input - Use this input to attach an external player to the <strong>CH<strong>AMPION</strong></strong>-<strong>RV</strong>.13. 1/8” Mp3 Player/Laptop Input - Use this jack to attach a Mp3 player, laptop or other media device with a 1/8”connector.14. ¼” Headphone Jack - Use this jack to attach headphones to the <strong>CH<strong>AMPION</strong></strong>-<strong>RV</strong>. Note: Plugging in headphones willswitch off the on-board speakers.15. DSP Effects - See page 15 for more details.16. Graphic EQ ON/OFF Switch - Use the switch to enable/disable the Graphic EQ.17. Input Selector Buttons - Use these buttons to select the music input/source. Press AV1 to select the RCA inputon the front panel, and AV2 to select the first RCA input on the back panel. Press AV3 to toggle between thesecond RCA input on the rear panel and the 1/8” input on the front panel. Press DVD to toggle between the discplayer, USB jumpdrive reader and SD card reader.18. Power Switch - Use this button to power the <strong>CH<strong>AMPION</strong></strong>-<strong>RV</strong> on and off.12
Descriptions and Functions cont. Disc Player Control Buttons 1. Eject Button - Use this button to open and close the disc tray.2. Play/Pause Button - Press this button to play a track that is stopped or paused, and pause a track that is playing.3. Stop Button - This button will stop a track that is playing. 4. PBC Button - This button activates menu navigation on VCD Discs.5. Prev/Next - Press Prev to jump to the previous track, and Next to jump to the next track. 6. B-Scan/F-Scan - Press B-scan to scan backwards through the current track, and F-scan to scan forward throughthe current track.7. Mute Button - This button will silence the audio from the playback source, but not the microphone audio.8. L/R Button - This button toggles between left channel, right channel and stereo outputs. Selecting L will place theleft channel on the left and right channel outputs, and selecting R will place the right channel on the left and rightchannel outputs.9. Repeat - This button will cycle through the available repeat options for the current audio media.10. Digital Key Control - These buttons adjust the key of the disc audio.(flat): will lower the key of the music.(natural): will return the key to normal.(sharp): will raise the key of the music.11. Vocal Cancel/Partner - This button will remove the vocal track from multiplexed discs.The Vocal Cancel Feature removes vocals from multiplex formatted discs. Press the button one time to enable thisfunction. When Vocal Cancel is enabled, the LED will be lit.The Vocal Partner Feature temporarily removes vocals from multiplex formatted discs only when singing into aconnected microphone. When the singing stops, the vocal track is automatically resumed. Press the button twotimes to enable this function. When Vocal Partner is enabled, the LED will be blinking. 13
Descriptions and Functions cont. Channel Controls1. Gain Control - This dial controls the volume on this mic/line channel. Turn the dial clockwise to increase the volume,and counter-clockwise to decrease.2. Mic/Line Button - Use this button to switch between high and low level devices. When using a microphone, guitaror keyboard use the MIC setting to boost the signal. When attaching a self amplifying device like an amplifying mixeror player, set the button to LINE.3. Effect On/Effect Off Button - Press this button in to apply the DSP effects to this channel. Press the button againto turn off the effects on this channel. The effects that are applied to these channels are controlled using the DSPEFFECT controls, and MIC/LINE TONE controls.4. XLR/¼” Combo Jack - Use this combination jack to plug in a microphone or instrument using a ¼” jack or an XLRjack.NOTE: Plugging a cable into a channel that is being used by a wireless mic will switch off that wireless mic. If youwant to use the wireless mics and wired mics or instruments, make sure you plug the cables into unused channels.The wireless mic module in the top expansion slot uses channel 1 and 2. The bottom expansion slot uses channel 3and 4.14
Descriptions and Functions cont. DSP Effects 1. Echo Delay Control - This dial controls the amount of time between the echo repititions. Turn this dial clockwise toincrease the delay, and counter-clockwise to decrease.2. Echo Repeat Control - This dial controls the amount of repititions in the echo. Turn this dial clockwise to increasethe amount of echos, and counter-clockwise to decrease.3. Echo Volume Control - This dial controls the volume of the echo effect. Turn this dial clockwise to increase thevolume of the echos, and counter-clockwise to decrease.4. Hiss Filter - This dial controls the amount of hiss filter that is applied to the mic/line channels. 5. Reverb Volume Control - This dial controls the volume of the reverb effect. Turn this dial clockwise to increase thevolume of the reverb effect, and counter-clockwise to decrease.15
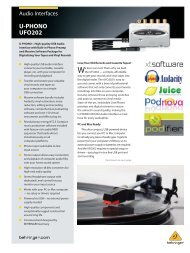
Descriptions and Functions cont. Rear Panel1. ¼” L/R Speaker Outputs - Attach the <strong>CH<strong>AMPION</strong></strong>-<strong>RV</strong> speakers here using the included ¼” to ¼” cables.2. SCART Output - Use this output to connect to European TV systems that utilize SCART inputs.3. VGA Output - Use this output to connect to TVs or monitors that utilize VGA inputs.4. L/R XLR Balanced Audio Output - Use these outputs to connect the <strong>CH<strong>AMPION</strong></strong>-<strong>RV</strong> to an external system, such asan in-house system at a club.5. RCA A/V Outputs - Use this output to connect to additional TVs, monitors, recorders, or other devices.6. RCA A/V Inputs - Use this input to connect an external player.7. FL/FR Audio Output - Left and Right stereo audio output. Note that microphone audio will not be present on thisoutput. The graphic EQ does not adjust this output.8. Component (Y/Pb/Pr) Video Ouput - Use this output to connect to a TV or monitor with Component (Y/Pb/Pr)inputs.9. Coaxial Digital Audio Output - Use this audio output to connect to a digital receiver. Note that microphone audio willnot be present on this output. The graphic EQ does not adjust this output.10. RCA and S-Video Video Outputs - Use these video outputs to connect to a TV or monitor that has RCA inputs orS-Video inputs.11. Optical Digital Audio Output - Use this audio output to connect to a digital receiver. Note that microphone audiowill not be present on this output. The graphic EQ does not adjust this output.12. Fuse Cover - Remove to access the fuse. Note: Replace only with type listed on back panel.13. Volatage Selector Switch - Use this to select the voltage. 120V for United States, 240V for Europe.14. Power Output - Use this output to power another device up to 200W.15. AC Power Input - Connect the power cable here.16. CH1/2 Wireless Microphone Module - Receives signal from wireless microphones. Use the dials to adjust thevolume of the wireless microphone audio.17. CH3/4 Optional Wireless Microphone Module Port - Use this port to install the channel 3-4 optional wirelessmirophone module (sold separately).16
Descriptions and Functions cont.Remote Control1. Mute Button - This button will silence the audio from theplayback source, but not the microphone audio.2. Eject Button - Use this button to open/close the disc tray.3. Input Select Buttons - Use these buttons to select themusic input/source. Press AV1 to select the RCA input onthe front panel, and AV2 to select the first RCA input on theback panel. Press AV3 to toggle between the second RCAinput on the back panel and the 1/8” input on the frontpanel. Press DVD to toggle between the disc player, USBjumpdrive reader and SD card reader.4. Mic/Line Master Volume Buttons - Use this button toadjust the master volume of the mic/line inputs.5. Program Button - Use this button to enter program mode.6. Enter Button - Use this button to activate a selected menuitem in an on-screen menu.7. Menu Button - Use this button to access a disc menu.8. Play/Pause Button - Plays a paused or stopped track, andpauses a playing track. 9. B-Scan/F-Scan Buttons - Press B-scan to scan backwardsthrough the current track, and F-scan to scan forwardthrough the current track.10. Number Buttons - Use these buttons to jump directly to atrack for playback. 11. Audio Button - Will switch between alternate audio trackson a DVD. Note: Not all DVDs have alternate audio tracksavailable.12. Angle Button - Use this button to select viewing angles ona DVD. Note: Not all DVDs have alternate viewing anglesavailable.13. Slow Button - Use this button to view DVD video in slowmotion.14. Digital Key Control Button - These buttons adjust the keyof the disc audio.(flat): will lower the key of the music.(sharp): will raise the key of the music. 15. Music Master Volume Buttons - Use this button toincrease/decrease the master volume.16. Setup Button - Use this button to access the <strong>CH<strong>AMPION</strong></strong>-<strong>RV</strong> setup menu.17. Arrow Buttons - Use these buttons to navigate on-screenmenus.17
Descriptions and Functions cont.18. Vocal Cancel/Partner Button - This button will remove thevocal track from multiplexed discs.19. Multi-Function Buttons:REPEAT - This button will cycle through the available repeatoptions for the current audio media.STOP - This button will stop a track that is playing.L/R - This button toggles between left channel, rightchannel and stereo outputs. Selecting L will place the leftchannel on the left and right channel outputs, and selectingR will place the right channel on the left and right channeloutputs.20. Prev/Next Buttons - Press Prev to jump to the previoustrack, and Next to jump to the next track.21. P/N Button - Use this button to switch between PAL andNTSC. Use NTSC for United States and PAL for Europe.22. A-B Button - Use this button to loop a section of a track.Press once to set the start point, again to set the endpoint, the track will then loop. Press the button again toexit the loop.23. PBC Button - This button activates menu navigation onVCD Discs.24. Mode Button - Use this button to change the picturemode.25. Title Button - Use this button to go to the title screen of aDVD disc. 26. OSD Button - Use this button to show/hide the on-screendisplay, and cycle through the time display modes.27. Subtitle Button - Use this button to switch betweenavailable subtitles on a DVD. Note: Not all DVDs havesubtitles available. 28. Step Button - Use this button to advance forward oneframe at a time on a DVD.18
Basic OperationsUsing the Disc PlayerTo play a disc:1. Use the Input select buttons to select the DVDplayer.2. Press eject to open the disc tray.3. Place one disc in the tray, label side up.4. Press eject again to close the tray. Do not try tomanually force the tray closed.5. The disc will automatically begin to play. (Disc willnot automatically begin to play if autoplay is turnedoff. See the setup menu section for more details.)Selecting the Input SourceTo select the input source, use the input select buttonson the front panel or remote control.• AV1: The RCA input on the front panel.• AV2: The first RCA input on the rear panel.• AV3 - Mp3/LAPTOP: Switches between the 1/8”jack on the front panel and the second RCA input ofthe rear panel.• DVD - USB - SD CARD: Switches between theinternal disc player, USB and SD card reader.Playing from USB Jumpdrive or SD CardTo play songs, videos and other files from a USBjumpdrive or SD card:1. Plug a USB jumpdrive or SD card into the readerslots on the front panel of the <strong>CH<strong>AMPION</strong></strong>-<strong>RV</strong>.2. Use the input select buttons to switch to either theUSB or SD port.3. The first readable file on the card or drive will beginto play automatically. (File will not automaticallybegin to play if autoplay is turned off. See the setupmenu section for more details.)Using DSP EffectsThe DSP effects can add a stylized feel to vocals andinstruments. The DSP Effects include: Delay, Repeat,Hiss Filter and Reverb. To use DSP effects:1. Connect a microphone or instrument to one of theinput channels on the front panel.2. Press in the effects button on that channel toenable effects for that channel.3. Adjust the DSP effects dials while speaking into themicrophone until you are satisfied with the sound.Using Digital Key ControlIf a song’s natural musical key is either too high, ortoo low to be sung comfortably, use the DIGITAL KEYCONTROL feature to bring the musical key into range.• Press the (sharp) button to raise the key• Press the (flat) button to lower the key• Press the (natural) button to return the key to itsnatural positionThere is a maximum of 6 steps in either direction (UP/DOWN.) The current setting is displayed in the on-screendisplay when the key is changed.Programming a Custom track orderA custom track order can contain up to 16 tracks. Toprogram a custom track order:1. Insert a disc in the disc player.2. Press the program button on the remote control toenter the program menu.3. Use the arrow keys to highlight the first open trackslot.4. Use the number keys to enter the number of thetrack.5. Repeat steps 3 and 4 until the desired track orderis complete.6. Use the arrow buttons to highlight “PLAY” in themenu, and press enter to begin playback, or pressplay on the remote control.To exit the programmed track order playback, press stopon the remote control or front panel.Using the File Navigation MenuThe file navigation menu will be displayed when a USBdrive, SD card, or disc containing files is selected forplayback. Use the arrow keys to navigate the menu. Toplay a track or file, highlight the track or file, then pressenter on the remote control.Note: Although MIC/LINE TONE treble and bass are notDSP Effects, they will be enabled/disabled by the EFFECTON/OFF buttons.19
Basic OperationsUsing the Wireless MicrophonesTo use the wireless mics:1. Attach the included antennas to the wireless micmodule.2. Insert a battery into the mic.3. Switch the mic ON.4. When the mic is ON, the RF light on the rear panelwill turn on.5. Use the volume control on the rear panel module,the channel volume control, and the master micvolume control to adjust the volume the desiredlevel.6. Repeat these steps for additional mics.Removing a Wireless ModuleThe Wireless modules are designed to be easily removedand installed in case it requires service.To remove a wireless module:1. Turn the <strong>CH<strong>AMPION</strong></strong>-<strong>RV</strong> OFF, and unplug thepower cable.2. Remove the two screws that hold the module inplace.3. Carefully slide the module out.4. Carefully detach the connector cable.NOTE: Make sure the cable does not fall back intothe unit. It may be necessary to temporarily securethe cable to the unit with tape while there is nomodule in the slot.Installing a Wireless ModuleThe Wireless modules are designed to be easily removedand installed in case it requires service.To install a wireless module:1. Turn the <strong>CH<strong>AMPION</strong></strong>-<strong>RV</strong> OFF, and unplug thepower cable.2. (If the slot cover is already removed, skip to step 4)Remove the two screws that hold the slot cover inplace.3. Carefully detach the connector cable from the slotcover.NOTE: Make sure the cable does not fall back intothe unit. It may be necessary to temporarily securethe cable to the unit with tape while there is nomodule in the slot.4. Carefully connect the connector cable to themodule. The cable plug is designed to fit only oneway, if it does not fit correctly, flip the plug over andtry again.5. Carefully slide the module into the slot.6. Secure the module with the two screws.20
Setup MenuSetup MenuPress the setup button on the remote control to enter the setup menu. Press the setup button on the remotecontrol while in the setup menu to exit.System SetupTV System: NTSC, PAL60, PAL, AUTONTSC: Use this setting for North America.PAL60: Use this setting for regions that use PAL at 60Hz.PAL: Use this setting for Europe.AUTO: The unit will attempt to auto detect the video system.Auto Play: ON, OFFOn: Will play a disc as soon as it is put in.Off: Will wait for the play button to be pushed before playing a disc.Video: INTERLACE-YUV, TV-RGB, P-SCAN YPBPR, PC-VGA, S-VIDEOUse these settings to change the video output of the Component (Y/Pb/Pr) outputs.TV Type: 4:3PS, 4:3LB, 16:94:3PS: Use this setting for viewing a standard movie on a standard TV.4:3LB: Use this setting for viewing a widescreen movie on a standard TV.16:9: Use this setting for a widescreen TV.Password: - - - -Use this setting to lock/unlock the ratings. The default password is 0000. To set the password, first unlock thepassword, then enter a new password and press enter.Rating: G, PG, PG13, R, NC-17This setting controls what rating of DVD movie can be watched on the <strong>CH<strong>AMPION</strong></strong>-<strong>RV</strong>. To change this setting, thepassword must be set to unlocked.Default: RESTORERestore: Will return all settings to factory default.Resume: ON, OFFOn: Will continue playback from the last point when the unit was turned off.Off: Will playback from the beginning of the disc when the unit is turned back on.Language SetupOSD Language: English, Chinese, German, Spanish, French, PortugueseSelect what language will appear on the on-screen display.Audio Lanuage: Chinese, English, Japanese, French, Spanish, Portuguese, Latin, GermanSelect a preferred audio language for DVDs. Note that not all DVDs have every language available.Subtitle Language: Chinese, English, Japanese, French, Spanish, Portuguese, German, OffSelect a language for the DVD subtitles. Note that not all DVDs have multiple languages available.Menu Language: Chinese, English, Japanese, French, Spanish, Portuguese, German, LatinSelect a language for the DVD menu. Note that not all DVDs have multiple languages available.21
Setup MenuAudio SetupAudio Out: SPDIF/OFF, SPDIF/RAW, SPDIF/PCMSPDIF/OFF: Select to disable SPDIF output.SPDIF/RAW: Select when connecting to a 5.1 channel digital amplifier (DTS/Dolby Movie.).SPDIF/PCM: Select when connecting to a 2-channel digital amplifier (Audio CD.).Key: -6 to +6This menu item functions the same as the Digital Key Control buttons on the front panel and remote control.Video SetupBrightness:Set the brightness of the image with this setting. A lower value will make the image darker.Contrast:Set the contrast of the image with this setting. A higher value will make the light colors lighter and the dark colorsdarker. A lower value will make the light and dark colors less vibrant.Hue:Set the hue or color of the image with this setting.Saturation:Set the Saturation of the image with this setting. Saturation makes the colors in an image more intense.Sharpness:Set the sharpness of the image with this setting.Speaker SetupDownmix: LT/RT, STEREO, VSSLT/RT: Select when connecting to a Dolby Digital amplifier.STEREO: Select when connecting to a 2-channel stereo amplifier/mixer .VSS: Virtual surround sound. Select when using the 5.1 channel outputs on the rear panel.Digital SetupOP MODE: LINE OUT, RF REMODLINE OUT: This sets the output level to normal.RF REMOD: This will slightly increase the output level.Dynamic Range: FULL, 6/8, 4/8, 2/8, OFFUse this control to adjust the dynamic range.Dual Mono: STEREO, MONO L, MONO R, MIX MONOStereo: Select for standard L/R audio output.Mono L: Select for mono audio output with the left channel on both sides.Mono R: Select for mono audio output with the right channel on both sides.Mix mono: Select for mono audio output to both sides.22
TroubleshootingThe disc tray will not open.Make sure the <strong>CH<strong>AMPION</strong></strong>-<strong>RV</strong> is powered on.Make sure the input select is set to DVD.A disc is playing, but no sound is coming from the speakers.Make sure the music master volume is turned up.Make sure the speaker cables are connected firmly.If you are playing a VOB file from an SD card or jumpdrive, it may not function as VOB file playback is not supported.The disc player will not play a particular disc.Make sure the input select is set to DVD.Make sure the disc is not scratched or dirty.Some types of recorded discs may not be compatible with the <strong>CH<strong>AMPION</strong></strong>-<strong>RV</strong>.The Graphic EQ has no effect on the music.Make sure the EQ ON/OFF button is set to ON.Microphone audio is not present in the speakers.Make sure the mic is switched on.Make sure the MIC/LINE button on the mic channel is set to MIC.Make sure the mic channel and master mic volume are turned up.An instrument such as a guitar or keyboard that is plugged into the MIC/LINE channels cannot beheard via speakers.Make sure the MIC/LINE button on the input channel is set to MIC.Make sure the channel and master mic volume are turned up.No microphone audio is present in the FR/FL, or digital audio outputs.This is not a malfunction. Microphone audio is not output through these channels.No Wireless microphone audio is present.Make sure the wireless mics are switched on.Make sure the volume is turned up on the wireless mic module.Make sure the mic channel and mic master volume are turned up.Make sure the microphone battery is charged and installed correctly.If there is a wired mic or instrument plugged into the same channel as the wireless mic, it will switch off the wirelessmic, make sure that cables are only plugged into unused channels.A USB Jumpdrive or SD card is not playing.Make sure the input selector is set to USB or SD.Make sure the card or drive is formatted with FAT or FAT32. NTFS format cannot be read by the <strong>CH<strong>AMPION</strong></strong>-<strong>RV</strong>.If you are playing a VOB file from an SD card or jumpdrive, it may not function as VOB file playback is not supported.The remote control is not working.Make sure the <strong>CH<strong>AMPION</strong></strong>-<strong>RV</strong> is powered on.Make sure you are within 23 feet of the <strong>CH<strong>AMPION</strong></strong>-<strong>RV</strong>.Make sure the remote control batteries are not dead.23
<strong>CH<strong>AMPION</strong></strong>-<strong>RV</strong> Owner’s Manual© VocoPro 2009v1.1021www.vocopro.com