S.A.S LECOMBLE & SCHMITT - PYI Inc.
S.A.S LECOMBLE & SCHMITT - PYI Inc.
S.A.S LECOMBLE & SCHMITT - PYI Inc.
You also want an ePaper? Increase the reach of your titles
YUMPU automatically turns print PDFs into web optimized ePapers that Google loves.
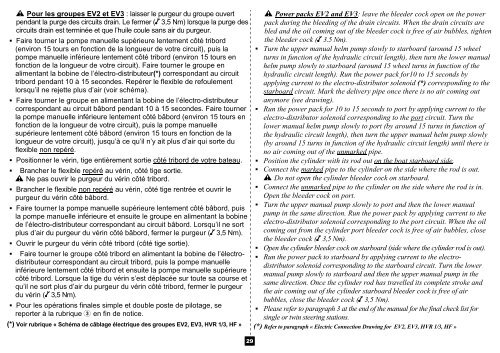
! Pour les groupes EV2 et EV3 : laisser le purgeur du groupe ouvert<br />
pendant la purge des circuits drain. Le fermer ( 3,5 Nm) lorsque la purge des<br />
circuits drain est terminée et que l’huile coule sans air du purgeur.<br />
Faire tourner la pompe manuelle supérieure lentement côté tribord<br />
(environ 15 tours en fonction de la longueur de votre circuit), puis la<br />
pompe manuelle inférieure lentement côté tribord (environ 15 tours en<br />
fonction de la longueur de votre circuit). Faire tourner le groupe en<br />
alimentant la bobine de l’électro-distributeur(*) correspondant au circuit<br />
tribord pendant 10 à 15 secondes. Repérer le flexible de refoulement<br />
lorsqu’il ne rejette plus d’air (voir schéma).<br />
Faire tourner le groupe en alimentant la bobine de l’électro-distributeur<br />
correspondant au circuit bâbord pendant 10 à 15 secondes. Faire tourner<br />
la pompe manuelle inférieure lentement côté bâbord (environ 15 tours en<br />
fonction de la longueur de votre circuit), puis la pompe manuelle<br />
supérieure lentement côté bâbord (environ 15 tours en fonction de la<br />
longueur de votre circuit), jusqu’à ce qu’il n’y ait plus d’air qui sorte du<br />
flexible non repéré.<br />
Positionner le vérin, tige entièrement sortie côté tribord de votre bateau.<br />
<br />
Brancher le flexible repéré au vérin, côté tige sortie.<br />
! Ne pas ouvrir le purgeur du vérin côté tribord.<br />
Brancher le flexible non repéré au vérin, côté tige rentrée et ouvrir le<br />
purgeur du vérin côté bâbord.<br />
Faire tourner la pompe manuelle supérieure lentement côté bâbord, puis<br />
la pompe manuelle inférieure et ensuite le groupe en alimentant la bobine<br />
de l’électro-distributeur correspondant au circuit bâbord. Lorsqu’il ne sort<br />
plus d’air du purgeur du vérin côté bâbord, fermer le purgeur ( 3,5 Nm).<br />
Ouvrir le purgeur du vérin côté tribord (côté tige sortie).<br />
<br />
Faire tourner le groupe côté tribord en alimentant la bobine de l’électrodistributeur<br />
correspondant au circuit tribord, puis la pompe manuelle<br />
inférieure lentement côté tribord et ensuite la pompe manuelle supérieure<br />
côté tribord. Lorsque la tige du vérin s’est déplacée sur toute sa course et<br />
qu’il ne sort plus d’air du purgeur du vérin côté tribord, fermer le purgeur<br />
du vérin ( 3,5 Nm).<br />
Pour les opérations finales simple et double poste de pilotage, se<br />
reporter à la rubrique 3 en fin de notice.<br />
(*) Voir rubrique « Schéma de câblage électrique des groupes EV2, EV3, HVR 1/3, HF »<br />
! Power packs EV2 and EV3: leave the bleeder cock open on the power<br />
pack during the bleeding of the drain circuits. When the drain circuits are<br />
bled and the oil coming out of the bleeder cock is free of air bubbles, tighten<br />
the bleeder cock ( 3.5 Nm).<br />
Turn the upper manual helm pump slowly to starboard (around 15 wheel<br />
turns in function of the hydraulic circuit length), then turn the lower manual<br />
helm pump slowly to starboard (around 15 wheel turns in function of the<br />
hydraulic circuit length). Run the power pack for10 to 15 seconds by<br />
applying current to the electro-distributor solenoid (*) corresponding to the<br />
starboard circuit. Mark the delivery pipe once there is no air coming out<br />
anymore (see drawing).<br />
Run the power pack for 10 to 15 seconds to port by applying current to the<br />
electro-distributor solenoid corresponding to the port circuit. Turn the<br />
lower manual helm pump slowly to port (by around 15 turns in function of<br />
the hydraulic circuit length), then turn the upper manual helm pump slowly<br />
(by around 15 turns in function of the hydraulic circuit length) until there is<br />
no air coming out of the unmarked pipe.<br />
Position the cylinder with its rod out on the boat starboard side.<br />
Connect the marked pipe to the cylinder on the side where the rod is out.<br />
! Do not open the cylinder bleeder cock on starboard.<br />
Connect the unmarked pipe to the cylinder on the side where the rod is in.<br />
Open the bleeder cock on port.<br />
Turn the upper manual pump slowly to port and then the lower manual<br />
pump in the same direction. Run the power pack by applying current to the<br />
electro-distributor solenoid corresponding to the port circuit. When the oil<br />
coming out from the cylinder port bleeder cock is free of air bubbles, close<br />
the bleeder cock ( 3,5 Nm).<br />
Open the cylinder bleeder cock on starboard (side where the cylinder rod is out).<br />
Run the power pack to starboard by applying current to the electrodistributor<br />
solenoid corresponding to the starboard circuit. Turn the lower<br />
manual pump slowly to starboard and then the upper manual pump in the<br />
same direction. Once the cylinder rod has travelled its complete stroke and<br />
the air coming out of the cylinder starboard bleeder cock is free of air<br />
bubbles, close the bleeder cock ( 3,5 Nm).<br />
Please refer to paragraph 3 at the end of the manual for the final check list for<br />
single or twin steering stations.<br />
(*) Refer to paragraph « Electric Connection Drawing for EV2, EV3, HVR 1/3, HF »<br />
29


