collins classic 22a - Rothenberger
collins classic 22a - Rothenberger
collins classic 22a - Rothenberger

You also want an ePaper? Increase the reach of your titles
YUMPU automatically turns print PDFs into web optimized ePapers that Google loves.
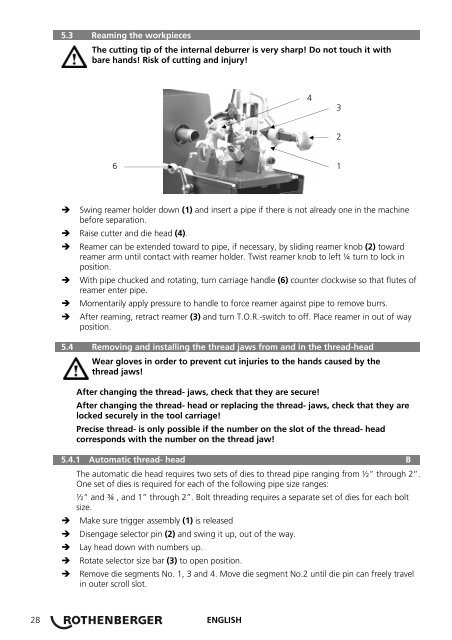
5.3 Reaming the workpieces<br />
The cutting tip of the internal deburrer is very sharp! Do not touch it with<br />
bare hands! Risk of cutting and injury!<br />
6<br />
� Swing reamer holder down (1) and insert a pipe if there is not already one in the machine<br />
before separation.<br />
� Raise cutter and die head (4).<br />
� Reamer can be extended toward to pipe, if necessary, by sliding reamer knob (2) toward<br />
reamer arm until contact with reamer holder. Twist reamer knob to left ¼ turn to lock in<br />
position.<br />
� With pipe chucked and rotating, turn carriage handle (6) counter clockwise so that flutes of<br />
reamer enter pipe.<br />
� Momentarily apply pressure to handle to force reamer against pipe to remove burrs.<br />
� After reaming, retract reamer (3) and turn T.O.R.-switch to off. Place reamer in out of way<br />
position.<br />
5.4 Removing and installing the thread jaws from and in the thread-head<br />
Wear gloves in order to prevent cut injuries to the hands caused by the<br />
thread jaws!<br />
After changing the thread- jaws, check that they are secure!<br />
After changing the thread- head or replacing the thread- jaws, check that they are<br />
locked securely in the tool carriage!<br />
Precise thread- is only possible if the number on the slot of the thread- head<br />
corresponds with the number on the thread jaw!<br />
5.4.1 Automatic thread- head B<br />
The automatic die head requires two sets of dies to thread pipe ranging from ½” through 2”.<br />
One set of dies is required for each of the following pipe size ranges:<br />
½” and ¾ , and 1” through 2”. Bolt threading requires a separate set of dies for each bolt<br />
size.<br />
� Make sure trigger assembly (1) is released<br />
� Disengage selector pin (2) and swing it up, out of the way.<br />
� Lay head down with numbers up.<br />
� Rotate selector size bar (3) to open position.<br />
� Remove die segments No. 1, 3 and 4. Move die segment No.2 until die pin can freely travel<br />
in outer scroll slot.<br />
28 ENGLISH<br />
4<br />
3<br />
2<br />
1