Anleitung A4 - Brandrup
Anleitung A4 - Brandrup
Anleitung A4 - Brandrup
- No tags were found...

Create successful ePaper yourself
Turn your PDF publications into a flip-book with our unique Google optimized e-Paper software.
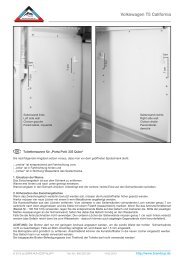
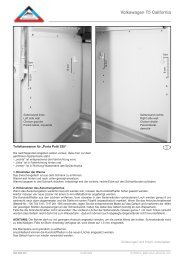
FLYOUT VW T4®DE1. Fahrer-/Beifahrerfenster (100 111 01S)Das selbstklebende Flauschband wird innen am Fensterrahmenangebracht: oben, links und rechts direktneben der Gummifensterdichtung; unten auf die waagrechteFensterdichtlippe. Die Inbetriebnahme (=Fahren,motorisch bewegen) des Fahrzeuges mit aufgesetztenMoskitonetzen an Fahrerhausfenstern ist nicht zulässig!2. Aufstellfenster VW-T4 Califonia (100 111 031)Die Befestigung des Flauschbandes erfolgt zuerst aufder Metallblende und zwar auf der Möbelseite, nichtFensterseite! Anschließend wird das untere, vordere(Richtung Fahrzeugbug) Druckknopfunterteil angebracht:Dies wird auf der Oberkante der vorderen, senkrechten(quer zur Fahrzeuglängsachse liegenden)Küchenblockwand–Seitenwand angeschraubt, vgl. Abb.F 1. Danach befestigen Sie das Moskitonetz an diesemDruckknopf und bringen das selbstklebende Flauschbandauch an den übrigen drei Netzseiten an passenderPosition an.2.1. Original-VW-T4 Schiebefenster (100 111 03S)Diese Moskitonetze sind passend für den Schiebeausschnittund nur für Fahrzeuge mit Original-VW-Verkleidung.Man beginnt mit der Befestigung am Steg der Festscheibe,das heißt am vorderen Ende. Danach beliebig.3. Schiebetür VW-T4 (100 111 04S)Die Moskitonetze passen nur bei Fahrzeugen mit Original-VW-Verkleidung(z.B. Multivan). Bringen Sie zuerstden oberen Teil über der Schiebtürlaufschiene an undzwar so hoch, dass der Klettverschluss am unteren Teildes Netzes auf der senkrechten Wand der Trittstufe befestigtwerden kann. Das Netz wird am oberen Rand derLaufschienen-Verkleidung befestigt. Die Druckknopfunterteilekönnen (müssen nicht) angeschraubt werden.Eventuelle Stoffspiegel werden ausgespart. Beim ÜbergangFahrzeugsäule/Trittstufe kann die Seiteneinfassungdes Netzes nach innen eingeschlagen werden. BeimFahrzeugen ab Modelljahr 1996 wird links und rechtsvon der Trittstufe die seitliche Einfassung des Netzesnach innen umgeschlagen und mit dem Klettband amselbstklebenden Flauschband befestigt, vgl. Abb. F3.3.1. Schiebetür VW-T4 California (100 111 041)Befestigen Sie zuerst das Netz an den serienmäßig vorhandenenDruckknopfunterteilen, die zur Anbringung derFahrerhausgardine (vor der Schiebetür, an der B-Säule)dienen (vgl. Abb. F5).Anschließend bringen Sie das Netz passend oben an.Das selbstklebende Flauschband wird hier zwischenSchiebetür- und Gardinenlaufschiene angebracht: Imvorderen Krümmungsbereich müssen am Flauschbandunbedingt Spannungsentlastungsschnitte durchgeführtwerden. Anschließend befestigen Sie das Netz seitlichvorn, dann hinten (vgl. Abb. F6) und zuletzt an der Trittstufe.Hier können Sie die beiliegenden Druckknopfunterteilemit den Edelstahlschrauben anbringen. EinVorbohren ist nicht notwendig. ACHTUNG: Schraubennicht überdrehen! Die untere Flauschbandbefestigungerfolgt auf der senkrechten Oberkante der Trittstufe.Die „benutzten“ Gardinen-Druckknöpfe sind auch aufder Netzumrandung vorhanden, so dass Sie die Gardineam entsprechenden Netzdruckknopf befestigen können.4. Heckklappe VW-T4 (100 111 05S)Das Heckklappen Moskitonetz ist für alle VW-T4 ausgelegtund wird rundum mit Klettverschluss befestigt. Espasst bei allen Fahrzeugen mit Originalverkleidung.Achten Sie stets darauf, daß der Reißverschluss-Schiebernicht in den Heckklappenverschluss gelangen kann,wenn Sie die Heckklappe schließen.4.1. Heckklappe VW-T4 California (100 111 051)Die Anbringung erfolgt erst oben, knapp über der Abschlussleistedes Dachstaukastens (vgl. Abb. F8), dannlinks (vgl. Abb. F7), anschließend rechts (vgl. Abb. F9):Hier kann das selbstklebende Flauschband ca. 2 mmunter die Gummidichtung geschoben werden sowie imMittelteil unter die Kunststoffverkleidungsteile geschobenwerden, um einen optisch schönen Abschluss zu erzielen;in allen gekrümten Bereichen muss dasFlauschband ca. 1 cm tief und im Abstand von ca. 2 cmeingeschnitten werden, um die Spannung zu reduzieren.Zum Schluss wird das Flauschband auf die schwarzeBodenblende geklebt (vgl. Abb. F10). Auf der rechtenSeite kann der Anfang des Flauschbandes unter die Bodenblendegeschoben werden, wenn man die letzteBlendenschraube hierfür löst, Flauschband einschiebtund Schraube wieder anzieht.EN1. Driver’s / passenger’s window (100 111 01S)These mosquito nets fit to all VW T4 models and offerthe best possible ventilation of the cabin windows.The nets are attached with hook-and-loop fastener. Theselfadhesive frieze band is attached to the interiorwindow frame: above, on the left and the right side directlynext to the rubber window sealing; beneath, ontothe horizontal window sealing lip.It is no allowed to activate the vehicle (=to drive/to movewith motor) with nets attached to the cabin windows ontraffic areas that are dedicated to the public!2. Hinged window VW T4 California (100 111 031)First, the frieze band is attached to the metal blind, namelyonto the side where the furniture is, not thewindow! Then, attach the lower front (direction: vehiclenose) press stud bottom part: screw it onto the upperedge of the front upright (lying diagonally to the vehicleslongitudinal axle) kitchen side wall, cp. arrow in imageF1. Thereafter, attach the mosquito net to this press studand apply the selfadhesive frieze band to the three remainingsides as appropriate.2.1. Original VW T4 sliding window (100 111 03S)These mosquito nets only fit into the sliding windowopening with original VW lining. Start at the bar of thepane, that is at the foremost ending. Thereafter, procedeas you wish.3. Sliding door VW T4 (100 111 04S)The mosquito nets can be used in vehicles with originalVW lining (e.g. Multivan).First, apply the frieze band above the sliding door runner.It has to be so high that the frieze band for the lower partof the net can be attached to the vertical wall of the steptread. Please leave out possible linings made of fabrics.At the transition of the vehicle’s pillar and the step tread,you can wrap the side edging of the net inwards. In vehiclessince model year 1996, the side edging of the netis wrapped in at the left and right side of the step treadand attached with hook-and loop fastener to the selfadhesivefrieze band, cp. image. F3.3.1. Sliding door VW T4 California (100 111 041)First, attach the net to the serial press stud bottom parts(in front of the sliding door, at pillar B) which actuallyserve for attaching the cabin curtain (cp. image F5).Then, appropriately attach the net above. Herefore,apply the selfadhesive frieze band between sliding doorand curtain runner. At the front bending, please cut inthe frieze band in order to reduce the tension. Thereafter,attach the net to the front side, then at the back(cp. image F6) and finally at the step tread. Here, youcan insert the enclosed press studs bottom parts withthe high-grade stell screws. You do not have to pre-drill.ATTENTION: do not overscrew the screws!Below, attach the frieze band to the vertical upper edgeof the step tread.The “occupied” curtain press studs also have to be appliedto the net rim so that the curtain can be attachedto the respective net press stud.4. Tailgate VW T4 (100 111 05S)The tailgate mosquito net fits into all VW T4 models withoriginal lining. It is attached with hook-and-loop fastenerall around the opening.When closing the tailgate, please take care that thezipper slide does not get into the tailgate closure.4.1. Tailgate VW T4 California (100 111 051)The tailgate mosquito net is attached all around theopening with hook-and-loop fastener. It fits to all VW T4California with tailgates.First, apply the hook-and-loop fastener above, justabove the end strip of the roof storage box (cp. imageF8, below), then to the left side (cp. image F7, below)and finally to the right side (cp. image F9, below): inorder to achieve a nice finish here, you can push the selfadhesivefrieze band 2 mm under the rubber sealing aswell as in the middle under the plastic lining; in all bendings,cut in the frieze band approx. 1 cm at intervals ofapprox. 2 cm in order to reduce the tension.Finally, stick the frieze band onto the black blind on thefloor (cp. image F10, below). On the right side, you canpush the beginning of the frieze band under the floorblind. Therefore, loosen the screw in the blind, insert thefrieze band and tighten the screw again.F 1F 2WVW T4 MultivanF 3F 4F 5 F 6F 7 F 8 F 9WF 10Änderungen und Irrtum vorbehalten. Changes and errors are excepted. Sous réserve de changements et d‘erreurs. Nos reservamos ante cambios y errores.
FLYOUT VW T4®FR1. Fenêtres conducteur et passager avant (100 111 01S)La partie velours autocollante est fixée à l‘intérieur aucadre de la fenêtre : en haut, à gauche et à droite directementà côté du joint d’étanchéïté en caoutchouc de lafenêtre ; en bas sur le bourrelet horizontal d’étanchéïtéde la fenêtre. La mise en marche du véhicule avec desmoustiquaires installées aux fenêtres conducteur et passageravant est interdite!2. Fenêtre rabattante du California T4 VW (100 111 031)Le collage du ruban velours se fait d’abord sur le cadremétallique, et en fait sur le côté du meuble et non sur lecôté de la fenêtre ! On fixe en dernier la partie creuse dubouton-pression en-bas à l‘avant (en direction de l’avantdu véhicule) : elle se visse sur l’arête supérieure de lacloison avant verticale du bloc cuisine/cloison latérale(perpendiculaire à l’axe longitudinal du véhicule), cf. F1.Enfin fixer la moustiquaire à ce bouton-pression et collerle ruban velours adhésif sur les trois côtés restants dela moustiquaire à l’emplacement prévu.2.1. Fenêtre coulissante d’origine du T4 (100 111 03S)Ces moustiquaires s’adaptent au carreau coulissant etuniquement sur les véhicules avec revêtement VW d’origine.Attention au sens de positionnement : étiquettepour le haut.3. Porte coulissante des T4 (100 111 04S)Les moustiquaires s’adaptent sur les véhicules avecrevêtement VW d’origine (Multivan p. ex.). Plaquerd’abord la partie supérieure de la moustiquaire au-dessusdu rail de roulement de la porte coulissante, et à unehauteur permettant à la fermeture auto-agrippantes dela partie inférieure de la moustiquaire de venir s’appliquersur le rebord vertical du marchepied. Au niveau dupassage du chassis du véhicule avec le marchepied, onpeut replier à l’intérieur la bordure latérale du filet. Pourgarantir le passage (entrée et sortie du véhicule), lesdeux pans de la moustiquaire se fixent de part et d’autrede la porte. Le filet est accroché sur le bord supérieurdu revêtement du rail de roulement. Les parties creusesdes boutons pressions peuvent être vissées (pasobligatoirement). Sur les modèles postérieurs à l’annéede construction 1996, la bordure latérale du filet se rabatà l’intérieur à gauche et à droite du marchepied, pour sefixer par contact du ruban à crochets sur le ruban velours,comme sur l‘illustration F3.3.1. Porte coulissante du California T4 VW (100 111 041)Accrocher tout d’abord la moustiquaire aux boutonspressionde série qui servent à installer le rideau de l’habitacleconducteur (qui va de la porte coulissante d’uncôté au montant de l’autre côté, cf. F5). Ensuite, fixer exactementle filet en haut. Le ruban velours autocollantse colle ici entre le rail de roulement du rideau et celuide la portière coulissante ; dans la partie coudée àl’avant, il faut absolument pratiquer des entailles de détentedans le ruban velours. Ensuite, fixer le filet sur lecôté avant, puis derrière (F6), et en dernier au marchepied.Ici il est possible de fixer les parties creuses inférieuresdes boutons-pression avec des vis d’acierspécial. Il n’est pas nécessaire de pré-perforer à la perceuse.ATTENTION : ne pas forcer les vis ! Le collagedu ruban velours du bas se fait sur le rebord supérieurvertical du marchepied. Les boutons-pression “utilisés”pour les rideaux existent aussi sur la bordure du filet, desorte que le rideau peut se fixer sur le bouton-pressioncorrespondant du filet.4. Hayon du T4 VW (100 111 05S)La moustiquaire de hayon pour tous les T4 VW se fixesur le pourtour avec du ruban de fermetures auto-agrippantes.Elle s’adapte à tous les véhicules avec revêtementd’origine. Toujours prendre garde à ne pas coincerle curseur de la fermeture à glissière dans le verrou duhayon lors de la fermeture du hayon.4.1. Hayon du California T4 VW (100 111 051)La moustiquaire du hayon se fixe sur le pourtour avecdu ruban de fermetures auto-agrippantes. Elle s’adapteà tous les California T4 VW avec hayon. La mise en placese fait tout d’abord en haut, juste au dessus de la lisièredu coffre de toit (cf. F8), puis à gauche (cf. F7), enfin àdroite (cf. F9): pour l’esthétique, il est ici possible d‘insérerle ruban velours autocollant de 2 mm environ sousle caoutchouc d’étanchéité, tout comme il est possiblede le repousser dans la partie médiane sous les portionsde revêtement en matière synthétique ; à tous les endroitscoudés, il est nécessaire d’entailler le ruban velourssur environ 1 cm de profondeur et à intervalles de2 cm environ, pour réduire la tension. En dernier collerle ruban velours sur le marchepied noir au sol (cf. F10).Sur le côté droit il est possible de glisser l‘extrêmité duruban velours sous le marchepied en dévissant pour cefaire la dernière vis, puis en glissant le ruban veloursavant de revisser.ES1. Ventana del conductor/acompañante (100 111 01S)La tira de flojel autoadhesiva se fija al interior al marcode la ventana: arriba, a la izquierda y derecha, directamenteal lado del cierre de goma de la ventana; abajo,sobre el labio de junta horizontal de la ventana.!La puesta en marcha del vehículo (= conducir, moversecon motor) con mosquiteras montadas a las ventanasdel conductor/acompañante está prohibida!2. Ventana abatible California VW T4 (100 111 031)Primero, fije la tira de flojel al listón de metal, al lado delmueble y no de la ventana! Luego, aplique la parte bajadel butón de presión más inferior y delantero (direcciónde la proa del vehículo): ésta se enrosca en el bordesuperior de la pared lateral de la cocina (pared frontal,yacendo a través del eje logitudinal del vehículo)Después, aplique el mosquitero a este butón de presióny fije la tira de flojel autoadhesiva a los otros trés ladosde la red al lugar adecuado.2.1. Ventana corredera original VW T4 (100 111 03S)Esta mosquitera se adapta a las ventanas correderas ysolamente a vehículos con revestimiento original VW.Empieze en el puente del cristal, es decir en el extremodelantero. Luego, proceda a voluntad.3. Puerta corredera VW T4 (100 111 04S)Las mosquiteras se adaptan a los vehículos con revestimientooriginal VW (p.ej. Multivan). Empieze arriba, encimadel carril de rodadura de la puerta corredera, asaber así tan alto que se puede fijar el tejido autoadhesivoen la parte baja de la red al pared vertical del pledaño.En la transición del montante del vehículo/ pledañose puede doblar por dentro la cenefa lateral de la red.Aplique la red al borde del revestimiento del carril másarriba. Puede (no debe) atornillar las partes bajas de losbutones de presión. Deje libre posibles piezas detejido (Multivan VW). En vehículos del año de modelo1996 doble por dentro la cenefa de la red al lado derechay izquierda y fijela con el cierre adhesivo al flojelautoadhesivo, cp. F3.3.1. Puerta corredera VW T4 California (100 111 041)Primero, aplique la red a las partes bajas de los butonesde presión de serie de las cortinas de la cabina (delantede la puerta corredera, al montante B, cp. F5).Luego, monte la red a la parte arriba. Fije el flojel autoadhesivoentre el carril de la puerta corredera y de lacortina: en la curvatura delantera hay que cortar el flojelpara minimar la tensión. Ahora, aplique la red en el lateraldelantero, después en la parte trasera (cp. F6) y alfinal en el peldaño. Aquí, puede colocar con los tornillosde acero fino las partes bajas de los butones de presión.No hay que preperforar la superficie.¡ATENCIÓN: no dé demasiado cuerda, es decir no tirecon demasiado fuerza!La fijación baja del flojel se realiza en el borde superiordel peldaño. Los butones de presión ahora “ocupados”se encuentran otra vez en el borde de la red. De estaforma, puede fijar la cortina al butón de presión correspondienteen la red.4. Portón trasero VW T4 (100 111 05S)La mosquitera se adapta a todos los VW T4 con revestimientooriginal. Se la fija en todo el alrededor concierre adhesivo. Siempre tenga cuidado que el deslizadorde la cremallera no llegue en el portón trasero cuandose lo cierre.4.1. Portón trasero VW T4 California (100 111 051)La mosquitera para el portón trasero se fija con cierreadhesivo en todo el alrededor con cierre adhesivo. Seadapta en todos los California VW T4 con portón trasero.Al fijar la red al vehículo, empieze arriba, justo sobre ellistón final de la caja del techo (cp. F8), después a la izquierda(cp. F7), luego a la derecha (cp. F9): en ello,puede empujar la tira de flojel aprox. 2 mm bajo la juntade goma asi que en la parte central bajo las piezas delrevestimiento de plástico para un fin opticamente perfecto.En las partes del vehículo no completamente rectashay que entallar la tira de flojel con pequeños cortesde 1 cm como mínimo (distancia aprox. 1-2 cm) paraque la tira de flojel no se arrugue demasiado en las curvas.Al final, aprete la tira del flojel en la blenda negra delsuelo (cp. F10). Al lado derecha, puede empujar el comienzode la tira de flojel bajo la blenda del suelo. Paraello tiene que aflojar el tornillo último de la blenda, introducirla tira de flojel y apretar el tornillo de nuevo.F 1F 2WVW T4 MultivanF 3F 4F 5 F 6F 7 F 8 F 9WF 10Änderungen und Irrtum vorbehalten. Changes and errors are excepted. Sous réserve de changements et d‘erreurs. Nos reservamos ante cambios y errores.
FLYOUT VW T4DEAllgemein gültigDas beiliegende Flauschband ist mit einem Spezialkleberbeschichtet, der für den Verwendungszweck am bestengeeignet ist. Allerdings ist das beste selbstklebendeFlauschband ein Kompromiss zwischen einfacher Anbringungund guter Universal–Haltbarkeit. Deshalb ist esmöglich, dass sich das Flauschband bei Einwirkunghoher Temperaturen vom Untergrund abhebt. Sollte diesgeschehen, drücken Sie es einfach wieder auf. Bei vielenFahrzeugen (z.B. bei den meisten VW-T3-Modellen) wurdenzum Teil Kunststoffverkleidungen verwendet, diehohe Anteile an sog. „Weichmachern“ enthalten. DieseWeichmacher „unterwandern“ jeden selbsthaftendenKleber und lösen ihn. Dann kann man zwar das Flauschbandwieder andrücken (die Klebehaftung wird in derRegel nicht beeinträchtigt), es wird sich jedoch nach einigerZeit, vor allem bei höherer Umgebungstemperatur,wieder lösen.Die Anbringung des selbstklebenden Flauschbandesmuss bei Temperaturen über 20° C erfolgen.Der Untergrund muss vollkommen trocken, gesäubertund entfettet sein, z.B. mittels Alkohol oder Waschbenzin(dabei unbedingt Schutzhandschuhe verwenden!ACHTUNG: Feuergefahr!). Nach dem Aufbringen mussdas Flauschband mit einem Föhn auf ca. 40-45 Grad Cerwärmt und sofort gut auf den Untergrund angepresstwerden.Sofern die Verkleidung Ihres Fahrzeuges aus Kunststoffenbesteht, ist es empfehlenswert die Anbringungsstellenfür das selbstklebende Flauschband mitSika-Haftreiniger 205 vorzubehandeln. Gehen Sie dabeivorsichtig und sparsam mit Haftreiniger um, achten Sieinsbesondere darauf, dass die Lösungen nicht „verlaufen“,weil sie bei Austrocknung weiße Flecken hinterlassenkönnen. Nach dem Bestreichen mit Haftreinigermuss mindestens 30 Minuten abgelüftet werden. AufMöbeloberflächen und lackiertem Blech ist eine Vorbehandlungnicht notwendig – nur entfetten. Bringen Siedas selbstklebende Flauschband stets erst oben unddanach seitlich an. Das Moskitonetz kann am oberenFlauschband befestigt werden, so dass es Ihnen als„Befestigungsschablone“ für die Verklebung des übrigenBandes dient. Die einzelnen Flauschbandteile werdenStoß an Stoß aneinander gefügt. Lediglich bei den Moskitonetzen,welche genau in der Ecke Druckknöpfehaben, müssen hier die Flauschbandteile überlappt werden.An allen nicht völlig gerade verlaufenden Verklebungsstellenmuss das Flauschband seitlich mind. 1 cmtiefe Entspannungs-Einschnitte erhalten, damit es sichdurch Krümmungs-Spannung nicht löst. Die Einschnitteführt man im Abstand von ca. 1-2 cm durch – beidseitigversetzte Einschnitte sind bei ca. 90° Biegungen empfehlenswert;sicherheitshalber sollte das Flauschband inder Mitte der Biegung völlig durchtrennt werden. Nachder Anbringung des Flauschbandes wird das Moskitonetzpassgerecht aufgesetzt. Markieren Sie die Verschraubungspunkteder Druckknopfunterteile mit einemFilzstift. Für die Befestigung der Druckknopfunterteilewerden durch das Flauschband hindurch an passenderStelle Bohrungen (Bohrer 2,5 – 2,8 mm) durchgeführtund jedes Druckknopfunterteil mit einer Schraube befestigt.Die Vorbohrungen sind entbehrlich, wenn dieSchraube lediglich in die Kunststoffverkleidung (undnicht in das Blech) eingeschraubt werden: In Kunststoffverkleidungensowie Holzteile werden die Schrauben direkteingeschraubt – VORSICHT: nicht überdrehen, alsonicht zu fest anziehen!TIPP: Verkleidungen nie mit silikonhaltigen Mitteln behandeln,weil dann keine Verklebungen halten!ENGeneral informationThe enclosed frieze band is coated with a special adhesivewhich is the most suitable for the intended use.Nevertheless, even the best adhesive frieze band is acompromise between easy handling and good universalstability. With very high temperatures, the frieze bandcan peel off the surface. If this occurs, simply press itonto the surface again.Many vehicles (e.g. most of the VW T3 models) partiallyhave a plastic lining with a high share of so called “flexibilisers”.These flexibilisers are a “threat” to all adhesivesas they then peel off. In this case, you can press thefrieze band on again (in general, the adhesive strengthis not affected), but after some time it will peel off again,especially in high temperatures.The selfadhesive frieze band must be attached withtemperatures above 20 °C (= 68 °F). The surface has®to be completely dry, clean and degreased, e.g. withalcohol or benzine (hereby, please always wear protectivegloves! CAUTION: danger of fire!). After attachingthe frieze band, heat it up to 40 - 45 °C (104 - 113 °F)with a hair dryer and immediately press it firmly ontothe surface.If the lining of your vehicle contains plastics, we recommendto pretreat the mounting surface of the selfadhesivefrieze band with Sika Cleaner 205. Please usecleaner carefully and sparingly, especially take care thatthe solutions do not run as they can leave white blotchesafter drying. After applying cleaner let the surfaceair for at least 30 minutes. On furniture and painted metalsheet a pretreat is not necessary. Simply degrease thesurface.Always attach the selfadhesive frieze first above andthen to the sides of the vehicle lining. If you attach themosquito net to the upper frieze band, you can use it asa template for the remaining frieze band. The individualfrieze band pieces are attached one after the other ontothe surface. Merely the frieze band of mosquito netswhich have press studs right in the corner has to overlap.All not fully straight attachable pieces have be to cutin minimum 1 cm at the sides every 1-2 cm in order toreduce the tension and to avoid that the frieze bandpeels off the surface. In edges with an 90° angle, we recommendto cut in the tag by turns on both sides. As aprecaution, the frieze band should be cut through totallyin the centre of a bending. After applying the frieze band,attach the mosquito net as appropriate. Mark the screwingpoints for the press stud bottom parts with a feltpen. In order to fixate the press stud bottom parts, drilla hole through the frieze band at the appropriate spot(drill bit 2.5 - 2.8 mm).Then, attach each press stud bottom part with a screw.You do not have to pre-drill if the screws are merely appliedto the plastic lining (and not to the metal sheet): inplastic lining as well as wood the screws are directly insertedinto the material.Caution: do not over-screw, so do not pull to tightly!Do not clean the lining with agents that containsilicone. Otherwise, the adhesive does not stick!FRRègle généraleLe ruban velours joint est enduit sur son envers de l’adhésifle mieux adapté à cette utilisation particulière. Enfait le meilleur ruban velours autocollant est un compromisentre une fixation ordinaire et une bonne adhérencegénérale. C’est pourquoi il est possible que, sous l’effetde températures élevées, le ruban velours se décolle dusupport. Si c’était le cas, il suffit de lui appliquer de nouveauune forte pression. On a utilisé pour partie dans denombreux véhicules (p. ex. dans la plupart des modèlesT3 VW) des revêtements de plastique contenant degrandes proportions de soi-disant “agents adoucissants”qui ne polymérisent pas avec la colle. Ces agentsadoucissants “infiltrent” tous les autocollants et les dissolvent.Alors on peut certes exercer de nouveau uneforte pression sur le ruban velours (l’adhérence de lacolle n’est en régle générale pas atténuée), et cependantil se détache de nouveau après quelque temps, avanttout à cause de l’élévation de la température ambiante.Il faut absolument une température supérieure à 20° Cpour procéder à la fixation du ruban velours. Le supportdoit être complètement dégraissé, nettoyé et sec,par exemple avec de l’alcool ou du détachant (prièred‘utiliser des gants de protection ! ATTENTION : produitinflammable !). Après collage il faut chauffer leruban velours au sèche-cheveux à environ 40-45° C etimmédiatement le presser fortement sur le support.Dans la mesure où le revêtement de votre véhicule contientdes matières synthétiques, il est recommandé depré-traiter les emplacements d’encollage du ruban veloursautocollant avec le dégraissant Sika 205. Ce faisant,manipuler le dégraissant avec prudence etéconomie, et veiller particulièrement à ce que les solutionsne coulent pas, parce qu’en séchant elles peuventlaisser des traces blanches. Après l’application de dégraissantaérer absolument au moins 30 minutes. Lepré-traitement n’est pas nécessaire sur la surface desmeubles et sur la tôle peinte, il suffit de dégraisser. Fixerle ruban velours autocollant toujours en premier en haut,et ensuite sur les côtés. Il est possible d’accrocher lamoustiquaire à la partie supérieure du ruban velourspour qu’elle serve de “gabarit de fixation” pour l’encollagedu reste du ruban velours sur le support. Les différentsmorceaux de ruban velours sont assemblés les unsaux autres au coup par coup. C’est uniquement pour lesmoustiquaires possédant des boutons-pression exactementdans l’angle que les morceaux de ruban veloursdoivent à cet endroit être partiellement superposées. Auniveau de toutes les portions d’encollage qui ne sont pasdroites, il faut pratiquer sur le côté du ruban velours desentailles de souplesse d’environ 1 cm, afin qu’il ne sedécolle pas au niveau du coude ou de la tension. Onpratique ces entailles à intervalles de 1 à 2 cm ; ces entaillessont nécessaires au moins sur les deux côtés pourdes coudes d’environ 90° ; par mesure de précaution, ilfaudrait complètement couper le ruban velours au milieudu coude. Après la fixation du ruban velours, installer lamoustiquaire comme il convient. Marquer au stylo feutreles points de vissage de la partie creuse des boutonspression,puis percer à travers le ruban velours à l’endroitmarqué (foret de 2,5 – 2,8 mm) et fixer chaquepartie creuse par une vis. L’utilisation de la perceuse estsuperflue lorsque la vis est vissée uniquement dans lerevêtement de matière synthétique (et pas dans la tôle): les vis se vissent directement dans les revêtements dematière synthétique et dans les parties en bois.PRUDENCE : ne pas forcer, ne pas serrer trop fort !Ne jamais traiter les revêtements avec des produits contenantdes silicones parce qu’alors les collages ne tiennentpas !ESInformación generalNuestras mosquiteras se ajustan en todo su alrededorcon cierre adhesivo. Con este sistema, el vehículo quedaperfectamente sellado y protegido de insectos. El adhesivoen la tira de flojel incluida es el mejor adhesivo parael uso previsto. Sin embargo, en todo caso un flojel adhesivoes un compromiso entre fijación simple y adhesiónuniversal buena. En el caso de que el flojel sedespegue, por ejemplo con temperaturas muy altas,apriételo bien al contorno otra vez. En muchos vehículos(p.ej. en la majoría de los modelos VW T3) se utilizan porparte revestimientos de plástico los que contienen cantidadesaltas de así llamados “plastificantes”. Los plastificantes“infiltran” cada adhesivo y le despeguen. Eneste caso aprete el flojel otra vez al contorno (en general,no influye en la adhesión), pero después de algúntiempo se desolverá otra vez, sobre todo en temperaturasaltas.Monte la tira de flojel autoadhesiva con temperaturasexteriores superiores a 20 grados centigrados. La basedonde vaya a ir pegado tiene que estar completamenteseca, limpia y desengrasada. Se la puede limpiarpor ejemplo con alcohol o espiritú (por favor,¡póngase guantes de protección! ATENCIÓN: ¡peligrode incendio!). Después del montaje, recaliente el flojelcon un secador (entre aprox. 40-45 grados centigrados)y apriételo inmediatamente al contorno.En el caso de que el revistimiento consiste en plasticos,se recomenda pretratar el subsuelo con Sika Limpiador205 para poder apretar la tira de flojel correctamente. Enello, proceda con cautela. En primer lugar, tenga cuidadoque las soluciones no se “deslizen”. Al secar, puedendejar manchas blancas. Tras el tratamiento conlimpiador dejelo air durante 30 minutos. No es necesariopretratar la superficie de muebles y chapa lacada. Solamentetiene que desengrasarla. Primero, ajúste la tira deflojel arriba y después a los laterales. Para la fijación alos laterales, recomendamos aplicar la mosquitera al flojelsuperior. Así sirve como una plantilla y facilita el pegadoen los laterales. Fije en batería las piezasindividuales del flojel.En las partes del vehículo no completamente rectas hayque entallar la tira de flojel con pequeños cortes de 1 cmcomo mínimo (distancia aprox. 1-2 cm) para que la tirade flojel no se arrugue demasiado en las curvas. Enángulos de 90° tendrá que cortar la tira de flojel enambos lados. Por si acaso, corte la tira de flojel completamenteen la mitad del ángulo. Tras la fijación del flojel,aplique la mosquitera adecuadamente.Marque los punctos de atornamiento de las partes inferioresde los butones de presión con un rotulador.Para la fijación de las partes bajas de los butones depresión hay que perforar la tira de flojel en los lugaresadecuados (barrena de 2,5 – 2,8 mm) y fijar cada partebaja de los butones de presión con un tornillo. En elcaso de que se debe enroscar los tornillos en revestimientosde plástico (y no en la chapa), las perforacionesestán imprescindibles: en revestimientos de plástico yde madera se enroscan los tornillos directamente en elmaterial.ATENCIÓN: no dé demasiado cuerda, es decirno tire con demasiado fuerza!Por favor, no use medios con silicona para limpiar elrevestimiento, ya que el flojel no pegaría bien.© 2013 by BRANDRUP Art.-Nr.: 900 111 004 14.02.2013 http://www.brandrup.de