Toilettenwanne VW-T5 California, Porta Potti 335 Qube - Brandrup
Toilettenwanne VW-T5 California, Porta Potti 335 Qube - Brandrup
Toilettenwanne VW-T5 California, Porta Potti 335 Qube - Brandrup
- No tags were found...

You also want an ePaper? Increase the reach of your titles
YUMPU automatically turns print PDFs into web optimized ePapers that Google loves.
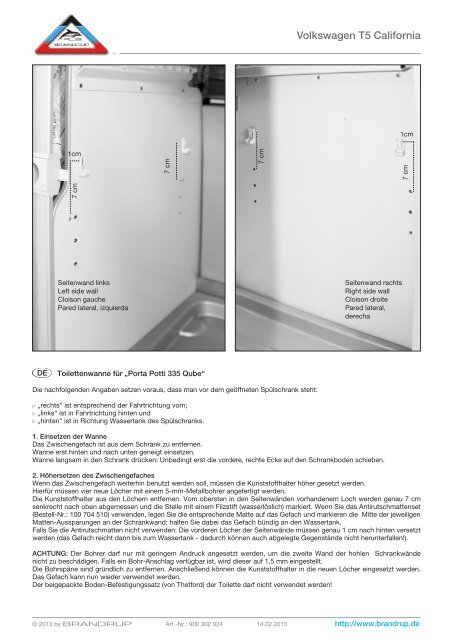
Volkswagen <strong>T5</strong> <strong>California</strong>®1cm1cm7 cm7 cm7 cm7 cmSeitenwand linksLeft side wallCloison gauchePared lateral, izquierdaSeitenwand rechtsRight side wallCloison droitePared lateral,derechaDE<strong>Toilettenwanne</strong> für „<strong>Porta</strong> <strong>Potti</strong> <strong>335</strong> <strong>Qube</strong>“Die nachfolgenden Angaben setzen voraus, dass man vor dem geöffneten Spülschrank steht:b „rechts“ ist entsprechend der Fahrtrichtung vorn;b „links“ ist in Fahrtrichtung hinten undb „hinten“ ist in Richtung Wassertank des Spülschranks.1. Einsetzen der WanneDas Zwischengefach ist aus dem Schrank zu entfernen.Wanne erst hinten und nach unten geneigt einsetzen.Wanne langsam in den Schrank drücken: Unbedingt erst die vordere, rechte Ecke auf den Schrankboden schieben.2. Höhersetzen des ZwischengefachesWenn das Zwischengefach weiterhin benutzt werden soll, müssen die Kunststoffhalter höher gesetzt werden.Hierfür müssen vier neue Löcher mit einem 5-mm-Metallbohrer angefertigt werden.Die Kunststoffhalter aus den Löchern entfernen. Vom obersten in den Seitenwänden vorhandenem Loch werden genau 7 cmsenkrecht nach oben abgemessen und die Stelle mit einem Filzstift (wasserlöslich) markiert. Wenn Sie das Antirutschmattenset(Bestell-Nr.: 100 704 510) verwenden, legen Sie die entsprechende Matte auf das Gefach und markieren die Mitte der jeweiligenMatten-Aussparungen an der Schrankwand; halten Sie dabei das Gefach bündig an den Wassertank.Falls Sie die Antirutschmatten nicht verwenden: Die vorderen Löcher der Seitenwände müssen genau 1 cm nach hinten versetztwerden (das Gefach reicht dann bis zum Wassertank - dadurch können auch abgelegte Gegenstände nicht herunterfallen!).ACHTUNG: Der Bohrer darf nur mit geringem Andruck angesetzt werden, um die zweite Wand der hohlen Schrankwändenicht zu beschädigen. Falls ein Bohr-Anschlag verfügbar ist, wird dieser auf 1,5 mm eingestellt.Die Bohrspäne sind gründlich zu entfernen. Anschließend können die Kunststoffhalter in die neuen Löcher eingesetzt werden.Das Gefach kann nun wieder verwendet werden.Der beigepackte Boden-Befestigungssatz (von Thetford) der Toilette darf nicht verwendet werden!© 2013 by BRANDRUP Art.-Nr.: 900 302 024 14.02.2013 http://www.brandrup.de
ENToilet tray for “<strong>Porta</strong> <strong>Potti</strong> <strong>335</strong> <strong>Qube</strong>”In order to follow these instructions, you have to be in front of the opened kitchen cupboard. In this case:b “right” means the front of the car (in driving direction)b “left” means the back of the car (in driving direction)b “back” means in the direction of the water tank (kitchen).1. Inserting the trayRemove the middle shelf. Then, slide the tray into the cupboard with its back part first, slightly inclined downwards.Push the tray slowly into the cupboard. At this, start at the front right corner.2. Lifting the middle shelfIf you still want to use the middle shelf, the plastic holders have to be placed slightly higher. Herefore, you have to prepare fournew holes with a 5 mm driller for metal. Remove the plastic holders. Mark a point with a felt-tip pen (water soluble) exactly 7 cmabove the most upper hole in the side wall. If you have the rubber mats set (Reference: 100 704 510), put the correspondent matonto the shelf and mark the middle of the correspondent mat cavity at the side wall. Thereby, the shelf has to be flush with thewater tank. If you don’t have the rubber mats, the front holes have to be moved exactly 1 cm into the scullery (the shelf is thenflush with the water tank; deposited items can not fall down!).ATTENTION: Please applicate the driller with little presure in order not to damage the second wall of the hollow cupboard walls.If you have a driller with stop position, adjust it at 1,5 mm.Remove the swarf thoroughly. Then, insert the plastic holders into the newly srewed holes. Now the shelf can be used again.It is not allowed to use fixation kit (included from Thetford) for mounting the toilet on the ground!FRBaquet pour les toilettes « <strong>Porta</strong> <strong>Potti</strong> <strong>335</strong> <strong>Qube</strong> »Les indications suivantes présupposent que l’on est debout devant le placard d’évier ouvert :b « droit » correspond au sens de la marche avant;b « gauche » est dans le sens de la marche arrière, etb « l‘arrière » est en direction du réservoir d’eau du placard sous l’évier.1. Installation du baquetEnlever du placard la planche intermédiaire. Installer le baquet d’abord vers l’arrière et en le penchant vers le bas.Enfoncer le baquet lentement dans le placard. Très important de positionner le baquet en commençant par le coin avant droit.2. Déplacement vers le haut de la planche intermédiairePour continuer à utiliser la planche intermédiaire, il faut placer plus haut les supports de plastique.Il faut donc percer 4 nouveaux trous avec un foret métallique de 5 mm.Retirer les supports de plastique des trous. A partir du trou le plus élevé dans les parois latérales, il faut mesurer exactement7 cm verticalement et marquer l’emplacement au stylo feutre (lavable à l’eau).Si vous utilisez le set de tapis antidérapants (N°. : 100 704 510), posez sur la planche le tapis correspondant et marquez lemilieu de chaque échancrure du tapis sur la cloison du placard, en tenant bien la planche contre le réservoir d’eau.Si vous n’utilisez pas les tapis antidérapants : les trous de devant dans les cloisons latérales doivent être repoussés exactementà 1 cm derrière (la planche arrive alors contre le réservoir d’eau, et ainsi les objets rangés ne peuvent pas non plustomber derrière !).ATTENTION : ne pas appuyer fort sur le foret pour ne pas endommager la seconde paroi des cloisons creuses du placard.S’il existe un indicateur de forage, il faut le régler sur 1,5 mm. Enlever soigneusement les copeaux de forage. Pour finir, replacerles supports de plastique dans les nouveaux trous. La tablette est de nouveau utilisable. Il ne faut absolument pas utiliserle kit de fixation au sol des toilettes Thetford joint à l’emballage !ES Bandeja de apoyo para „<strong>Porta</strong> <strong>Potti</strong> <strong>335</strong> <strong>Qube</strong>“Para introducir la bandeja de apoyo tiene que abrir el armario del mueble cocina. Al estar delante del armariob “derecha” significa la parte delantera del véhiculo (de acuerdo con el sentido de marcha)b “izquierda” significa la parte trasera del véhiculo (de acuerdo con el sentido de marcha)b “detrás” significa en dirección del depósito de agua.1. Introducir la bandejaRemueve el estante intermedio del mueble. Primero, introduzca la bandeja inclinada hacia abajo en la parte trasera del armario,después déjela entrar lentamente en la parte delantera empezando con la esquina derecha.2. Levantar el estante intermedioSi quiere seguir utilizando el estante intermedio, tiene que levantar los soportes de plástico. Para ello, hay que perforar quatroagujeros nuevos con un taladro para metal de 5 mm. Saque los soportes de plástico de los agujeros y con un rotulador (solubleen agua) marque un punto exactamente 7 cm encima y 1 cm hacía atrás del agujero original. Así el estante llega hasta el depósitode agua y los objetos no pueden caerse. Si tiene el set de antideslizantes (N°. : 100 704 510), también puede poner elantideslizante correspondiente sobre el estante y marcar la pared lateral en la mitad de la cavidad correspondiente,aguantando el estante directamente al déposito de agua.ATENCIÓN: El mueble tiene una pared lateral doble. Para no dañar la segunda pared, maneje el rotulador en la primera paredcon poca presión. Si el rotulador tiene un indicador tope, ajustelo a 1,5 mm. Remueve la ralladura completamente. Despuéspuede introducir los soportes de plástico en los agujeros nuevos y utilizar el estante de nuevo como almacén.¡No debe utilizar el kit de fijacíon (está incluido de Thetford) para asegurar el apoyo en el fondo!Änderungen und Irrtum vorbehalten. Changes and errors are excepted. Sous réserve de changements et d‘erreurs. Nos reservamos ante cambios y errores.