TOP-RAIL VW T5 - Brandrup
TOP-RAIL VW T5 - Brandrup
TOP-RAIL VW T5 - Brandrup

Create successful ePaper yourself
Turn your PDF publications into a flip-book with our unique Google optimized e-Paper software.
Mounting instructions<br />
<strong>TOP</strong>-<strong>RAIL</strong> <strong>T5</strong><br />
®<br />
Thank you for opting for original German high-quality accessories from BRANDRUP.<br />
These guidances are not final nor can they be final either.<br />
All changes, errors and improvements are and remain excepted.<br />
We point out that no warranty for the correctness of the contents of this manual is taken. We cannot<br />
consider e all individual handlings, external circumstances, particular individual skills etc., and therefore<br />
manual errors cannot be avoided.<br />
If you have any questions concerning usage, mounting, maintenance etc. of our products, please trustfully<br />
contact your BRANDRUP licensed retailer or us directly. We are happy to offer you any<br />
advise you need and thankfully accept your suggestions for improvement.<br />
<strong>TOP</strong>-<strong>RAIL</strong> may only be mounted by a BRANDRUP licensed retailer or a qualified specialised<br />
garage. The mounting has to be done accurately and uniformly on both sides.<br />
V ATTENTION:<br />
Responsibility and verification for proper mounting rests on the person who mounted<br />
<strong>TOP</strong>-<strong>RAIL</strong> <strong>T5</strong>.<br />
Additional necessary mounting tools for <strong>TOP</strong>-<strong>RAIL</strong> <strong>T5</strong>:<br />
V masking tape, breadth 3-5 cm<br />
V 1 cartouche "Sikaflex Adhesive 252" (colour: black)<br />
V 1 "Sika Cleaner 205" (clinging cleaner)<br />
V 1 "Sika Primer 210 T", 1 Sikaflex Remover<br />
V 1 steel drill each of 3.00 mm with centre punching point<br />
V 1 sheet of sandpaper, granulation 40-60<br />
V 1 overhead marker or soft pencil<br />
V 1 transparent parcel tape<br />
In general, these mounting tools are sufficient for two <strong>TOP</strong>-<strong>RAIL</strong> mountings. As far as possible only use<br />
"bullet"-drills. Those are drills which have a further smaller and thinner point in front of the real drill<br />
point (obtainable at specialised shops).<br />
V ATTENTION:<br />
It is not allowed to mount the aluminium rail without spoiler set (endings).
I. Mounting instructions for <strong>VW</strong> <strong>T5</strong><br />
<strong>TOP</strong>-<strong>RAIL</strong> <strong>T5</strong> is available for <strong>VW</strong> <strong>T5</strong> vehicles with short wheelbase.<br />
The aluminium rails are always mirror imaged. This means, we have one for the right and one for the<br />
left side of the vehicle.<br />
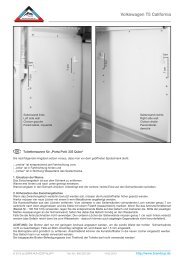
1. Preparing the vehicle/mounting surface (applies to all <strong>VW</strong> <strong>T5</strong> vehicles)<br />
The perforations in the aluminium profile have to be applied to the mounting surface on the<br />
vehicle with a drill of 3 mm diameter.<br />
V ATTENTION:<br />
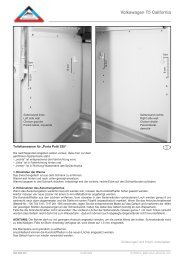
You need an assistant to help you to<br />
adjust the aluminium rail to the vehicle.<br />
The aluminium rail is mounted onto the longitudinal<br />
spar above the windows.<br />
The lower edge of <strong>TOP</strong>-<strong>RAIL</strong> has to be flush<br />
with the lower sheet metal edge of the longitudinal<br />
spar. However, the aluminium rail<br />
has to rest entirely upon the vehicle sheet;<br />
the lower edge must not protrude below.<br />
For the right position of the aluminium rail,<br />
first put the ending (rear) onto the longitudinal<br />
spar. Thereby, the put the ending close to<br />
the back end of the longitudinal spar (but<br />
not over the bending, cp. image 1).<br />
Mark the exact beginning of the aluminium<br />
profile with a overhead marker (cp. image 2).<br />
Then, put the aluminium rail onto the longitudinal<br />
spar together with your assistant (the<br />
assistant holds the aluminium profile in the<br />
front) and bring it into line with the just marked<br />
spot at the back. Now apply the back<br />
drilling onto the vehicle sheet. Right thereafter,<br />
cautiously screw in the correspondent<br />
screws.<br />
Now, pre-drill the holes one after the other<br />
from back to front and insert the screws.<br />
Thereby, your assistant has to appropriatly<br />
hold the aluminium rail onto the longitudinal<br />
spar.<br />
a<br />
s<br />
V ATTENTION:<br />
If your drilling machine suddenly penetrates the sheet, be careful that the drill chuck does not<br />
damage the anodisation of the <strong>TOP</strong>-<strong>RAIL</strong>.<br />
You can insert the screws with a cordless screwdriver at minimum rotating speed, but you do<br />
not fasten them herewith: screw in the screws very cautiously by hand in order not to over-twist<br />
them!<br />
2
After attaching the aluminium profile, cover<br />
the vehicle sheet above and under the <strong>TOP</strong>-<br />
<strong>RAIL</strong> with masking tape (cp. illustration 3).<br />
Before, thoroughly remove the drill chuck<br />
(either you wipe it away or use a vacuum<br />
cleaner with a soft brush). The masking tape<br />
has to be flush with the aluminium rail.<br />
At the back, loosly hold the rear ending onto<br />
the sheet in order to apply the masking tape.<br />
d<br />
At the front, attach the front spoiler as<br />
follows:<br />
As an elongation of the aluminium rail, the<br />
front spoiler has to be attached to the vehicle<br />
as straight as possible. Do not bend it to one<br />
side! At the windscreen pillar (A pillar)<br />
bend the front spoiler slightly downwards.<br />
The front spoiler has to be flush with the<br />
windscreen’s rim, so that the rainwater can<br />
drain off.<br />
f<br />
Equally attach masking tape to the vehicle<br />
sheet above and beneath the front spoiler<br />
(cp. image 4, 5).<br />
Thereafter, cautiously screw<br />
out the screws and remove<br />
the aluminium rail.<br />
g<br />
Before bonding, thoroughly<br />
degrease all screws (e.g.<br />
with petrol)!<br />
2. Final assembly of the aluminium profile, bonding<br />
V ATTENTION:<br />
Applies to all bondings: the ideal bonding temperature lies between 18–25° C (64,4°-77° F).<br />
In cold weather, put the vehicle into a heated room for at least 2 hours and let the sheet warm up<br />
and the condense water evaporate for bonding. In general, the mounting surface on the vehicle<br />
has to be absolutely dry!<br />
Please implicitly control the proper state of the anodisation on the contact face. If the anodisation has<br />
fissures or irregularities, grind these spots with sand paper (granulation 100) until you reach through to<br />
the bare aluminium.<br />
3
2.1. Preparing the bonding<br />
V ATTENTION:<br />
Thoroughly grind the contact faces of all spoiler parts with sand paper (granulation 40/60) until<br />
the respective surface is evenly matt. At the foremost point of the front spoiler (approx. 30 mm<br />
long) grind a small hollow of approx. 3 mm depth to ensure an absolute clean subsurface.<br />
Now, all mounting surfaces on the vehicle, on the <strong>TOP</strong>-<br />
<strong>RAIL</strong> and the spoiler parts have to be thoroughly cleaned<br />
with Sika Cleaner (cp. image 7). Let the surface flash off for<br />
at least 30 minutes.<br />
Thereafter, brush with primer and let the surface flash off<br />
again for at least 30 minutes.<br />
Please use adhesive, cleaner and primer as prescribed h<br />
in the processing instructions of there respective manufacturers.<br />
Don’t forget to appropriately clean the cutting edges of the aluminium rail. This equally applies to the<br />
respective small contact face of the rear piece/front spoiler extensions within the <strong>TOP</strong>-<strong>RAIL</strong> rainwater<br />
gutter!<br />
V ATTENTION:<br />
Be careful when using the primer! If primer drips onto varnished vehicle sheets, stains can<br />
remain, even if you immediately wipe the drops away.<br />
Now applicate two longitudinal stripes (lines) of "Sikaflex<br />
adhesive 252" along the contact surface of <strong>TOP</strong>-<strong>RAIL</strong> (onto<br />
the aluminium profile!) leaving a free stripe in-between<br />
(cp. image 7).<br />
In order to acchieve a good sealing, the stripes have to be<br />
thick enough in order that the adhesive emerges a little<br />
above and beneath the profile when pushing <strong>TOP</strong>-<strong>RAIL</strong><br />
against the surface.<br />
The upper stripe has to be approx. 8 mm and the lower<br />
one approx. 4-5 mm thick.<br />
j<br />
2.2. Final assembly of the aluminium profile<br />
V ATTENTION:<br />
Herefore you need an assistant to hold the <strong>TOP</strong>-<strong>RAIL</strong>.<br />
Place the <strong>TOP</strong>-<strong>RAIL</strong> into the right position on the vehicle’s spar and screw in the last back screw as<br />
explained before.<br />
V ATTENTION:<br />
Before inserting the screws, put a clot of Sikaflex adhesive into the holes of the aluminium profile<br />
in order to guarantee a good protection of the screws against humidity.<br />
After screwing in the screws, the emerging adhesive has to be wiped off with the cleaner.<br />
Then, successively accomplisch all the screw connections while the assistant pushes the aluminium<br />
profile apropriately onto the vehicle. Caution: do not overtwist the screws!<br />
The attachment is correct if the upper and lower edge of the <strong>TOP</strong>-<strong>RAIL</strong> rest with its entire surface<br />
upon the vehicle’s sheet and the adhesive continously emerges a little all along the rail.<br />
4
Planish the emerging adhesive with a cloth soaked in soap-water (better: dishwashing liquid) so that<br />
the top and bottom side of the <strong>TOP</strong>-<strong>RAIL</strong> is thoroughly sealed. Scrape away the remaining adhesive<br />
with a spatula. Now, carefully remove the masking tape. Adhesive remainings must be removed with<br />
the cleaner (hint: only wipe in one direction!). Once hardened, it is hardly possible to remove the<br />
adhesive.<br />
V ATTENTION:<br />
After approx. 10 minutes carefully examine if each screw has been fitted tightly enough.<br />
2.3. Assembly of the rear ending and front spoiler<br />
a) Preparing the bonding<br />
Slightly grind the bottom side (installation faces) of the rear ending and front spoiler with sand paper<br />
and thoroughly clean them with “Sika Adhesive Cleaner 205”; let them flash off for at least 30 minutes.<br />
Then, put “Sika-Primer 210T” onto the bonding points and let them flash off again for at least<br />
30 minutes. Cover the joint between aluminium rail and rear ending/front spoiler at its lateral outside<br />
with masking tape. You can then remove the emerging adhesive more easily.<br />
Now, apply “Sikaflex Adhesive 252” to the rear ending and the front spoiler, more precisely to the joint<br />
with the aluminium profile as well as to the contact face with the vehicle.<br />
Apply little adhesive as these parts ease off when pressing them onto the vehicle’s sheet. If you use too<br />
much adhesive the parts can slide on the vehicle’s sheet and are then hard to fixate. Nevertheless, the<br />
contact face channel which goes all around has to be completely filled with adhesive. Remove the<br />
emerging adhesive as described above. If the adhesive is already hard, you have to remove it with with<br />
a blade (please avoid!).<br />
Please watch out that the piper entry is not blocked by adhesive remains and that it proceeds to the<br />
rear ending without swelling. Hint: induct a<br />
piece of folded carton in matching diameter<br />
into the piper rail so that one part sticks inside<br />
the aluminium profile and the other part in the<br />
rear ending (cp. image 8). Hereby, it appropriately<br />
widens the piper entry.<br />
b) Fastening the front spoiler with masking<br />
tape<br />
At the front, fasten the front spoiler with transparent<br />
masking tape: first, stick the masking<br />
tape onto the windscreen, then over the end of<br />
the spoiler and finally onto the driver’s/passenger’s<br />
window in such a way that<br />
the front spoiler is in the right position with its<br />
point properly pressed onto the vehicle.<br />
If required, you can fasten the spoiler with further<br />
tape stripes: place the stripes crossed over<br />
the spoiler with the crossing point directly<br />
above the spoiler (cp. image 9).<br />
l<br />
k<br />
5
V ATTENTION for every fixing with masking tape<br />
Never follow the shape of the rear ending or the front spoiler! Apply the masking tape onto the<br />
upper edge and stick it onto the sheet on a large scale. Thereby, you achieve the best strain.<br />
Emerging adhesive has to be removed immediately. Please check if an allround sealing has been<br />
achieved (as mentioned above in the mounting instructions of the aluminium rail).<br />
V ATTENTION:<br />
Let the adhesive harden for at least 24 hours.<br />
Please also consider the instructions of the adhesive manufacturer!<br />
Do not move the vehicle during the hardening process.<br />
After the hardening process of the adhesive, please remove the masking tapes. If the adhesive in the<br />
linking fugue of PUR-parts/aluminium rail has shrinked, you can fill up these fugues with adhesive: put<br />
masking tape onto both sides of the fugue, fill it with adhesive and smoothen it with your finger<br />
previously dipped in dish liquid; then remove the masking tape.<br />
V ATTENTION:<br />
If the peak of the front spoiler has not been sealed correctly, fill the affected parts with adhesive.<br />
Please first clean these parts with “Sika Cleaner 205” (very sparingly) and leave to flash off<br />
before bonding!<br />
V WARNING:<br />
After the attachment, do not sress <strong>TOP</strong>-<strong>RAIL</strong> for at least three weeks in order to guarantee a<br />
proper hardening of the adhesive. It is not yet permitted to use <strong>TOP</strong>-<strong>RAIL</strong> as mounting support<br />
for roof load carriers.<br />
3. Maintenance<br />
The <strong>TOP</strong>-<strong>RAIL</strong> aluminium profile can be maintained with wax polish for cars.<br />
The rear ending and the front spoiler can be “spruced up” with a plastic care product for cars.<br />
Black silicone shoe polish is just as good and cheaper.<br />
II. OTHER<br />
Material: aluminium profile made of Al Mg Si 0,5, F 18-22, anodised in black G220 (“carbon”);<br />
Front spoiler and rear ending made of flexible PUR integral foam;<br />
Cross-head screws made of high-grade steel A2/A4: 10 pieces 3,9 x 9,5 mm, DIN 7982.<br />
V ATTENTION:<br />
In order to identify and to give evidence about the origin of the product at all times, the included<br />
label has to be attached well visible to the outside of the rail.<br />
Please keep these mounting instructions for controls and general inspections in your vehicle .<br />
III. Guarantee conditions<br />
The guarantee declarations and conditions are only effective for all original BRANDRUP products<br />
which have been attached and are used according to the instructions.<br />
The entire guarantee strictly only refers to the quality of the good. Continuing claims concerning<br />
deficiency of delivery are excluded, especially claims concerning compensation for damages not<br />
caused at the product itself. This certainly does not apply for intent or gross negligence by us.<br />
We are not liable for any damages resulting from improper usage, mounting, storage, transport, forcemajeure,<br />
air contamination or suchlike. Furthermore, we are not liable for damages to people or objects<br />
caused by mounting or dismounting, by usage or during attachment (e.g. damages on the surface,<br />
6
fissures, bulges, contaminations etc.). Any usage or attachment is solely at one’s own risk.<br />
Reclamations cannot be lodged due to inapplicable or mistakable instructions: if you have any practical<br />
problems you can ask for support by our specialised retailers or contact us during our general office<br />
hours.<br />
All information in our catalogue and the manual are given to the best of our knowledge.<br />
The instructions for bonding or linking follow the current state of technology. However, we cannot give<br />
any guarantee for the general durability of possible linkings as the durability depends on the respective<br />
mounting surface.<br />
Therefore, please always ask your specialised retailer or vehicle manufacturer which kind of<br />
connection (e.g. which adhesive) is suitable for your mounting surface.<br />
Car paintings vary and have been changed a lot lately. Therefore, it can occur that an adhesive,<br />
although suitable for the respective car painting so far, has to be replaced by another adhesive.<br />
All reclamations have to be transacted by your specialised retailer, unless he has given up his<br />
business. In this case, please contact us directly. For this purpose, please keep your proof of purchase.<br />
Yet, we explicitly point out that we give no guarantee for mounting errors or changes of the product<br />
which have not been authorised by us in writing.<br />
In general, complaints about defects have to be explained in writing and must be added to the<br />
damaged product. Only send in the damaged piece; otherwise, the additional costs for delivery shall be<br />
for your account. Proper and justified complaints on damages caused by production or material error<br />
are either replaced or repaired at our choice.<br />
If repairs or replacement of the defective product fail three times in a row, you can claim for an appropriate<br />
reduction of the purchase price.<br />
Our guarantee declarations and conditions have no effect on your rights concerning the<br />
purchase contract with your retailer who is liable for justified damages due to the legal warranties<br />
deed.<br />
Yet, double demands are excluded. That means, action from us and your retailer at the same time cannot<br />
be required as this means that you would receive compensation for your claim twice. The same<br />
applies to a time-delayed double demand.<br />
Stamp of the garage that mounted <strong>TOP</strong>-<strong>RAIL</strong>:<br />
Date:<br />
Signature:<br />
Ref: 900 700 011 As at: 01.07.2005 © 2005 by BRANDRUP All changes and errors are excepted.<br />
7<br />
The <strong>Brandrup</strong> dolphin emblem and <strong>TOP</strong>-<strong>RAIL</strong> are registered trade marks of <strong>Brandrup</strong>.<br />
All other product names are trade marks or registered trade marks of their respective holders.<br />
BRANDRUP • Rodlhof • D-94157 Perlesreut • www.brandrup.de