Alesis Performance Pad Quickstart Manual - Rev A
Alesis Performance Pad Quickstart Manual - Rev A
Alesis Performance Pad Quickstart Manual - Rev A

Create successful ePaper yourself
Turn your PDF publications into a flip-book with our unique Google optimized e-Paper software.
QUICKSTART OWNER’S MANUAL(ENGLISH) 1-4 MANUAL DE INICIO RÁPIDO DEL USUARIO(ESPAÑOL) 5-8 GUIDE D’UTILISATION SIMPLIFIÉ(FRANÇAIS) 9-12 MANUALE RAPIDO DI UTILIZZO(ITALIANO) 13-16 KURZBEDIENUNGSANLEITUNG(DEUTSCH) 17-20
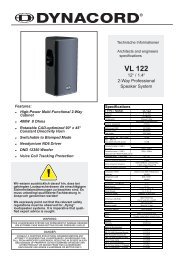
QUICKSTART OWNER’S MANUALBOX CONTENTSALESISPERFORMANCE PAD9vACADAPTERHOOKUP DIAGRAMHEADPHONESCD PLAYERPLEASE NOTE:DEVICES IN DOTTEDBOXES NOT INCLUDED.POWER ADAPTERFOOTSWITCHESSPEAKERSEXTERNAL MIDI DEVICE1
QUICK SETUP GUIDE1. Make sure all items listed on the front of this guide are included in the box.2. READ SAFETY INSTRUCTION BOOKLET BEFORE USING THE PRODUCT.3. Study this setup diagram.4. Place the <strong>Performance</strong> <strong>Pad</strong> in an appropriate position for operation – either on a flat surface, such as a table orattach to a drum set clamp mount (sold separately).5. Make sure all speaker devices are turned off and all volume knobs/faders are at “zero.”6. Connect all input sources as indicated in the diagram.7. Connect the outputs to headphones, and/or powered amplifier stereo system.8. Plug in both power adapters and other devices into AC power.9. Switch everything on in the following order.a. <strong>Performance</strong> <strong>Pad</strong>.b. Any external devices.c. Any external speakers.10. When turning off, always reverse this operation by,a. Any external speakers.b. Any external devices.c. <strong>Performance</strong> <strong>Pad</strong>.NOTE: Speakers, external sound device, additional triggers and CD player are NOT included.GETTING STARTEDThis section will cover how to begin using your Peformace <strong>Pad</strong>. Be sure that your setup matches the diagram aspreviously shown.• Be sure that the <strong>Performance</strong> <strong>Pad</strong> is powered on.1. While the unit is powered on, turn the volume up on the back panel half way.2. Strike the drum pads with your drum sticks. This should produce a sound.2
3. To change the drum kit:a. Press “DRUM SET.” The display will show the current drumset number.b. To change the sounds, press the up and down arrows.4. To play along to preset patterns:a.Make sure that the <strong>Performance</strong> <strong>Pad</strong> is in ‘Pattern’ Mode. If ‘Pattern’ is notdisplayed on the screen, press the “PATTERN/SONG” button until it appears.b.Make sure that you are in ‘Preset’ Mode. Press the button labeled“PRESET/USER.” The display should show the current preset (i.e. ‘Rock 1’).c.Use the up and down arrows to change and shuffle through the 50 differentpatterns.d. Press “PLAY” to hear the preset pattern.e. Tempo can be adjusted by the tempo up and down buttons.fYou can play along with the preset samples on the drum pads. To add a fill pressthe “FILL” button while the sample is playing.5. To record a drum pattern:a. Press the button labeled “PRESET/USER” until the display shows ‘USER’.b.Press the “PERFORM/COMPOSE” button until the display shows “COMPOSE” and“RECORDING”.c.Press “PLAY” to start recording. You will hear a click sound corresponding to thetempo of the current pattern. The recording will continually loop through the patternso that you may add drum parts one at a time.d. You can enter drum beats by striking the pads.e. Press “STOP” to stop the recording.f. Press “PLAY” to hear the recorded pattern.TIP: You can use the “STOP” button tomanually adjust the tempo. Simply tap the“STOP” button repeatedly – the tempo will beset to how fast you tap the button.TIP: Each pattern can hold two related sequences and fills. Youcan switch between the sequences while playing a preset bypressing “A” and “B” buttons. You can also alternate betweenthe two fills by holding down “A” or “B” and then pressing “FILL”.NOTE: To reset the unit, erasing all stored values to return to the default modes, holddown “ERASE” and “PLAY” while powering the unit on.3
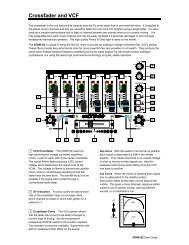
PAD ARRANGEMENTBelow is a diagram describing how the pads correspond to most of the sounds from each kit. This diagram also showswhich MIDI note number the <strong>Performance</strong> <strong>Pad</strong> will transmit when controlling an external device via MIDI.HIGH TOMLOW TOMCRASHCYMBALRIDECYMBALMIDI NOTE#48MIDI NOTE#45MIDI NOTE#49MIDI NOTE#51BASS KICKDRUMSNAREDRUMCLOSED HI-HATOPEN HI-HATMIDI NOTE#36MIDI NOTE#38MIDI NOTE#42MIDI NOTE#46If you are using an external footswitch (sold separately) connected to the KICK input on the back of the <strong>Performance</strong> <strong>Pad</strong>,pressing it down will generate a bass kick drum and MIDI note #36.If you are using an external footswitch (sold separately) connected to the HI-HAT input on the back of the <strong>Performance</strong><strong>Pad</strong>, pressing it down will simulate the behavior of a closed hihat and generate a closed hi-hat sound (MIDI note #42) evrytime it is pressed down. While the footswitch is pressed down, hitting the OPEN HI-HAT pad will generate a closed hihatsound (MIDI note #42). When you release the footswitch, hitting the OPEN HI-HAT pad will generate an open hihatsound.NOTE: For best results, strike the middle of the pad. Striking the edge of the pad couldresult in the triggering of an adjacent pad.4
MANUAL DE INICIO RÁPIDO DEL USUARIOCONTENIDO DE LA CAJAALESISPERFORMANCEPADADAPTADORDE 9 vcaDIAGRAMA DE CONEXIÓNAURICULARESREPRODUCTOR DE CD O MP3NOTA:LOS DISPOSITIVOS ENLÍNEA PUNTEADA NOESTÁN INCLUIDOS .ADAPTADOR DE ALIMENTACIÓNPEDALESALTAVOCESDISPOSITIVO MIDI EXTERNO5
GUÍA DE INSTALACIÓN RÁPIDA1. Asegúrese que todos los artículos incluidos al inicio de este manual estén incluidos en la caja.2. LEA LAS INSTRUCCIONES DEL FOLLETO DE SEGURIDAD ANTES DE UTILIZAR EL PRODUCTO.3. Estudie este diagrama de instalación.4. Coloque la <strong>Performance</strong> <strong>Pad</strong> en una posición apropiada para la operación – ya sea sobre una superficie plana,como una mesa, o con un montaje con abrazaderas (que se vende por separado).5. Asegúrese de que todos los dispositivos están apagados y de que todos los faders y perillas de volumen estén enla posición «cero».6. Conecte todas las fuentes de entrada como se indica en el diagrama.7. Conecte las salidas a los auriculares y/o al sistema estéreo de amplificador alimentado.8. Enchufe los adaptadores de potencia y otros dispositivos a la alimentación de corriente alterna.9. Encienda todo en el siguiente orden:d. <strong>Performance</strong> <strong>Pad</strong>e. Los dispositivos externos.f. Los altavoces externos.10. Al apagar, realice siempre esta operación en sentido inverso:g. Los altavoces externos.h. Los dispositivos externos.i. <strong>Performance</strong> <strong>Pad</strong>NOTA: NO se incluyen los altavoces, dispositivos de sonido externos, disparos adicionales ni reproductor de CD.PARA COMENZAREsta sección explica la manera a comenzar a usar su batería electrónica. Asegúrese de que su configuración coincidacon el diagrama que se mostró previamente.• Asegúrese de que la <strong>Performance</strong> <strong>Pad</strong> esté encendida.1. Mientras está encendida la unidad, aumente el volumen en el panel trasero hasta la mitad.2. Golpee los pads de tambores con las baquetas. Se debe producir un sonido.6
3. Para cambiar la batería:a. Pulse “DRUM SET” (Configuración de batería) La pantalla (1) mostrará el númeroactual de la configuración de batería.b. Para cambiar los sonidos, pulse las flechas ascendente y descendente.4. Para tocar con los patrones predeterminados:a.Asegúrese de que la batería digital esté en modo ‘Pattern’ (Patrón) Si no aparece‘Pattern’ en la pantalla, pulse el botón “PATTERN/SONG” (Patrón/Canción) hastaque aparezca.b.Asegúrese de estar en modo ‘Preset’ (Predeterminados). Pulse el botón“PRESET/USER” (Predeterminados/Usuario). La pantalla debe mostrar ahora elpatrón predeterminado actual (por ej. ‘Rock 1’).c.Use las flechas ascendente para cambiar y desplazarse por los 50 patronesdiferentes.d. Pulse “PLAY” (Reproducir) para oír el patrón predeterminado.e. El tempo se puede ajustar con los botones de tempo ascendente y descendente.fPuede tocar con los pads de tambores junto con las muestras predeterminadas.Para añadir un relleno pulse el botón “FILL” mientras la muestra se estáreproduciendo.5. Para grabar un patrón de batería:a.Pulse el botón “PRESET/USER” hasta que aparezca ‘USER’ (Usuario) en lapantalla.b. Pulse el botón “PERFORM/COMPOSE” (Tocar/componer) hasta que aparezca enla pantalla “COMPOSE” (Componer) y “RECORDING” (Grabando).c.Pulse PLAY para comenzar a grabar. Escuchará un “clic” que le corresponde altempo del patrón actual. La grabación se reproducirá de manera continua a lolargo del patrón para que pueda añadir partes de batería una por una.d. Puede introducir beats de tambor golpeando los pads.e. Pulse “STOP” para parar la grabación.f. Pulse “PLAY” (Reproducir) para oír el patrón grabado.CONSEJO: Puede usar el botón “STOP” para ajustarmanualmente el tempo. Simplemente, golpee enforma leve el botón repetidamente —el tempo seajustará a la velocidad en que usted dé los golpes.CONSEJO: Cada patrón puede retener dos secuencias y rellenosrelacionados. Es posible conmutar entre las secuencias mientras reproduceun patrón predeterminado pulsando los botones “A” y “B”. También puedealternar entre los dos rellenos manteniendo oprimido “A” o “B” y pulsando“FILL”.NOTA: Para resetear la unidad y borrar todos los valores almacenados a fin de volver a los modospredeterminados, mantenga presionados “ERASE” (borrar) y “PLAY” mientras enciende la unidad.7
DISPOSICIÓN DE LOS PADSSe presenta a continuación un diagrama que describe cómo se corresponden los pads a la mayoría de los sonidos decada kit. Este diagrama muestra también qué número de nota MIDI transmite la <strong>Performance</strong> <strong>Pad</strong> cuando controla undispositivo externo vía MIDI.HIGH TOMLOW TOMPLATILLOCRASHPLATILLORIDENOTA MIDINº 48NOTA MIDINº 45NOTA MIDINº 49NOTA MIDINº 51TAMBORKICKGRAVENOTA MIDINº 36TAMBORSNARENOTA MIDINº 38HI-HATCERRADONOTA MIDINº 42HI-HATABIERTONOTA MIDINº 46Si usa un pedal externo (que se vende por separado) conectado a la entrada KICK de la parte trasera de la <strong>Performance</strong><strong>Pad</strong>, al oprimirlo se genera un kick grave y la nota MIDI Nº 36.Si usa un pedal externo (que se vende por separado) conectado a la entrada HI-HAT de la parte trasera de la<strong>Performance</strong> <strong>Pad</strong>, al oprimirlo simula el comportamiento de un hihat cerrado y genera un sonido de hi-hat cerrado (notaMIDI Nº 42) cada vez que se oprime. Mientras el pedal está oprimido, al golpear el pad OPEN HI-HAT se genera unsonido de hihat cerrado (nota MIDI Nº 42). Cuando suelta el pedal, al golpear el pad OPEN HI-HAT se genera un sonidode hihat abierto.NOTA: Para obtener los mejores resultados, golpee en el centro del pad. Si lo golpea enel borde, puede producirse el disparo de un pad adyacente.8
GUIDE D’UTILISATION SIMPLIFIÉCONTENU DE LA BOÎTEALESISPERFORMANCEPADADAPTATEUR9 V CASCHÉMA D’INSTALLATIONCASQUE D’ÉCOUTELECTEUR CD OU MP3REMARQUE :LES APPAREILS ILLUSTRÉSDANS LES BOÎTESPOINTILLÉESNE SONT PAS INCLUS.CÂBLE D’ALIMENTATIONPÉDALESHAUT-PARLEURSAPPAREIL MIDI EXTERNE9
GUIDE D'INSTALLATION RAPIDE1. Assurez-vous que tous les articles énumérés sur la page couverture de ce guide sont inclus dans la boîte.2. VEUILLEZ LIRE LE LIVRET DES CONSIGNES DE SÉCURITÉ AVANT D'UTILISER LE PRODUIT.3. Examinez bien le schéma d'installation.4. Placez la <strong>Performance</strong> <strong>Pad</strong> en position de fonctionnement – soit sur une surface à plat, telle une table, soit fixéesur un support à batterie (vendu séparément).5. Assurez-vous que tous les haut-parleurs sont hors tension et que le volume et tous les atténuateurs sont réglés à« zéro ».6. Branchez toutes les sources tel qu'indiqué sur le schéma.7. Reliez les sorties au casque d'écoute et/ou au système d’amplificateurs de puissance stéréo.8. Branchez les deux adaptateurs de courant et les autres appareils dans une prise d’alimentation CA.9. Mettre tous les appareils sous tension dans l'ordre suivant :j. <strong>Performance</strong> <strong>Pad</strong>;k. Tous les appareils externes.l. Tous les haut-parleurs externes.10. Pour mettre hors tension, toujours inverser l'opération :m. Tous les haut-parleurs externes;n. Tous les appareils externes.o. <strong>Performance</strong> <strong>Pad</strong>.REMARQUE : Les haut-parleurs, appareils externes, commandes à distance additionnelles et lecteur de disquescompact ne sont PAS inclus.GUIDE DE DÉMARRAGECette section couvre la mise en marche de votre batterie électronique. Veillez à vous assurer que votre installationressemble à celle du schéma précédemment indiqué.• Assurez-vous que le <strong>Performance</strong> <strong>Pad</strong> est mis sous tension.1.Avec l'appareil sous tension, augmentez le volume de moitié à l’aide de la touche sur lepanneau arrière.2.Frappez les pads de la batterie à l’aide des baguettes incluses. Vous devriez entendreun son.10
3. Pour modifier l'ensemble des sons de la batterie (drum kit) :a. Appuyer sur la touche DRUM SET (rythmes de batterie). Le numérodu rythme de batterie en cour apparait à l’écran.b.Utiliser les flèches de sélection pour modifier les sons.4.Pour jouer avec des enchaînements programmés :a.Assurez-vous que la batterie est en mode Pattern (enchaînement).Si le mot « Pattern » n'est pas affiché à l’écran, appuyez sur latouche PATTERN/SONG (enchaînement/piste) jusqu'à ce qu’ils’affiche.b.Assurez-vous que la batterie est en mode Preset (programme).Appuyer sur la touche PRESET/USER (programme/utilisateur). Leprogramme en cour devrait apparaitre à l’écran (c.-à-d. « Rock 1 »).c.Utiliser les flèches de sélection pour faire défiler les 50enchaînements différents.d. Appuyer sur la touche PLAY (lecture) pour entendre l’enchaînement.e. Le tempo peut être réglé à l'aide des touches de sélection du tempo.f.Vous pouvez jouer avec les échantillons programmés. Appuyer surla touche FILL (rythme de fond) pour ajouter un rythme de fondlorsqu’un échantillon joue.5. Pour sauvegarder un enchaînement :a. Appuyer sur la touche PRESET/USER (programme/utilisateur)jusqu’à ce que le mot « USER » s’affiche.b.c.Appuyez sur la touche PERFORM/COMPOSE(performance/composition) jusqu’à ce que les mots « COMPOSE »(composition) et « RECORDING » (enregistrement) s'affiche.Appuyez sur la touche PLAY (lecture) pour lancer l’enregistrement.Vous entendrez un clic correspondant au tempo de l’enchaînementen cours. L'enregistrement bouclera continuellement durant leprogramme afin de permettre l’ajout d'enchaînements, un à la fois.d. Vous pouvez ajouter des rythmes en frappant sur les pads.e. Appuyez sur la touche STOP (arrêt) pour arrêter l’enregistrement.f. Appuyer sur la touche PLAY (lecture) pour entendre l’enchaînementenregistré.CONSEIL : Vous pouvez utiliser la toucheSTOP pour ajuster le tempo manuellement.Pour régler le tempo, frappez simplement latouche STOP au rythme désiré.CONSEIL : Chaque enchaînement peut être composé de deuxséquences et de fonds de rythme. Vous pouvez passer d'uneséquence à une autre durant la lecture d’un programme enappuyant sur les touches A et B. Il est également possibled’alterner entre deux rythmes de fond en appuyant sur la toucheFILL tout en maintenant enfoncé la touche A ou B.REMARQUE : Pour réinitialiser l’appareil, effaçant tous les paramètres sauvegardés pourretourner aux réglages d'usine, enfoncer les touches ERASE (effacement) et PLAY(lecture) lors de la mise en marche de l’appareil.11
DISPOSITION DES PADSL'image ci-dessous indique comment les pads correspondent à la plupart des sons. Il indique également le numéro denote MIDI que le <strong>Performance</strong> <strong>Pad</strong> transmet lorsqu’il commande un appareil externe.TOM AIGUTOM GRAVECYMBALECRASHCYMBALE RIDENOTE MIDINo 48NOTE MIDINo 45NOTE MIDINo 49NOTE MIDINo 51GROSSECAISSECAISSECLAIRECYMBALECHARLESTONFERMÉECYMBALECHARLESTONOUVERTENOTE MIDINo 36NOTE MIDINo 38NOTE MIDINo 42NOTE MIDINo 46Si vous utilisez une commande au pied (vendue séparément), branchée à l'entrée KICK à l'arrière du <strong>Performance</strong> <strong>Pad</strong>;vous produisez un son de grosse caisse et la note MIDI No 36 lorsque vous appuyez dessus.Si vous utilisez une commande au pied (vendue séparément), branchée à l'entrée HI-HAT à l'arrière du <strong>Performance</strong> <strong>Pad</strong>;vous produisez un son de cymbale Charleston fermée et la note MIDI No 42 lorsque vous appuyez dessus. Lorsque lacommande au pied est enfoncée et que le pad de la cymbale Charleston ouverte est frappé, vous produirez un son decymbale Charleston fermée (note MIDI No 42). Mais lorsque vous relâchez la commande au pied et que vous frappez lepad de la cymbale Charleston ouverte vous produisez un son de cymbale Charleston ouverte.REMARQUE : Pour de meilleurs résultats, frappez au centre du pad. Si vous frappez surles côtés des pads au lieu du centre, vous pourriez activer le pad voisin.12
MANUALE RAPIDO DI UTILIZZOCONTENUTI DELLA CONFEZIONEALESISPERFORMANCEPADADATTATORECA 9vSCHEMA DI COLLEGAMENTOCUFFIELETTORE CD O MP3NOTA BENE:I DISPOSITIVI INDICATI INRIQUADRI TRATTEGGIATINON SONO INCLUSI.ADATTATOREPEDALIALTOPARLANTIDISPOSITIVO MIDI ESTERNO13
GUIDA D’IMPOSTAZIONE RAPIDA1. Assicurarsi che tutti gli elementi elencati sul frontespizio di questo manuale siano contenuti nella confezione.2. PRIMA DI UTILIZZARE IL PRODOTTO, LEGGERE ATTENTAMENTE IL LIBRETTO DELLE ISTRUZIONI DISICUREZZA.3. Studiare con cura lo schema di impostazione.4. Porre la <strong>Performance</strong> <strong>Pad</strong> in un luogo adeguato all’uso – su di una superficie piana quale un tavolo oppure fissataad un apposito cavalletto (venduto separatamente).5. Assicurarsi che tutti gli altoparlanti siano spenti e che le manopole di regolazione del volume e i fader siano su“zero.”6. Collegare tutte le sorgenti d’ingresso come indicato nello schema.7. Collegare le uscite alle cuffie e/o ad un impianto di amplificatori stereo.8. Inserire entrambi gli adattatori di alimentazione e gli altri dispositivi nella presa di corrente ca.9. Accendere tutto nel seguente ordine:p. <strong>Performance</strong> <strong>Pad</strong>.q. Qualsiasi dispositivo esterno.r. Qualsiasi altoparlante esterno.10. Al momento dello spegnimento, invertire sempre tale operazione spegnendo:s. Qualsiasi altoparlante esterno.t. Qualsiasi dispositivo esterno.u. <strong>Performance</strong> <strong>Pad</strong>.NOTA: altoparlanti, dispositivi sonori esterni, dispositivi addizionali e il lettore CD NON sono inclusi.PER INIZIAREQuesto paragrafo vi indicherà come iniziare a usare la vostra <strong>Performance</strong> <strong>Pad</strong>. Assicurarsi che l’impostazione deldispositivo corrisponda allo schema illustrato in precedenza.• Assicurarsi che l’<strong>Performance</strong> <strong>Pad</strong> sia acceso (on).1. Ad apparecchio acceso, alzare il volume sul pannello posteriore fino a metà corsa.2. Battere i pad con le bacchette in dotazione. Questo produrrà un suono.14
3. Per cambiare il drum kit:a. Premere “DRUM SET”. Il display mostrerà l’attuale numero di batteria.b. Per cambiare i suoni, premere le frecce su e giù.4. Per suonare a tempo di pattern predefiniti:a.Assicurarsi che la Peformace <strong>Pad</strong> Digitale si trovi in modalità ‘Pattern’. Se la scritta‘Pattern’ non appare sullo schermo, premere il tasto “PATTERN/SONG” fino aquando non appare.b.Assicurarsi di essere in modalità ‘Preset’. Premere il tasto “PRESET/USER”. Adisplay apparirà ora l’attuale predefinito (es: ‘Rock 1’).c. Servirsi delle frecce per passare e mischiare i 50 diversi pattern.d. Premere “PLAY” per ascoltare il pattern predefinito.e.Il tempo può essere regolato tramite i tasti tempo up e down (aumento ediminuzione).fSi può suonare a tempo dei campioni predefiniti sui pad. Per aggiungere unriempimento, premere il tasto “FILL” durante la riproduzione del campione.5. Per registrare un pattern di batteria:a. Premere il tasto “PRESET/USER” fino all’apparire della scritta ‘USER’ a display.b.Premere il tasto “PERFORM/COMPOSE” fino all’apparire delle scritte “COMPOSE”e “RECORDING” a display.c.Premere “PLAY” per avviare la registrazione. Si sentirà un ticchettio checorrisponde al tempo del pattern attuale. La registrazione procederà in circolocontinuo lungo il pattern in modo tale da poter aggiungere parti di batteria una allavolta.d. Si può inserire il ritmo della batteria battendo i pad.e. Premere “STOP” per interrompere la registrazione.f. Premere “PLAY” per ascoltare il pattern registrato.CONSIGLIO: si può utilizzare il tasto “STOP”per regolare manualmente il tempo. Limitarsia battere ripetutamente il tasto “STOP” – iltempo dipenderà da quanto velocementeviene battuto il tasto.CONSIGLIO: ogni pattern può contenere due sequenze eriempimenti correlati. Si può passare da una sequenza all’altradurante la riproduzione di un predefinito premendo i tasti “A” e“B”. Si può anche alternare tra i due riempimenti tenendopremuto “A” o “B” e quindi premendo “FILL”.NOTA: per azzerare l’apparecchio, cancellando tutti i valori salvati e tornare a quellipredefiniti, tenere premuti “ERASE” e “PLAY” durante l’accensione dell’apparecchiostesso.15
DISPOSIZIONE DEI PADDi seguito appare uno schema che illustra come i pad corrispondono alla maggior parte dei suoni da ciascun kit. Questoschema mostra inoltre quale numero di nota MIDI verrà trasmesso di <strong>Performance</strong> <strong>Pad</strong> quando controlla un dispositivoesterno via MIDI.TOM ALTOTOM BASSOPIATTOCRASHPIATTORIDENOTA MIDI#48NOTA MIDI#45NOTA MIDI#49NOTA MIDI#51GRANCASSARULLANTEHI-HATCHIUSOHI-HATAPERTONOTA MIDI#36NOTA MIDI#38NOTA MIDI#42NOTA MIDI#46Utilizzando un tasto a pedale esterno (venduto separatamente) collegato all’ingresso KICK sul retro di <strong>Performance</strong> <strong>Pad</strong>,premendolo verrà prodotta una grancassa e una nota MIDI #36.Utilizzando un tasto a pedale esterno (venduto separatamente) collegato all’ingresso HI-HAT sul retro di <strong>Performance</strong><strong>Pad</strong>, la sua pressione simulerà il comportamento di un hi-hat chiuso, generando un suono di hi-hat chiuso (nota MIDI #42)ogni volta che viene premuto. Durante la pressione del tasto a pedale, battendo il pad HI-HAT APERTO verrà generatoun suono di hi-hat chiuso (nota MIDI #42). Rilasciando il tasto a pedale, battendo il pad HI-HAT APERTO verrà generatoun suono di hi-hat aperto.NOTA: per i migliori risultati, battere la parte centrale del pad. Battendo i margini del padsi rischia di attivare un pad adiacente.16
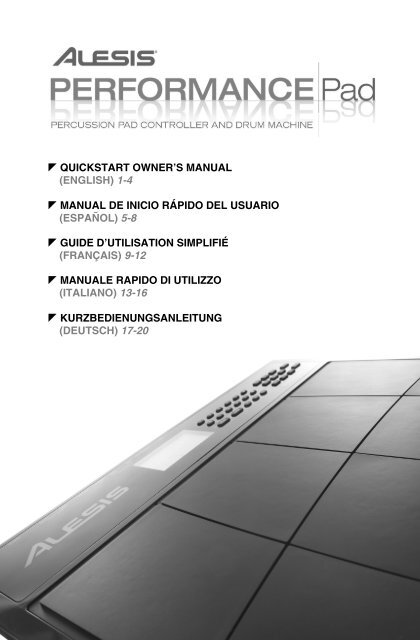
KURZBEDIENUNGSANLEITUNGINHALT DER VERPACKUNGALESISPERFORMANCEPADNETZTEIL (9VAC)ANSCHLUSSÜBERSICHTKOPFHÖRERCD ODER MP3-PLAYERHINWEIS:PUNKTIERTE GERÄTENICHT IM LIERUMFANGENTHALTEN.NETZTEILPEDALELAUTSPRECHEREXTERNES MIDI-GERÄT17
3. Um ein Drumkit zu wechseln:a.Drücken Sie “DRUM SET.” Das Display zeigt die Nummer des gegenwärtigausgewählten Drumkits an.b. Mit Hilfe der Auf und Ab Pfeiltasten können Sie ein anderes Drumset auswählen.4. Um zu einem vorgefertigtem Pattern dazuzuspielen:a.Stellen Sie die Peformace <strong>Pad</strong> in den ‘Pattern’ Mode, indem Sie den“PATTERN/SONG” Button drücken, bis „Pattern“ im Display steht.b.Sie sollten sich des Weiteren im ‘Preset’ Mode befinden. Drücken Sie dazu denButton “PRESET/USER.” Im Display sollte das ausgewählte Preset zu erkennensein (z.B. ‘Rock 1’).c.Mit den Auf und Ab Pfeiltasten können Sie nun durch die 50 verschiedenenPatterns schalten.d. Drücken Sie “PLAY”, um die Wiedergabe des voreingestellten Patterns zu starten.e. Stellen Sie das Tempo mit den Tempo Auf und Tempo Ab Buttons ein.fNun können Sie zu dem Pattern dazuspielen, um ein Fill abzurufen, drücken Siewährend der Wiedergabe den “FILL” Button.5. Zur Aufnahme eines Drum Patterns:a. Drücken Sie den “PRESET/USER” Button, bis im Display ‘USER’ angezeigt wird.b.Drücken Sie den “PERFORM/COMPOSE” Button, bis das Display “COMPOSE”und “RECORDING” zeigt.c.Beginnen Sie mit “PLAY” die Aufnahme. Sie hören einen Metronomsound in derGeschwindigkeit des eingestellten Tempos. Die Aufnahme wird in einer Schleifeimmer wieder wiederholt, so dass Sie nach und nach verschiedene Instrumenteeinspielen können.d. Schlagen Sie die <strong>Pad</strong>s mit den Drumsticks an.e. Beenden Sie die Aufnahme mit dem “STOP” Button.f. Mit “PLAY” können Sie das aufgenommene Pattern wiedergeben.HINWEIS: Sie können mit dem “STOP” Button dasTempo manuell eingeben. Drücken Sie den “STOP”Button einfach wiederholt an. Das Tempo errechnetsich daraus, wie schnell Sie den Button wiederholtdrücken.HINWEIS: Jedes Pattern besteht aus zwei Sequencen und Fills.Zwischen den Sequencen schalten Sie während der Wiedergabemit den “A” und “B” Buttons um. Sie können auch Fills einstreuen,indem Sie “A” oder “B” halten und dann “FILL” drücken.HINWEIS: Um das Gerät auf den Werkszustand zurückzusetzen, halten Sie beim Einschalten die “ERASE”und “PLAY” Tasten des Gerätes gedrückt.19
PAD BELEGUNGDie folgende Übersicht zeigt die Standartbelegung der <strong>Pad</strong>s mit den am häufigsten verwendeten Drumsounds. Sieerkennen auch, welche MIDI Notennummer das <strong>Performance</strong> <strong>Pad</strong> ausgibt, wenn Sie ein <strong>Pad</strong> anschlagen, um einexternes Gerät über MIDI zusteuern.HOHESTOMTIEFESTOMCRASHBECKENRIDEBECKENMIDI NOTE#48MIDI NOTE#45MIDI NOTE#49MIDI NOTE#51BASSDRUMSNAREDRUMGESCHLOSSENEHI-HATOFFENEHI-HATMIDI NOTE#36MIDI NOTE#38MIDI NOTE#42MIDI NOTE#46Wenn Sie einen optional erhältlichen, externen Fußschalter an den KICK Eingang auf der Rückseite des <strong>Performance</strong><strong>Pad</strong> anschließen und ihn drücken, wird eine Bassdrum mit der MIDI Note #36 erzeugt.Wenn Sie einen optional erhältlichen, externen Fußschalter an den HI-HAT Eingang auf der Rückseite des <strong>Performance</strong><strong>Pad</strong> anschließen und ihn drücken, wird das Verhalten einer geschlossenen Hi-Hat simuliert und der Klang einergeschlossenen Hi-Hat sowie die MIDI Notennummer #42 ausgegeben. Wenn Sie den Fußschaltergedrückt halten unddas OPEN HI-HAT <strong>Pad</strong> anschlagen, hören Sie den Klang einer geschlossenen Hi-Hat. (MIDI Note #42). Wenn Sie denFußschalter loslassen und das OPEN HI-HAT <strong>Pad</strong> anschlagen, wird der Sound einer geöffneten Hi-Hat erzeugt.HINWEIS: Die besten Resultate erzielen Sie, wenn Sie in die Mitte eines <strong>Pad</strong>s schlagen.Das Anschlagen am Rand kann dazu führen, dass ein benachbartes <strong>Pad</strong> mitgetriggertwird.20
7-51-0244-A
www.alesis.com