【User Manual】 Lite-Puter Enterprise Co., Ltd. - Notape
【User Manual】 Lite-Puter Enterprise Co., Ltd. - Notape
【User Manual】 Lite-Puter Enterprise Co., Ltd. - Notape

Create successful ePaper yourself
Turn your PDF publications into a flip-book with our unique Google optimized e-Paper software.
ISO 9001 CERTIFIED www.liteputer.com.tw<br />
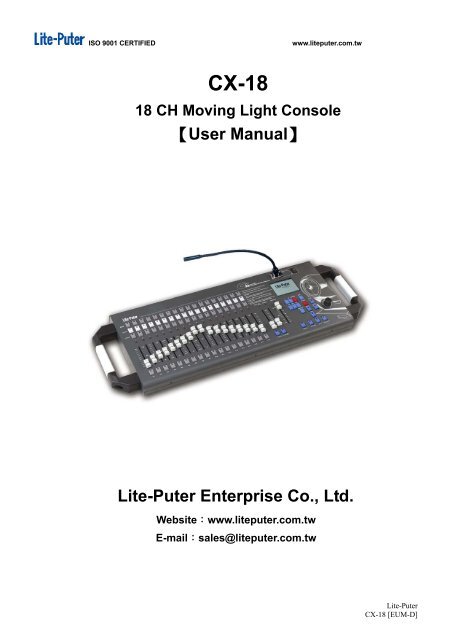
CX-18<br />
18 CH Moving Light <strong>Co</strong>nsole<br />
<strong>【User</strong> <strong>Manual】</strong><br />
<strong>Lite</strong>-<strong>Puter</strong> <strong>Enterprise</strong> <strong>Co</strong>., <strong>Ltd</strong>.<br />
Website:www.liteputer.com.tw<br />
E-mail:sales@liteputer.com.tw<br />
<strong>Lite</strong>-<strong>Puter</strong><br />
CX-18 [EUM-D]
ISO 9001 CERTIFIED www.liteputer.com.tw<br />
Index<br />
CHAPTER 1 4<br />
1-1 FEATURE ..........................................................................................................................4<br />
1-2 SPECIFICATION..................................................................................................................5<br />
1-3 DIMENSION.......................................................................................................................5<br />
1-4 FRONT PANEL INTRODUCTION.............................................................................................6<br />
1-5 REAR PANEL INTRODUCTION ..............................................................................................6<br />
1-6 INSTALLATION....................................................................................................................7<br />
CHAPTER 2 FUNCTION 8<br />
2-1 BANK INTRODUCTION .......................................................................................................8<br />
2-2 SHOW INTRODUCTION......................................................................................................8<br />
2-3 SCENE INTRODUCTION.....................................................................................................8<br />
2-4 FADER INTRODUCTION.....................................................................................................8<br />
2-5 FIXTURE NO. SELECTION BUTTON...................................................................................8<br />
2-6 FADE TIME PITCH FADER...............................................................................................8<br />
2-7 SHOW RECALL BUTTON ...................................................................................................9<br />
2-8 FIXTURE FUNCTION BUTTON............................................................................................9<br />
2-9 RANGE FADER ..............................................................................................................9<br />
2-10 SMOKE RECALL BUTTON................................................................................................9<br />
2-11 STROBE RECALL BUTTON ..............................................................................................9<br />
2-12 EDIT BUTTON.................................................................................................................9<br />
2-13 BLACKOUT BUTTON ...................................................................................................10<br />
2-14 FUNC BUTTON.............................................................................................................10<br />
2-15 MACRO INTRODUCTION................................................................................................10<br />
2-16 PREV SHOW INTRODUCTION .......................................................................................10<br />
2-17 FINE FUNCTION BUTTON...............................................................................................10<br />
2-18 JOYSTICK INTRODUCTION ...........................................................................................10<br />
2-19 LCD SCREEN INTRODUCTION ......................................................................................10<br />
2-20 GOOSENECK LAMP STAND .....................................................................................10<br />
2-21 GOOSENECK LAMP SWITCH ................................................................................... 11<br />
2-22 ADD BUTTON ............................................................................................................... 11<br />
2-23 INS BUTTON................................................................................................................. 11<br />
2-24 DEL BUTTON................................................................................................................ 11<br />
2-25 STORE BUTTON .......................................................................................................... 11<br />
2-26 SPOT SC BUTTON ....................................................................................................... 11<br />
2-27 ◄ AND ► BUTTON ........................................................................................................ 11<br />
2-28 ENTER BUTTON........................................................................................................... 11<br />
1<br />
<strong>Lite</strong>-<strong>Puter</strong><br />
CX-18 [EUM-D]
ISO 9001 CERTIFIED www.liteputer.com.tw<br />
2-29 ESC BUTTON ............................................................................................................... 11<br />
2-30 MASTER FADER........................................................................................................12<br />
2-31 LED INDICATOR ........................................................................................................12<br />
2-32 USB PORT..................................................................................................................12<br />
2-33 SD CARD....................................................................................................................12<br />
2-34 MIDI IN........................................................................................................................12<br />
2-35 AUDIO IN....................................................................................................................12<br />
2-36 POWER IN..................................................................................................................12<br />
2-37 DMX OUT ...................................................................................................................12<br />
2-38 POWER ON/OFF........................................................................................................12<br />
CHAPTER 3 OPERATION 13<br />
3-1 HOME PAGE INTRODUCTION.............................................................................................13<br />
3-2 HARDWARE INSPECTION ..................................................................................................14<br />
3-3 DMX ADDRESS ALLOCATION CHECK.................................................................................17<br />
3-4 FIXTURE SETTING.........................................................................................................18<br />
3-5 SHOW SETTING/RECALL ................................................................................................22<br />
3-5-1 INSERT STEP ...........................................................................................................30<br />
3-5-2 EDIT STEP ................................................................................................................31<br />
3-5-3 DELETE STEP ..............................................................................................................31<br />
3-5-4 PREVIEW SHOW.........................................................................................................31<br />
3-5-5 RECALL SHOW .............................................................................................................32<br />
3-6 STROBE SETTING/RECALL.............................................................................................35<br />
3-6-1 STROBE RECALL .........................................................................................................37<br />
3-7 SMOKE SETTING/RECALL...............................................................................................37<br />
3-7-1 SMOKE RECALL .........................................................................................................40<br />
3-8 SPOT RECALL/SETTING..................................................................................................40<br />
3-8-1 SPOT RECALL ............................................................................................................42<br />
3-9 SEQ SETTING.................................................................................................................42<br />
3-9-1 SEQ RECALL ..............................................................................................................45<br />
3-10 MAIN FIXTURE CONTROL ................................................................................................45<br />
3-11 SYSTEM TIME SETTING ..................................................................................................46<br />
3-12 SYSTEM INITIALIZATION..................................................................................................50<br />
CHAPTER 4 OTHER FUNCTION 53<br />
4-1 OUTPUT CHANNEL DELETE ...............................................................................................53<br />
4-2 CHANNEL DIMMING VALUE CHECK......................................................................................53<br />
4-3 SD CARD CHECK..........................................................................................................55<br />
4-4 FILE COPY ......................................................................................................................56<br />
4-5 FILE DELETE ...................................................................................................................66<br />
2<br />
<strong>Lite</strong>-<strong>Puter</strong><br />
CX-18 [EUM-D]
ISO 9001 CERTIFIED www.liteputer.com.tw<br />
CHAPTER 5 TUTORIAL 72<br />
5-1 FIXTURE LIST ..................................................................................................................72<br />
5-2 DMX ADDRESS SETTING ..................................................................................................73<br />
5-3 FIXTURE SET UP ..............................................................................................................75<br />
5-4 STROBE SET UP ..............................................................................................................77<br />
5-5 SMOKE SET UP................................................................................................................78<br />
5-6 SPOT SET UP ..................................................................................................................79<br />
5-7 PROGRAMMING A BANK A SHOW ........................................................................................80<br />
5-8 PROGRAMMING A BANK A SCENE .......................................................................................81<br />
5-9 COPY A BANK ..................................................................................................................82<br />
5-10 COPY A SHOW TO EDITOR ...............................................................................................82<br />
5-10-1 PROGRAMMING A SHOW WITH MACRO...........................................................................84<br />
5-10-2 MODIFY SHOW FADES TIME..........................................................................................85<br />
5-10-3 ADD A SHOW STEP......................................................................................................86<br />
5-10-4 COPY A NEW SHOW DELET A STEP ................................................................................87<br />
5-11 PLAYBACK A SHOW AND SCENE .......................................................................................88<br />
5-11-1 PAUSE TO A SHOW AND SCENE .....................................................................................89<br />
5-11-2 CHANGING THE RATE OF A SHOW..................................................................................89<br />
5-12 SD CARD......................................................................................................................90<br />
GUARANTEE 92<br />
3<br />
<strong>Lite</strong>-<strong>Puter</strong><br />
CX-18 [EUM-D]
Chapter 1<br />
1-1 Feature<br />
ISO 9001 CERTIFIED www.liteputer.com.tw<br />
� Standard DMX-512 signal.<br />
� Hardware inspection function.<br />
� 18 faders and one joystick control up to 18 fixtures each with 18 channels.<br />
� 18 BANK hotkey can recall any BANK; each BANK has 18 groups of SHOW.<br />
� 18 SHOW hotkey can recall any SHOW; each SHOW has 32 STEPS.<br />
� 18 LIGHT buttons correspond to 18 fixtures.<br />
� User can set X, Y channel and DIMMER channel of the fixture to the joystick and faders<br />
on the console.<br />
� SHOW editing has step ADD, INSER and DEL function.<br />
� CX-18 can control 18 moving lights, 18 smoke machines and 144 dimmer channels.<br />
� Joystick’s recover function is used to control PAN/TILT moving speed: at the<br />
central place, the speed is 0; the bigger angel it poses the faster moving speed will be.<br />
� When SHOW is editing, each step can choose four build-in modes, straight line<br />
mode(Y), lateral line mode(X),oblique line mode(X,Y), and clockwise & anticlockwise<br />
circle mode(X,Y, O). Each step can set SIZE and SPEED.<br />
� SD memory card can download the file to other console or copy file.<br />
� One fixture can be isolated from the SHOW mode to work as joystick -controlled follow<br />
spot.<br />
� STEP can change with the music or directly controlled by MIDI.<br />
� SD memory card can download the program to the PLAYER. It can directly recall the<br />
preset SHOW or recall it periodically.<br />
4<br />
<strong>Lite</strong>-<strong>Puter</strong><br />
CX-18 [EUM-D]
1-2 Specification<br />
ISO 9001 CERTIFIED www.liteputer.com.tw<br />
� Power input:AC 100-240V, 50-60Hz/0.5A<br />
� Protocol:DMX-512<br />
� DMX signal connector:RJ11(6P4C)<br />
XLR PHONE JECK 5-PIN<br />
XLR 3-PIN<br />
� Audio signal input: Build- in MIKE MAX. 120dB; External input MAX.:AC 100mV<br />
� Gooseneck lamp connector:XLR 3-PIN,DC +12V 250mA<br />
� Dimension :790(W) * 265(H) *63(D)mm<br />
� Weight: 6Kg<br />
1-3 Dimension<br />
790 (W) *265 (H) *63 (D) mm<br />
5<br />
<strong>Lite</strong>-<strong>Puter</strong><br />
CX-18 [EUM-D]
ISO 9001 CERTIFIED www.liteputer.com.tw<br />
1-4 Front Panel Introduction<br />
32 31<br />
20 21<br />
1<br />
2 19<br />
3<br />
4<br />
5<br />
6<br />
6 7 8 9 10 11 12 13 14<br />
1 18 BANK NO. buttons<br />
17 FINE—moving light speed control<br />
(BANK1~BANK18)<br />
button<br />
2 18 SHOW NO. buttons 18 Joystick<br />
3 18 SC NO. buttons 19 LCD screen<br />
4 VR1—VR18 20 Gooseneck lamp base<br />
5 P1—P18 FIXTURE NO. buttons 21 Gooseneck lamp ON/OFF<br />
6 FADE TIME PITCH FADER 22 ADD—SHOW step add<br />
7 SHOW recall button 23 INS—SHOW step insert<br />
8 FIXTURE function button 24 DEL—SHOW delete<br />
9 RANGE FADER 25 STORE—SHOW save<br />
10 SMOKE recall button 26 SPOT--SPOT SC setting, save<br />
11 STROBE recall button<br />
27<br />
select button<br />
12 EDIT main function button<br />
28<br />
13 BLACKOUT 29 ENTER<br />
14 FUNC button 30 ECS<br />
15 MACRO—moving light mode 31 MASTER—master FADER<br />
16 PREV—SHOW preview 32 LED indicator<br />
1-5 Rear Panel Introduction<br />
27~30 22~26<br />
18<br />
15 16 17<br />
<strong>Lite</strong>-<strong>Puter</strong><br />
CX-18 [EUM-D]
ISO 9001 CERTIFIED www.liteputer.com.tw<br />
1 2 3 4 5 6<br />
1 AC Input 4 USB Port<br />
2 Power on/off 5 MIDI Input<br />
3 SD Card Slot 6 DMX Output<br />
1-6 Installation<br />
You can buy our other products to facilitate your use.<br />
7<br />
<strong>Lite</strong>-<strong>Puter</strong><br />
CX-18 [EUM-D]
ISO 9001 CERTIFIED www.liteputer.com.tw<br />
Chapter 2 Function<br />
2-1 BANK Introduction<br />
� Each BANK includes SHOW, SCENE, SMOKE, STROBE and SPOT, you can<br />
save the setting to the 5 functions above separately and recall them.<br />
� The device has 18 BANK, each includes 18 SHOW, 18 SCENE, 1 SMOKE, 1 STROBE and<br />
1 SPOT.<br />
2-2 SHOW Introduction<br />
� The device has 18 SHOW; each can store 32 STEP of each 18 moving lights. You can run<br />
the step in certain order or in x, y axle and the step has Pitch time and Wait time setting,<br />
which can be called Chase. The Step in SHOW can’t store the channels (after channel 361)<br />
of traditional fixture (1-360 channel are the channels of moving light). You can run several<br />
SHOWS at the same time. Use Prev. to preview and change the run time.<br />
�<br />
2-3 SCENE Introduction<br />
� The device has 18 SCENE for traditional fixture( after channel 361).Each SCENE can be<br />
the one with only one step or several steps, it can run in x,y axle and has Pitch time and<br />
Wait time setting, which can be called Chase. Use Prev. to preview and change the run<br />
time.<br />
2-4 FADER Introduction<br />
� It’s used for recall and set the dimming value of channel. In the FIXTURE mode, it can set<br />
position, movement, speed and brightness of moving light; in the SCENE mode, it can<br />
recall the scene of traditional fixture.<br />
2-5 FIXTURE NO. Selection Button<br />
� When set FIXTURE and recall moving light, you can use it to recall the corresponding<br />
moving light.<br />
2-6 FADE TIME PITCH Fader<br />
� Set the shift speed of each step: the basic value is 2 second (range from 0.1 to 25 second),<br />
it can be changed according to speed of Chase. Please note the minimal speed can’t lower<br />
than that of moving light, otherwise it will influence the operation.<br />
� When SHOW is running, it must on the 0 position. It can move upward to accelerate or<br />
downward to slow down.<br />
8<br />
<strong>Lite</strong>-<strong>Puter</strong><br />
CX-18 [EUM-D]
ISO 9001 CERTIFIED www.liteputer.com.tw<br />
2-7 SHOW Recall Button<br />
� It’s used for run and set moving light’s mode. Entering the SHOW play back mode is equal<br />
to PLAYBACK mode, you can run all the setting here.<br />
1. On the main menu, press EDIT to enter SHOE editing.<br />
2. After setting, press SHOW to recall it or recall SCENE at the same time.<br />
2-8 FIXTURE Function Button<br />
� It’s a function to call moving light’s mode. It can choose moving light, set channel’s value,<br />
movement, speed and brightness.<br />
1. On the main menu, press it to enter moving light setting.<br />
2. Fixture : On any condition, except under SPOT, FUNC and EDIT menu, you can use it<br />
to control the moving light independently , at the same time , use Fader and<br />
joystick to fine adjust .<br />
Please note: Only under SPOT, FUNC, and EDIT menu, you can’t use FIXTURE button<br />
but use P1/Fader 1 to recall the channel of traditional fixture (after channel<br />
361).<br />
2-9 RANGE FADER<br />
� When edit SHOW mode, it is set wait time (range from 0.1 to 25 second) of each step, the<br />
default value is 2 second and it can be changed according to Chase speed.<br />
� When edit SHOW mode, the Macro mode is on, the RANGE is used for choose circle<br />
radius.<br />
2-10 SMOKE Recall Button<br />
� It can set the channel 325 to 342 of smoke machine. You can set different value to each<br />
channel, for example, the channel with high value for warm machine, one with low value for<br />
smoke volume.<br />
2-11 STROBE Recall Button<br />
� It can set the channel 343 to 360 of strobe light. It will set different value to each channel,<br />
for example, the channel with high value for brightness, one with low value for turn on.<br />
2-12 EDIT Button<br />
� It is to enter the main menu, including FIXTURE, SMOKE, STROBE,SPOT, SHOW, and<br />
COMMEN SC function.<br />
9<br />
<strong>Lite</strong>-<strong>Puter</strong><br />
CX-18 [EUM-D]
ISO 9001 CERTIFIED www.liteputer.com.tw<br />
2-13 BLACKOUT Button<br />
� It supplies a function which is take out all intensity When the SHOW, STOBE, SKOME,<br />
SPOT and SCENE are in action.<br />
2-14 FUNC Button<br />
� Press FUNC to enter function menu, it includes system time, operation status, data copy,<br />
and delete setting.<br />
2-15 MACRO Introduction<br />
� When edit SHOW, it can set the path of moving light by console default setting.<br />
There are 5 modes: OFF/RIGHT & LEFT /UP & DOWN/CIRC<br />
CIRCOFF------turn off moving light<br />
RIGHT&LEFT ------move in X axle<br />
PAN&TILT------move in Y axle<br />
CIRC/-CIRC------move in circle (X and Y axle) (clockwise and anti-clock direction)<br />
� When running SHOW, press MACRO to pause output and press it once again to restart.<br />
2-16 PREV SHOW Introduction<br />
� When edit SHOW, press PREV to PREV. (preview) and test the show and also adjust the<br />
pitch and range (fade and wait time).Store it you can save an ideal chase you want.<br />
2-17 FINE Function Button<br />
� When set moving light’s position, use it to enlarge the resolution to easy adjust the speed<br />
for setting the PAN&TILT.<br />
� When program a SHOW, after choose the FIXTURE, press FINE for 3 second, it will put<br />
the PAN&TILT value to 50%.<br />
2-18 JOYSTICK Introduction<br />
� Can replace the channel used for RIGHT&LEFT and UP&DOWN control in moving light.<br />
The bigger the move angle, the faster the speed is. You can freely control the moving light<br />
together with fine adjust function.<br />
2-19 LCD SCREEN Introduction<br />
� It displays the input and output status.<br />
2-20 GOOSENECK LAMP STAND<br />
� Stand for gooseneck lamp installation.<br />
10<br />
<strong>Lite</strong>-<strong>Puter</strong><br />
CX-18 [EUM-D]
ISO 9001 CERTIFIED www.liteputer.com.tw<br />
2-21 GOOSENECK LAMP SWITCH<br />
� Switch for Gooseneck lamp<br />
2-22 ADD Button<br />
� Add the STEP in SHOW editing.<br />
2-23 INS Button<br />
� Insert a new STEP in show or scene editing.<br />
2-24 DEL Button<br />
� Delete any STEP in show or scene editing.<br />
2-25 STORE Button<br />
� It’s used for save the setting of a step which was updated when it was editing in a SHOW.<br />
Or in [Prev.] function it can save the timing when the steps were change.<br />
2-26 SPOT SC Button<br />
� It’s used for save the pre-set scene of moving light in SPOT. When run the SHOW, if you<br />
recall the SPOT, moving light will come out of the SHOW and run the pre-set scene<br />
independently. For example, set a scene for stage; if the host comes out suddenly and the<br />
moving light is running the SHOW, press spot to call out the pre-set scene for stage<br />
immediately.<br />
2-27 ◄ and ► Button<br />
� They are used for move the cursor in function menu.<br />
1. Choose the place to insert STEP in the SHOW.<br />
2. Choose the function on the list of FUN and FIXTURE.<br />
� During the SHOW and press [MACRO/PAUSE] to stop the link of sequence , press them to<br />
go next step or previous step.<br />
2-28 ENTER Button<br />
� <strong>Co</strong>nfirm operation.<br />
2-29 ESC Button<br />
� On FUNC and EDIT function menu or editing any setting in the menu, press it to go back<br />
to main menu and then press it once again to release the device, especially is clear off<br />
everything on stage.<br />
11<br />
<strong>Lite</strong>-<strong>Puter</strong><br />
CX-18 [EUM-D]
ISO 9001 CERTIFIED www.liteputer.com.tw<br />
2-30 MASTER FADER<br />
� As the master dimming fader, you can use it to change the dimming value.<br />
� When in the fixture set up function, the master fader is set the value of the Maximum and<br />
Minimum.<br />
2-31 LED INDICATOR<br />
� The device has 103 LED and display the operation status and hardware status.<br />
2-32 USB PORT<br />
� The function is not available in this version.<br />
2-33 SD CARD<br />
� Save the setting in SD card or download the setting to another device. When you going to<br />
save the SD card, it had to be format by Microsoft FAT16 system. During the copy SD<br />
card, the SD card check should be set in on that it can be copy in the FUNC menu.<br />
2-34 MIDI IN<br />
� <strong>Co</strong>ntrol the step by midi signal.<br />
2-35 AUDIO IN<br />
� Use Phone jet to connect the console during play back a show or a scene it can trigger by<br />
the audio control.<br />
There is internal microphone in this console.<br />
2-36 POWER IN<br />
� 110V-240V 50-60 Hz power input.<br />
2-37 DMX OUT<br />
� DMX signal output connector, three types: XLR-3, XLR-5, and RJ11.<br />
� RJ11 can connect <strong>Lite</strong>-<strong>Puter</strong>’s DP-512, LED512, ED-450 and DPE-4000, which can<br />
connect Internet and lighting control software on PC to check channel’s status.<br />
� XLR-5 can connect <strong>Lite</strong>-<strong>Puter</strong>’s DP-11DMX Patch Interface to realize the PATCH<br />
function.<br />
2-38 POWER ON/OFF<br />
Power on and off.<br />
12<br />
<strong>Lite</strong>-<strong>Puter</strong><br />
CX-18 [EUM-D]
ISO 9001 CERTIFIED www.liteputer.com.tw<br />
Chapter 3 Operation<br />
3-1 Home Page Introduction<br />
One second after CX-18 switches on, its system will enter the HOME PAGE and LCD<br />
displays as below,<br />
LITE-PUTER CX-18 Ver1.0 BANK:01<br />
SELECT SHOW TO RUN<br />
SCENE:00<br />
INTER MEMORY 08/01/2008 10:08<br />
File operate<br />
COMMON SC NO.<br />
Software version<br />
Date & Time<br />
Attention:<br />
1. BANK NO. -----Use BANK 01~BANK 18 to change current BANK.<br />
Each time after it switches on, it will automatically go back to<br />
BANK 01.<br />
2. SCENE NO----- Use SCENE 01~ SCENE 18 to recall the COMMON SC under<br />
BANK.<br />
Each time after it switches on, it will go back to SCENE:00 .<br />
3. File operate status please refer to Chapter 3<br />
13<br />
BANK<br />
<strong>Lite</strong>-<strong>Puter</strong><br />
CX-18 [EUM-D]
ISO 9001 CERTIFIED www.liteputer.com.tw<br />
3-2 Hardware inspection<br />
Inspection function include: 82 LED indicators check<br />
91 buttons check<br />
21 Fader and 1 joystick check<br />
82 LED indicators check<br />
STEP-1 Press both【ENTER】 and【ESC】 at meantime switch on CX-18, LCD displays as below,<br />
At this time , the 82 LED indicators will turn on(if not, it means the LED is broken)<br />
91 buttons check<br />
STEP-2 After LED inspection, system will automatically enter button check, LCD displays<br />
as below,<br />
LITE-PUTER CX-18 Ver1.0 BANK:01<br />
TEST I/O & LED FUNCTION<br />
[STEP1] LEDS TEST END<br />
[STEP2] TEST KEYS, PRESS KEY TO TEST<br />
[STEP3] TEST VR, CHANGE VR FOR TEST<br />
PRESS’ESC’ EXIT TEST<br />
PRESS’ENTER’ NEXT STEP<br />
INTER MEMORY 08/01/2008 10:08<br />
LITE-PUTER CX-18 Ver1.0 BANK:01<br />
TEST I/O & LED FUNCTION<br />
[STEP1] LEDS TEST END<br />
[STEP2] TEST KEYS, PRESS KEY TO TEST<br />
[STEP3] TEST VR, CHANGE VR FOR TEST<br />
PRESS’ESC’ EXIT TEST<br />
PRESS’ENTER’ NEXT STEP<br />
INTER MEMORY 08/01/2008 10:08<br />
14<br />
Reminder<br />
Reminder<br />
<strong>Lite</strong>-<strong>Puter</strong><br />
CX-18 [EUM-D]
ISO 9001 CERTIFIED www.liteputer.com.tw<br />
For example: check NO. 18 BANK button and NO. 1 SHOW button<br />
Press BANK 18 on the front panel, LCD displays as below,<br />
LITE-PUTER CX-18 Ver1.0 BANK:01<br />
TEST I/O & LED FUNCTION<br />
[STEP1] LEDS TEST END<br />
[STEP2] TEST KEYS, PRESS KEY TO TEST<br />
[STEP3] TEST VR, CHANGE VR FOR TEST<br />
BANK KEY 18 IS OK!<br />
PRESS’ESC’ EXIT TEST<br />
PRESS’ENTER’ NEXT STEP<br />
INTER MEMORY 08/01/2008 10:08<br />
Then press the SHOW 1, LCD display as below,<br />
[STEP1] LEDS TEST END<br />
[STEP2] TEST KEYS, PRESS KEY TO TEST<br />
[STEP3] TEST VR, CHANGE VR FOR TEST<br />
SHOW KEY 01 IS OK!<br />
PRESS’ESC’ EXIT TEST<br />
PRESS’ENTER’ NEXT STEP<br />
Attention: When press NO. 1 SHOW, there is no SHOW BUTTON 01 IS OK! display on the<br />
LCD and still display BANK BUTTON 18 IS OK!, it means NO. 1 SHOW button is broken.<br />
Please check other button in the same way.<br />
15<br />
Reminder<br />
LITE-PUTER CX-18 Ver1.0 BANK:01<br />
TEST I/O & LED FUNCTION<br />
INTER MEMORY 08/01/2008 10:08<br />
Reminder<br />
Key name and<br />
status<br />
NO.1 SHOW IS<br />
OK.<br />
<strong>Lite</strong>-<strong>Puter</strong><br />
CX-18 [EUM-D]
ISO 9001 CERTIFIED www.liteputer.com.tw<br />
21 Fader and 1 joystick check<br />
STEP-3 After [STEP2] button check, press【ENTER】move arrowhead to [STEP3] and LCD<br />
displays as below,<br />
VR under<br />
check<br />
LITE-PUTER CX-18 Ver1.0 BANK:01<br />
TEST I/O & LED FUNCTION<br />
[STEP1] LEDS TEST END<br />
[STEP2] TEST KEYS, PRESS KEY TO TEST<br />
[STEP3] TEST VR, CHANGE VR FOR TEST<br />
VR 23 VALUE=168<br />
PRESS’ESC’ EXIT TEST<br />
PRESS’ENTER’ NEXT STEP<br />
INTER MEMORY 08/01/2008 10:08<br />
Now move fader to check the function.<br />
For example: For example check fader 02, LCD display as below,<br />
LITE-PUTER CX-18 Ver1.0 BANK:01<br />
TEST I/O & LED FUNCTION<br />
[STEP1] LEDS TEST END<br />
[STEP2] TEST KEYS, PRESS KEY TO TEST<br />
[STEP3] TEST VR, CHANGE VR FOR TEST<br />
VR 02 VALUE=168<br />
PRESS’ESC’ EXIT TEST<br />
PRESS’ENTER’ NEXT STEP<br />
INTER MEMORY 08/01/2008 10:08<br />
Introduction: VALUE=168-------Stand for fader value, it range from 000 to 255.<br />
fader 02 -----------Stand for fader under check, CX-18 has 18 fader in total.<br />
16<br />
VR 23/24 is<br />
joystick check<br />
Move VR, the value<br />
will change<br />
<strong>Lite</strong>-<strong>Puter</strong><br />
CX-18 [EUM-D]
ISO 9001 CERTIFIED www.liteputer.com.tw<br />
Attention: When move FADER 02, there is no FADER 02 VALUE=168 display on the screen<br />
but still display FADER 23 VALUE=168, it means FADER 02 is broken, LCD displays as below,<br />
STEP-4 After hardware inspection, press【ESC】go back to HOME PAGE and LCD displays<br />
as below,<br />
LITE-PUTER CX-18 Ver1.0 BANK:01<br />
TEST I/O & LED FUNCTION<br />
[STEP1] LEDS TEST END<br />
[STEP2] TEST KEYS, PRESS KEY TO TEST<br />
[STEP3] TEST VR, CHANGE VR FOR TEST<br />
VR 23 VALUE=168<br />
PRESS’ESC’ EXIT TEST<br />
PRESS’ENTER’ NEXT STEP<br />
INTER MEMORY 08/01/2008 10:08<br />
3-3 DMX Address Allocation Check<br />
On the HOME PAGE, press【ENTER】and LCD displays as below,<br />
LITE-PUTER CX-18 Ver1.0 BANK:01<br />
DMX ADDRESS ALLOCATE<br />
P01:001 , P02:019 , P03:037 , P04:055<br />
P05:073 , P06:091 , P07:109 , P08:127<br />
P09:145 , P10:163 , P11:181 , P12:199<br />
P13:217 , P14:235 ,P15:253 , P16:271<br />
P17:289 , P18:307<br />
SMOKE DMX:325-342<br />
STROBE DMX:343-360<br />
DIMMER STARE DMX:361<br />
PRESS’ENTER’ EXIT<br />
INTER MEMORY 08/01/2008 10:08<br />
17<br />
Reminder<br />
<strong>Lite</strong>-<strong>Puter</strong><br />
CX-18 [EUM-D]
ISO 9001 CERTIFIED www.liteputer.com.tw<br />
Introduction:<br />
1.This function can check fixture’s DMX address allocation(DMX address change is not<br />
permitted)<br />
2.PRESS’ENTER’ EXIT---- They are operation reminder, press ‘ENTER’can go back to HOME<br />
PAGE.<br />
3-4 FIXTURE Setting<br />
FIXTURE—moving light parameter setting<br />
STEP-1 On the HOME PAGE, press【EDIT】and LCD displays as below,<br />
LITE-PUTER CX-18 Ver1.0 BANK:01<br />
ENTER EDIT FCN :3S<br />
INTER MEMORY 08/01/2008<br />
STEP-2 Press【EDIT】for 3 seconds to enter function menu and LCD displays as below,<br />
LITE-PUTER CX-18 Ver1.0 BANK:01<br />
EDIT MODE, SELECT ITEM<br />
F1: ‘FIX’ FOR CONFIG FIXTURE<br />
F2: ‘SHOW’ FOR SHOE EDIT<br />
F3: ‘STROBE’ FOR STROBE SC<br />
F4: ‘SMOKE’ FOR SMOKE SC<br />
F5: ‘SPOT’ FOR SPOT SC<br />
F6: ANY SC KEY FOR COMMON SC<br />
USE HOT KEY SELECT TIME<br />
INTER MEMORY 08/01/2008<br />
18<br />
Reminder<br />
<strong>Lite</strong>-<strong>Puter</strong><br />
CX-18 [EUM-D]
ISO 9001 CERTIFIED www.liteputer.com.tw<br />
Introduction:<br />
F1~F5:Press FIX, SHOW, STROBE, SMOKE, SPOT separately to enter function setting.<br />
F6: Select any one from SCENC 01 to SCENC 18 to enter COMMON SC setting.<br />
STEP-3 Press【FIXTURE】and LCD displays as below,<br />
At this time, select fixture (moving light) and BANK.<br />
(Select BANK first and then select the main fixture)<br />
a. Select one or more moving lights from P1to P18 (mode: single, multiple, and jump select)<br />
b. Select only one from BANK 01 to BANK 18.<br />
STEP-4 Press【ENTER】to enter moving light parameter setting menu and LCD displays as<br />
below,<br />
LITE-PUTER CX-18 Ver1.0 BANK:01<br />
FIXTURE CONFIG<br />
WAITING SEL. FIXTURE AND BANK<br />
[ step1]SELECT FIXTURE(S) AND BANK<br />
[ step2]PRESS’ENT’FIXTURE CONFIG<br />
INTER MEMORY 08/01/2008<br />
FIXTURE CONFIG<br />
PAN CHANNEL =NONE<br />
TILT CHANNEL = NONE<br />
DIMMER CHANNEL =NONE<br />
DIMMER CH MIN VAL=000<br />
DIMMER CH MAX VAL=255<br />
PRESS’ ‘OR JOYSSTICK SEL. ITME<br />
USE MASTER VR SET MIN/MAX VAL<br />
19<br />
Blink<br />
LITE-PUTER CX-18 Ver1.0 BANK:01<br />
INTER MEMORY 08/01/2008<br />
Reminder<br />
No channel setting.<br />
Reminder<br />
<strong>Lite</strong>-<strong>Puter</strong><br />
CX-18 [EUM-D]
ISO 9001 CERTIFIED www.liteputer.com.tw<br />
Attention: Press【MACRO】to set fixture’s moving mode.<br />
STEP-5 Press 【►】and【◄】 (move joystick up and down) to set or change PAN,TILT,<br />
DIM CH,DIM CH MIN VAL and DIM CH MAX VAL.<br />
STEP-6 When the arrowhead point to any one of PAN CHANNEL,TILT CHANNEL,DIMMER<br />
CHANNEL, you can move FADER1~FADER18 or【MASTER】to set or<br />
change DIM CH MIN VAL and DIM CH MAX VAL.<br />
STEP-7 After setting, press【ENTER】to save and go back to FIXTURE menu.Attention: .When<br />
select PAN/TILT/DIMMER CH, you can use 【DEL】to delete certain channel and it<br />
displays “NONE”.<br />
For example: PAN CHANNEL set as channel 11<br />
TILT CHANNEL set as channel 12<br />
DIMMER CHANNEL set as channel 13<br />
DIM CH MIN VAL set as 125-----minimum dimming value<br />
DIM CH MAX VAL set as 200-----maximum dimming value<br />
1. Under the condition of STEP-4, move VR11 and LCD displays as below,<br />
LITE-PUTER CX-18 Ver1.0 BANK:01<br />
FIXTURE CONFIG<br />
PAN CHANNEL =11<br />
TILT CHANNEL = NONE<br />
DIMMER CHANNEL =NONE<br />
DIMMER CH MIN VAL=000<br />
DIMMER CH MAX VAL=255<br />
PRESS’ ‘OR JOYSSTICK SEL. ITME<br />
USE MASTER VR SET MIN/MAX VAL<br />
INTER MEMORY 08/01/2008<br />
2. Press【►】or move joystick(down)to select TILT CHANNEL , LCD displays as below,<br />
20<br />
<strong>Lite</strong>-<strong>Puter</strong><br />
CX-18 [EUM-D]
ISO 9001 CERTIFIED www.liteputer.com.tw<br />
LITE-PUTER CX-18 Ver1.0 BANK:01<br />
FIXTURE CONFIG<br />
PAN CHANNEL =11<br />
TILT CHANNEL = NONE<br />
DIMMER CHANNEL =NONE<br />
DIMMER CH MIN VAL=000<br />
DIMMER CH MAX VAL=255<br />
PRESS’ ‘OR JOYSSTICK SEL. ITME<br />
USE MASTER VR SET MIN/MAX VAL<br />
INTER MEMORY 08/01/2008<br />
3. Move VR 12 to set TILT CHANNEL and LCD display as below,<br />
LITE-PUTER CX-18 Ver1.0 BANK:01<br />
FIXTURE CONFIG<br />
PAN CHANNEL =11<br />
TILT CHANNEL = 12<br />
DIMMER CHANNEL =NONE<br />
DIMMER CH MIN VAL=000<br />
DIMMER CH MAX VAL=255<br />
PRESS’ ‘OR JOYSSTICK SEL. ITME<br />
USE MASTER VR SET MIN/MAX VAL<br />
INTER MEMORY 08/01/2008<br />
4. Set DIMMER CHANNEL as channel 13, please refer to the above steps.<br />
5. Move the arrowhead to DIMMER CH MIN VAL=000 and move 【MASTER】 to change<br />
000 to 20, LCD display as below,<br />
21<br />
<strong>Lite</strong>-<strong>Puter</strong><br />
CX-18 [EUM-D]
ISO 9001 CERTIFIED www.liteputer.com.tw<br />
LITE-PUTER CX-18 Ver1.0 BANK:01<br />
FIXTURE CONFIG<br />
PAN CHANNEL =11<br />
TILT CHANNEL = 12<br />
DIMMER CHANNEL =13<br />
DIMMER CH MIN VAL=20<br />
DIMMER CH MAX VAL=255<br />
PRESS’ ‘OR JOYSSTICK SEL. ITME<br />
USE MASTER VR SET MIN/MAX VAL<br />
INTER MEMORY 08/01/2008<br />
6. Move the arrowhead to DIMMER CH MAX VAL and move 【MASTER】to change 000<br />
to 80 to finish the setting and LCD displays as below,<br />
LITE-PUTER CX-18 Ver1.0 BANK:01<br />
FIXTURE CONFIG<br />
PAN CHANNEL =11<br />
TILT CHANNEL = 12<br />
DIMMER CHANNEL =13<br />
DIMMER CH MIN VAL=20<br />
DIMMER CH MAX VAL=80<br />
PRESS’ ‘OR JOYSSTICK SEL. ITME<br />
USE MASTER VR SET MIN/MAX VAL<br />
INTER MEMORY 08/01/2008<br />
7.Press【ENTER】to save and go back to FIXTURE interface.<br />
3-5 SHOW Setting/Recall<br />
STEP-1 On the HOME PAGE, press【EDIT】for 3 seconds and LCD displays the function menu,<br />
22<br />
<strong>Lite</strong>-<strong>Puter</strong><br />
CX-18 [EUM-D]
ISO 9001 CERTIFIED www.liteputer.com.tw<br />
LITE-PUTER CX-18 Ver1.0 BANK:01<br />
EDIT MODE, SELECT ITEM<br />
F1: ‘FIX’ FOR CONFIG FIXTURE<br />
F2: ‘SHOW’ FOR SHOE EDIT<br />
F3: ‘STROBE’ FOR STROBE SC<br />
F4: ‘SMOKE’ FOR SMOKE SC<br />
F5: ‘SPOT’ FOR SPOT SC<br />
F6: ANY SC KEY FOR COMMON SC<br />
USE HOT KEY SELECT TIME<br />
INTER MEMORY 08/01/2008<br />
STEP-2 Press【SHOW】and LCD display as below,<br />
LITE-PUTER CX-18 Ver1.0 BANK:01<br />
BANK: 01 SHOW:01<br />
display01-18 display01-18<br />
[STEP1] SEL. EDIT BANK & SHOE NO<br />
[STEP2] THEN PRESS’ENT’<br />
INTER MEMORY 08/01/2008 10:08<br />
STEP-3 Press BANK NO. (1~18) and SHOW NO.(1~18) to select the BANK and SHOW<br />
need to edit (for example, set BANK as 12 and SHOW as 18), LCD display as<br />
below, It means edit the SHOW 18 under BANK12.(Select BANK NO. first and then<br />
select SHOW NO.)<br />
STEP-4 Press【ENTER】to enter SHOW edit menu and LCD displays as below,<br />
23<br />
Reminder<br />
Reminder<br />
<strong>Lite</strong>-<strong>Puter</strong><br />
CX-18 [EUM-D]
SHOW step<br />
is empty.<br />
ISO 9001 CERTIFIED www.liteputer.com.tw<br />
LITE-PUTER CX-18 Ver1.0<br />
BANK: 12 SHOW:18<br />
FAND : 0.1S WAIT:0.1S<br />
SPEED:0.1S SIZE:000%<br />
SCENE:EMPTY MACRO:OFF<br />
’ENTER’FOR’FADE/WAIT/SPEED/ANGLE’S<br />
E.<br />
’PREV’ TO PREVIEW PREGRAMED SHOW<br />
INTER MEMORY 08/01/2008<br />
Attention:<br />
FADE/WAIT/SPEED’s value can range from 0.1S to 25.5S.<br />
Size’s value can range from 000% to 100%.<br />
MACRO has 5 operate modes: OFF/PAN/TILT/CIRC/-CIRC<br />
SCENE can range from 1 to 32 steps.<br />
STEP-5 Press【P1—P18 FIXTURE NO.】to select any moving light need to edit. (The<br />
LED on P1—P18 will turn on when the correspond moving light is selected)<br />
For example: FADE TIME set as: 22.2S<br />
WAIT TIME set as: 18.6S<br />
SPEED TIME set as: 18.6S<br />
SIZE set as: 88%<br />
MACRO set as: PAN<br />
SCENE: SHOW step as 8 steps<br />
STEP-6 Press【ENTER】to select FAND/WAIT/SPEED. When FADE is selected, it displays<br />
as 0.1S, and move【FADE TIME PITCH】 FADER to change FADE TIME as 22.2S,<br />
LCD displays as below,<br />
24<br />
min. value:<br />
0.1S and 000%<br />
Moving light operate mode<br />
Reminder<br />
<strong>Lite</strong>-<strong>Puter</strong><br />
CX-18 [EUM-D]
ISO 9001 CERTIFIED www.liteputer.com.tw<br />
LITE-PUTER CX-18 Ver1.0 BANK:01<br />
STEP-7 Press【ENTER】once again to select WAIT and LCD displays as below,<br />
STEP-8 Move【FADE TIME PITCH】FADER to set WAIT TIME as 18.6S and LCD displays<br />
as below,<br />
BANK: 12 SHOW:18<br />
FADE : 22.2S WAIT:0.1S<br />
SPEED:0.1S SIZE:000%<br />
SCENE:EMPTY MACRO:OFF<br />
’ENTER’FOR’FADE/WAIT/SPEED/ANGLE’SE.<br />
’PREV’ TO PREVIEW PREGRAMED SHOW<br />
INTER MEMORY 08/01/2008 10:08<br />
LITE-PUTER CX-18 Ver1.0 BANK:01<br />
BANK: 12 SHOW:18<br />
FAND : 22.2S WAIT: 0.1S<br />
SPEED:0.1S SIZE:000%<br />
SCENE:EMPTY MACRO:OFF<br />
’ENTER’FOR’FADE/WAIT/SPEED/ANGLE’SE.<br />
’PREV’ TO PREVIEW PREGRAMED SHOW<br />
INTER MEMORY 08/01/2008 10:08<br />
25<br />
<strong>Lite</strong>-<strong>Puter</strong><br />
CX-18 [EUM-D]
ISO 9001 CERTIFIED www.liteputer.com.tw<br />
LITE-PUTER CX-18 Ver1.0 BANK:01<br />
BANK: 12 SHOW:18<br />
FAND : 22.2S WAIT: 18.6S<br />
SPEED:0.1S SIZE:000%<br />
SCENE:EMPTY MACRO:OFF<br />
’ENTER’FOR’FADE/WAIT/SPEED/ANGLE’SE.<br />
’PREV’ TO PREVIEW PREGRAMED SHOW<br />
INTER MEMORY 08/01/2008 10:08<br />
Set SPEED TIME, please refer to the steps of FADE/ WAIT TIME setting.<br />
STEP-9 Move【RANGE】FADER to set SIZE as 88%, (no need to choose SIZE:000%) and<br />
LCD displays as below,<br />
LITE-PUTER CX-18 Ver1.0 BANK:01<br />
BANK: 12 SHOW:18<br />
FAND : 22.2S WAIT: 18.6S<br />
SPEED: 18.6S SIZE:88%<br />
SCENE:EMPTY MACRO:OFF<br />
’ENTER’FOR’FADE/WAIT/SPEED/ANGLE’SE.<br />
’PREV’ TO PREVIEW PREGRAMED SHOW<br />
INTER MEMORY 08/01/2008 10:08<br />
STEP-10 MACRO setting(moving light operate mode setting). The current mode is OFF.<br />
Press【MACRO】to set moving light operate as PAN and LCD displays as below,<br />
(START ANGLE:000°)<br />
26<br />
<strong>Lite</strong>-<strong>Puter</strong><br />
CX-18 [EUM-D]
ISO 9001 CERTIFIED www.liteputer.com.tw<br />
LITE-PUTER CX-18 Ver1.0 BANK:01<br />
BANK: 12 SHOW:18<br />
FAND : 22.2S WAIT: 18.6S<br />
SPEED: 18.6S SIZE:88%<br />
START ANGLE: 000°<br />
SCENE:EMPTY MACRO:PAN<br />
’ENTER’FOR’FADE/WAIT/SPEED/ANGLE’SE.<br />
’PREV’ TO PREVIEW PREGRAMED SHOW<br />
INTER MEMORY 08/01/2008 10:08<br />
STEP-11 Moving light operate angel setting. Press【ENTER】to select START ANGLE<br />
and move【FADE TIME PITCH】FADER to set START ANGLE value.(for<br />
example, set as 80°)LCD displays as below,<br />
LITE-PUTER CX-18 Ver1.0 BANK:01<br />
BANK: 12 SHOW:18<br />
FAND : 22.2S WAIT: 18.6S<br />
SPEED: 18.6S SIZE:88%<br />
START ANGLE: 80°<br />
SCENE:EMPTY MACRO:PAN<br />
’ENTER’FOR’FADE/WAIT/SPEED/ANGLE’SE.<br />
’PREV’ TO PREVIEW PREGRAMED SHOW<br />
INTER MEMORY 08/01/2008 10:08<br />
Special attention:<br />
1.Each STEP of SHOW and each moving light on STEP can be set different parameter.<br />
2. Moving lights on each STEP have independent operate mode, please refer to following<br />
example.<br />
27<br />
<strong>Lite</strong>-<strong>Puter</strong><br />
CX-18 [EUM-D]
ISO 9001 CERTIFIED www.liteputer.com.tw<br />
For example: set 4 moving lights on STEP 1<br />
First moving light’s operate mode is –CIRC<br />
Second moving light’s operate mode is CIRC<br />
Third moving light’s operate mode is TILT<br />
Forth moving light’s operate mode is PAN<br />
STEP-1 Enter SHOW edit menu, press 【P1 FIXTURE NO.LED on P1will turn on and<br />
Repeat the steps from STEP-6 to STEP-10 to set the parameter, and then repeat<br />
STEP-11 to STEP-12 set moving light operate as –CIRC and START ANGLE as 60°.<br />
STEP-2 Move FADER1—FADER18 to edit SCENE on STEP.<br />
STEP-3 After P1 setting, press P1 FIXTURE NO.】to exit(LED on P1will turn off and then<br />
press P2 FIXTURE NO.LED on P2 will turn on).<br />
STEP-4 Repeat STEP-6 to STEP-10 set parameter and then repeat STEP-11 to STEP-12<br />
set moving light operate mode as CIRC and START ANGLE as 90°.<br />
Please repeat above step to set the third and forth moving light.<br />
After above setting, then go to the STEP setting on SHOW(ADD, DEL and INSER). STEP can<br />
range from 1 to 32.<br />
STEP-12 If add first STEP, move VR1—VR18 to edit STEP(When the channel is on<br />
editing, the LED on correspond FADER will turn on)<br />
STEP-13 Press ADD to save the setting(max. number is 32)and LCD displays as below,<br />
SHOW on<br />
editing now<br />
LITE-PUTER CX-18 Ver1.0 BANK:01<br />
BANK: 12 SHOW:18<br />
FAND : 22.2S WAIT: 18.6S<br />
SPEED: 18.6S SIZE:88%<br />
START ANGLE: 80°<br />
SCENE: 01,01 MACRO:PAN<br />
’ENTER’FOR’FADE/WAIT/SPEED/ANGLE’SE.<br />
’PREV’ TO PREVIEW PREGRAMED SHOW<br />
INTER MEMORY 08/01/2008 10:08<br />
28<br />
Total no. of SHOW<br />
step under BANK<br />
<strong>Lite</strong>-<strong>Puter</strong><br />
CX-18 [EUM-D]
ISO 9001 CERTIFIED www.liteputer.com.tw<br />
STEP-14 Add second STEP, repeat STEP-5 and STEP-12 then press ADD to save the setting,<br />
LCD displays as below,<br />
LITE-PUTER CX-18 Ver1.0 BANK:01<br />
BANK: 12 SHOW:18<br />
FAND : 22.2S WAIT: 18.6S<br />
SPEED: 18.6S SIZE:88%<br />
START ANGLE: 80°<br />
SCENE: 02,02 MACRO:PAN<br />
’ENTER’FOR’FADE/WAIT/SPEED/ANGLE’SE.<br />
’PREV’ TO PREVIEW PREGRAMED SHOW<br />
INTER MEMORY 08/01/2008 10:08<br />
STEP-15 Add third to eighth STEP, repeat STEP-12 and STEP-13 and LCD displays as below,<br />
LITE-PUTER CX-18 Ver1.0 BANK:01<br />
BANK: 12 SHOW:18<br />
FAND : 22.2S WAIT: 18.6S<br />
SPEED: 18.6S SIZE:88%<br />
START ANGLE: 80°<br />
SCENE: 08,08 MACRO:PAN<br />
’ENTER’FOR’FADE/WAIT/SPEED/ANGLE’SE.<br />
’PREV’ TO PREVIEW PREGRAMED SHOW<br />
INTER MEMORY 08/01/2008 10:08<br />
29<br />
<strong>Lite</strong>-<strong>Puter</strong><br />
CX-18 [EUM-D]
3-5-1 INSERT STEP<br />
ISO 9001 CERTIFIED www.liteputer.com.tw<br />
The STEP insert function means insert a new STEP in front of any preset STEP.<br />
Press【►】【◄】to select the place need insert step and repeat STEP-5 and STEP-12<br />
For example: insert a new STEP in front of the eighth STEP.<br />
After setting, press【INS】to save the STEP insert and LCD displays as below,<br />
LITE-PUTER CX-18 Ver1.0 BANK:01<br />
BANK: 12 SHOW:18<br />
FAND : 22.2S WAIT: 18.6S<br />
SPEED: 18.6S SIZE:88%<br />
START ANGLE: 80°<br />
SCENE: 08,08 MACRO:PAN<br />
’ENTER’FOR’FADE/WAIT/SPEED/ANGLE’SE.<br />
’PREV’ TO PREVIEW PREGRAMED SHOW<br />
INTER MEMORY 08/01/2008 10:08<br />
LITE-PUTER CX-18 Ver1.0 BANK:01<br />
BANK: 12 SHOW:18<br />
FAND : 22.2S WAIT: 18.6S<br />
SPEED: 18.6S SIZE:88%<br />
START ANGLE: 80°<br />
SCENE: 08,09 MACRO:PAN<br />
’ENTER’FOR’FADE/WAIT/SPEED/ANGLE’SE.<br />
’PREV’ TO PREVIEW PREGRAMED SHOW<br />
INTER MEMORY 08/01/2008 10:08<br />
30<br />
<strong>Lite</strong>-<strong>Puter</strong><br />
CX-18 [EUM-D]
3-5-2 EDIT STEP<br />
ISO 9001 CERTIFIED www.liteputer.com.tw<br />
After STEP setting finished, user can change it.<br />
When SHOW is on editing, select STEP need to change and move VR1—VR18 to edit it then<br />
pres【STORE】to save the change.<br />
3-5-3 Delete Step<br />
Delete STEP on SHOW. When SHOW is on editing, press【►】【◄】 to select STEP need to<br />
delete and then press【DEL】to delete it.<br />
3-5-4 Preview SHOW<br />
When SHOW is on editing, user can preview it.<br />
STEP-1 On SHOW edit menu, LCD displays as below,<br />
SHOW<br />
step no.<br />
LITE-PUTER CX-18 Ver1.0 BANK:01<br />
BANK: 12 SHOW:18<br />
FAND : 22.2S WAIT: 18.6S<br />
SPEED: 18.6S SIZE:88%<br />
START ANGLE: 80°<br />
SCENE: 08,08 MACRO:PAN<br />
’ENTER’FOR’FADE/WAIT/SPEED/ANGLE’SE.<br />
’PREV’ TO PREVIEW PREGRAMED SHOW<br />
INTER MEMORY 08/01/2008 10:08<br />
STEP-2 Press【PREV】, LCD displays as below,<br />
31<br />
<strong>Lite</strong>-<strong>Puter</strong><br />
CX-18 [EUM-D]
ISO 9001 CERTIFIED www.liteputer.com.tw<br />
Move【FADE TIME PITCH】FADER to change SHOW STEP shift speed and then user can<br />
preview it.<br />
STEP-3 After preview, press【PREV】to exit and continue SHOW setting.<br />
3-5-5 Recall SHOW<br />
LITE-PUTER CX-18 Ver1.0 BANK:01<br />
SHOW:PREVIEW FADE: 1.4S<br />
SCN: 01/08 PTCH:+10<br />
PRESS ’PREV’ EXIT PREVIEW MODE<br />
INTER MEMORY 08/01/2008 10:08<br />
SHOW recall has 2 modes, one is internal recall; another is AUDIO/MIDI recall.<br />
Mode 1: Select preset BANK NO.<br />
STEP-1 Press【SHOW】and LCD display as below,<br />
LITE-PUTER CX-18 Ver1.0 BANK:01<br />
SELECT RUN SHOW NO<br />
SCENE:00<br />
INTER MEMORY 08/01/2008 10:08<br />
32<br />
Reminder<br />
<strong>Lite</strong>-<strong>Puter</strong><br />
CX-18 [EUM-D]
scene operate<br />
on SHOW<br />
ISO 9001 CERTIFIED www.liteputer.com.tw<br />
STEP-2 Press SHOW NO. (LED on the selected button will turn on) and LCD displays as<br />
below,<br />
(For example, recall SHOW 18 under BANK 18)<br />
LITE-PUTER CX-18 Ver1.0 BANK:01<br />
SHOW:18 WAIT(FADE):0.1S<br />
SCN: 01/06 PT:+1.4 WT: +2.5<br />
RUN SHOW LIST (MACRO TO PAUSE)<br />
SHOW18[06]<br />
Show 18 has 6 steps<br />
SEQ01:EMPTY<br />
scene edit on SHOW<br />
INTER MEMORY 08/01/2008 10:08<br />
:Only when recall SEQ, this function display will come out. 02/07 means the<br />
SCENE STEP of SEQ. 02 means the current step; 07 means the total step number.<br />
:It mean there is no SCENE STEP on SEQ.<br />
Attention:<br />
1.SHOW step =SHOW scene<br />
2. SCN: 01/06-SHOW step is change from 01 to 06(max. 01~32).<br />
3. PT, WT range from+10 to -10. FADE TIME PITCH FADER and RABGE FADER control them<br />
separately.<br />
+10~0 means WAIT/FADE TIME’s negative growth( The speed will faster, for example, FADE<br />
TIME is 0.2 and PT is +1.4 then FADE TIME is 0.5X1/1.4. So as to WAIT TIME)<br />
0~10 means WAIT/FADE TIME’s positive growth( the speed will slower, for example, FADE<br />
TIME is 1.0 and PT is -2.5 then FADE TIME is 0.5X2.5. So as to WAIT TIME)<br />
33<br />
FAND/WAIT/SPEED<br />
time shift<br />
WAITTIME/FADE TIME<br />
Adjust<br />
Press MACRO<br />
to pause or run<br />
SHOW<br />
<strong>Lite</strong>-<strong>Puter</strong><br />
CX-18 [EUM-D]
ISO 9001 CERTIFIED www.liteputer.com.tw<br />
Attention:<br />
a. When recall SHOW, SHOW NO.has 3 select mode: signal, multiple, jump select.<br />
signal select----select any one from SHOW NO.1 to SHOW NO.18<br />
multiple select----press start SHOW NO.and then press end SHOW NO.<br />
(for example, select SHOW NO.8 to SHOW NO.17, press SHOW NO.8and then press SHOW<br />
NO.17)<br />
Jump select-----select any one or more from SHOW NO.1~ SHOW NO.18<br />
b. On 3-5-5 STEP-2 when recall the SHOW 18 under BANK 18 and LCD displays as below,<br />
LITE-PUTER CX-18 Ver1.0 BANK:01<br />
SHOW:18 WAIT:0.1S<br />
SCN: 01/06 PTCH:+1.4<br />
RUN SHOW LIST<br />
SHOW01[00].SHOW02[00].SHOW03[00]<br />
SHOW01[00].SHOW02[00].SHOW03[00]<br />
SHOW01[00].SHOW02[00].SHOW03[00]<br />
SHOW01[00].SHOW02[00].SHOW03[00]<br />
SHOW01[00].SHOW02[00].SHOW03[00]<br />
SHOW01[00].SHOW02[00].SHOW03[00]<br />
SCENE:00<br />
INTER MEMORY 08/01/2008 10:08<br />
STEP-3 Move【FADE TIME PITCH】FADER to change SHOW speed.<br />
Mode 2: On the condition of internal recall SHOW, move 【FADE TIME PITCH】 FADER to the<br />
bottom and LCD displays as below,<br />
34<br />
<strong>Lite</strong>-<strong>Puter</strong><br />
CX-18 [EUM-D]
ISO 9001 CERTIFIED www.liteputer.com.tw<br />
LITE-PUTER CX-18 Ver1.0 BANK:01<br />
SHOW:18<br />
SCN: 01/06 CONTROL BY AUDID<br />
RUN SHOW LIST (MACRO TO PAUSE)<br />
SHOW18[06]<br />
SCENE:00<br />
INTER MEMORY 08/01/2008 10:08<br />
STEP can change with the music or directly controlled by MIDI.<br />
3-6 STROBE Setting/Recall<br />
Introduction: STROBE has 2 scene modes.<br />
Press【STROBE】recall the ACTIVE STROBE SC;<br />
Release【STROBE】recall the INTIVE STROBE SC;<br />
STEP-1 On the home page, press【EDIT】for 3 seconds and LCD displays the function menu,<br />
LITE-PUTER CX-18 Ver1.0 BANK:01<br />
EDIT MODE, SELECT ITEM<br />
F1: ‘FIX’ FOR CONFIG FIXTURE<br />
F2: ‘SHOW’ FOR SHOE EDIT<br />
F3: ‘STROBE’ FOR STROBE SC<br />
F4: ‘SMOKE’ FOR SMOKE SC<br />
F5: ‘SPOT’ FOR SPOT SC<br />
F6: ANY SC KEY FOR COMMON SC<br />
USE HOT KEY SELECT TIME<br />
INTER MEMORY 08/01/2008<br />
35<br />
Reminder<br />
<strong>Lite</strong>-<strong>Puter</strong><br />
CX-18 [EUM-D]
ISO 9001 CERTIFIED www.liteputer.com.tw<br />
STEP-2 Press【STROBE】and LCD displays as below, :<br />
LITE-PUTER CX-18 Ver1.0 BANK:01<br />
SETUP BANK: 01 ACTIVE STROBE SC<br />
STEP-3 Press BANK NO. (1~18) to select the BANK NO. need to edit (for example, change<br />
BANK as 12) and LCD displays as below,<br />
STEP-4 Move VR1—VR18 to edit the channel and its dimming value (LED on the correspond<br />
button will turn on)<br />
display<br />
PRESS ‘ENT’ SETUP (IN) ACTIVE SC<br />
INTER MEMORY 08/01/2008 10:08<br />
LITE-PUTER CX-18 Ver1.0 BANK:01<br />
SETUP BANK: 12 ACTIVE STROBE SC<br />
press<br />
【STROBE】<br />
PRESS ‘ENT’ SETUP (IN) ACTIVE SC<br />
INTER MEMORY 08/01/2008 10:08<br />
Attention: STROBE’s setting is no need to use P1—P18 FIXTURE NO.<br />
36<br />
Reminder<br />
Reminder<br />
<strong>Lite</strong>-<strong>Puter</strong><br />
CX-18 [EUM-D]
ISO 9001 CERTIFIED www.liteputer.com.tw<br />
STEP-5 After setting, press 【ENTER】to save it to ACTIVE STROBE SC and automatically<br />
enter INTIVE STROBE SC setting, LCD displays as below,<br />
LITE-PUTER CX-18 Ver1.0 BANK:01<br />
STEP-6 INACTIVE STROBE SC’s setting is same as that of ACTIVE STROBE SC.<br />
3-6-1 STROBE Recall<br />
SETUP BANK: 12 INTIVE STROBE SC<br />
release<br />
【STROBE】<br />
PRESS ‘ENT’ SETUP (IN) ACTIVE SC<br />
INTER MEMORY 08/01/2008 10:08<br />
After STROBE setting, press【ESC】2 times to enter the home page.<br />
First select BANK NO. and press【STROBE】to recall ACTIVE STROBE SC and then release<br />
【STROBE】to recall INACTIVE STROBE SC.<br />
3-7 SMOKE Setting/Recall<br />
Introduction: SMOKE has 2 scene modes.<br />
Press【SMOKE】to recall ACTIVE SMOKE SC;<br />
Release【SMOKE】to recall INTIVE SMOKE SC;<br />
STEP-1 On the home page, press【EDIT】 for 3 seconds and LCD displays the function menu,<br />
37<br />
Reminder<br />
<strong>Lite</strong>-<strong>Puter</strong><br />
CX-18 [EUM-D]
ISO 9001 CERTIFIED www.liteputer.com.tw<br />
LITE-PUTER CX-18 Ver1.0 BANK:01<br />
F1: ‘FIX’ FOR CONFIG FIXTURE<br />
F2: ‘SHOW’ FOR SHOE EDIT<br />
F3: ‘STROBE’ FOR STROBE SC<br />
F4: ‘SMOKE’ FOR SMOKE SC<br />
F5: ‘SPOT’ FOR SPOT SC<br />
F6: ANY SC KEY FOR COMMON SC<br />
STEP-2 Press【SMOKE】and LCD displays as below,<br />
STEP-3 Press BANK NO.(1~18) to select BANK NO.(for example, set BANK as 9) and LCD<br />
displays as below,<br />
EDIT MODE, SELECT ITEM<br />
USE HOT KEY SELECT TIME<br />
INTER MEMORY 08/01/2008<br />
LITE-PUTER CX-18 Ver1.0 BANK:01<br />
SETUP BANK: 01 ACTIVE SMOKE SC<br />
PRESS ‘ENT’ SETUP (IN) ACTIVE SC<br />
INTER MEMORY 08/01/2008 10:08<br />
38<br />
Reminder<br />
Reminder<br />
<strong>Lite</strong>-<strong>Puter</strong><br />
CX-18 [EUM-D]
ISO 9001 CERTIFIED www.liteputer.com.tw<br />
LITE-PUTER CX-18 Ver1.0 BANK:01<br />
SETUP BANK: 09 ACTIVE SMOKE SC<br />
PRESS ‘ENT’ SETUP (IN) ACTIVE SC<br />
STEP-4 Move VR1—VR18 to edit the channel and its dimming value.(LED on the<br />
correspond button will turn on)<br />
Attention: SMOKE’s setting is no need to use P1—P18 FIXTURE NO.<br />
STEP-5 After editing, press 【ENTER】to save it(save as ACTIVE SMOKE SC)and<br />
automatically<br />
enter INTIVE STROBE SC setting, LCD displays as below,<br />
STEP-6 Repeat STEP-3 STEP-4 and STEP-5(Save as INTIVE SMOKE SC)<br />
39<br />
press<br />
【SMOKE】<br />
INTER MEMORY 08/01/2008 10:08<br />
LITE-PUTER CX-18 Ver1.0 BANK:01<br />
SETUP BANK: 09 INTIVE SMOKE SC<br />
PRESS ‘ENT’ SETUP (IN) ACTIVE SC<br />
release<br />
【SMOKE】<br />
INTER MEMORY 08/01/2008 10:08<br />
Reminder<br />
Reminder<br />
<strong>Lite</strong>-<strong>Puter</strong><br />
CX-18 [EUM-D]
3-7-1 SMOKE Recall<br />
ISO 9001 CERTIFIED www.liteputer.com.tw<br />
After SMOKE setting, press【ESC】 for 2 times to go back to the home page. Select BANK NO.and<br />
press 【SMOKE】 to recall ACTIVE SMOKE SC, then release 【SMOKE】to recall INACTIVE SMOKE<br />
SC.<br />
3-8 SPOT Recall/Setting<br />
STEP-1 On the home page, press【EDIT】for 3 seconds and LCD displays the function menu,<br />
LITE-PUTER CX-18 Ver1.0 BANK:01<br />
EDIT MODE, SELECT ITEM<br />
F1: ‘FIX’ FOR CONFIG FIXTURE<br />
F2: ‘SHOW’ FOR SHOE EDIT<br />
F3: ‘STROBE’ FOR STROBE SC<br />
F4: ‘SMOKE’ FOR SMOKE SC<br />
F5: ‘SPOT’ FOR SPOT SC<br />
F6: ANY SC KEY FOR COMMON SC<br />
USE HOT KEY SELECT TIME<br />
INTER MEMORY 08/01/2008<br />
STEP-2 Press【SPOT】and LCD displays as below,<br />
LITE-PUTER CX-18 Ver1.0 BANK:01<br />
SETUP BANK: 01 SPOT SCENE<br />
FADE TIME: 0.1S<br />
USE PATCH Adj. FADE TIME<br />
INTER MEMORY 08/01/2008 10:08<br />
40<br />
Reminder<br />
Reminder<br />
<strong>Lite</strong>-<strong>Puter</strong><br />
CX-18 [EUM-D]
ISO 9001 CERTIFIED www.liteputer.com.tw<br />
STEP-3 Press BANK NO.(1~18) to select BANK (for example, set BANK as 09) and LCD<br />
`<br />
displays as below,<br />
LITE-PUTER CX-18 Ver1.0 BANK:01<br />
STEP-4 Press【P1—P18 FIXTURE NO.】to select one or more moving lights( LED on the<br />
correspond button will turn on)<br />
STEP-5 Move 【FADE TIME PITCH】FADER to set FADE TIME as 15.5S and LCD displays as<br />
below,<br />
SETUP BANK: 09 SPOT SCENE<br />
FADE TIME: 0.1S<br />
LITE-PUTER CX-18 Ver1.0 BANK:01<br />
SETUP BANK: 09 SPOT SCENE<br />
FADE TIME: 15.5S<br />
USE PATCH Adj. FADE TIME<br />
INTER MEMORY 08/01/2008 10:08<br />
STEP-6 Move VR1—VR18 edit the channel and its dimming value (LED on correspond<br />
button will turn on).<br />
0.1~25.5S<br />
USE PATCH Adj. FADE TIME<br />
INTER MEMORY 08/01/2008 10:08<br />
STEP-7 After setting, press【ENTER】 to save it.<br />
Set by FADE TIME PITCH<br />
fader<br />
41<br />
Reminder<br />
<strong>Lite</strong>-<strong>Puter</strong><br />
CX-18 [EUM-D]
3-8-1 SPOT Recall<br />
ISO 9001 CERTIFIED www.liteputer.com.tw<br />
After SPOT setting, press【ESC】for 2 seconds to enter the home page.<br />
Select BANK NO. and press【SPOT】to recall it.<br />
3-9 SEQ setting<br />
STEP-1 On the home page, press【EDIT】for 3 seconds and LCD displays the function menu as<br />
below,<br />
LITE-PUTER CX-18 Ver1.0 BANK:01<br />
EDIT MODE, SELECT ITEM<br />
F1: ‘FIX’ FOR CONFIG FIXTURE<br />
F2: ‘SHOW’ FOR SHOE EDIT<br />
F3: ‘STROBE’ FOR STROBE SC<br />
F4: ‘SMOKE’ FOR SMOKE SC<br />
F5: ‘SPOT’ FOR SPOT SC<br />
F6: ANY SC KEY FOR COMMON SC<br />
USE HOT KEY SELECT TIME<br />
INTER MEMORY 08/01/2008<br />
STEP-2 Press【SC NO.】(1~18)(for example select 16) and LCD display as below,<br />
LITE-PUTER CX-18 Ver1.0 BANK:01<br />
SETUP COMMON SCENE<br />
BANK: 01 SEQ: 16<br />
USE P1—P8 SEL CH PAGE<br />
e.g.P1 SEL. CH1—CH18,P2 SEL. CH19—CH36…<br />
INTER MEMORY 08/01/2008 10:08<br />
42<br />
Reminder<br />
<strong>Lite</strong>-<strong>Puter</strong><br />
CX-18 [EUM-D]
ISO 9001 CERTIFIED www.liteputer.com.tw<br />
STEP-3 Press BANK NO.(1~18 )select the BANK need to edit (for example, set BANK as 09)<br />
Display 01~18<br />
and LCD displays as below,<br />
LITE-PUTER CX-18 Ver1.0 BANK:01<br />
SETUP COMMON SCENE<br />
BANK: 09 SEQ : 16<br />
Reminder<br />
USE P1—P8 SEL CH PAGE<br />
e.g.P1 SEL. CH1—CH18,P2 SEL. CH19—CH36…<br />
INTER MEMORY 08/01/2008 10:08<br />
STEP-4 Press【ENTER】to edit and LCD displays as below,<br />
LITE-PUTER CX-18 Ver1.0 BANK:09<br />
SETUP COMMON SCENE<br />
BANK: 09 SEQ : 15<br />
FADE:2.0S WAIT:2.0S:<br />
PREVIEW SCENE : EMPTY<br />
‘PREV’ TO PREVIEW PROGRAMED SEQ<br />
INTER MEMORY 08/01/2008 10:08<br />
STEP-5 Press 【P1—P18 FIXTURE NO.】to select the channel page need to edit. (The LED on<br />
EIXTURE NO. button will turn on when the correspond page’s selected)<br />
43<br />
Display 01~18<br />
Use FADE TIME<br />
PITCH fader and<br />
RANGE fader<br />
separately.<br />
<strong>Lite</strong>-<strong>Puter</strong><br />
CX-18 [EUM-D]
100<br />
%<br />
0s<br />
ISO 9001 CERTIFIED www.liteputer.com.tw<br />
Introduction: P1 page : channel 361---378 P2 page : channel 379---396<br />
P3 page : channel 397---414 P4 page : channel 415---432<br />
P5 page : channel 433---450 P6 page : channel 451---468<br />
P7 page : channel 469---485 P8 page : channel 486---503<br />
If select P1-P8 all at one time, use VR1 to controlCH361,CH379,CH397,CH415,CH433,<br />
CH451,CH469,CH486 at the same time.<br />
STEP-6 Add the SEQ SCENE, move VR1- VR18 to select channel and adjust dimming value.<br />
STEP-7 Press 【ADD】to save the setting and LCD displays as below,<br />
LITE-PUTER CX-18 Ver1.0 BANK:09<br />
SETUP COMMON SCENE<br />
BANK: 09 SEQ : 15<br />
FADE:2.0S WAIT:2.0S:<br />
PREVIEW SCENE : 01/01 MODE : 00<br />
‘PREV’ TO PREVIEW PROGRAMED SEQ<br />
INTER MEMORY 08/01/2008 10:08<br />
Attention: SEQ SC’s Add, Delete and Insert operation, please refers to that of SHOW.<br />
After first SEQ SC setting, move VR1- VR 18 to select channel and adjust dimming value, then<br />
press【ADD】to save the setting the next SEQ SC.<br />
STEP-8 Press 【MACRO】to shift mode between 00 and 01.<br />
MODE 00, FADE=3S,WAIT=2S<br />
SC1=CH1=100%, SC2=CH1~CH2=100%, SC3=CH1~CH3=100%<br />
3s 5s<br />
SC 1<br />
8s 11s 13s 16s<br />
SC 2<br />
44<br />
Add the first SEQ<br />
SCENE, then display<br />
Mode selection<br />
19s 21s<br />
SC 3<br />
<strong>Lite</strong>-<strong>Puter</strong><br />
CX-18 [EUM-D]
ISO 9001 CERTIFIED www.liteputer.com.tw<br />
MODE 01, FADE=3S,WAIT=2S<br />
SC1=CH1=100%, SC2=CH1~CH2=100%, SC3=CH1~CH3=100%<br />
100<br />
%<br />
0s<br />
MODE 01, FADE=3S,WAIT=2S<br />
SC1=CH1=100%, SC2=CH1~CH2=100%, SC3=CH1~CH3=100%<br />
STEP-9Press 【ENTER】to exit.<br />
3-9-1 SEQ Recall<br />
After SEQ setting, press【ESC】for 2 times go back to home page.<br />
Select BANK NO. and press【COMMON SC NO.】to recall it.<br />
3-10 Main fixture control<br />
On any condition, CX-18 can independently control the main fixture. (except on SPOT,FUNC<br />
and EDIT menu condition)<br />
STEP-1 Press【FIXTURE】.<br />
3s 5s 8s 10s 13s 15s<br />
SC 1<br />
SC 2<br />
STEP-2 Press【P1—P18 FIXTURE NO.】to select any one or more moving lights.<br />
(LED on correspond P1—P18 will turn on)<br />
STEP-3 Move VR1—VR18 and joystick to control main fixture.<br />
Attention:<br />
1. When using FADER and joystick to control main fixture, press【FINE】<br />
(LED on the button will turn on) then use FADER and joystick to fine adjust main fixture.<br />
2. On any condition, press【FINE】for 1 second and the selected fixture will go back to the<br />
central place<br />
45<br />
SC 3<br />
18s<br />
<strong>Lite</strong>-<strong>Puter</strong><br />
CX-18 [EUM-D]
ISO 9001 CERTIFIED www.liteputer.com.tw<br />
3-11 System Time Setting<br />
STEP-1 On the home page and LCD displays as below,<br />
LITE-PUTER CX-18 Ver1.0 BANK:01<br />
SELECT SHOW TO RUN<br />
SCENE:00<br />
INTER MEMORY 08/01/2008<br />
STEP-2 Press【FUNC】to enter function menu and LCD displays as below,<br />
LITE-PUTER CX-18 Ver1.0 BANK:01<br />
F1: INTER COPY SHOW� SHOW<br />
F2: DEL INTER SHOW MEM<br />
F3: INTER COPY SC� SC<br />
F4: DEL INTER SC MEM<br />
F5: INTER COPY BANK�BANK<br />
F6: DEL INTER BANK MEM<br />
F7: INITINAL SYSTEM<br />
F8: COPY SD� INTERMEMORY<br />
F9: COPY INTERMEMORY� SD<br />
F10: SETUP SYSTEM CLOCK<br />
F11: SD CARD CHECK ON/OFF<br />
USE KEY OR JOYSTICK SEL. ITEM<br />
INTER MEMORY 08/01/2008 10:08<br />
46<br />
Time setting<br />
Reminder<br />
<strong>Lite</strong>-<strong>Puter</strong><br />
CX-18 [EUM-D]
ISO 9001 CERTIFIED www.liteputer.com.tw<br />
STEP-3 Move arrowhead to F10 and press【ENTER】to enter time setting, LCD displays as<br />
below,<br />
STEP-4 Press【►】【◄】(or move joystick right or left)to shift day, month, year, week, hour and<br />
minute.<br />
LITE-PUTER CX-18 Ver1.0 BANK:01<br />
SETUP SYSTEM CLOCK<br />
18/12/2007, TUE, 09:09<br />
USE JOYSTICK SELECT ITEM & Adj<br />
INTER MEMORY 08/01/2008 10:08<br />
STEP-5 After selection, move joystick up and down to change those.<br />
STEP-6 After setting, press【ENTER】to save it and go back to the function menu.<br />
For example: change the current 18/12/2007, TUE, 09:09 to 23/01/2008, WED,12:59.<br />
1. Press 【FUNC】 to enter the function menu and LCD display as that of 2-9 STEP-2<br />
2.Move arrowhead to F1 and press【ENTER】to enter time setting menu and LCD displays as<br />
below,<br />
47<br />
Display time<br />
Reminder<br />
<strong>Lite</strong>-<strong>Puter</strong><br />
CX-18 [EUM-D]
ISO 9001 CERTIFIED www.liteputer.com.tw<br />
LITE-PUTER CX-18 Ver1.0 BANK:01<br />
SETUP SYSTEM CLOCK<br />
18/12/2007, TUE, 09:09<br />
USE JOYSTICK SELECT ITEM & Adj<br />
INTER MEMORY 08/01/2008 10:08<br />
3.(Move joystick up and down to change time)move joystick up to change the day as 23, and<br />
LCD display as below,<br />
LITE-PUTER CX-18 Ver1.0 BANK:01<br />
SETUP SYSTEM CLOCK<br />
23/12/2007, TUE, 09:09<br />
USE JOYSTICK SELECT ITEM & Adj<br />
INTER MEMORY 08/01/2008 10:08<br />
4.Press【►】once shift to month and LCD display as below,<br />
48<br />
Time display<br />
Reminder<br />
<strong>Lite</strong>-<strong>Puter</strong><br />
CX-18 [EUM-D]
ISO 9001 CERTIFIED www.liteputer.com.tw<br />
LITE-PUTER CX-18 Ver1.0 BANK:01<br />
SETUP SYSTEM CLOCK<br />
23/12/2007, TUE, 09:09<br />
USE JOYSTICK SELECT ITEM & Adj<br />
INTER MEMORY 08/01/2008 10:08<br />
LITE-PUTER CX-18 Ver1.0 BANK:01<br />
SETUP SYSTEM CLOCK<br />
23/12/2007, TUE, 09:09<br />
USE JOYSTICK SELECT ITEM & Adj<br />
INTER MEMORY 08/01/2008 10:08<br />
5. Move joystick up and down to change the value. For example, change month as 1 and LCD<br />
display as below,<br />
49<br />
<strong>Lite</strong>-<strong>Puter</strong><br />
CX-18 [EUM-D]
ISO 9001 CERTIFIED www.liteputer.com.tw<br />
LITE-PUTER CX-18 Ver1.0 BANK:01<br />
SETUP SYSTEM CLOCK<br />
23/01/2007, TUE, 09:09<br />
USE JOYSTICK SELECT ITEM & Adj<br />
INTER MEMORY 08/01/2008 10:08<br />
Please refer to the step of day, month setting to set year, week, hour, minute.After those settings<br />
LCD displays as below,<br />
LITE-PUTER CX-18 Ver1.0 BANK:01<br />
SETUP SYSTEM CLOCK<br />
23/01/2008, WED, 12:59<br />
USE JOYSTICK SELECT ITEM & Adj<br />
INTER MEMORY 08/01/2008 10:08<br />
6. After editing, press【ENTER】to save it and exit time setting , go back to the function menu.<br />
3-12 System Initialization<br />
STEP-1 On the home page and LCD display as below,<br />
50<br />
<strong>Lite</strong>-<strong>Puter</strong><br />
CX-18 [EUM-D]
ISO 9001 CERTIFIED www.liteputer.com.tw<br />
LITE-PUTER CX-18 Ver1.0 BANK:01<br />
SELECT SHOW TO RUN<br />
SCENE:00<br />
INTER MEMORY 08/01/2008 10:08<br />
STEP-2 Press【FUNC】to enter the function menu and LCD display as below,<br />
LITE-PUTER CX-18 Ver1.0 BANK:01<br />
F1: INTER COPY SHOW� SHOW<br />
F2: DEL INTER SHOW MEM<br />
F3: INTER COPY SC� SC<br />
F4: DEL INTER SC MEM<br />
F5: INTER COPY BANK�BANK<br />
F6: DEL INTER BANK MEM<br />
F7: INITINAL SYSTEM<br />
F8: COPY SD� INTERMEMORY<br />
F9: COPY INTERMEMORY� SD<br />
F10: SETUP SYSTEM CLOCK<br />
F11: SD CARD CHECK ON/OFF<br />
USE KEY OR JOYSTICK SEL. ITEM<br />
INTER MEMORY 08/01/2008 10:08<br />
STEP-3 Press【►】(move joystick down)to move arrowhead to F7 and LCD displays<br />
as below,<br />
51<br />
<strong>Lite</strong>-<strong>Puter</strong><br />
CX-18 [EUM-D]
ISO 9001 CERTIFIED www.liteputer.com.tw<br />
LITE-PUTER CX-18 Ver1.0 BANK:01<br />
F1: INTER COPY SHOW� SHOW<br />
F2: DEL INTER SHOW MEM<br />
F3: INTER COPY SC� SC<br />
F4: DEL INTER SC MEM<br />
F5: INTER COPY BANK�BANK<br />
F6: DEL INTER BANK MEM<br />
F7: INITINAL SYSTEM<br />
F8: COPY SD� INTERMEMORY<br />
F9: COPY INTERMEMORY� SD<br />
F10: SETUP SYSTEM CLOCK<br />
F11: SD CARD CHECK ON/OFF<br />
USE KEY OR JOYSTICK SEL. ITEM<br />
INTER MEMORY 08/01/2008 10:08<br />
STEP-4 Press【ENTER】and LCD displays as below,<br />
LITE-PUTER CX-18 Ver1.0 BANK:01<br />
ARE YOU SURE INITINAL?<br />
YES ’ENT’ , NO ’ECS’<br />
STEP-5 Press【ENTER】to restore factory setting and go back to the function menu.<br />
Press【ECS】to exit initialization and go back to the function menu.<br />
52<br />
Reminder<br />
INTER MEMORY 08/01/2008 10:08<br />
<strong>Lite</strong>-<strong>Puter</strong><br />
CX-18 [EUM-D]
ISO 9001 CERTIFIED www.liteputer.com.tw<br />
Chapter 4 Other Function<br />
4-1 Output channel delete<br />
When FIX, SHOW, STROBE, SMOKE, SPOT and SC are outputting, press 【DEL】to stop all<br />
output.<br />
4-2 Channel dimming value check<br />
CX-18 can check 512 channels’ dimming value.<br />
STEP-1 On the home page, LCD display as below,<br />
STEP-2 Press【PERV】to enter dimming value display page and LCD displays as below,<br />
Channel no.<br />
LITE-PUTER CX-18 Ver1.0 BANK:01<br />
SELECT SHOW TO RUN<br />
SCENE:00<br />
INTER MEMORY 08/01/2008 10:08<br />
LITE-PUTER CX-18 Ver1.0<br />
DMX OUTPUT VALUE<br />
C001:00%, 00%, 00%, 00%, 00%, 00%, 00%, 00%<br />
C009: 00%, 00%, 00%, 00%, 00%, 00%, 00%,00%<br />
C017: 00%, 00%, 00%, 00%, 00%, 00%, 00%,00%<br />
C025: 00%, 00%, 00%, 00%, 00%, 00%, 00%,00%<br />
C033: 00%, 00%, 00%, 00%, 00%, 00%, 00%,00%<br />
C041: 00%, 00%, 00%, 00%, 00%, 00%, 00%,00%<br />
C049: 00%, 00%, 00%, 00%, 00%, 00%, 00%,00%<br />
C057: 00%, 00%, 00%, 00%, 00%, 00%, 00%,00%<br />
USE TO PRE/NEXT PAGE, ’ESC’ EXIT<br />
SCENE:01<br />
INTER MEMORY 08/01/2008<br />
53<br />
1~8 channel’s dimming value<br />
Reminder<br />
<strong>Lite</strong>-<strong>Puter</strong><br />
CX-18 [EUM-D]
ISO 9001 CERTIFIED www.liteputer.com.tw<br />
STEP-3 Press【►】【◄】to turn over page(8 pages in total)<br />
Introduction:<br />
Page 1-------- display channel C001~C064<br />
Page 2---------display channel C065~C128<br />
Page 3---------display channel C129~C192<br />
Page 4---------display channel C193~C256<br />
Page 5---------display channel C257~C320<br />
Page 6--------display channel C321~C384<br />
Page 7---------display channel C385~C448<br />
Page 8---------display channel C448~C512<br />
STEP-4 After check, press【ESC】go back to the home page.<br />
For example: check channel C465~C512’s dimming value and C385~C448’s dimming value.<br />
1. On the home page, press【PERV】to enter dimming value display page and press【►】7 times<br />
to check certain channels, LCD displays as below,<br />
LITE-PUTER CX-18 Ver1.0 BANK:01<br />
DMX OUTPUT VALUE<br />
C449: 00%, 00%, 00%, 00%, 00%, 00%, 00%, 00%<br />
C457: 00%, 00%, 00%, 00%, 00%, 00%, 00%, 00%<br />
C465: 25%, 25%, 00%, 49%, 49%, 49%, 00%, 49%<br />
C473: 49%, 26%, 36%, 49%, 49%, 28%,00%, FL%<br />
C481: 00%, 00%, 00%, 00%, 00%, 00%, 00%, 00%<br />
C489: 00%, 00%, 00%, 00%, 00%, 00%, 00%, 00%<br />
C497: 00%, 00%, 00%, 00%, 00%, 00%, 00%, 00%<br />
C505: 00%, 00%, 00%, 00%, 00%, 00%, 00%, 00%<br />
USE TO PRE/NEXT PAGE, ’ESC’ EXIT<br />
SCENE:01<br />
INTER MEMORY 08/01/2008 10:08<br />
2. Press【◄】once and LCD displays as below,<br />
54<br />
<strong>Lite</strong>-<strong>Puter</strong><br />
CX-18 [EUM-D]
ISO 9001 CERTIFIED www.liteputer.com.tw<br />
LITE-PUTER CX-18 Ver1.0 BANK:01<br />
DMX OUTPUT VALUE<br />
C385: 00%, 00%, 00%, 00%, 00%, 00%, 00%, 00%<br />
C393: 00%, 00%, 00%, 00%, 00%, 00%, 00%, 00%<br />
C401: 49%, 99%, 00%, 00%, FL%, %, 00%, 00%<br />
C409: 00%, 99%, 00%, 00%, FL%, %, 00%, 99%<br />
C417: 00%, 00%, 00%, 00%, 00%, 00%, 00%, 00%<br />
C425: 00%, 00%, 00%, 00%, 00%, 00%, 00%, 00%<br />
C433: 00%, 00%, 00%, 00%, 00%, 00%, 00%, 00%<br />
C441: 00%, 00%, 00%, 00%, 00%, 00%, 00%, 00%<br />
USE TO PRE/NEXT PAGE, ’ESC’ EXIT<br />
SCENE:01<br />
INTER MEMORY 08/01/2008 10:08<br />
Above two graphs show the channel from C385~C448 and C465~C512.<br />
4-3 SD CARD check<br />
This device has INTER MEMORY for date save and SD CARD for data copy.<br />
STEP-1 On the function menu, press【FUNC】and LCD displays as below,<br />
LITE-PUTER CX-18 Ver1.0 BANK:01<br />
F1: INTER COPY SHOW� SHOW<br />
F2: DEL INTER SHOW MEM<br />
F3: INTER COPY SC� SC<br />
F4: DEL INTER SC MEM<br />
F5: INTER COPY BANK�BANK<br />
F6: DEL INTER BANK MEM<br />
F7: INITINAL SYSTEM<br />
F8: COPY SD� INTERMEMORY<br />
F9: COPY INTERMEMORY� SD<br />
F10: SETUP SYSTEM CLOCK<br />
F11: SD CARD CHECK ON/OFF<br />
USE KEY OR JOYSTICK SEL. ITEM<br />
INTER MEMORY 08/01/2008 10:08<br />
55<br />
<strong>Lite</strong>-<strong>Puter</strong><br />
CX-18 [EUM-D]
ISO 9001 CERTIFIED www.liteputer.com.tw<br />
STEP-2 press【◄】【►】(move joystick up and down)to move arrowhead to F11.<br />
STEP-3 Press【ENTER】and LCD displays as below,<br />
LITE-PUTER CX-18 Ver1.0 BANK:01<br />
SD CARD CHECK ON/OFF<br />
OFF ON<br />
ON ---There is a SD CARD insert and it’s valid.<br />
OFF ---There isn’t a SD CARD insert, so it’s invalid<br />
4-4 File copy<br />
CX-18 has 4 file copy methods: 1.SD CARD——〉INTER MEMORY<br />
2. INTER MEMORY——〉SD CARD<br />
3.SC——〉SC<br />
4.BANK——〉BANK<br />
5.SHOW——〉SHOW<br />
1.SD CARD—〉INTER MEMORY<br />
Insert a<br />
valid SD CARD<br />
SD:0014MB 08/01/2008 10:08<br />
STEP-1 On the function menu, Press【◄】 【►】(move joystick up and down)to move<br />
arrowhead to F8 and LCD displays as below,<br />
56<br />
<strong>Lite</strong>-<strong>Puter</strong><br />
CX-18 [EUM-D]
ISO 9001 CERTIFIED www.liteputer.com.tw<br />
LITE-PUTER CX-18 Ver1.0 BANK:01<br />
F1: INTER COPY SHOW� SHOW<br />
F2: DEL INTER SHOW MEM<br />
F3: INTER COPY SC� SC<br />
F4: DEL INTER SC MEM<br />
F5: INTER COPY BANK�BANK<br />
F6: DEL INTER BANK MEM<br />
F7: INITINAL SYSTEM<br />
F8: COPY SD� INTERMEMORY<br />
F9: COPY INTERMEMORY� SD<br />
F10: SETUP SYSTEM CLOCK<br />
F11: SD CARD CHECK ON/OFF<br />
USE KEY OR JOYSTICK SEL. ITEM<br />
INTER MEMORY 08/01/2008 10:08<br />
STEP-2 Press【ENTER】and LCD displays as below,<br />
LITE-PUTER CX-18 Ver1.0 BANK:01<br />
COPY DATA SD —〉 INTER MEMORY<br />
WAITING SEL. BANKS<br />
[STEP1] SELECT BANK(S)<br />
[STEP2] PRESS’ENT’ START COPY DATA<br />
SD:0014MB 08/01/2008 10:08<br />
STEP-3 Press BANK NO. (1~18) to select BANK need to copy.<br />
Attention: at this time, user can select one or more BANK(LED on the selected BANK will<br />
turn on).<br />
blink<br />
57<br />
remider<br />
<strong>Lite</strong>-<strong>Puter</strong><br />
CX-18 [EUM-D]
ISO 9001 CERTIFIED www.liteputer.com.tw<br />
STEP-4Press【ENTER】and LCD displays as below,<br />
LITE-PUTER CX-18 Ver1.0 BANK:01<br />
COPY DATA SD —〉 INTER MEMORY<br />
BANK: 01 COPYING, WAIT…….<br />
SD:0014MB 08/01/2008 10:08<br />
After copying, go back to the function menu.<br />
2. INTER MEMORY—〉SD CARD<br />
<strong>Co</strong>py BANK<br />
NO.<br />
STEP-1 On the function menu, press【◄】 【►】(move joystick up and down)to move<br />
arrowhead to F9 and LCD displays as below,<br />
LITE-PUTER CX-18 Ver1.0 BANK:01<br />
F1: INTER COPY SHOW� SHOW<br />
F2: DEL INTER SHOW MEM<br />
F3: INTER COPY SC� SC<br />
F4: DEL INTER SC MEM<br />
F5: INTER COPY BANK�BANK<br />
F6: DEL INTER BANK MEM<br />
F7: INITINAL SYSTEM<br />
F8: COPY SD� INTERMEMORY<br />
F9: COPY INTERMEMORY� SD<br />
F10: SETUP SYSTEM CLOCK<br />
F11: SD CARD CHECK ON/OFF<br />
USE KEY OR JOYSTICK SEL. ITEM<br />
INTER MEMORY 08/01/2008 10:08<br />
STEP-2 The following steps are the same as STEP-2 ~ STEP-4 .<br />
58<br />
<strong>Lite</strong>-<strong>Puter</strong><br />
CX-18 [EUM-D]
3. SC→SC<br />
ISO 9001 CERTIFIED www.liteputer.com.tw<br />
STEP-1 On the function menu, press【◄】 【►】(move joystick up and down)to move<br />
arrowhead to F3 and LCD displays as below,<br />
LITE-PUTER CX-18 Ver1.0 BANK:01<br />
F1: INTER COPY SHOW� SHOW<br />
F2: DEL INTER SHOW MEM<br />
F3: INTER COPY SC� SC<br />
F4: DEL INTER SC MEM<br />
F5: INTER COPY BANK�BANK<br />
F6: DEL INTER BANK MEM<br />
F7: INITINAL SYSTEM<br />
F8: COPY SD� INTERMEMORY<br />
F9: COPY INTERMEMORY� SD<br />
F10: SETUP SYSTEM CLOCK<br />
F11: SD CARD CHECK ON/OFF<br />
USE KEY OR JOYSTICK SEL. ITEM<br />
INTER MEMORY 08/01/2008 10:08<br />
STEP-2 Press【ENTER】and LCD displays as below,<br />
LITE-PUTER CX-18 Ver1.0 BANK:09<br />
COPY FROM BANK: 09 TO BANK :18<br />
COPY FROM SC: 12 TO SC:01<br />
[STEP1] SELECT BANK(S)<br />
[STEP2] PRESS’ENT’ START COPY DATA<br />
SD:0014MB 08/01/2008 10:08<br />
Notice: BANK 09/SC 12--- BANK 18/SC 01is the data copy record in the last time.<br />
If the user don’t copy any data before, it will display: BANK 00/SC 00--- BANK 00/SC<br />
00<br />
For example copy BANK 05/SC 06 to BANK 11/SC16<br />
59<br />
Reminder<br />
<strong>Lite</strong>-<strong>Puter</strong><br />
CX-18 [EUM-D]
ISO 9001 CERTIFIED www.liteputer.com.tw<br />
STEP-3 Press BANK NO. 05 and then press SC. 06 and LCD displays as below,<br />
LITE-PUTER CX-18 Ver1.0 BANK:09<br />
COPY FROM BANK: 05 TO BANK :18<br />
COPY FROM SC: 06 TO SC:01<br />
[STEP1] SELECT BANK(S)<br />
[STEP2] PRESS’ENT’ START COPY DATA<br />
SD:0014MB 08/01/2008 10:08<br />
STEP-4 Press【◄】or 【►】shift to 18.01 and LCD display as below,<br />
LITE-PUTER CX-18 Ver1.0 BANK:09<br />
COPY FROM BANK: 05 TO BANK : 18<br />
COPY FROM SC: 06 TO SC: 01<br />
[STEP1] SELECT BANK(S)<br />
[STEP2] PRESS’ENT’ START COPY DATA<br />
SD:0014MB 08/01/2008 10:08<br />
STEP-5 Press BANK NO.11 and then press SC.16 and LCD displays as below,<br />
60<br />
<strong>Lite</strong>-<strong>Puter</strong><br />
CX-18 [EUM-D]
ISO 9001 CERTIFIED www.liteputer.com.tw<br />
STEP-6 Press 【ENTER】to finish the SC→SC data copy.<br />
3. SHOW—〉SHOW<br />
LITE-PUTER CX-18 Ver1.0 BANK:09<br />
COPY FROM BANK:05 TO BANK : 11<br />
COPY FROM SC:06 TO SC: 16<br />
[STEP1] SELECT BANK(S)<br />
[STEP2] PRESS’ENT’ START COPY DATA<br />
SD:0014MB 08/01/2008 10:08<br />
STEP-1 On the function menu, press【►】【w】(move joystick up and down)to move arrowhead<br />
to F1 and LCD displays as below,<br />
LITE-PUTER CX-18 Ver1.0 BANK:01<br />
F1: INTER COPY SHOW� SHOW<br />
F2: DEL INTER SHOW MEM<br />
F3: INTER COPY SC� SC<br />
F4: DEL INTER SC MEM<br />
F5: INTER COPY BANK�BANK<br />
F6: DEL INTER BANK MEM<br />
F7: INITINAL SYSTEM<br />
F8: COPY SD� INTERMEMORY<br />
F9: COPY INTERMEMORY� SD<br />
F10: SETUP SYSTEM CLOCK<br />
F11: SD CARD CHECK ON/OFF<br />
USE KEY OR JOYSTICK SEL. ITEM<br />
INTER MEMORY 08/01/2008 10:08<br />
61<br />
<strong>Lite</strong>-<strong>Puter</strong><br />
CX-18 [EUM-D]
ISO 9001 CERTIFIED www.liteputer.com.tw<br />
STEP-2 Press【ENTER】and LCD displays as below,<br />
LITE-PUTER CX-18 Ver1.0 BANK:01<br />
COPY FROM BANK: 10 TO BANK :09<br />
COPY FROM SHOW: 18 TO SHOW:11<br />
[STEP1] SELECT BANK & SHOW<br />
[STEP2] PRESS’ENT’ START COPY DATA<br />
SD:0014MB 08/01/2008 10:08<br />
For example: copy SHOW 10 on BANK 11 to SHOW 18 on BANK 2.<br />
STEP-3 Press BANK NO.11 and then press SHOW NO.10 and LCD displays as below,<br />
LITE-PUTER CX-18 Ver1.0 BANK:01<br />
COPY FROM BANK: 11 TO BANK :09<br />
COPY FROM SHOW: 10 TO SHOW:11<br />
[STEP1] SELECT BANK & SHOW<br />
[STEP2] PRESS’ENT’ START COPY DATA<br />
SD:0014MB 08/01/2008 10:08<br />
STEP-4 Press【►】【◄】shift to 09.11 and LCD displays as below,<br />
62<br />
<strong>Lite</strong>-<strong>Puter</strong><br />
CX-18 [EUM-D]
ISO 9001 CERTIFIED www.liteputer.com.tw<br />
LITE-PUTER CX-18 Ver1.0 BANK:01<br />
COPY FROM BANK: 11 TO BANK :09<br />
COPY FROM SHOW:10 TO SHOW: 11<br />
[STEP1] SELECT BANK & SHOW<br />
[STEP2] PRESS’ENT’ START COPY DATA<br />
SD:0014MB 08/01/2008 10:08<br />
STEP-5 Press BANK NO.2 and then SHOW NO.18 and LCD displays as below,<br />
LITE-PUTER CX-18 Ver1.0 BANK:01<br />
COPY FROM BANK: 11 TO BANK :02<br />
COPY FROM SHOW:10 TO SHOW: 18<br />
[STEP1] SELECT BANK & SHOW<br />
[STEP2] PRESS’ENT’ START COPY DATA<br />
SD:0014MB 08/01/2008 10:08<br />
STEP-6 Press【ENTER】to copy SHOW—〉SHOW and LCD displays as below,<br />
63<br />
<strong>Lite</strong>-<strong>Puter</strong><br />
CX-18 [EUM-D]
4. BANK—〉BANK<br />
ISO 9001 CERTIFIED www.liteputer.com.tw<br />
LITE-PUTER CX-18 Ver1.0 BANK:01<br />
COPY FROM BANK: 11 TO BANK :02<br />
COPY FROM SHOW:10 TO SHOW: 18<br />
COPY SHOW OK<br />
SD:0014MB 08/01/2008 10:08<br />
STEP-1 On function menu, press【►】【◄】(move joystick up and down)to move arrowhead<br />
to F5 and LCD displays as below,<br />
LITE-PUTER CX-18 Ver1.0 BANK:01<br />
F1: INTER COPY SHOW� SHOW<br />
F2: DEL INTER SHOW MEM<br />
F3: INTER COPY SC� SC<br />
F4: DEL INTER SC MEM<br />
F5: INTER COPY BANK�BANK<br />
F6: DEL INTER BANK MEM<br />
F7: INITINAL SYSTEM<br />
F8: COPY SD� INTERMEMORY<br />
F9: COPY INTERMEMORY� SD<br />
F10: SETUP SYSTEM CLOCK<br />
F11: SD CARD CHECK ON/OFF<br />
USE KEY OR JOYSTICK SEL. ITEM<br />
INTER MEMORY 08/01/2008 10:08<br />
STEP-2 Press【ENTER】and LCD display as below,<br />
64<br />
<strong>Lite</strong>-<strong>Puter</strong><br />
CX-18 [EUM-D]
ISO 9001 CERTIFIED www.liteputer.com.tw<br />
LITE-PUTER CX-18 Ver1.0 BANK:01<br />
COPY INTER FROM BANK TO BANK<br />
COPY FROM BANK: 17 TO BANK:09<br />
[STEP1] SELECT BANK(S)<br />
[STEP2] PRESS’ENT’ START COPY DATA<br />
SD:0014MB 08/01/2008 10:08<br />
For example, copy BANK 10 to BANK 1.<br />
STEP-3 Press BANK NO.10 and LCD displays as below,<br />
LITE-PUTER CX-18 Ver1.0 BANK:01<br />
COPY INTER FROM BANK TO BANK<br />
COPY FROM BANK: 10 TO BANK:09<br />
[STEP1] SELECT BANK(S)<br />
[STEP2] PRESS’ENT’ START COPY DATA<br />
SD:0014MB 08/01/2008 10:08<br />
STEP-4 Press【►】【◄】shift to 09 and LCD display as below,<br />
65<br />
reminder<br />
<strong>Lite</strong>-<strong>Puter</strong><br />
CX-18 [EUM-D]
ISO 9001 CERTIFIED www.liteputer.com.tw<br />
LITE-PUTER CX-18 Ver1.0 BANK:01<br />
STEP-5 Press BANK NO.1 and LCD displays as below,<br />
STEP-6 Press【ENTER】copy BANK—〉BANK.<br />
4-5 File delete<br />
COPY INTER FROM BANK TO BANK<br />
COPY FROM BANK: 10 TO BANK: 09<br />
[STEP1] SELECT BANK(S)<br />
[STEP2] PRESS’ENT’ START COPY DATA<br />
SD:0014MB 08/01/2008 10:08<br />
LITE-PUTER CX-18 Ver1.0 BANK:01<br />
COPY INTER FROM BANK TO BANK<br />
COPY FROM BANK: 10 TO BANK: 01<br />
[STEP1] SELECT BANK(S)<br />
[STEP2] PRESS’ENT’ START COPY DATA<br />
SD:0014MB 08/01/2008 10:08<br />
CX-18 has file delete function: 1. BANK file delete<br />
2. SHOW file delete<br />
3. SC file delete<br />
66<br />
<strong>Lite</strong>-<strong>Puter</strong><br />
CX-18 [EUM-D]
1. BANK file delete<br />
ISO 9001 CERTIFIED www.liteputer.com.tw<br />
STEP-1 On the function menu, press【►】【◄】(move joystick up and down)to move arrowhead<br />
to F6 and LCD displays as below,<br />
LITE-PUTER CX-18 Ver1.0 BANK:01<br />
F1: INTER COPY SHOW� SHOW<br />
F2: DEL INTER SHOW MEM<br />
F3: INTER COPY SC� SC<br />
F4: DEL INTER SC MEM<br />
F5: INTER COPY BANK�BANK<br />
F6: DEL INTER BANK MEM<br />
F7: INITINAL SYSTEM<br />
F8: COPY SD� INTERMEMORY<br />
F9: COPY INTERMEMORY� SD<br />
F10: SETUP SYSTEM CLOCK<br />
F11: SD CARD CHECK ON/OFF<br />
USE KEY OR JOYSTICK SEL. ITEM<br />
INTER MEMORY 08/01/2008 10:08<br />
STEP-2 Press【ENTER】and LCD displays as below,<br />
LITE-PUTER CX-18 Ver1.0 BANK:01<br />
DELETE BANK : 18<br />
[STEP1] SELECT BANK(S)<br />
[STEP2] PRESS’ENT’ DELETE MEMORY<br />
SD:0014MB 08/01/2008 10:08<br />
STEP-3 Press BANK NO.1-18 to select the BANK need to delete<br />
67<br />
<strong>Lite</strong>-<strong>Puter</strong><br />
CX-18 [EUM-D]
ISO 9001 CERTIFIED www.liteputer.com.tw<br />
For example, delete BANK 12. Press BANK NO.12 and LCD displays as below,<br />
STEP-4 Press【ENTER】is ok and LCD displays as below,<br />
2. SHOW file delete<br />
LITE-PUTER CX-18 Ver1.0 BANK:01<br />
DELETE BANK : 12<br />
[STEP1] SELECT BANK(S)<br />
[STEP2] PRESS’ENT’ DELETE MEMORY<br />
SD:0014MB 08/01/2008 10:08<br />
LITE-PUTER CX-18 Ver1.0 BANK:01<br />
DELETE BANK : 12<br />
STEP-1 On the function menu, press【►】【◄】(move joystick up and down)to move arrowhead<br />
to F2 and LCD displays as below,<br />
DELETE: OK<br />
[STEP1] SELECT BANK(S)<br />
[STEP2] PRESS’ENT’ DELETE MEMORY<br />
SD:0014MB 08/01/2008 10:08<br />
68<br />
<strong>Lite</strong>-<strong>Puter</strong><br />
CX-18 [EUM-D]
ISO 9001 CERTIFIED www.liteputer.com.tw<br />
LITE-PUTER CX-18 Ver1.0 BANK:01<br />
F1: INTER COPY SHOW� SHOW<br />
F2: DEL INTER SHOW MEM<br />
F3: INTER COPY SC� SC<br />
F4: DEL INTER SC MEM<br />
F5: INTER COPY BANK�BANK<br />
F6: DEL INTER BANK MEM<br />
F7: INITINAL SYSTEM<br />
F8: COPY SD� INTERMEMORY<br />
F9: COPY INTERMEMORY� SD<br />
F10: SETUP SYSTEM CLOCK<br />
F11: SD CARD CHECK ON/OFF<br />
USE KEY OR JOYSTICK SEL. ITEM<br />
INTER MEMORY 08/01/2008 10:08<br />
STEP-2 Press【ENTER】and LCD displays as below,<br />
LITE-PUTER CX-18 Ver1.0 BANK:01<br />
DELETE BANK : 18 SHOW: 01<br />
[STEP1] SELECT BANK & SHOW<br />
[STEP2] PRESS’ENT’ DELETE MEMORY<br />
SD:0014MB 08/01/2008 10:08<br />
STEP-3 Press BANK NO.1-18 to select BANK and press SHOW NO.1-18 to select the SHOW<br />
need to delete.<br />
For example, delete SHOW 16 under BANK 9 and LCD displays as below,<br />
(Press BANK 9 first, and then press SHOW 16)<br />
69<br />
<strong>Lite</strong>-<strong>Puter</strong><br />
CX-18 [EUM-D]
ISO 9001 CERTIFIED www.liteputer.com.tw<br />
STEP-4 Press【ENTER】is ok.<br />
3.SC file delete<br />
LITE-PUTER CX-18 Ver1.0 BANK:01<br />
DELETE BANK :09 SHOW: 16<br />
[STEP1] SELECT BANK & SHOW<br />
[STEP2] PRESS’ENT’ DELETE MEMORY<br />
SD:0014MB 08/01/2008 10:08<br />
STEP-1 On the function menu, press【►】【◄】(move joystick up and down)to move arrowhead<br />
to F4 and LCD displays as below,<br />
LITE-PUTER CX-18 Ver1.0 BANK:01<br />
F1: INTER COPY SHOW� SHOW<br />
F2: DEL INTER SHOW MEM<br />
F3: INTER COPY SC� SC<br />
F4: DEL INTER SC MEM<br />
F5: INTER COPY BANK�BANK<br />
F6: DEL INTER BANK MEM<br />
F7: INITINAL SYSTEM<br />
F8: COPY SD� INTERMEMORY<br />
F9: COPY INTERMEMORY� SD<br />
F10: SETUP SYSTEM CLOCK<br />
F11: SD CARD CHECK ON/OFF<br />
USE KEY OR JOYSTICK SEL. ITEM<br />
INTER MEMORY 08/01/2008 10:08<br />
70<br />
<strong>Lite</strong>-<strong>Puter</strong><br />
CX-18 [EUM-D]
ISO 9001 CERTIFIED www.liteputer.com.tw<br />
STEP-2 Press【ENTER】and LCD displays as below,<br />
LITE-PUTER CX-18 Ver1.0 BANK:18<br />
DELETE BANK : 18 SC: 01<br />
[STEP1] SELECT BANK & SHOW<br />
[STEP2] PRESS’ENT’ DELETE MEMORY<br />
SD:0014MB 08/01/2008 10:08<br />
STEP-3 Press BANK NO.1-18 to select BANK and press SC NO.1-18 to select the SC<br />
need to delete.<br />
For example, delete SC 08 under BANK 15 and LCD displays as below,<br />
(Press BANK 15 first, and then press SC 08)<br />
LITE-PUTER CX-18 Ver1.0 BANK:18<br />
DELETE BANK : 15 SC: 08<br />
[STEP1] SELECT BANK & SHOW<br />
[STEP2] PRESS’ENT’ DELETE MEMORY<br />
SD:0014MB 08/01/2008 10:08<br />
STEP-4 Press【ENTER】is ok<br />
71<br />
<strong>Lite</strong>-<strong>Puter</strong><br />
CX-18 [EUM-D]
ISO 9001 CERTIFIED www.liteputer.com.tw<br />
Chapter 5 tutorial<br />
5-1 Fixture list<br />
In this chapter we set some equipment to demo this program.<br />
4 Geni OBY-8bit’s moving head fixture 、<br />
2 two channel strobe 、<br />
2 one channel foggy machines.<br />
2 Par64<br />
Geni OBY-3 8bit’s moving head channel List<br />
Lightning Strikes 500k<br />
Cir Fun<br />
1 Int.<br />
2 Strobe<br />
3 <strong>Co</strong>lor<br />
4 Gobo<br />
5 Gobo Turn<br />
6 Prism<br />
7 Edge<br />
8 Pan<br />
9 Tilt<br />
10 rest<br />
11 Lamp on/off<br />
Cir Fun<br />
1 Int.<br />
2 Strobe<br />
72<br />
<strong>Lite</strong>-<strong>Puter</strong><br />
CX-18 [EUM-D]
ISO 9001 CERTIFIED www.liteputer.com.tw<br />
5-2 DMX address setting<br />
Set those equipment’s DMX address by the lighting plane.<br />
2 Strobe’s channel<br />
DMX address Fun<br />
343 Int.<br />
344 Strobe speed<br />
DMX address Fun<br />
346 Int.<br />
347 Strobe speed<br />
Equipment DMX address<br />
foggy machine 1 325<br />
foggy machine 2 326<br />
1 Par64 L106 361<br />
2 Par64 L106 362<br />
1 Par64 L343 363<br />
2 Par64 L343 364<br />
73<br />
<strong>Lite</strong>-<strong>Puter</strong><br />
CX-18 [EUM-D]
ISO 9001 CERTIFIED www.liteputer.com.tw<br />
DMX address setting table<br />
CX- 18 allows control of up to 18 fixtures or fixture groups. (A fixture group comprises similar<br />
fixtures with the same DMX address.) The CX- 18 can control the first 18 channels of each<br />
fixture, or group, and can activate smoke and strobe fixtures. The CX- 18 assigns 18 channels<br />
to each fixture regardless of how many channels it uses, therefore the DMX addresses have<br />
been pre-defined.<br />
CX-18 fixture ID DMX address<br />
1 1<br />
2 19<br />
3 37<br />
4 55<br />
5 73<br />
6 91<br />
7 109<br />
8 127<br />
9 145<br />
10 163<br />
11 181<br />
12 199<br />
13 217<br />
14 235<br />
15 253<br />
16 271<br />
17 289<br />
18 307<br />
74<br />
<strong>Lite</strong>-<strong>Puter</strong><br />
CX-18 [EUM-D]
5-3 Fixture set up<br />
ISO 9001 CERTIFIED www.liteputer.com.tw<br />
Action Explain<br />
In home page<br />
Press and hold【EDIT】for 3 seconds→<br />
Press【Fixture】<br />
Press【Bank1】→press and hold P1 through P4<br />
→<br />
press 【Enter】<br />
Slide the fader 8 → press【►】<br />
[→PAN CHANNEL (+)=08 (MAC SEL’+ -‘ ]<br />
Slide the fader 9 → press【►】<br />
[→TILT CHANNEL (+)=08 (MAC SEL’+ -‘ ]<br />
Slide the fader 1 → press【►】[→DIMMER<br />
CHANNEL =01]<br />
Set the 4 fixture in the same set up<br />
Enter editor mode→<br />
enter fixture config selector menu to set up.<br />
select【Bank1】→Select the Fixture 1 through Fixture<br />
4. (Set up the 4 fixtures at the same time.<br />
Enter fixture config mode.<br />
press and hold can be select a serial numbers of<br />
fixture<br />
Specify the pan channel by moving the fader 8→<br />
save & press to next .<br />
Specify the tilt channel by moving the fader 9→ save<br />
& press to next .<br />
Specify the dimmer/intensity channel by moving the<br />
fader 1<br />
→ save & press to next .<br />
Slide the MASTER fader set a value<br />
Specify the minimum dimmer intensity value by the<br />
[→DIM CH MIN VAL =000%]<br />
MASTER FADER value (you can set any value you<br />
want, usually set in 0 )<br />
→ press【►】 → save & press to next .<br />
Slide the MASTER fader set a value<br />
Specify the maximum dimmer intensity value by the<br />
[→DIM CH MAX VAL =100%]<br />
MASTER FADER value (you can set any value you<br />
want, usually set in 100 )<br />
→ press【►】 → save & press to next .<br />
Press【Enter】 save & finish & go back to config selector menu to<br />
select the Fixture function<br />
Set 3,4 fixture reverse pan<br />
press and hold P3 through P4→<br />
press 【Enter】<br />
press【MACRO】→press 【Enter】<br />
[→PAN CHANNEL (-)=08 (MAC SEL’+ -‘ ]<br />
Select the Fixture 3 through Fixture 4. (Set up the 2<br />
fixtures at the same time.<br />
Enter fixture config mode<br />
Specify the pan channel reverse.<br />
→ Save &finish set up go back config selector menu<br />
→press 【ESC】→press 【ESC】 →Back to editor mode→Back to home page<br />
In home page<br />
[ SELECT SHOW TO RUN ]<br />
Press bank 1 →Press【FIXTURE】→<br />
press and hold P1 through P4→Slide the fader 1<br />
to full<br />
Test the fixture<br />
In the home page<br />
Select bank 1 , → in the fixture mode. →<br />
Select the fixture 1 through 4 →put the lamp on<br />
Play Joystick go around Play the 4 fixture to go, see no. 1, 2 and 3, 4 goes<br />
75<br />
<strong>Lite</strong>-<strong>Puter</strong><br />
CX-18 [EUM-D]
ISO 9001 CERTIFIED www.liteputer.com.tw<br />
different.<br />
→press 【FIXTURE】→press 【ESC】 →release to clean the stage.<br />
* Put the Fixture set up only in this bank only, if you want play other bank with the<br />
same set up .You may do the bank copy to make a quickly set up for other.<br />
* When you do the bank copy ,all the [SMOKE]、[STROBE]、[SPOT] will copy to that<br />
bank too.<br />
76<br />
<strong>Lite</strong>-<strong>Puter</strong><br />
CX-18 [EUM-D]
ISO 9001 CERTIFIED www.liteputer.com.tw<br />
5-4 Strobe set up<br />
Action Explain<br />
Set 344,347 strobe in the Bank2<br />
In the home page<br />
Press and hold【EDIT】for 3 seconds→<br />
Enter editor mode→<br />
Press【STROBE】<br />
Enter strobe function to set up.<br />
[SETUP BANK:01 ACTIVE STROBE SC] The default bank is 1<br />
→Press bank2→set fader 2&5 to 50%,→【Enter】 Select the strobe batten in bank 2, set dimmer 344 to<br />
[SETUP BANK:02 ACTIVE STROBE SC] 50%, 347 to 50% for 2 strobe speed in the preset<br />
value. →save & enter to the next setting step .(The<br />
led lamp will on when you set the lever in a fader.)<br />
→set P1 to100%,P4 to 100%→【Enter】<br />
[SETUP BANK:02 INACTIVE STROBE SC]<br />
→press 【ESC】 Back to the home page<br />
Editor the strobe 343,346 in 50%<br />
In the home page<br />
Press and hold【EDIT】for 3 seconds→<br />
Enter editor mode→<br />
Press【STROBE】<br />
[SETUP BANK:02 ACTIVE STROBE SC]<br />
→【Enter】<br />
[SETUP BANK:02 ACTIVE STROBE SC]<br />
→set P1 down to0 and up to 100% , P4 down<br />
to0 and up to 50%→【Enter】<br />
[SETUP BANK:02 INACTIVE STROBE SC]<br />
Set dimmer 343, 346 to full value when press the<br />
strobe button to active out put. →save and finish the<br />
set up return to editor mode .<br />
Enter strobe function to set up.<br />
→press 【ESC】 Back to the home page<br />
In the home page<br />
[ SELECT SHOW TO RUN ]<br />
Press bank 2<br />
Press【STROBE】<br />
Don’t do anything. →enter to the next setting step<br />
To release dimmer 343, 346 to 0 and set to 100%<br />
value. Put the strobe button with a new active out put<br />
lever.<br />
→save and finish the set up return to editor mode .<br />
Play back a strobe button<br />
In the home page<br />
Select bank 2 , →press strobe to run.<br />
* A bank only have one 【STROBE】to set up.<br />
* When you do the bank copy ,all the [SMOKE]、[STROBE]、[SPOT] will copy to that<br />
bank too.<br />
77<br />
<strong>Lite</strong>-<strong>Puter</strong><br />
CX-18 [EUM-D]
ISO 9001 CERTIFIED www.liteputer.com.tw<br />
5-5 Smoke set up<br />
Action Explain<br />
Set a smoke in the Bank02 dimmer 325,326 to lower lever30% , height lever 60%<br />
In the home pag<br />
Press and hold【EDIT】for 3 seconds→<br />
Press【SMOKE】<br />
[SETUP BANK:01 ACTIVE SMOKE SC]<br />
→Press bank2→set P1, P2 to 30%→【Enter】<br />
[SETUP BANK: 02 ACTIVE SMOKE SC.]<br />
→set P1 to 60%,P2 to 60%→【Enter】<br />
[SETUP BANK:02 INACTIVE STROBE SC]<br />
Enter editor mode→<br />
Enter smoke function to set up.<br />
The default bank is 01<br />
→press 【ESC】 Back to the home page<br />
Select the smoke button in bank 2, set dimmer 325 to<br />
30%, 326 to 30% for 2 smokes in the preset value. →<br />
save & enter to the next setting step .(The led lamp<br />
will on when you set the lever in a fader.)<br />
Set dimmer 325, 326 to 60% values when press the<br />
smoke button to active out put. →save and finish the<br />
set up return to editor mode .<br />
Editor the smoke dimmer 325,326 in height lever 50%<br />
In the home pag<br />
Press and hold【EDIT】for 3 seconds→<br />
Enter editor mode→<br />
Press【SMOKE】<br />
[SETUP BANK:02 ACTIVE SMOKE SC]<br />
→【Enter】<br />
[SETUP BANK:02 ACTIVE SMOKE SC]<br />
Enter smoke function to set up.<br />
Don’t do anything. →enter to the next setting step<br />
→set P1, P2 down to 0 and up to 50%→【Enter】 To release dimmer 343, 346 to 0 and set to 50%<br />
[SETUP BANK:02 INACTIVE SMOKE SC] value. Put the smoke button with a new active out put<br />
lever.<br />
→save and finish the set up return to editor mode .<br />
→press 【ESC】 Back to home page<br />
In home page<br />
[ SELECT SHOW TO RUN ]<br />
Press bank 2<br />
Press【SMOKE】<br />
Play back a smoke button<br />
In the home page<br />
Select bank 2 , →press smoke to run.<br />
* A bank only have a 【SMOKE】to set up.<br />
* When you do the bank copy ,all the [SMOKE]、[STROBE]、[SPOT] will copy to that<br />
bank too.<br />
78<br />
<strong>Lite</strong>-<strong>Puter</strong><br />
CX-18 [EUM-D]
5-6 Spot set up<br />
ISO 9001 CERTIFIED www.liteputer.com.tw<br />
Action Explain<br />
Set fixture 4 to be a special spot to master of ceremonies in BANK 2<br />
In home page<br />
Press and hold【EDIT】for 3 seconds→<br />
Enter editor mode→<br />
Press【Spot】<br />
Enter spot scene function to set up.<br />
[SETUP BANK: 01 SPOT SCENE.]<br />
[FADE TIME : 0.0S ]<br />
The default bank is 01 fade time is 0.0 second<br />
→Press bank2→press P4<br />
Select the spot button in bank 2, Select 4<br />
→Slide the no.1fader to full,play Joystick to a<br />
position→Slide the pitch fader to 0.8 s→【Enter】<br />
th fixture →<br />
set the lamp on to full ,use Joystick set a point to be<br />
a position→set a 0.8 fade time with pitch fade →save<br />
& finish the set up return to editor mode .<br />
→press 【ESC】 Back to home page<br />
In home page<br />
[ SELECT SHOW TO RUN ]<br />
Press bank 2<br />
Press【SPOT】<br />
Play back a spot button<br />
In the home page<br />
Select bank 2 , →press spot to run.<br />
* A bank only have a 【SPOT】to set up.<br />
* When you do the bank copy ,all the [SMOKE]、[STROBE]、[SPOT] will copy to that<br />
bank too.<br />
79<br />
<strong>Lite</strong>-<strong>Puter</strong><br />
CX-18 [EUM-D]
ISO 9001 CERTIFIED www.liteputer.com.tw<br />
5-7 Programming a bank a show<br />
Action Explain<br />
In home page<br />
Press and hold【EDIT】for 3 seconds→press<br />
【SHOW】<br />
Program a show 1 in bank 2 with 3 step<br />
In home page<br />
Enter editor mode→select show editor mode.<br />
→Press Bank 2→press show 1→press【Enter】 Select the show 1 in the bank2 to be editor<br />
[ BANK:02 SHOW:01 ]<br />
The default values.<br />
[ FADE: 2.0S WAIT: 2.S ]<br />
[ SPEED:0.1S SIZE:052% ]<br />
[ SCENE:EMPTY MACRO:OFF ]<br />
→press and hold P1 through P4→Slide no.1fader Select first through 4<br />
to full→press 【FINE】3 sec.→play Joystick to a<br />
position play Joystick to a position 1 →press<br />
[ADD]<br />
[ BANK:02 SHOW:01 ]<br />
[ FADE: 2.0S WAIT: 2.S ]<br />
[ SPEED:0.1S SIZE:052% ]<br />
[ SCENE: 01, 01 MACRO:OFF ]<br />
th fixture →set the 4 lamp on to<br />
full →set the 4 fixture’s PAN/TILT value to 50%,use<br />
Joystick set a point to be a position 1<br />
→record the first step in show1.<br />
There are one step in the show<br />
→play Joystick to a position play Joystick to a use Joystick set a point to be a position 2<br />
position 2 →press [ADD]<br />
→record the second step in show1.<br />
[ BANK:02 SHOW:01 ]<br />
[ FADE: 2.0S WAIT: 2.S ]<br />
[ SPEED:0.1S SIZE:052% ]<br />
[ SCENE: 02, 02 MACRO:OFF ]<br />
There are two steps in the show<br />
→play Joystick to a position play Joystick to a use Joystick set a point to be a position 3<br />
position 3 →press [ADD]<br />
→record the third step in show1.<br />
[ BANK:02 SHOW:01 ]<br />
[ FADE: 2.0S WAIT: 2.S ]<br />
[ SPEED:0.1S SIZE:052% ]<br />
[ SCENE: 03, 03 MACRO:OFF ]<br />
There are three steps in the show<br />
Program the time with live<br />
Press【PREV.】→Slide PITCH,RANGE,→ In preview function with live →use PITCH,RANGE, ,<br />
Press【STORE.】→Press【PREV.】<br />
adjust the timing→record the show time→return to<br />
show editor mode<br />
→press 【ESC】→press 【ESC】→press 【ESC】 Back to home page<br />
In the home page<br />
[ SELECT SHOW TO RUN ]<br />
Press bank 2<br />
Press【SHOW】→Press【SHOW1】<br />
Play back the show<br />
In the home page<br />
Select bank 2 , →press show function→run the<br />
show1 .<br />
80<br />
<strong>Lite</strong>-<strong>Puter</strong><br />
CX-18 [EUM-D]
ISO 9001 CERTIFIED www.liteputer.com.tw<br />
*When you have sever shows already been settled,you can press them all the way you<br />
want , it will goes the sequence by shows number order.<br />
5-8 Programming a bank a scene<br />
Action Explain<br />
Program a scene 1 in bank 2 with 2 step<br />
In bank 2<br />
In the bank 2<br />
Press and hold【EDIT】for 3 seconds→<br />
Enter editor mode→select scene editor mode ,select<br />
press 【SCENE1】<br />
scene 1 to be editor.<br />
[ BANK:02 SEQ:01 ]<br />
→【Enter】<br />
Enter scene editor mode<br />
[ BANK:02 SEQ:01 ]<br />
[ FADE: 2.0S WAIT: 2.0S ]<br />
[ SCENE: EMPTY MODE:00 ]<br />
Press →Slide PITCH ,RANGE fader to 0.6S →Set the time with fade 0.6s and wait 0.6s<br />
→ P1→ Slide 1+3 fader to 50%→press [ADD] Press P1 select dimmer 361+363 value to 50% ,add<br />
[ BANK:02 SEQ:01 ]<br />
first step<br />
[ FADE: 0.6S WAIT: 0.6S ]<br />
[ SCENE: 01, 01 MODE:00 ]<br />
Slide 1+3 fader to 0%→Slide 2+4 fader to 50%→ Take 361+363 at value to 00% , set 362+364 value to<br />
press [ADD]<br />
50%<br />
[ BANK:02 SEQ:01 ]<br />
Add second step<br />
[ FADE: 0.6S WAIT: 0.6S ]<br />
[ SCENE: 02, 02 MODE:00 ]<br />
MODE :00 in one scene cue is stand mode;<br />
MODE: 01 in one scene cue will flash itself.<br />
→press 【ESC】→press 【ESC】 Back to home page<br />
In the home page<br />
[ SELECT SHOW TO RUN ]<br />
Press bank 2<br />
Press【SHOW】→Press【SCENE1】<br />
Play back the scene<br />
In the home page<br />
Select bank 2 , →press show function→run the<br />
scene1 .<br />
* Run a scene you don’t have to running in show mode,<br />
* It can be with a one scene cue in MODE :00 ; a chase cue with 32 steps. in MODE :00<br />
81<br />
<strong>Lite</strong>-<strong>Puter</strong><br />
CX-18 [EUM-D]
5-9 <strong>Co</strong>py a bank<br />
ISO 9001 CERTIFIED www.liteputer.com.tw<br />
Action Explain<br />
In home page<br />
Press【func.】→press【►】→press【►】…<br />
[ F1:INTER COPY SHOW→SHOW]<br />
[F2:DEL INTER SHOW MEM]<br />
[F3:INTER COPY SC→SC]<br />
[F4:DEL INTER SC MEM]<br />
→[F5:INTER COPY BANK→BANK]<br />
[F6:DEL INTER BANK MEM]<br />
[F7:INITINAL SYSTEM]<br />
[F8:COPY SD→INTERMEMORY]<br />
[F:9COPY INTERMEMORY→SD]<br />
[F:10SETUP SYSTEM CLOCK]<br />
[F:11SD CARD CHECK ON/OFF]<br />
→press【ENTER】<br />
[ COPY INTER FROM BANK TO BANK ]<br />
[ COPY FROM BANK:00 TO BANK:00 ]<br />
Press BANK 2→PRESS 【►】→<br />
Press BANK 1 →<br />
press【Enter】<br />
<strong>Co</strong>py bank 2 to bank 1<br />
In home page<br />
Enter function menu→press 【►】5 time<br />
Chose bank copy functions<br />
Enter copy function<br />
→press 【ESC】 Back to home page<br />
5-10 <strong>Co</strong>py a show to editor<br />
In home page<br />
Press【func.】<br />
Press bank 2 want to be copy<br />
→change cursor to next<br />
→ press bank 1 to be target<br />
→ finish the copy return to editor mode .<br />
Action Explain<br />
→[ F1:INTER COPY SHOW→SHOW]<br />
[F2:DEL INTER SHOW MEM]<br />
[F3:INTER COPY SC→SC]<br />
[F4:DEL INTER SC MEM]<br />
[F5:INTER COPY BANK→BANK]<br />
[F6:DEL INTER BANK MEM]<br />
[F7:INITINAL SYSTEM]<br />
[F8:COPY SD→INTERMEMORY]<br />
[F:9COPY INTERMEMORY→SD]<br />
<strong>Co</strong>py bank 2 show 1 to bank 2 show 2<br />
In home page<br />
Enter function menu→<br />
Chose chow copy functions<br />
82<br />
<strong>Lite</strong>-<strong>Puter</strong><br />
CX-18 [EUM-D]
ISO 9001 CERTIFIED www.liteputer.com.tw<br />
[F:10SETUP SYSTEM CLOCK]<br />
[F:11SD CARD CHECK ON/OFF]<br />
→press【ENTER】<br />
[ COPY FROM BANK:00 TO BANK:00 ]<br />
[ COPY FROM SHOW:00 TO SHOW:00 ]<br />
Press BANK 2→Press SHOW 1<br />
PRESS 【►】→<br />
Press BANK 2 →Press SHOW 2<br />
press【Enter】<br />
[ COPY FROM BANK:02 TO BANK:02 ]<br />
[ COPY FROM SHOW:01 TO SHOW:02 ]<br />
Enter copy function<br />
→press 【ESC】 Back to home page<br />
In home page<br />
Press and hold【EDIT】for 3 seconds→press<br />
【SHOW】<br />
→Press Bank 2→press show 2→press【Enter】<br />
→Slide fader 4 to 50% →press 【STORE】<br />
[ BANK:02 SHOW:02 ]<br />
[ FADE: 2.0S WAIT: 2.S ]<br />
[ SPEED:0.1S SIZE:052% ]<br />
[ SCENE:01, 03 MACRO:OFF ]<br />
Press bank 2 , show1 want to be copy<br />
→change cursor to next.<br />
→ press bank 2, show2 to be target<br />
→ finish the copy return to editor mode .<br />
Editor bank 2 show 2’s step with gobo<br />
In home page<br />
Enter editor mode→select show editor mode.<br />
Select the show 2 in the bank2 to be editor<br />
→Select channel 4 gobo 3 on stage<br />
→ save this step<br />
→【►】→Set fader 4 to 50% →press 【STORE】 Change step 2 on stage<br />
[ BANK:02 SHOW:02 ]<br />
→Slide channel 4 gobo 3 on stage again<br />
[ FADE: 2.0S WAIT: 2.S ]<br />
→ save this step<br />
[ SPEED:0.1S SIZE:052% ]<br />
[ SCENE:02, 03 MACRO:OFF ]<br />
→【►】→Set fader 4 to 50% →press 【STORE】 Change step 3 on stage<br />
[ BANK:02 SHOW:02 ]<br />
→slide channel 4 gobo 3 on stage again<br />
[ FADE: 2.0S WAIT: 2.S ]<br />
→ save this step<br />
[ SPEED:0.1S SIZE:052% ]<br />
[ SCENE:03, 03 MACRO:OFF ]<br />
→press 【ESC】→press 【ESC】→press<br />
【ESC】<br />
Back to home page<br />
83<br />
<strong>Lite</strong>-<strong>Puter</strong><br />
CX-18 [EUM-D]
ISO 9001 CERTIFIED www.liteputer.com.tw<br />
5-10-1 Programming a show with macro<br />
Action Explain<br />
Press and hold【EDIT】for 3 seconds→press<br />
【SHOW】<br />
→Press Bank 2→press show 5→press【Enter】<br />
[ BANK:02 SHOW:01 ]<br />
[ FADE: 2.0S WAIT: 2.S ]<br />
[ SPEED:0.1S SIZE:052% ]<br />
[ SCENE:EMPTY MACRO:OFF ]<br />
→press and hold P1 through P4→Slide no.1fader<br />
to full→press 【FINE】→play Joystick to a<br />
position play<br />
[ BANK:02 SHOW:01 ]<br />
[ FADE: 2.0S WAIT: 2.S ]<br />
[ SPEED:0.1S SIZE:052% ]<br />
[ SCENE: EMPTY MACRO:OFF ]<br />
Slide pitch fader in 3 sec.<br />
[ BANK:02 SHOW:02 ]<br />
[ FADE: 3S WAIT: 2.S ]<br />
[ SPEED:0.1S SIZE:000% ]<br />
[ SCENE: EMPTY MACRO:CIRC ]<br />
→press 【ENTER】<br />
Slide pitch fader in 3 sec.<br />
[ BANK:02 SHOW:02 ]<br />
[ FADE: 3S WAIT: 3S ]<br />
[ SPEED:0.1S SIZE:000% ]<br />
[ SCENE: EMPTY MACRO:CIRC ]<br />
→press 【ENTER】<br />
Slide speed in 1 sec.<br />
[ BANK:02 SHOW:02 ]<br />
[ FADE: 3S WAIT: 3S ]<br />
[ SPEED: 1S SIZE:000% ]<br />
[ SCENE: EMPTY MACRO:CIRC ]<br />
→Slide 【RANGE】to 80%<br />
→Press[ADD]<br />
[ BANK:02 SHOW:02 ]<br />
[ FADE: 3S WAIT: 3S ]<br />
[ SPEED: 1S SIZE: 081% ]<br />
[ SCENE: 01, 01 MACRO:CIRC ]<br />
Program a show 5 in bank 2 with 3 step<br />
Enter editor mode→select show editor mode.<br />
Select the show 5 in the bank2 to be editor<br />
The default values.<br />
Select first through 4 th fixture →set the 4 lamp on to<br />
full →set the a PAN/TILT value to 50%,use Joystick<br />
set a propriety position 。<br />
Set the fade time in 3second<br />
Change the cursor to wait time<br />
Set the wait time in 3second<br />
Change the cursor to SPEED time<br />
Set the speed time in 1 second<br />
Change the VALUE to 80%<br />
Add a step and save .<br />
Play back the show<br />
84<br />
<strong>Lite</strong>-<strong>Puter</strong><br />
CX-18 [EUM-D]
ISO 9001 CERTIFIED www.liteputer.com.tw<br />
In the home page<br />
[ SELECT SHOW TO RUN ]<br />
Press bank 2<br />
Press【SHOW】→Press【SHOW5】<br />
5-10-2 Modify show fades time<br />
In the home page<br />
Select bank 2 , →press show function→run the<br />
show5 .<br />
Editor the show in blind ,change fade in0.7S wait 0.8s<br />
Press and hold【EDIT】for 3 seconds→press<br />
【SHOW】<br />
[ BANK:02 SHOW:02 ]<br />
[ FADE: 2.0S WAIT: 2.S ]<br />
[ SPEED:0.1S SIZE:052% ]<br />
[ SCENE:01, 03 MACRO:OFF ]<br />
Enter editor mode→select show editor mode.<br />
→Press Bank 2→press show 2→press【ENTER】 Select the show 2 in the bank2 to be editor<br />
→Slider PITCH to0.7S →press【ENTER】 →Slider PITCH from 0 up 1leve to to0.7S for the fade<br />
[ BANK:02 SHOW:02 ]<br />
time→change cursor to next WAIT<br />
[ FADE: 0.7S WAIT: 2.S ]<br />
[ SPEED:0.1S SIZE:052% ]<br />
[ SCENE:01, 03 MACRO:OFF ]<br />
IN STEP 1<br />
→Slider RANGE to0.8S<br />
Slider RANGE from 0 up 1leve to to0.8S for the Wait<br />
time→<br />
[ BANK:02 SHOW:02 ]<br />
[ FADE: 0.7S WAIT: 0.8S ]<br />
[ SPEED:0.1S SIZE:052% ]<br />
[ SCENE:01, 03 MACRO:OFF ]<br />
→【►】→press【ENTER】→Slider PITCH to0.7S<br />
[ BANK:02 SHOW:02 ]<br />
[ FADE: 0.7S WAIT: 2.S ]<br />
[ SPEED:0.1S SIZE:052% ]<br />
[ SCENE:02, 03 MACRO:OFF ]<br />
→press【ENTER】→Slider RANGE to0.8S<br />
[ BANK:02 SHOW:02 ]<br />
[ FADE: 0.7S WAIT: 0.8S ]<br />
[ SPEED:0.1S SIZE:052% ]<br />
[ SCENE:02, 03 MACRO:OFF ]<br />
Select the STEP 2 →into the fade time to editor<br />
→Slider PITCH from 0 up 1leve to to0.7S for the fade<br />
time<br />
IN STEP 2<br />
into the wait time to editor→Slider RANGE from 0 up<br />
1leve to to0.8S for the Wait time<br />
85<br />
<strong>Lite</strong>-<strong>Puter</strong><br />
CX-18 [EUM-D]
ISO 9001 CERTIFIED www.liteputer.com.tw<br />
→【►】→press【ENTER】→Slider PITCH to0.7S<br />
[ BANK:02 SHOW:02 ]<br />
[ FADE: 0.7S WAIT: 2.S ]<br />
[ SPEED:0.1S SIZE:052% ]<br />
[ SCENE:03, 03 MACRO:OFF ]<br />
→press【ENTER】→Slider RANGE to0.8S<br />
[ BANK:02 SHOW:02 ]<br />
[ FADE: 0.7S WAIT: 0.8S ]<br />
[ SPEED:0.1S SIZE:052% ]<br />
[ SCENE:03, 03 MACRO:OFF ]<br />
Select the STEP 3 →into the fade time to editor<br />
→Slider PITCH from 0 up 1leve to to0.7S for the fade<br />
time<br />
IN STEP 3<br />
press 【STORE】→ Save the show<br />
→press 【ESC】→press 【ESC】→press<br />
【ESC】<br />
5-10-3 Add a show step<br />
Press【func.】<br />
into the wait time to editor→Slider RANGE from 0 up<br />
1leve to to0.8S for the Wait time<br />
Back to home page<br />
Action Explain<br />
<strong>Co</strong>py bank 2 show 1 to bank 2 show 3 ,and add a step<br />
→[ F1:INTER COPY SHOW→SHOW]<br />
[F2:DEL INTER SHOW MEM]<br />
[F3:INTER COPY SC→SC]<br />
[F4:DEL INTER SC MEM]<br />
[F5:INTER COPY BANK→BANK]<br />
[F6:DEL INTER BANK MEM]<br />
[F7:INITINAL SYSTEM]<br />
[F8:COPY SD→INTERMEMORY]<br />
[F:9COPY INTERMEMORY→SD]<br />
[F:10SETUP SYSTEM CLOCK]<br />
[F:11SD CARD CHECK ON/OFF]<br />
→Press【ENTER】<br />
[ COPY FROM BANK:00 TO BANK:00 ]<br />
[ COPY FROM SHOW:00 TO SHOW:00 ]<br />
Press BANK 2→Press SHOW 1<br />
PRESS 【►】→<br />
Press BANK 2 →Press SHOW 3<br />
press【Enter】<br />
Enter function menu→<br />
Chose chow copy functions<br />
Enter copy function<br />
Press bank 2 , show1 want to be copy<br />
→change cursor to next.<br />
→ press bank 2, show3 to be target<br />
→ Save &finish the copy return to editor mode .<br />
86<br />
<strong>Lite</strong>-<strong>Puter</strong><br />
CX-18 [EUM-D]
ISO 9001 CERTIFIED www.liteputer.com.tw<br />
→press 【ESC】 Back to home page<br />
Press and hold【EDIT】for 3 seconds→press<br />
【SHOW】<br />
→Press Bank 2→press show 3→press【Enter】<br />
[ BANK:02 SHOW:03 ]<br />
[ FADE: 2.0S WAIT: 2.S ]<br />
[ SPEED:0.1S SIZE:052% ]<br />
[ SCENE:01, 03 MACRO:OFF ]<br />
PRESS 【►】→…<br />
[ BANK:02 SHOW:03 ]<br />
[ FADE: 2.0S WAIT: 2.S ]<br />
[ SPEED:0.1S SIZE:052% ]<br />
[ SCENE:02, 03 MACRO:OFF ]<br />
play Joystick to a new position<br />
press[ADD]<br />
[ BANK:02 SHOW:01 ]<br />
[ FADE: 2.0S WAIT: 2.S ]<br />
[ SPEED:0.1S SIZE:052% ]<br />
[ SCENE:04, 04 MACRO:OFF ]<br />
→press 【ESC】→press 【ESC】→press<br />
【ESC】<br />
5-10-4 <strong>Co</strong>py a new show delet a step<br />
Press【func.】<br />
Enter editor mode→select show editor mode.<br />
Select the show 3 in the bank2 to be editor<br />
The led lamp display this show on the desk<br />
Press each step see which step you wand to add<br />
Example .new step will be added after step 2.<br />
So press【►】until display scene:02, 02<br />
Set a new step by the joy stick<br />
Record a new step<br />
Back to home page<br />
Action Explain<br />
<strong>Co</strong>py bank 2 show 1 to bank 2 show 4 ,and delete a step<br />
→[ F1:INTER COPY SHOW→SHOW]<br />
[F2:DEL INTER SHOW MEM]<br />
[F3:INTER COPY SC→SC]<br />
[F4:DEL INTER SC MEM]<br />
[F5:INTER COPY BANK→BANK]<br />
[F6:DEL INTER BANK MEM]<br />
[F7:INITINAL SYSTEM]<br />
[F8:COPY SD→INTERMEMORY]<br />
[F:9COPY INTERMEMORY→SD]<br />
[F:10SETUP SYSTEM CLOCK]<br />
[F:11SD CARD CHECK ON/OFF]<br />
Enter function menu→<br />
Chose chow copy functions<br />
87<br />
<strong>Lite</strong>-<strong>Puter</strong><br />
CX-18 [EUM-D]
ISO 9001 CERTIFIED www.liteputer.com.tw<br />
→Press【ENTER】<br />
[ COPY FROM BANK:00 TO BANK:00 ]<br />
[ COPY FROM SHOW:00 TO SHOW:00 ]<br />
Press BANK 2 → Press SHOW 1<br />
PRESS 【►】→<br />
Press BANK 2 → Press SHOW 4<br />
press【Enter】<br />
[ COPY FROM BANK:02 TO BANK:02 ]<br />
[ COPY FROM SHOW:01 TO SHOW:04 ]<br />
Enter copy function<br />
→press 【ESC】 Back to home page<br />
Press and hold【EDIT】for 3 seconds→press<br />
【SHOW】<br />
→Press Bank 2→press show 4→press【Enter】<br />
[ BANK:02 SHOW:04 ]<br />
[ FADE: 2.0S WAIT: 2.S ]<br />
[ SPEED:0.1S SIZE:052% ]<br />
[ SCENE:01, 03 MACRO:OFF ]<br />
PRESS 【►】→…<br />
[ BANK:02 SHOW:01 ]<br />
[ FADE: 2.0S WAIT: 2.S ]<br />
[ SPEED:0.1S SIZE:052% ]<br />
[ SCENE:02, 03 MACRO:OFF ]<br />
press[DEL]<br />
[ BANK:02 SHOW:01 ]<br />
[ FADE: 2.0S WAIT: 2.S ]<br />
[ SPEED:0.1S SIZE:052% ]<br />
[ SCENE:01, 03 MACRO:OFF ]<br />
→press 【ESC】→press 【ESC】→press<br />
【ESC】<br />
5-11 Playback a show and scene<br />
Put the pitch fader to half way in the fader.<br />
Put the range fader to half way in the fader.<br />
In the home page<br />
Press BANK 2 →<br />
Press SCENE1<br />
select bank 2 , show1 want to be copy<br />
→ change cursor to next.<br />
→ press bank 2, show4 to be target<br />
→ finish the copy return to editor mode .<br />
Enter editor mode→select show editor mode.<br />
Select the show 4 in the bank2 to be editor<br />
The led lamp display this show on the desk<br />
Press each step see which step you wand to delete<br />
Example. Delete step will be step 2.<br />
So press【►】until display scene:02, 03<br />
Delete the step2<br />
Back to home page<br />
Play a scene , a show<br />
During the show those two fade have to set this for<br />
the default setting in this control.<br />
In home page<br />
Select BANK2 to run<br />
Select scene1 on stage<br />
Press [show] →show1 In to show mode→play back show1<br />
88<br />
<strong>Lite</strong>-<strong>Puter</strong><br />
CX-18 [EUM-D]
ISO 9001 CERTIFIED www.liteputer.com.tw<br />
[ SELECT SHOW TO RUN ]<br />
Off the show<br />
Press【SHOW】→ →press show function to turn off show mode (show1<br />
is out, but only turn off the intensity ).<br />
Press【SHOW】→ <strong>Co</strong>me back the show1<br />
Press show2,scene2 in the same time <strong>Co</strong>me in those together , it will change by itself<br />
Call sever shows come in together<br />
Press and hold show1,add press show3 There are show1,show2,show3 and scene1 on stage<br />
* Scene do not have to run in show mode<br />
5-11-1 Pause to a show and scene<br />
Pause the show<br />
Put the pitch fader to half way in the fader. During the show those two fade have to set this for<br />
Put the range fader to half way in the fader. the default setting in this control.<br />
In the home page<br />
[ SELECT SHOW TO RUN ]<br />
In the home page<br />
Press Bank 2<br />
Select bank 2 , →press show function→run the<br />
Press【SHOW】→ Press【SHOW1】<br />
show1 .<br />
→Press【MACRO】<br />
Pause the show<br />
→【►】<br />
→Go next step<br />
→【w】<br />
→Go back previous.<br />
→Press【MACRO】 Release the pause of the show.<br />
5-11-2 changing the Rate of a show<br />
In the home page<br />
[ SELECT SHOW TO RUN ]<br />
Press Bank 2<br />
Press【SHOW】→ Press SHOW 1, SCENE 1<br />
Slide the pitch & range fader up<br />
Slide the pitch & range fader down<br />
Reduce the speed of the show and the scene<br />
In the home page<br />
Select bank 2 , →press show function→run the<br />
show1 .<br />
Slide up will going up the speed.<br />
Slide down will slow down the speed.<br />
* Pitch is fade time ,Range is wait time 。You can try to adjust them together or<br />
separate ,when the music is change you do not have time to editor the timing.<br />
89<br />
<strong>Lite</strong>-<strong>Puter</strong><br />
CX-18 [EUM-D]
5-12 SD card<br />
Press【func.】<br />
ISO 9001 CERTIFIED www.liteputer.com.tw<br />
Action Explain<br />
<strong>Co</strong>py inter memory to SD card<br />
→[ F1:INTER COPY SHOW→SHOW]<br />
[F2:DEL INTER SHOW MEM]<br />
[F3:INTER COPY SC→SC]<br />
[F4:DEL INTER SC MEM]<br />
[F5:INTER COPY BANK→BANK]<br />
[F6:DEL INTER BANK MEM]<br />
[F7:INITINAL SYSTEM]<br />
[F8:COPY SD→INTERMEMORY]<br />
[F:9COPY INTERMEMORY→SD]<br />
[F:10SETUP SYSTEM CLOCK]<br />
[F:11SD CARD CHECK ON/OFF]<br />
Press【►】11 time<br />
[ F1:INTER COPY SHOW→SHOW]<br />
[F2:DEL INTER SHOW MEM]<br />
[F3:INTER COPY SC→SC]<br />
[F4:DEL INTER SC MEM]<br />
[F5:INTER COPY BANK→BANK]<br />
[F6:DEL INTER BANK MEM]<br />
[F7:INITINAL SYSTEM]<br />
[F8:COPY SD→INTERMEMORY]<br />
[F9:COPY INTERMEMORY→SD]<br />
[F10:SETUP SYSTEM CLOCK]<br />
→[F11:SD CARD CHECK ON/OFF]<br />
→Press【ENTER】ON/OFF<br />
[ SD CARD CHECH ON/OFF]<br />
[ OFF ON ]<br />
Enter function menu→<br />
Chose chow copy functions<br />
Select the F11: SD card check function<br />
Into SD card menu<br />
→Press【►】[ OFF ON ] Move cursor to select on<br />
→Press【ENTER】<br />
→[ F1:INTER COPY SHOW→SHOW]<br />
[F2:DEL INTER SHOW MEM]<br />
[F3:INTER COPY SC→SC]<br />
[F4:DEL INTER SC MEM]<br />
[F5:INTER COPY BANK→BANK]<br />
[F6:DEL INTER BANK MEM]<br />
[F7:INITINAL SYSTEM]<br />
[F8:COPY SD→INTERMEMORY]<br />
Save and back to function menu<br />
90<br />
<strong>Lite</strong>-<strong>Puter</strong><br />
CX-18 [EUM-D]
ISO 9001 CERTIFIED www.liteputer.com.tw<br />
[F9:COPY INTERMEMORY→SD]<br />
[F10:SETUP SYSTEM CLOCK]<br />
[F11:SD CARD CHECK ON/OFF]<br />
→Press【►】7 time<br />
[ F1:INTER COPY SHOW→SHOW]<br />
[F2:DEL INTER SHOW MEM]<br />
[F3:INTER COPY SC→SC]<br />
[F4:DEL INTER SC MEM]<br />
[F5:INTER COPY BANK→BANK]<br />
[F6:DEL INTER BANK MEM]<br />
[F7:INITINAL SYSTEM]<br />
[F8:COPY SD→INTERMEMORY]<br />
→ [F9:COPY INTERMEMORY→SD]<br />
[F10:SETUP SYSTEM CLOCK]<br />
[F11:SD CARD CHECK ON/OFF]<br />
→Press【ENTER】<br />
COPY DATA INTER MEMORY→ SD<br />
Press and hold BANK1..BANK18<br />
→Press【ENTER】<br />
→[ F1:INTER COPY SHOW→SHOW]<br />
[F2:DEL INTER SHOW MEM]<br />
[F3:INTER COPY SC→SC]<br />
[F4:DEL INTER SC MEM]<br />
[F5:INTER COPY BANK→BANK]<br />
[F6:DEL INTER BANK MEM]<br />
[F7:INITINAL SYSTEM]<br />
[F8:COPY SD→INTERMEMORY]<br />
[F9:COPY INTERMEMORY→SD]<br />
[F10:SETUP SYSTEM CLOCK]<br />
[F11:SD CARD CHECK ON/OFF]<br />
Select the F9: COPY INTERMEMORY→SD<br />
Enter copy data mode<br />
→press 【ESC】 Back to home page<br />
Select the bank from 1 to 18 (select range of the<br />
bank that you wand)<br />
When finish the copy it will go back to the<br />
FUNC.menu<br />
91<br />
<strong>Lite</strong>-<strong>Puter</strong><br />
CX-18 [EUM-D]
ISO 9001 CERTIFIED www.liteputer.com.tw<br />
Guarantee<br />
<strong>Lite</strong>-<strong>Puter</strong> promises to fulfill the following acceptances:<br />
1. <strong>Lite</strong>-<strong>Puter</strong> is only responsible for CX-18 itself.<br />
2. <strong>Lite</strong>-<strong>Puter</strong> guarantees to keep <strong>Lite</strong>-<strong>Puter</strong>’s fault products caused by techniques,<br />
materials and any other logical reasons in good repair for free within a year since<br />
the distributing date.<br />
3. We do not offer door-visiting service. If the trouble appears in <strong>Lite</strong>-<strong>Puter</strong>’s<br />
products, please deliver the equipment to local distributors or Taipei headquarter.<br />
*** Special Statement***<br />
Any fault caused by false usage, imprudence (collision or inadequate installation) or<br />
force majeure factors are not in <strong>Lite</strong>-<strong>Puter</strong>’s service.<br />
Issued on: July, 2009<br />
Revision Record<br />
Version Record<br />
D Change function menu<br />
92<br />
<strong>Lite</strong>-<strong>Puter</strong><br />
CX-18 [EUM-D]
ISO 9001 CERTIFIED www.liteputer.com.tw<br />
World Headquarter:<br />
<strong>Lite</strong>-<strong>Puter</strong> <strong>Enterprise</strong> <strong>Co</strong>., <strong>Ltd</strong>.<br />
Address: 9F, No. 196, Sec. 3, Da Tung Rd., Shijr City, Taipei, Taiwan<br />
Zip <strong>Co</strong>de: 22103<br />
Tel: +886-2-86472828<br />
Fax: +886-2-86472727<br />
Website: www.liteputer.com.tw<br />
E-mail: sales@liteputer.com.tw<br />
Shanghai Factory:<br />
<strong>Lite</strong>-<strong>Puter</strong> Technology (Shanghai) <strong>Co</strong>., <strong>Ltd</strong>.<br />
Address: Building B5, No. 298, Lane 3509, Hongmei S. Road, Shanghai, China<br />
Zip <strong>Co</strong>de: 201108<br />
Tel: +86-21-54408210<br />
Fax: +86-21-64978079<br />
Shanghai Sales Center:<br />
Address: Room 701, Building Gem, No. 487, Tianlin Road, Shanghai, China<br />
Zip <strong>Co</strong>de: 201103<br />
Tel: +86-21-33674316/33674850<br />
Fax: +86-21-33674013<br />
Website: www.liteputer.com.cn<br />
E-mail: sales_china@liteputer.com.tw<br />
93<br />
<strong>Lite</strong>-<strong>Puter</strong><br />
CX-18 [EUM-D]