UNI-TROLL & EASI-TROLL - Cannon Downriggers
UNI-TROLL & EASI-TROLL - Cannon Downriggers
UNI-TROLL & EASI-TROLL - Cannon Downriggers
- No tags were found...

Create successful ePaper yourself
Turn your PDF publications into a flip-book with our unique Google optimized e-Paper software.
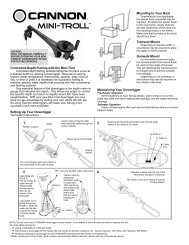
FIGURE 48FIGURE 3Pour régler la longueur du bras (en ayant le bras étenduloin de vous), tournez les brides (voir l’élément n° 7 sur lapage 5) environ un quart de tour dans le sens antihorairepour déverrouiller et glissez la section du bras vers laposition désirée. Une fois en place, verrouillez les bridesen tournant dans le sens horaire jusqu’à ce qu’elles soientserrées.FIGURE 2***BRAS TÉLESCOPIQUE SEULEMENT***4) Insérez un boulon 1/4-20 x 2 po dans le nez du cadredu côté du moulinet. À l’aide d’un tournevis cruciforme,enfi lez le boulon dans le contre-écrou de nylon mentionnéà l’étape 3. Serrez le boulon jusqu’à voir son extrémitéalignée avec le haut de l’écrou. (Figure 4)3) Insérez le contre-écrou de nylon 1/4-20 dans la pochehexagonale sur le nez du cadre. (Figure 3)FIGURE 12) Retirez le boulon 1/4-20 x 2 po et le contre-écrou denylon 1/4-20 du sac de quincaillerie fourni. (Figure 2)1) Introduisez le bras dans le cadre (Figure 1) et alignezles trous du bras avec les trous du cadre. Remarque :les modèles Easi-Troll nécessitent l’adaptateur de brasfourni.InstallationINSTALLATION DU BRASET DU CROCHET À BOULE............................................................................................INSTALLING THE BOOM AND BALL HOOK............................................................................................1) Insert boom into frame (Figure 1) and line upholes in boom with holes in frame. Note:Easi-Troll units require the included boom adapter.2) Remove 1/4-20 x 2” bolt and 1/4-20 nylon locknutfrom included hardware bag assembly. (Figure 2)3) Insert the 1/4-20 nylon locknut into the hex pocketon the nose of the frame. (Figure 3)4) Insert 1/4-20 x 2” bolt into reel side of frame nose.With a Phillips head screw driver, thread bolt into nylonlocknut from step 3. Tighten bolt until the end of thebolt is fl ush with the top of the nut. (Figure 4)8**TELESCOPIC BOOM ONLY**To adjust the boom length (with the boom extendingaway from you) rotate the clamps (See item # 7 onpage 5) approximately ¼ turn counter-clockwise tounlock and slide the boom section to the desired position.Once in place, lock the clamps by rotating clockwise untiltight.FIGURE 1FIGURE 2FIGURE 3FIGURE 4Installation