TECHNICAL BOOKLETGRADINO PLUS - STEP TREAD PLUS - NEZ DE MARCHE PLUS - PLUS-STUFENSOLO PER INTERNI - ONLY FOR INTERIORSPOSE INTERIEURE UNIQUEMENT - NUR FÜR INNENRÄUMEPosa APosa BCollante - AdhesiveColle - Kleber5 mmCollante - AdhesiveColle - Kleber2 mmAlzata - RiseContremarche - StoßflieseCollante - AdhesiveColle - Kleber2 mmAlzata - RiseContremarche - StoßflieseCOPRIBORDO - C-CAP - ELÉMENT “L” - L-ELEMENTENPER INTERNI E PER ESTERNI - FOR INTERIOR AND EXTERIOR USESPOSE INTERIEURE ET EXTERIEURE - FÜR INNENRÄUME UND AUSSENBEREICHEPosa AGra<strong>di</strong>no Plus sinistro / Left step tread Plus / Plat de marche Plus gauche / Stufenplatte Plus linksCORTEX COUNTRY RETT | 45/14mm | 34x120cm / 13 3/ 8”x48”INFORMAZIONIPER LA POSALAYINGINFORMATIONINFORMATIONSPOUR LA POSEINFORMATIONENFÜR DIE VERLEGUNGEffettuare sempre la posa conadesivo.Per la posa su sottofon<strong>di</strong> cementiziutilizzare adesivi elastici <strong>di</strong>classe S2 secondo EN 12004. Nelcaso <strong>di</strong> posa su altri supporti (es.legno, truciolare…) contattare ifornitori per la scelta dell’adesivopiù idoneo.Verificare che il sottofondo siastabile, planare e pulito. Gli straticementizi (massetti, calcestruzzo,strati <strong>di</strong> livellamento/pendenza…)devono essere stagionati,cioè devono aver esaurito ifenomeni <strong>di</strong> ritiro.Evitare la presenza <strong>di</strong> acqua sulsottofondo. Nel caso in cui lapavimentazione in esercizio saràa contatto con l’ acqua (ambientiesterni, centri benessere, docce,spogliatoi…) è necessario:• realizzare sottofon<strong>di</strong> conpendenza <strong>di</strong> almeno l’1% (1 cmper ogni metro);• applicare idonei impermeabilizzantisulla superficie delsottofondo;• miscelare gli stucchi conidonei lattici che riducano laporosità delle fughe.NON LASCIARE VUOTI sotto aiCopribordo e Gra<strong>di</strong>ni Plus, posarecon “doppia spalmatura” anchenella parte verticale dei pezzi.Il bordo verticale <strong>di</strong> Copribordo eGra<strong>di</strong>no Plus deve essere <strong>di</strong>stanziato<strong>di</strong> alcuni mm (almeno 3-4mm) dal sottofondo e lo spaziovuoto deve essere riempito concollante, v. figure.Calpestare i Copribordo/Gra<strong>di</strong>niPlus e riempire le fughe soloquando l’adesivo ha fatto presasecondo le in<strong>di</strong>cazioni riportatedai fabbricanti.Posare sempre con la fuga, chedovrà avere idonee <strong>di</strong>mensionie comunque calcolata dalprogettista.Prevedere nella pavimentazionei giunti perimetrali a contattocon elementi strutturali verticali(muri, colonne…) ed idonei giunti<strong>di</strong> <strong>di</strong>latazione.Evitare sistemi rigi<strong>di</strong>:• volendo rivestire la parte verticaledegli scalini (“alzata”),posare il materiale ben <strong>di</strong>stanziatodai Copribordo e daiGra<strong>di</strong>ni Plus, come mostratonelle figure.• nel caso <strong>di</strong> terrazze o balconi,assicurarsi che le eventualigrondaie siano un sistemaa sé stante, cioè siano ben<strong>di</strong>staccate dai Copribordo odai Gra<strong>di</strong>ni Plus.Always lay using adhesive.When laying on cement basesuse elastic class S2 EN 12004compliant adhesive. Whenlaying on other bases (e.g. wood,chipboard…) contact suppliers forthe choice of the best adhesive.Check that the base is stable, flatand clean. Cement layers (screed,concrete, levelling/slopinglayers…) must be seasoned,that is must have withdrawncompletely.Avoid any water on the base.If flooring in use is in contactwith water (exteriors, wellnesscentres, showers, changingrooms…) you need to:• Create bases with a slopeof at least 1% (1 cm for eachmetre)• Apply suitable waterproofingto the base• Mix the stucco with suitablelatexes to reduce porosity offugues.DO NOT LEAVE EMPTY SPACESunder he C-Cap pieces and “Plus”Steps; lay by “double sprea<strong>di</strong>ng”even for vertical parts.The vertical parts of C-Cappieces and “Plus” Steps mustbe spaced a few mm (at least3-4 mm) from the base and theempty space must be filled withglue, see pictures.Walk on the C-Cap pieces/”Plus”Steps and only fill fugues whenthe adhesive holds followingmanufacturer instructions.Always lay with fugues of theright size, calculated by thedesigner.Plan for perimeter joints inflooring coming into contactwith vertical structural elements(walls, columns…) and suitableexpansion joints.Avoid rigid systems:• If you want to cover thevertical part of steps (“rise”),lay the material the right<strong>di</strong>stance from the C-Cappieces and “Plus” Steps, asshown in the pictures.• For terraces and balconies,makes sure any gutters are asystem to themselves; that isare well separated from theC-Cap pieces or “Plus” Steps.Effectuer toujours la pose collée.Pour la pose sur les souscouchesen ciment, utiliser descolles élastiques de classe S2conformes à la norme EN 12004.En cas de pose sur d’autressupports (ex. bois, mélaminé...),contacter les fournisseurspour le choix de la colle la plusappropriée.Vérifier que la sous-couche eststable, plane et propre. Lestemps de séchage du support(chapes, béton armé, produitsde ragréage...) doivent êtreparfaitement respectés c’està-<strong>di</strong>reque les phénomènes deretrait doivent être terminés.Éviter la présence d’eau sur lasous-couche. Si le sol à carrelerdoit entrer en contact avec l’eau(pose en extérieur, centres bienêtre,douches, vestiaires...) il estnécessaire:• de réaliser une sous-coucheavec une pente d’au moins 1%(1 cm/mètre)• d’appliquer desimperméabilisants appropriéssur la sous-couche• de gâcher les mortiers avecdes latex appropriés quiréduisent la porosité desjointoiements.NE PAS LAISSER DE VIDES sousles éléments en ‘’L’’ et les nezde marche ‘’Plus’’; appliquer lacolle avec la technique du doubleencollage (support et envers descarreaux), ainsi que sur le bordvertical des carreaux.Le bord vertical des élémentsen ‘’L’’ et des nez de marche‘’Plus’ doit être à une <strong>di</strong>stance dequelques mm (au moins 3-4 mm)de la sous-couche et l’espace videdoit être rempli avec de la colle,voir les figures.Ne piétiner les éléments en ‘’L’’et les nez de marche ‘’Plus’’ etne remplir les joints que lorsquela colle a déjà fait prise, selonles in<strong>di</strong>cations fournies par lesfabricants.Poser toujours avec un joint dontles <strong>di</strong>mensions seront calculéespar le projeteur.Prévoir sur le carrelage desjoints périphériques aux pointsde contact avec les élémentsstructurels verticaux (mur,colonnes...) et des joints de<strong>di</strong>latation opportuns.Éviter les systèmes rigides :• si l’on désire carreler la partieverticale des marches (contremarche),poser les carreauxà une certaine <strong>di</strong>stance deséléments en ‘’L’’ et des nezde marche ‘’Plus’’ comme lemontrent les figures.• Pour les terrasses et lesbalcons, s’assurer quegouttières sont totalementindépendantes, c’est-à-<strong>di</strong>rebien séparées des élémentsen ‘’L’’ ou des nez de marche‘’Plus’’.Zum Verlegen immer Kleberverwenden.Zum Verlegen aufzementhaltigem Untergrundelastische Kleber der Klasse S2gemäß EN 12004 verwenden.Wenden Sie sich beim Verlegenauf anderen Unterlagen (z.B.Holz, Spanplatten usw.) für <strong>di</strong>eWahl des geeigneten Klebers an<strong>di</strong>e Händler.Prüfen Sie, dass derVerlegeuntergrund stabil,eben und sauber ist. Diezementhaltigen Schichten(Estrich, Betonuntergrund,Nivellierschicht bzw. Gefälle,usw.) müssen abgelagert sein,d.h. <strong>di</strong>e Schrumpfung mussabgeschlossen sein.Es darf sich kein Wasser aufdem Untergrund befinden. Sollteder zu verlegende Fußboden inKontakt mit Wasser gelangen(Außenbereiche, Wellness-Center,Duschen, Umkleideräume usw.)ist Folgendes zu beachten:• Den Verlegeuntergrund miteiner Neigung von mindestens1% erstellen (1 cm pro Meter)• Geeignete Dichtstoffe auf derOberfläche des Untergrundsanbringen• Die Gipsmörtel mit einemgeeignetem Latex mischen,um <strong>di</strong>e Durchlässigkeit derFugen zu verringern.KEINE LEERRÄUME unterden L-Elementen und denPlus-Stufen HINTERLASSEN;auch den vertikalenAbschnitt der Elemente mit“Doppelbeschichtung” verlegen.Die vertikale Kante derL-Elemente und der Plus-Stufenmuss einige mm Abstand (mind.3-4 mm) zum Verlegeuntergrundaufweisen; dabei ist derLeerraum mit Kleber zu füllen,siehe Abbildungen.Die L-Elemente/Plus-Stufenbetreten und <strong>di</strong>e Fugen erstverschließen, nachdem derKleber entsprechend derHerstellerangaben gehärtet ist.Immer mit der Fuge verlegen,wobei deren Größe, <strong>di</strong>e vomProjektplaner berechnet wird,angemessen sein muss.Kalkulieren Sie bei derFußbodenverlegung <strong>di</strong>eumlaufenden Fugen,welche mit vertikalenKonstruktionselementen(Mauern, Säulen, usw.) in Kontaktstehen, sowie <strong>di</strong>e Dehnungsfugenmit ein.Vermeiden Sie starre Systeme:• Bei der Verkleidung desvertikalen Abschnittsder Stufen (“Setzstufe”)das Material in einemangemessenen Abstand zuden L-Elementen und denPlus-Stufen verlegen, sieheAbbildungen.• Bei Terrassen oder Balkonssicherstellen, dass <strong>di</strong>e evtl.vorhandenen Dachrinnenein unabhängiges Systemdarstellen, d.h. einenangemessenen Abstand zuden L-Elementen und denPlus-Stufen aufweisen.292
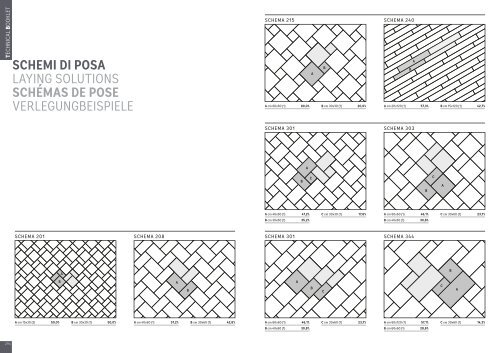
TECHNICAL BOOKLETSCHEMI DI POSALAYING SOLUTIONSSCHÉMAS DE POSEVERLEGUNGBEISPIELESCHEMA 215 SCHEMA 240ABBAA cm 60x60 (1) 80,0% B cm 30x30 (1) 20,0% A cm 20x120 (1) 57,3% B cm 15x120 (1) 42,7%SCHEMA 301 SCHEMA 303ABCBCAA cm 40x60 (1) 47,2% C cm 30x30 (1) 17,6% A cm 60x60 (1) 46,1% C cm 30x60 (1) 23,1%B cm 30x60 (1) 35,2% B cm 40x60 (1) 30,8%SCHEMA 201 SCHEMA 208SCHEMA 301 SCHEMA 344ABBABABCCAA cm 15x30 (2) 50,0% B cm 30x30 (1) 50,0% A cm 40x60 (1) 57,2% B cm 30x60 (1) 42,8%A cm 60x60 (1) 46,1% C cm 30x60 (1) 23,1% A cm 60x120 (1) 57,1% C cm 30x60 (1) 14,3%B cm 40x60 (1) 30,8% B cm 60x60 (1) 28,6%294