
Create successful ePaper yourself
Turn your PDF publications into a flip-book with our unique Google optimized e-Paper software.
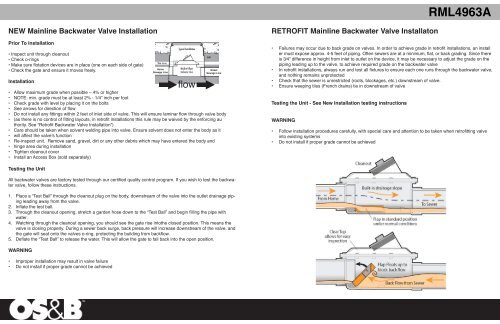
RML4963ANEW Mainline Backwater Valve InstallationPrior To Installation• Inspect unit through cleanout• Check o-rings• Make sure fl otation devices are in place (one on each side of gate)• Check the gate and ensure it moves freely.Installation<strong>Home</strong>Sewage LineflowStreetSewage Line• Allow maximum grade when possible – 4% or higher• NOTE: min. grade must be at least 2% - 1/4” inch per foot• Check grade with level by placing it on the bolts• See arrows for direction of fl ow• Do not install any fi ttings within 2 feet of inlet side of valve. This will ensure laminar fl ow through valve body• (as there is no control of fi tting layouts, in retrofi t installations this rule may be waived by the enforcing authority. See “Retrofi t Backwater Valve Installation”)• Care should be taken when solvent welding pipe into valve. Ensure solvent does not enter the body as it• will affect the valve’s function• Re-inspect unit. Remove sand, gravel, dirt or any other debris which may have entered the body and• hinge area during installation• Tighten cleanout cover• Install an Access Box (sold separately)RETROFIT Mainline Backwater Valve Installaton• Failures may occur due to back grade on valves. In order to achieve grade in retrofi t installations, an installer must expose approx. 4-5 feet of piping. Often sewers are at a minimum, flat, or back grading. Since thereis 3⁄4” difference in height from inlet to outlet on the device, it may be necessary to adjust the grade on thepiping leading up to the valve, to achieve required grade on the backwater valve• In retrofi t installations, always run and test all fi xtures to ensure each one runs through the backwater valve,and nothing remains unprotected• Check that the sewer is unrestricted (roots, blockages, etc.) downstream of valve.• Ensure weeping tiles (French drains) tie in downstream of valveTesting the Unit - See New Installation testing instructionsWARNING• Follow installation procedures carefully, with special care and attention to be taken when retrofi tting valveinto existing systems• Do not install if proper grade cannot be achievedTesting the UnitAll backwater valves are factory tested through our certifi ed quality control program. If you wish to test the backwatervalve, follow these instructions.1. Place a “Test Ball” through the cleanout plug on the body, downstream of the valve into the outlet drainage pipingleading away from the valve.2. Infl ate the test ball.3. Through the cleanout opening, stretch a garden hose down to the “Test Ball” and begin fi lling the pipe withwater.4. Watching through the cleanout opening, you should see the gate rise intothe closed position. This means thevalve is closing properly. During a sewer back surge, back pressure will increase downstream of the valve, andthe gate will seat onto the valves o-ring, protecting the building from backfl ow.5. Defl ate the “Test Ball” to release the water. This will allow the gate to fall back into the open position.WARNING• Improper installation may result in valve failure• Do not install if proper grade cannot be achieved