

Samsung D60 (EC-D60ZZBFL/E1 ) - Manuel de l'utilisateur 8.95 MB, pdf, Anglais
Samsung D60 (EC-D60ZZBFL/E1 ) - Manuel de l'utilisateur 8.95 MB, pdf, Anglais
Samsung D60 (EC-D60ZZBFL/E1 ) - Manuel de l'utilisateur 8.95 MB, pdf, Anglais

Create successful ePaper yourself
Turn your PDF publications into a flip-book with our unique Google optimized e-Paper software.
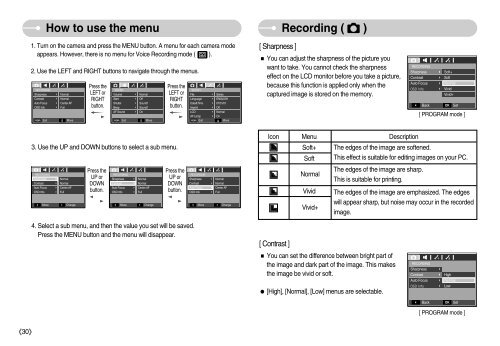
How to use the menu<br />
1. Turn on the camera and press the MENU button. A menu for each camera mo<strong>de</strong><br />
appears. However, there is no menu for Voice Recording mo<strong>de</strong> ( ).<br />
2. Use the LEFT and RIGHT buttons to navigate through the menus.<br />
R<strong>EC</strong>ORDING<br />
Press the<br />
LEFT or<br />
RIGHT<br />
button.<br />
SOUND<br />
Press the<br />
LEFT or<br />
RIGHT<br />
button.<br />
SETUP1<br />
Sharpness Normal<br />
Volume Normal<br />
File<br />
Contrast Normal<br />
Start<br />
Off<br />
Language<br />
Auto Focus Center AF<br />
Shutter Sound1<br />
OSD Info Full<br />
Beep<br />
Sound1<br />
Imprint<br />
AF Sound On<br />
LCD<br />
AF Lamp<br />
MEMU Exit Move<br />
MEMU Exit Move<br />
MEMU Exit<br />
<br />
<br />
Series<br />
ENGLISH<br />
Date&Time 07/01/01<br />
<br />
<br />
<br />
Off<br />
Normal<br />
On<br />
<br />
<br />
Move<br />
[ Sharpness ]<br />
Recording ( )<br />
You can adjust the sharpness of the picture you<br />
want to take. You cannot check the sharpness<br />
effect on the LCD monitor before you take a picture,<br />
because this function is applied only when the<br />
captured image is stored on the memory.<br />
R<strong>EC</strong>ORDING<br />
Sharpness Soft+<br />
Contrast Soft<br />
Auto Focus Normal<br />
Vivid<br />
Vivid+<br />
Back OK Set<br />
[ PROGRAM mo<strong>de</strong> ]<br />
Icon Menu Description<br />
3. Use the UP and DOWN buttons to select a sub menu.<br />
Soft+<br />
Soft<br />
The edges of the image are softened.<br />
This effect is suitable for editing images on your PC.<br />
R<strong>EC</strong>ORDING<br />
Sharpness<br />
Contrast<br />
Auto Focus<br />
OSD Info<br />
<br />
<br />
<br />
<br />
Move<br />
<br />
<br />
<br />
<br />
Normal<br />
Normal<br />
Center AF<br />
Full<br />
<br />
Change<br />
Press the<br />
UP or<br />
DOWN<br />
button.<br />
R<strong>EC</strong>ORDING<br />
Sharpness<br />
Contrast<br />
Auto Focus<br />
OSD Info<br />
<br />
<br />
<br />
<br />
Move<br />
<br />
<br />
<br />
<br />
Normal<br />
Normal<br />
Center AF<br />
Full<br />
<br />
Change<br />
Press the<br />
UP or<br />
DOWN<br />
button.<br />
R<strong>EC</strong>ORDING<br />
Sharpness<br />
Contrast<br />
Auto Focus<br />
OSD Info<br />
<br />
<br />
<br />
<br />
Move<br />
Normal<br />
Normal<br />
Center AF<br />
Full<br />
Change<br />
Normal<br />
Vivid<br />
Vivid+<br />
The edges of the image are sharp.<br />
This is suitable for printing.<br />
The edges of the image are emphasized. The edges<br />
will appear sharp, but noise may occur in the recor<strong>de</strong>d<br />
image.<br />
4. Select a sub menu, and then the value you set will be saved.<br />
Press the MENU button and the menu will disappear.<br />
[ Contrast ]<br />
You can set the difference between bright part of<br />
the image and dark part of the image. This makes<br />
the image be vivid or soft.<br />
R<strong>EC</strong>ORDING<br />
Sharpness<br />
Contrast<br />
<br />
High<br />
Auto Focus<br />
Normal<br />
[High], [Normal], [Low] menus are selectable.<br />
<br />
Low<br />
<br />
Back<br />
OK<br />
Set<br />
[ PROGRAM mo<strong>de</strong> ]<br />
30


