

Sony DTC-ZE700 - DTC-ZE700 Consignes d’utilisation
Sony DTC-ZE700 - DTC-ZE700 Consignes d’utilisation
Sony DTC-ZE700 - DTC-ZE700 Consignes d’utilisation

Create successful ePaper yourself
Turn your PDF publications into a flip-book with our unique Google optimized e-Paper software.
POWER<br />
TIMER<br />
REC OFF PLAY<br />
AUTO<br />
RENUMBER<br />
START ID<br />
REHEARSAL<br />
WRITE<br />
ERASE<br />
MODE<br />
RESET<br />
MARGIN<br />
RESET<br />
OPEN/CLOSE<br />
AMS<br />
ANALOG<br />
OPTICAL<br />
COAXIAL<br />
INPUT<br />
•<br />
48 kHz<br />
44.1 kHz<br />
LONG<br />
REC MODE<br />
STANDARD<br />
•<br />
• •<br />
SBM<br />
ON<br />
OFF<br />
REC MUTE<br />
REC<br />
•<br />
•<br />
3<br />
REC LEVEL<br />
5<br />
4<br />
PHONES<br />
L<br />
PHONE LEVEL<br />
0<br />
R<br />
2 8<br />
1<br />
•<br />
•<br />
0<br />
•<br />
•<br />
6<br />
10<br />
•<br />
•<br />
7<br />
9<br />
•<br />
•<br />
10<br />
POWER<br />
TIMER<br />
REC OFF PLAY<br />
AUTO<br />
RENUMBER<br />
START ID<br />
REHEARSAL<br />
WRITE<br />
ERASE<br />
MODE<br />
RESET<br />
MARGIN<br />
RESET<br />
OPEN/CLOSE<br />
AMS<br />
ANALOG<br />
OPTICAL<br />
COAXIAL<br />
INPUT<br />
•<br />
48 kHz<br />
44.1 kHz<br />
LONG<br />
REC MODE<br />
STANDARD<br />
•<br />
• •<br />
SBM<br />
ON<br />
OFF<br />
REC MUTE<br />
REC<br />
•<br />
•<br />
3<br />
1<br />
REC LEVEL<br />
5<br />
4<br />
•<br />
0<br />
PHONES<br />
•<br />
L<br />
PHONE LEVEL<br />
0<br />
6<br />
10<br />
R<br />
2 8<br />
•<br />
•<br />
•<br />
•<br />
7<br />
•<br />
9<br />
•<br />
10<br />
Inserting a Sound-Muted<br />
Section While Recording<br />
(Record Muting)<br />
Use Record Muting to insert a space of about 4 seconds<br />
between tracks. This is recommended if you plan to<br />
copy the DAT tape to an analog audio cassette tape<br />
since the spaces will allow you to use automatic search<br />
functions to locate the beginning of each track.<br />
When you start recording from the beginning of a<br />
blank tape and want to insert a space before the first<br />
track, be sure to create a sound-muted section using<br />
Record Muting only. Do not advance the tape with the<br />
) or · button since this will create a blank section<br />
on the tape (see page 9).<br />
Recording Operations<br />
g<br />
12 EN<br />
REC MUTE R<br />
§<br />
≠<br />
±<br />
• •<br />
0<br />
)<br />
p · P r<br />
• •<br />
· P<br />
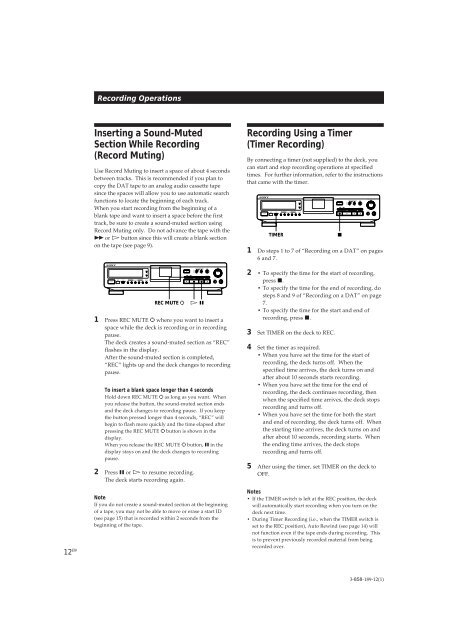
1 Press REC MUTE R where you want to insert a<br />
space while the deck is recording or in recording<br />
pause.<br />
The deck creates a sound-muted section as “REC”<br />
flashes in the display.<br />
After the sound-muted section is completed,<br />
“REC” lights up and the deck changes to recording<br />
pause.<br />
To insert a blank space longer than 4 seconds<br />
Hold down REC MUTE R as long as you want. When<br />
you release the button, the sound-muted section ends<br />
and the deck changes to recording pause. If you keep<br />
the button pressed longer than 4 seconds, “REC” will<br />
begin to flash more quickly and the time elapsed after<br />
pressing the REC MUTE R button is shown in the<br />
display.<br />
When you release the REC MUTE R button, P in the<br />
display stays on and the deck changes to recording<br />
pause.<br />
2 Press P or · to resume recording.<br />
The deck starts recording again.<br />
Note<br />
If you do not create a sound-muted section at the beginning<br />
of a tape, you may not be able to move or erase a start ID<br />
(see page 15) that is recorded within 2 seconds from the<br />
beginning of the tape.<br />
R<br />
Recording Using a Timer<br />
(Timer Recording)<br />
By connecting a timer (not supplied) to the deck, you<br />
can start and stop recording operations at specified<br />
times. For further information, refer to the instructions<br />
that came with the timer.<br />
g<br />
TIMER<br />
§<br />
≠<br />
p · P r<br />
1 Do steps 1 to 7 of “Recording on a DAT” on pages<br />
6 and 7.<br />
2 • To specify the time for the start of recording,<br />
press p.<br />
• To specify the time for the end of recording, do<br />
steps 8 and 9 of “Recording on a DAT” on page<br />
7.<br />
• To specify the time for the start and end of<br />
recording, press p.<br />
3 Set TIMER on the deck to REC.<br />
4 Set the timer as required.<br />
• When you have set the time for the start of<br />
recording, the deck turns off. When the<br />
specified time arrives, the deck turns on and<br />
after about 10 seconds starts recording.<br />
• When you have set the time for the end of<br />
recording, the deck continues recording, then<br />
when the specified time arrives, the deck stops<br />
recording and turns off.<br />
• When you have set the time for both the start<br />
and end of recording, the deck turns off. When<br />
the starting time arrives, the deck turns on and<br />
after about 10 seconds, recording starts. When<br />
the ending time arrives, the deck stops<br />
recording and turns off.<br />
5 After using the timer, set TIMER on the deck to<br />
OFF.<br />
Notes<br />
• If the TIMER switch is left at the REC position, the deck<br />
will automatically start recording when you turn on the<br />
deck next time.<br />
• During Timer Recording (i.e., when the TIMER switch is<br />
set to the REC position), Auto Rewind (see page 14) will<br />
not function even if the tape ends during recording. This<br />
is to prevent previously recorded material from being<br />
recorded over.<br />
p<br />
±<br />
• •<br />
0<br />
• •<br />
)<br />
R<br />
3-858-189-12(1)


