TPS-Compact Turbopump
TPS-Compact Turbopump
TPS-Compact Turbopump
You also want an ePaper? Increase the reach of your titles
YUMPU automatically turns print PDFs into web optimized ePapers that Google loves.
Cleaning<br />
Exterior<br />
The exterior surfaces of the <strong>TPS</strong>-compact may be<br />
cleaned with mild detergents only.<br />
Interior<br />
Internal dry scroll pump do not contain fluid for the<br />
cleansing of accumulated dust and debris. Run the<br />
pump periodically at atmosphere for a minute or<br />
two to flush it out.<br />
Tip-Seal Replacement<br />
The parts and tools required to replace Tip-Seals<br />
are listed below:<br />
- Tip-Seal Replacement Kit P/N IDP3TS<br />
- 4 mm Allen wrench<br />
- Razor blade or side-cutting pliers<br />
- Compressed air (optional)<br />
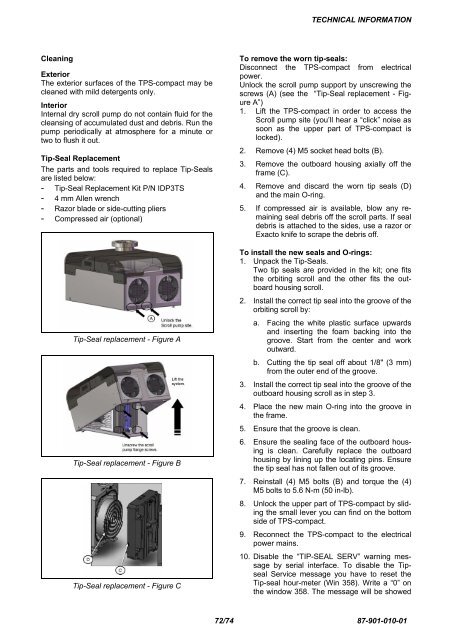
Tip-Seal replacement - Figure A<br />
Tip-Seal replacement - Figure B<br />
Tip-Seal replacement - Figure C<br />
TECHNICAL INFORMATION<br />
To remove the worn tip-seals:<br />
Disconnect the <strong>TPS</strong>-compact from electrical<br />
power.<br />
Unlock the scroll pump support by unscrewing the<br />
screws (A) (see the “Tip-Seal replacement - Figure<br />
A”)<br />
1. Lift the <strong>TPS</strong>-compact in order to access the<br />
Scroll pump site (you’ll hear a “click” noise as<br />
soon as the upper part of <strong>TPS</strong>-compact is<br />
locked).<br />
2. Remove (4) M5 socket head bolts (B).<br />
3. Remove the outboard housing axially off the<br />
frame (C).<br />
4. Remove and discard the worn tip seals (D)<br />
and the main O-ring.<br />
5. If compressed air is available, blow any remaining<br />
seal debris off the scroll parts. If seal<br />
debris is attached to the sides, use a razor or<br />
Exacto knife to scrape the debris off.<br />
To install the new seals and O-rings:<br />
1. Unpack the Tip-Seals.<br />
Two tip seals are provided in the kit; one fits<br />
the orbiting scroll and the other fits the outboard<br />
housing scroll.<br />
2. Install the correct tip seal into the groove of the<br />
orbiting scroll by:<br />
a. Facing the white plastic surface upwards<br />
and inserting the foam backing into the<br />
groove. Start from the center and work<br />
outward.<br />
b. Cutting the tip seal off about 1/8" (3 mm)<br />
from the outer end of the groove.<br />
3. Install the correct tip seal into the groove of the<br />
outboard housing scroll as in step 3.<br />
4. Place the new main O-ring into the groove in<br />
the frame.<br />
5. Ensure that the groove is clean.<br />
6. Ensure the sealing face of the outboard housing<br />
is clean. Carefully replace the outboard<br />
housing by lining up the locating pins. Ensure<br />
the tip seal has not fallen out of its groove.<br />
7. Reinstall (4) M5 bolts (B) and torque the (4)<br />
M5 bolts to 5.6 N-m (50 in-lb).<br />
8. Unlock the upper part of <strong>TPS</strong>-compact by sliding<br />
the small lever you can find on the bottom<br />
side of <strong>TPS</strong>-compact.<br />
9. Reconnect the <strong>TPS</strong>-compact to the electrical<br />
power mains.<br />
10. Disable the “TIP-SEAL SERV” warning message<br />
by serial interface. To disable the Tipseal<br />
Service message you have to reset the<br />
Tip-seal hour-meter (Win 358). Write a “0” on<br />
the window 358. The message will be showed<br />
72/74 87-901-010-01


