OPERATORE OLEODINAMICO PER CANCELLI AD ... - Aprimatic
OPERATORE OLEODINAMICO PER CANCELLI AD ... - Aprimatic
OPERATORE OLEODINAMICO PER CANCELLI AD ... - Aprimatic

Create successful ePaper yourself
Turn your PDF publications into a flip-book with our unique Google optimized e-Paper software.
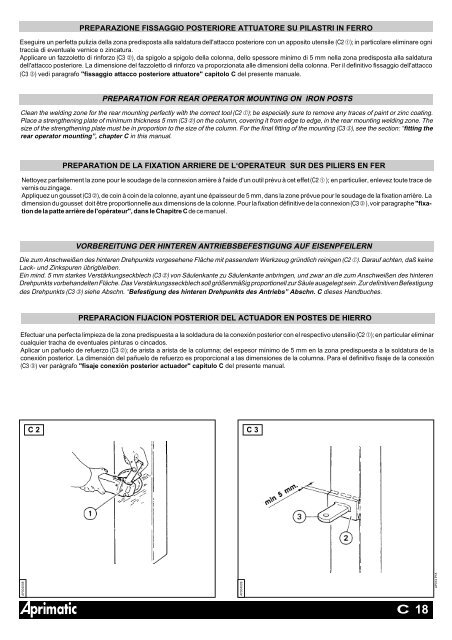
PREPARAZIONE FISSAGGIO POSTERIORE ATTUATORE SU PILASTRI IN FERRO<br />
Eseguire un perfetta pulizia della zona predisposta alla saldatura dell'attacco posteriore con un apposito utensile (C2 ➀); in particolare eliminare ogni<br />
traccia di eventuale vernice o zincatura.<br />
Applicare un fazzoletto di rinforzo (C3 ➁), da spigolo a spigolo della colonna, dello spessore minimo di 5 mm nella zona predisposta alla saldatura<br />
dell'attacco posteriore. La dimensione del fazzoletto di rinforzo va proporzionata alle dimensioni della colonna. Per il definitivo fissaggio dell'attacco<br />
(C3 ➂) vedi paragrafo "fissaggio attacco posteriore attuatore" capitolo C del presente manuale.<br />
PREPARATION FOR REAR O<strong>PER</strong>ATOR MOUNTING ON IRON POSTS<br />
Clean the welding zone for the rear mounting perfectly with the correct tool (C2 ➀); be especially sure to remove any traces of paint or zinc coating.<br />
Place a strengthening plate of minimum thickness 5 mm (C3 ➁) on the column, covering it from edge to edge, in the rear mounting welding zone. The<br />
size of the strengthening plate must be in proportion to the size of the column. For the final fitting of the mounting (C3 ➂), see the section: “fitting the<br />
rear operator mounting”, chapter C in this manual.<br />
PREPARATION DE LA FIXATION ARRIERE DE L‘O<strong>PER</strong>ATEUR SUR DES PILIERS EN FER<br />
Nettoyez parfaitement la zone pour le soudage de la connexion arrière à l'aide d'un outil prévu à cet effet (C2 ➀ ); en particulier, enlevez toute trace de<br />
vernis ou zingage.<br />
Appliquez un gousset (C3 ➁), de coin à coin de la colonne, ayant une épaisseur de 5 mm, dans la zone prévue pour le soudage de la fixation arrière. La<br />
dimension du gousset doit être proportionnelle aux dimensions de la colonne. Pour la fixation définitive de la connexion (C3 ➂ ), voir paragraphe "fixation<br />
de la patte arrière de l'opérateur", dans le Chapitre C de ce manuel.<br />
VORBEREITUNG DER HINTEREN ANTRIEBSBEFESTIGUNG AUF EISENPFEILERN<br />
Die zum Anschweißen des hinteren Drehpunkts vorgesehene Fläche mit passendem Werkzeug gründlich reinigen (C2 ➀). Darauf achten, daß keine<br />
Lack- und Zinkspuren übrigbleiben.<br />
Ein mind. 5 mm starkes Verstärkungseckblech (C3 ➁) von Säulenkante zu Säulenkante anbringen, und zwar an die zum Anschweißen des hinteren<br />
Drehpunkts vorbehandelten Fläche. Das Verstärkungsseckblech soll größenmäßig proportionell zur Säule ausgelegt sein. Zur definitiven Befestigung<br />
des Drehpunkts (C3 ➂) siehe Abschn. “Befestigung des hinteren Drehpunkts des Antriebs” Abschn. C dieses Handbuches.<br />
PREPARACION FIJACION POSTERIOR DEL ACTU<strong>AD</strong>OR EN POSTES DE HIERRO<br />
Efectuar una perfecta limpieza de la zona predispuesta a la soldadura de la conexión posterior con el respectivo utensilio (C2 ➀); en particular eliminar<br />
cualquier tracha de eventuales pinturas o cincados.<br />
Aplicar un pañuelo de refuerzo (C3 ➁); de arista a arista de la columna; del espesor mínimo de 5 mm en la zona predispuesta a la soldatura de la<br />
conexión posterior. La dimensión del pañuelo de refuerzo es proporcional a las dimensiones de la columna. Para el definitivo fisaje de la conexión<br />
(C3 ➂) ver parágrafo "fisaje conexión posterior actuador" capítulo C del presente manual.<br />
AP004008<br />
C 2<br />
AP004009<br />
C 3<br />
C<br />
18<br />
AP014 P18