OPERATORE OLEODINAMICO PER CANCELLI AD ... - Aprimatic
OPERATORE OLEODINAMICO PER CANCELLI AD ... - Aprimatic
OPERATORE OLEODINAMICO PER CANCELLI AD ... - Aprimatic

You also want an ePaper? Increase the reach of your titles
YUMPU automatically turns print PDFs into web optimized ePapers that Google loves.
POSITIONIEREN DES VORDEREN DREHPUNKTS<br />
Gewindeschaft des Kugelgelenks (C11 ➀) mit Fett abschmieren. Das mit Mutter (C11 ➁) und bestückte Kugelgelenk in die Antriebsstange einführen.<br />
Kugelgelenk um etwa eine halbe Gewindedrehung zuschrauben. Bolzen (C11 ➃) des vorderen Drehpunkts ins Kugelgelenk einsetzen, ohne ihn jedoch<br />
mit dem entsprechenden Seegerring zu verriegeln.<br />
Die entsprechende Gabel (C12 ➀) in den Antriebsboden mittels dem dafür vorgesehenen Bolzen (C12 ➁) stecken. Das Ganze mit beiden Seegerringen<br />
(C12 ➂) festmachen.<br />
AP014 P25<br />
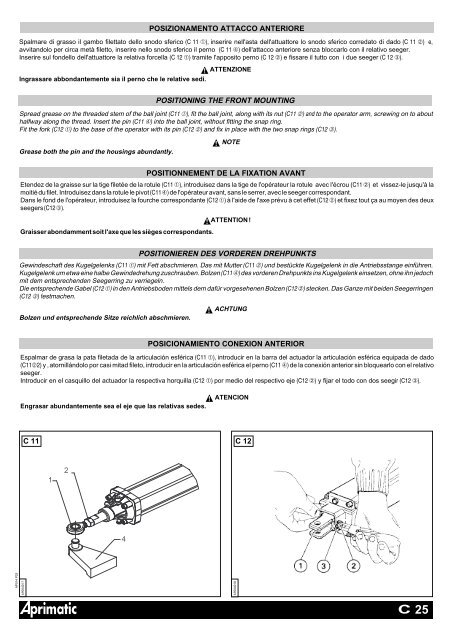
POSIZIONAMENTO ATTACCO ANTERIORE<br />
Spalmare di grasso il gambo filettato dello snodo sferico (C 11 ➀), inserire nell'asta dell'attuattore lo snodo sferico corredato di dado (C 11 ➁) e,<br />
avvitandolo per circa metà filetto, inserire nello snodo sferico il perno (C 11 ➃) dell'attacco anteriore senza bloccarlo con il relativo seeger.<br />
Inserire sul fondello dell'attuattore la relativa forcella (C 12 ➀) tramite l'apposito perno (C 12 ➁) e fissare il tutto con i due seeger (C 12 ➂).<br />
Ingrassare abbondantemente sia il perno che le relative sedi.<br />
ATTENZIONE<br />
POSITIONING THE FRONT MOUNTING<br />
Spread grease on the threaded stem of the ball joint (C11 ➀), fit the ball joint, along with its nut (C11 ➁) and to the operator arm, screwing on to about<br />
halfway along the thread. Insert the pin (C11 ➃) into the ball joint, without fitting the snap ring.<br />
Fit the fork (C12 ➀) to the base of the operator with its pin (C12 ➁) and fix in place with the two snap rings (C12 ➂).<br />
Grease both the pin and the housings abundantly.<br />
NOTE<br />
POSITIONNEMENT DE LA FIXATION AVANT<br />
Etendez de la graisse sur la tige filetée de la rotule (C11 ➀), introduisez dans la tige de l'opérateur la rotule avec l'écrou (C11 ➁) et vissez-le jusqu'à la<br />
moitié du filet. Introduisez dans la rotule le pivot (C11 ➃) de l'opérateur avant, sans le serrer, avec le seeger correspondant.<br />
Dans le fond de l'opérateur, introduisez la fourche correspondante (C12 ➀) à l'aide de l'axe prévu à cet effet (C12 ➁) et fixez tout ça au moyen des deux<br />
seegers (C12 ➂).<br />
ATTENTION !<br />
Graisser abondamment soit l'axe que les sièges correspondants.<br />
Bolzen und entsprechende Sitze reichlich abschmieren.<br />
ACHTUNG<br />
POSICIONAMIENTO CONEXION ANTERIOR<br />
Espalmar de grasa la pata filetada de la articulación esférica (C11 ➀), introducir en la barra del actuador la articulación esférica equipada de dado<br />
(C11➁2) y , atornillándolo por casi mitad fileto, introducir en la articulación esférica el perno (C11 ➃) de la conexión anterior sin bloquearlo con el relativo<br />
seeger.<br />
Introducir en el casquillo del actuador la respectiva horquilla (C12 ➀) por medio del respectivo eje (C12 ➁) y fijar el todo con dos seegir (C12 ➂).<br />
Engrasar abundantemente sea el eje que las relativas sedes.<br />
AP004017<br />
ATENCION<br />
C 11 C 12<br />
1<br />
2<br />
4<br />
AP004018<br />
C 25