Istruzioni per l'uso per il tecnico autorizzato SOLATRON S2.5
Istruzioni per l'uso per il tecnico autorizzato SOLATRON S2.5
Istruzioni per l'uso per il tecnico autorizzato SOLATRON S2.5

You also want an ePaper? Increase the reach of your titles
YUMPU automatically turns print PDFs into web optimized ePapers that Google loves.
Montaggio integrato nel tetto<br />
Ampliamento verticale (verso l'alto) <strong>per</strong> 2 collettori<br />
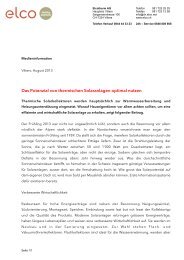
Fig. 27<br />
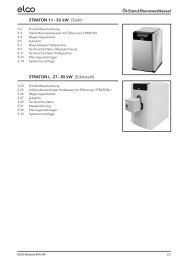
Fig. 28<br />
Pos.36<br />
A<strong>per</strong>tura d'ispezione <strong>per</strong> sonda del collettore<br />
con calottina di co<strong>per</strong>tura (Pos. 29)<br />
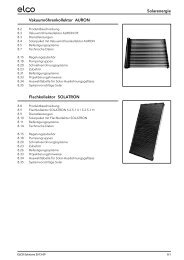
Fig. 29<br />
Pos.26<br />
Pos.32<br />
45<br />
Pos.37<br />
Pos.36 Pos.3<br />
Pos.15<br />
Inserire dal basso verso l'alto la lamiera<br />
intermedia del collettore (Pos. 32) fra<br />
entrambi i collettori e piegarne l'estremità<br />
su<strong>per</strong>iore <strong>per</strong> fissarla. (Fig. 27)<br />
Indicazione:<br />
La lamiera intermedia del collettore<br />
<strong>SOLATRON</strong> S 2.5 è disponib<strong>il</strong>e quale<br />
accessorio, precisamente quale co<strong>per</strong>tura<br />
decorativa <strong>per</strong> i montaggi<br />
sopra tetto, anche singolarmente.<br />
• Montare la lamiera di co<strong>per</strong>tura del<br />
lato su<strong>per</strong>iore sinistro (Pos. 36) e<br />
destro (Pos. 37 di Fig. 28)<br />
• Avvitare saldamente la lamiera di<br />
co<strong>per</strong>tura laterale su<strong>per</strong>iore sinistra<br />
(Pos. 36) e destra (Pos. 37) con le viti<br />
<strong>per</strong>foranti (Pos. 26) alle lamiere di<br />
collegamento a sinistra e a destra<br />
(Pos. 15) e alle lamiere di co<strong>per</strong>tura<br />
laterali sinistra e destra (Pos. 3). (Fig.<br />
29)