

My Power XL 100 MANUALE D'USO - Globus Italia Srl ...
My Power XL 100 MANUALE D'USO - Globus Italia Srl ...
My Power XL 100 MANUALE D'USO - Globus Italia Srl ...

You also want an ePaper? Increase the reach of your titles
YUMPU automatically turns print PDFs into web optimized ePapers that Google loves.
<strong>My</strong> <strong>Power</strong> <strong>XL</strong> <strong>100</strong> <strong>MANUALE</strong><br />
D’USO<br />
- 1 -
EGREGIO CLIENTE<br />
LA RINGRAZIAMO PER LA SCELTA EFFETTUATA E LE<br />
CONFERMIAMO LA NOSTRA PIU’ COMPLETA DISPONIBILITA’ PER<br />
QUALSIASI AIUTO O SUGGERIMENTO DI CUI AVESSE BISOGNO<br />
<strong>My</strong> <strong>Power</strong> <strong>XL</strong> <strong>100</strong> è distribuito da:<br />
GLOBUS ITALIA S.r.l.<br />
Tel. 0438.7933<br />
www.globusitalia.com<br />
info@globusitalia.com<br />
L’apparecchiatura è un dispositivo CE ed è stata costruita in conformità alle norme<br />
tecniche vigenti.<br />
Per mantenere il livello massimo di sicurezza, l’utente deve utilizzare l’apparecchio<br />
nel rispetto delle prescrizioni e dei limiti di impiego del manuale d’uso.<br />
Il produttore declina ogni responsabilità in merito ad un uso difforme da quanto<br />
indicato e prescritto nel presente manuale.<br />
Senza il permesso scritto del produttore sono vietati la riproduzione anche parziale in<br />
qualsiasi forma e con qualsiasi mezzo elettronico o meccanico di testi e/o foto<br />
contenute in questo manuale.<br />
Made in PRC.<br />
- 2 -
INDICE<br />
PRECAUZION IMPORTANTI PER LA SICUREZZA ————————————— 4<br />
CARATTERISTICHE TECNICHE ——————————————————— 5<br />
PARTI ASSEMBLAGGIO —————————————————— 7<br />
ASSEMBLAGGIO ——————————————————————— 8-10<br />
OPERAZIONI CONSOLE ——————————————————————— 11<br />
COMINCIARE L’UTILIZZO ___________________________________________ 12<br />
PERSONAL TRAINER _____________________________________________________ 13-15<br />
ISTRUZIONI ESERCIZI ———————————————————————— 16-21<br />
ESPLOSI ———————————————————————————— 22<br />
LISTA COMPONENTI ————————————————————————— 23<br />
DIAGRAMMA DEI CIRCUITI ——————————————————————— 24<br />
- 3 -
PRECAUZIONI PER LA SICUREZZA<br />
Grazie per aver acquistato uno dei nostri prodotti. Nonostante noi<br />
facciamo del nostro meglio per assicurare la più alta qualità di ogni<br />
nostro prodotto, errori occasionali e/o mancanze possono avere luogo.<br />
Nello sfortunato caso in cui dovesse trovare dei difetti nel presente<br />
prodotto o delle parti dovessero mancare, non esiti a contattarci.<br />
Si assicuri di aver letto attentamente il manuale prima dell’assemblaggio e<br />
dell’utilizzo. Inoltre, la preghiamo di tenere presenti le seguenti precauzioni per la<br />
sicurezza:<br />
1. Prima di cominciare uno qualsiasi dei programmi di esercizio, consulti il Suo medico. Se<br />
durante l’utilizzo dovesse avvertire dolore o senso di costrizione al petto, battiti irregolari,<br />
respiro corto, fiacchezza o altri disagi inusuali, interrompa l’esercizio e consulti il Suo<br />
medico prima di riprenderlo;<br />
2.Nello sfortunato caso in cui dovesse trovare dei difetti nel presente prodotto, interrompa<br />
l’esercizio e ci contatti;<br />
3. Non inserire oggetti nelle fessure;<br />
4. Non utilizzare in caso di peso corporeo superiore ai 150 kg;<br />
5. Utilizzare solo una persona alla volta;<br />
6. Utilizzare la macchina sempre e solo su di una superficie sgombra e piana. Non utilizzare<br />
all’aperto o vicino a dell’acqua;<br />
7. Tenere bambini e animali lontano dalla macchina;<br />
8. Non usare la macchina durante l’utilizzo di apparecchi per l’aerosol terapia o spray per<br />
inalazione;<br />
9. Verificare che tutte le viti e i bulloni della macchina siano correttamente fissati prima<br />
dell’utilizzo;<br />
10. Spegnere la macchina dopo l’utilizzo;<br />
11. Come la maggior parte delle apparecchiature sportive, la pedana non può essere<br />
utilizzata da bambini, che devono essere tenuti a debita distanza durante l’utilizzo.<br />
CONTROINDICAZIONI:<br />
• Gravidanza<br />
• Condizioni di trombosi acuta<br />
• Problemi cardio-vascolari<br />
• Cicatrici ancora fresche a seguito di interventi chirurgici e/o operazioni<br />
• Protesi a anche e/o ginocchia<br />
• Ernie acute, discopatie, spondilosi<br />
• Diabete<br />
• Epilessia<br />
• Forte emicrania<br />
• Portatori di pacemaker<br />
• Portatrici di spirali, perni metallici, bulloni o placche recentemente inseriti<br />
• Tumori<br />
- 4 -
CARATTERISTICHE TECNICHE<br />
2 motori AC<br />
Connessione elettrica 220V<br />
Peso 64 kg<br />
Massimo carico sopportabile 130 kg<br />
Frequenza da 35 a 50 Hz.<br />
Ampiezza High/Low<br />
Collegamento alla rete elettrica<br />
Non utilizzare spine multiple o riduttori di corrente.<br />
Collegare l’apparecchio ad una presa di corrente testata ed efficiente.<br />
In caso di dubbio non collegare l’apparecchio.<br />
Verificare che la tensione della rete di alimentazione corrisponda al voltaggio ed alla<br />
frequenza indicati sulla targhetta dell’apparecchio (un’errata tensione di alimentazione può<br />
danneggiarlo).<br />
L’utilizzo dell’apparecchio non correttamente collegato alla rete elettrica può essere<br />
pericoloso.<br />
Inserire la spina di connessione nella presa di corrente.<br />
Smaltimento dell’apparato<br />
Ai sensi dell'art 13 del Decreto Legislativo 25 luglio 2005, n. 151 "Attuazione<br />
delle Direttive 2002/95/CE, 2002/96/CE e 2003/108/CE, relative alla riduzione<br />
dell'uso di sostanze pericolose nelle apparecchiature elettriche ed elettroniche,<br />
nonché allo smaltimento dei rifiuti". II simbolo del cassonetto barrato riportato<br />
sull'apparecchiatura indica che il prodotto alla fine della propria vita utíle deve<br />
essere raccolto separatamente dagli altri rifiuti. L'utente dovrá, pertanto, con-<br />
ferire l'apparecchiatura giunta a fine vita agli idonei centri di raccolta differenzi-<br />
ata dei rifiuti elettrici ed elettronici, oppure riconsegnarla al rivenditore al<br />
momento dell'acquisto di una nuova apparecchiatura di tipo equivalente, in<br />
ragione di uno a uno. L'adeguata raccolta differenziata per l'avvio successivo<br />
dell'apparecchiatura dismessa al riciclaggio, al trattamento e allo smaltimento<br />
ambientalmente compatibile contribuisce ad evitare possibili effetti negativi<br />
sull'ambiente e sulla salute e favorisce il riciclo dei materiali di cui é composta<br />
l'apparecchiatura. Lo smaltimento abusivo del prodotto da parte dell'utente<br />
comporta l'applicazione delle sanzioni amministrative di cui al D.Lgs. n° 22/<br />
1997 (articolo 50 e seguenti del D.Lgs. n° 22/1997).<br />
- 5 -
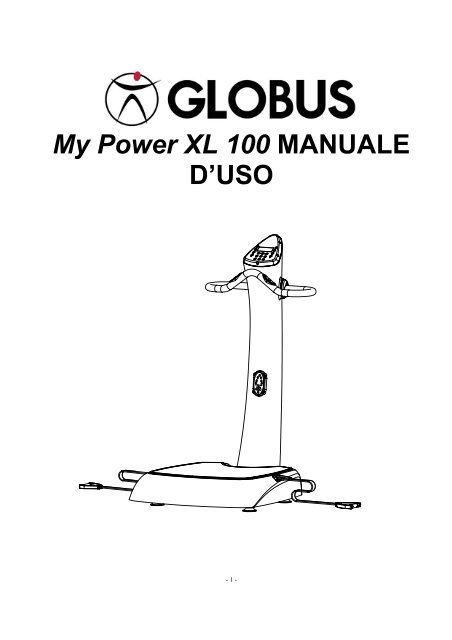
CARATTERISTICHE<br />
Cinghie<br />
Manubrio<br />
Sensore battiti<br />
Console Ⅱ<br />
- 6 -<br />
Console Ⅰ<br />
Piedini<br />
Colonna<br />
Pedana
PARTI ASSEMBLAGGIO<br />
SET ATTREZZI<br />
- 7 -
ISTRUZIONI PER L’ASSEMBLAGGIO<br />
STEP 1- Fissare la colonna al basamento inferiore<br />
A/ Come mostrato, installare la colonna sulla base seguendo i passaggi di seguito.<br />
- 8 -<br />
1<br />
2
B/ Una volta fissata la colonna alla pedana utilizzando i 4 bulloni M10*40, le 4 rondelle Φ10<br />
e le 4 guarnizioni Φ10, fissarle bene con la chiave inglese e connettere i cavi.<br />
Base M10 Bullone<br />
- 9 -<br />
Colonna<br />
Φ10 Rondella<br />
Φ10 Rondella
STEP 2- Installare il manubrio alla colonna<br />
A/ Connettere i cavi del sensore battiti e accertarsi che I fori siano correttamente allineati<br />
B/ Installare il manubrio alla colonna utilizzando le quattro viti M8X25<br />
M8X25 Bolt<br />
Handle Bar<br />
- 10 -<br />
M8X25 Bolt
OPERAZIONI CONSOLE<br />
TEMPO:30S、60S、90S、180S<br />
RANGE FREQUENZA:35Hz、40Hz、45Hz、50Hz<br />
CONTO ALLA ROVESCIA:180S~ 0S<br />
SETTAGGIO FREQUENZA H (ALTA) O L (BASSA): L/H<br />
PROGRAMMI PRE-IMPOSTATI :P1~ P5<br />
- 11 -
COMINCIARE L’UTILIZZO<br />
1. Connettere la spina alla presa elettrica a muro e accendere la macchina con l’interruttore.<br />
In caso di inutilizzo per lungo tempo, spegnere l’interruttore;<br />
2. Scegliere il tempo, la frequenza, l’ampiezza H / L e poi premere La pedana comincerà<br />
a lavorare;<br />
3. Durante l’esercizio sarà possibile modificare il TEMPO e la FREQUENZA;<br />
4. Premere [ ■ ] per arrestare la pedana;<br />
5. Premendo il tasto “SWITCH” nella “CONSOLE ”, sarà possibile cominciare ad usare la “CONSOLE<br />
” per controllare la pedana. Premere nuovamente il tasto “SWITCH” per ricominciare ad utilizzare<br />
la “CONSOLE ” per controllare la macchina;<br />
6. Hold the L&R Heart Rate Contact at the same time, 5~10s later, the window will show your heart rate.<br />
PROGRAMMI<br />
Premendo il tasto “PROG”, sarà possibile scegliere uno dei programmi pre-impostati P1~P5.<br />
COME SPOSTARE LA MACCHINA<br />
Per spostare la macchina afferrare le due cinghie e trascinarla<br />
come mostrato nella figura.<br />
- 12 -
GUIDA ALLA SCELTA DEI<br />
PROGRAMMI PREIMPOSTATI<br />
TABELLA 1: ELENCO PROGRAMMI<br />
NR NOME ZONA RIPETIZIONI DESCRIZIONE<br />
1 Sculpting<br />
2 <strong>Power</strong> Max<br />
3<br />
4<br />
Massaggio<br />
Energy<br />
Drenaggio/<br />
Cellu-lyse<br />
5 Toning<br />
Gambe<br />
Addominali<br />
Glutei<br />
Pettorali e braccia<br />
Gambe<br />
Addominali<br />
Glutei<br />
Pettorali e braccia<br />
Gambe<br />
Addominali<br />
Glutei<br />
Pettorali e braccia<br />
Gambe<br />
Addominali<br />
Glutei<br />
Pettorali e braccia<br />
Gambe<br />
Addominali<br />
Glutei<br />
Pettorali e braccia<br />
- 13 -<br />
5<br />
4<br />
5<br />
3<br />
6<br />
5<br />
6<br />
4<br />
3<br />
3<br />
3<br />
3<br />
4<br />
4<br />
4<br />
4<br />
5<br />
4<br />
5<br />
3<br />
Definizione muscolare<br />
Potenziamento muscolare<br />
Benessere di base – Vascolarizzazione e<br />
attivazione<br />
Dimagrimento localizzato<br />
Circolazione, Anti-stress e Tonificazione<br />
NOTA: Per eseguire in modo corretto l’esercizio occorre scegliere UNA delle posizioni di lavoro suggerite<br />
nelle figure ed eseguire il programma prescelto secondo il proprio obiettivo di lavoro.<br />
Il programma va ripetuto uguale a se stesso per il numero di ripetute indicato nella tabella di cui sopra. Tra una<br />
ripetuta e l altra, va inserito un periodo di riposo di 60 secondi. Tale periodo può essere ridotto di 5 secondi dopo<br />
ogni ciclo di 2 settimane, ma non dovrà mai scendere sotto i 30 secondi.<br />
Ogni giorno si possono allenare zone del corpo diverse fra loro ma per ripetere il medesimo esercizio bisogna<br />
rispettare una pausa di almeno 36/48 ore
PERSONAL TRAINER: GUIDA ALLA SCELTA DEI<br />
PARAMETRI DA UTILIZZARE PER IL LAVORO LIBERO<br />
TABELLA 2: ELENCO SUGGERIMENTI ALLENAMENTO<br />
NR NOME ZONA DESCRIZIONE<br />
1 Welcome Approccio alla<br />
stimolazione muscolare<br />
2 Forza Basic Benessere di base –<br />
Vascolarizzazione e<br />
attivazione<br />
3 Drenaggio Gambe Circolazione<br />
Addominali<br />
Arti superiori<br />
4 Stretching Allungamento muscolare<br />
5 Massaggio Relax Gambe Anti-stress e Tonificazione<br />
Tronco<br />
Glutei<br />
Pettorali e braccia<br />
6 Cellu-lyse Gambe Dimagrimento localizzato<br />
Addominali<br />
Glutei<br />
Pettorali e braccia<br />
7 Sculpting Gambe Definizione muscolare<br />
Addominali<br />
Glutei<br />
Pettorali e braccia<br />
8 <strong>Power</strong> Max Gambe Potenziamento muscolare<br />
Addominali<br />
Glutei<br />
Pettorali e braccia<br />
9 Personal Programmazione libera<br />
NOTA: Per eseguire in modo corretto l’esercizio occorre scegliere UNA delle posizioni di lavoro suggerite e<br />
ripeterla per un numero di volte pari a quello indicato nella colonna “nr. fasi” della tabella 2.<br />
Es: nel programma cellu-lyse, zona gambe, occorre scegliere una fra le 2 posizioni di lavoro indicate e la si ripete<br />
4 volte.<br />
- 14 -
N<br />
R<br />
TABELLA 3: PROGRAMMI DI ALLENAMENTO<br />
NOME ZONA POSIZIONI<br />
LAVORO<br />
NR.<br />
FASI<br />
- 15 -<br />
T.<br />
LAVORO<br />
(sec)<br />
T.<br />
REC.<br />
(sec)<br />
FREQ.<br />
(Hz)<br />
1 Welcome A01, A03,<br />
A12<br />
4 30 30 35 L<br />
2 Forza Basic A02, A04,<br />
A05, A06,<br />
A11, A13<br />
6 30 30 40 H<br />
3 Drenaggio Gambe A01, A03,<br />
A12<br />
3 60 60 35 L<br />
Addominali A11, A12,<br />
A16<br />
3 60 60 35 L<br />
Arti superiori A06, A10 3 60 60 40 L<br />
4 Stretching B01, B02,<br />
B03, B04,<br />
B05, B06<br />
2 60 30 35 L<br />
5 Massaggio<br />
relax<br />
Gambe C01, C03 6 30 30 35 L<br />
Tronco D02, D03,<br />
D04<br />
6 30 30 35 L<br />
Glutei C04 6 30 30 35 L<br />
Pettorali e<br />
braccia<br />
C02, D01 6 30 30 35 L<br />
6 Cellu-lyse Gambe A01, A02 4 30 40 35 H<br />
Addominali A13, A14,<br />
A15<br />
4 30 40 35 L<br />
Glutei A03, A04 4 30 40 35 H<br />
Pettorali e<br />
braccia<br />
A14, A16 4 30 40 35 L<br />
7 Sculpting Gambe A02, A03,<br />
A05<br />
5 60 60 40 H<br />
Addominali A11, A13,<br />
A15<br />
5 60 60 40 H<br />
Glutei A03, A04 5 60 60 40 H<br />
Pettorali e A07, A08, 5 60 60 40 H<br />
braccia A09, A10<br />
8 <strong>Power</strong> Max Gambe A02, A03,<br />
A04, A05<br />
6 60 60 45 H<br />
Addominali A11, A13,<br />
A15<br />
6 60 60 45 H<br />
Glutei A03, A04 6 60 60 45 H<br />
Pettorali e A07, A08, 6 60 60 45 H<br />
braccia A09, A10<br />
9 Personal A SCELTA<br />
AMP.<br />
NOTA: L’ampiezza di oscillazione “high” corrisponde ad un allenamento più intenso rispetto a quello che si ha<br />
con l’ampiezza impostata “low”.
ISTRUZIONI ESERCIZI<br />
A/ Forza<br />
A01 Squat<br />
Stare in piedi sulla pedana con i piedi allineati alle spalle.<br />
Tenendo la schiena dritta e le ginocchia leggermente<br />
piegate, contrarre i muscoli delle gambe. Lavoreranno i<br />
quadricipiti, i glutei e la schiena.<br />
A 02 Squat profondo<br />
Stare in piedi sulla pedana con i talloni sollevati e i piedi<br />
allineati alle spalle. Tenendo le ginocchia a formare un<br />
angolo di <strong>100</strong> gradi rispetto ai piedi, piegare leggermente<br />
le gambe e contrarre i muscoli. Tenendo la schiena dritta,<br />
piegare il busto leggermente in avanti. Tale esercizio è<br />
mirato a rafforzare la schiena, i glutei e le gambe.<br />
A 03 Squat ampio<br />
Stare in piedi sulla pedana con le gambe divaricate e le<br />
punte dei piedi rivolte in fuori. Tenendo le ginocchia a<br />
formare un angolo di <strong>100</strong> gradi rispetto ai piedi, piegare<br />
leggermente le gambe. Lavoreranno i muscoli della<br />
schiena, i glutei, i quadricipiti e l’interno coscia.<br />
A 04 Allungo<br />
Posizionare un piede in mezzo alla pedana e appoggiare<br />
completamente a terra la pianta dell’altro piede. Tenendo<br />
la schiena dritta, contrarre i muscoli delle gambe.<br />
Lavoreranno i flessori della coscia, quadricipiti e glutei.<br />
- 16 -
A 05 Polpacci<br />
Stando in piedi al centro della pedana, sollevarsi sulla<br />
punta dei piedi. Tenendo la schiena dritta e gli addominali<br />
contratti, cominceranno a lavorare i polpacci. Per una<br />
variante dell’esercizio, provi a piegare le gambe a 90<br />
gradi.<br />
A 06 Tricipiti<br />
Dando le spalle alla pedana, appoggiare le mani sul bordo<br />
di essa, piegare leggermente le braccia e avvicinare il<br />
bacino alla piattaforma, contraendo entrambe le spalle<br />
contemporaneamente. Lavoreranno tricipiti e spalle. Per<br />
una variante dell’esercizio, ripetere il tutto con le gambe<br />
tese.<br />
A 07 Bicipiti<br />
Posizionare i piedi appena sotto la pedana e afferrare le<br />
cinghie piegando le braccia fino all’altezza del petto.<br />
Tenere le ginocchia leggermente piegate e schiena e polsi<br />
dritti, con il palmo delle mani verso l’alto. Lavoreranno<br />
spalle e bicipiti<br />
A 08 Trazione obliqua<br />
Stare in piedi di fronte alla pedana. Tirare le cinghie verso i<br />
propri fianchi e spingere il petto in fuori. Tirare indietro le<br />
braccia, sentirete la contrazione nella parte superiore della<br />
schiena e delle spalle.<br />
A 09 Sollevamento frontale<br />
Stare in piedi di fronte alla pedana con i piedi allineati alle<br />
spalle e alzare le braccia orizzontalmente di fronte a Voi.<br />
Tenendo la schiena dritta e l’addome contratto, tirare le<br />
cinghie verso l’alto. Per una variazione dell’esercizio,<br />
ripetere la stessa posizione stando in piedi sopra la<br />
pedana.<br />
- 17 -
A 10 Spalle<br />
Posizionarsi parallelamente di fronte alla pedana con le<br />
mani appoggiate alla piattaforma e allineate alle spalle, le<br />
gambe e le spalle dritte e la testa alzata. Con movimenti<br />
lenti e controllati eseguire dei piegamenti di braccia sulla<br />
pedana per poi tornare alla posizione di partenza. Questo<br />
esercizio è perfetto per le spalle e i bicipiti.<br />
A 11 Addominali inferiori<br />
Appoggiare le braccia alla pedana con i gomiti piegati e,<br />
tenendo la schiena dritta, alzare il sedere lentamente come<br />
se si volesse trascinare la pedana verso i piedi. Lavorerà la<br />
regione addominale. Per una variazione, effettuare lo stesso<br />
esercizio dalla posizione in ginocchio.<br />
A 12 Addominali dalla posizione eretta<br />
Stare in piedi sulla pedana con i piedi allineati alle spalle,<br />
aggrappandosi al manubrio all’altezza del petto. Tenendo la<br />
schiena dritta e le gambe leggermente piegate, spingere il<br />
tronco del bacino in avanti. Lavoreranno i muscoli<br />
addominali. Per una variazione dell’esercizio, piegare<br />
ulteriormente le gambe.<br />
A 13 Addominali laterali<br />
Con un piede dietro l’altro, appoggiare un gomito sulla<br />
pedana e stendersi di lato. Mantenendo la testa, il tronco e<br />
le gambe dritte, spingere le spalle in basso e<br />
simultaneamente contrarre il tronco del bacino. Lavoreranno<br />
gli addominali laterali. Per una variazione dell’esercizio,<br />
provare a spingere le anche in su contemporaneamente.<br />
A 14 Spinta in su<br />
Inginocchiarsi di fronte alla pedana, appoggiare le mani<br />
sulla piattaforma con i gomiti piegati e le dita rivolte verso<br />
l’interno. Tenendo la schiena dritta e gli addominali contratti,<br />
spingere sulla piattaforma. Lavoreranno i muscoli del petto,<br />
delle spalle e i tricipiti. Per una variazione dell’esercizio,<br />
provare a far forza sulle gambe e ad alzare le ginocchia.<br />
- 18 -
A 15 Addominali<br />
Posizionare un materassino tra la pedana e la schiena,<br />
sollevare le gambe e mettere le mani sulla nuca<br />
accertandosi di tenere i gomiti paralleli al pavimento. Alzare<br />
la parte superiore del tronco verso le gambe fino a sentire gli<br />
addominali contrarsi. Assicurarsi che la parte inferiore della<br />
schiena sia sempre in contatto con il materassino. Per una<br />
variazione dell’esercizio, appoggiare i piedi su uno step.<br />
A 16 Affondi<br />
Posizionare le mani sulla pedana alla stessa larghezza delle<br />
spalle. Tenendo i polsi e gli avambracci dritti, caricare<br />
dolcemente il peso del corpo sulle braccia. E’ molto<br />
importante tenere le anche dritte e le spalle basse. Con<br />
questo esercizio lavoreranno i muscoli delle braccia, le<br />
spalle e l’addome. E’ possibile eseguire lo stesso esercizio<br />
anche con le gambe tese.<br />
B/ STRETCHING<br />
B 01 Stretching flessori coscia<br />
Posizionarsi sulla pedana con il sedere in fuori. Tenendosi<br />
alla maniglia, piegare il busto in avanti il più possibile. Con<br />
questo esercizio si eseguirà dello stretching ai glutei e ai<br />
flessori della coscia.<br />
B 02 Stretching quadricipiti<br />
Appoggiare la gamba sulla pedana all’altezza della tibia<br />
assicurandosi che il piede rimanga fuori dalla piattaforma.<br />
Tenendo il torso e la schiena dritti, contrarre l’addome.<br />
Spingendo il bacino in fuori, lavoreranno i quadricipiti.<br />
B 03 Stretching polpaccio<br />
Posizionarsi sulla pedana su un fianco, con una gamba di<br />
fronte all’altra e i piedi rivolti in avanti. La gamba davanti<br />
deve essere leggermente piegata, la gamba dietro tesa.<br />
Appoggiare sulla piattaforma il tallone della gamba dietro e<br />
lavoreranno i polpacci. Per una variazione dell’esercizio,<br />
tenere la schiena dritta e spingere il bacino avanti.<br />
- 19 -
B 05 Stretching spalle<br />
Dare le spalle alla pedana e afferrare con la mano sinistra la<br />
cinghia tirandola a se fino all’altezza dei glutei. Posizionare<br />
la mano destra sulla testa ed effettuare una leggera trazione<br />
verso destra. Alternarsi sui due lati.<br />
B 06 Stretching pettorali<br />
Sedere a terra con la schiena verso la pedana e appoggiare<br />
le mani sui bordi. Spingendo le spalle in basso, si effettuerà<br />
dello stretching al petto e alle spalle.<br />
C/ MASSAGGIO<br />
C 01 Massaggio polpacci<br />
Distendersi frontalmente alla pedana con i polpacci<br />
appoggiati ad essa e i piedi rivolti al soffitto. A questo punto<br />
rilassatevi semplicemente.<br />
C 02 Massaggio braccia<br />
Distendersi su un fianco con il volto alla pedana e le gambe<br />
leggermente piegate. Appoggiare un braccio sulla pedana e<br />
rilassarsi.<br />
C 03 Massaggio adduttori<br />
Distendersi su un fianco con il volto alla pedana, piegare<br />
leggermente una gamba e appoggiarla alla pedana<br />
assicurandosi che il corpo non tocchi la pedana.<br />
- 20 -
C 04 Massaggio adduttori<br />
Distendersi su un fianco sopra la pedana con le gambe<br />
piegate fino all’altezza delle anche. Utilizzare il gomito per<br />
sostenere il corpo. La schiena deve essere dritta. Il<br />
massaggio dovrebbe raggiungere le gambe e le anche.<br />
D/ RILASSAMENTO<br />
D 01 Rilassamento spalle e collo<br />
Inginocchiarsi di fronte alla pedana con le braccia allungate<br />
di fronte al corpo. Tenere collo e schiena dritti. Ora tirare<br />
indietro il tronco del corpo mentre rilassate la braccia sulla<br />
piattaforma. Questo esercizio dovrebbe servire per il<br />
rilassamento di collo e spalle.<br />
D 02 Rilassamento schiena<br />
Sedere a terra dando le spalle alla pedana con le gambe<br />
tese. Mettere il materassino tra la schiena e la pedana.<br />
Rilassarsi durante la vibrazione, indirizzata principalmente<br />
alla parte inferiore della schiena. Per una variazione<br />
dell’esercizio, piegare le gambe spingendo il corpo un po’<br />
più forte contro la pedana.<br />
D 03 Rilassamento del tronco<br />
Sedere dando la schiena alla pedana con le gambe piegate.<br />
Utilizzando i gomiti per bilanciamento, sollevare il tronco<br />
oltre la pedana. Tenendo il collo e la schiena dritti, tirare<br />
indietro le spalle. La vibrazione rilasserà il tronco.<br />
D 04 Rilassamento schiena<br />
Sedere al centro della pedana posizionando il materassino<br />
sotto il sedere e tenendo le gambe divaricate. Rilassate il<br />
busto, una piacevole vibrazione rilasserà la schiena, le<br />
anche e le cosce.<br />
- 21 -
ESPLOSO PARTI<br />
10<br />
9<br />
2<br />
6<br />
44 47<br />
45<br />
35<br />
16<br />
14<br />
17<br />
26 46 48 34<br />
23<br />
13<br />
45<br />
35<br />
27<br />
42<br />
14<br />
45 35<br />
40 21<br />
8<br />
15<br />
- 22 -<br />
52<br />
55 56 57<br />
40<br />
33<br />
37<br />
5<br />
6 44 47<br />
59<br />
53<br />
58<br />
28<br />
45 35<br />
29<br />
51 49 50<br />
11<br />
18<br />
4<br />
47 58<br />
36<br />
10<br />
8<br />
20<br />
19<br />
38<br />
22<br />
1<br />
43 46<br />
48<br />
7<br />
39<br />
25<br />
41<br />
24<br />
12<br />
22<br />
3<br />
54<br />
36<br />
32<br />
30<br />
31
LISTA PARTI<br />
ART. DESCRIZIONE Q.TA’ ART. DESCRIZIONE Q.TA’<br />
1 Piatto pedana 1 30 Interruttore 1<br />
2 Colonna 1 31 Fusibile 1<br />
3 Base colonna 1 32 Presa 1<br />
4 Manubrio 1 33 Sensore battiti 2<br />
5<br />
Supporto fissaggio<br />
manubrio<br />
1 34 Bullone esagonale M10X45 4<br />
6 Sede cinghie 2 35 Bullone M10X15 8<br />
7 Placca interruttori 1 36 Bullone M8x25 4<br />
8 Gomma manubrio 1 37 Vite M12 1<br />
9 Piedini 6 38 Vite auto-filettanteST4.0X20 2<br />
10 Maniglia cinghie 2 39 Vite auto-filettanteST3.8X16 14<br />
11 Copertura manubrio 2 40 Vite auto-filettanteST3.8X8 13<br />
12 Chiusura colonna 1 41 Vite auto-filettanteST3.8X10 4<br />
13 Chiusura motore 2 42 Vite auto-filettanteST3.0X10 2<br />
14 Cuscinetti pedana 4 43 Vite sicurezza M10 4<br />
15 Cuscinetti struttura 4 44 Vite sicurezza M8 4<br />
16 Cuscinetto antiscivolo 1 45 Rondella Φ10.5XΦ30 8<br />
17 Tappetino 1 46 Rondella Φ10 8<br />
18 Cover protezione 1 47 Rondella Φ8 12<br />
19 Anello gomma 2 48 Rondella Φ10 4<br />
20 Clip cavo 9 49 Rondella Φ12 1<br />
21 Gomma 1 50 Rondella Φ12 1<br />
22 Gomma 1 51 Cuscinetti 1<br />
23 Gomma 1 52 Gomma 1<br />
24 Console I 1 53 Gomma 1<br />
25 Console II 1 54 Bronzina 1<br />
26 Motore AC 1 56 Vite autofilettanteST3.8X10 4<br />
27 Trasduttore 1 57 Corda 4<br />
28 Filtro 1 58 Rondella Φ8 8<br />
29 Induttore 1 59 Bullone M8x16 8<br />
- 23 -
DIAGRAMMA CIRCUITI<br />
ART. DESCRIZIONE Q.TA’ ART. DESCRIZIONE Q.TA’ ART. DESCRIZIONE Q.TA’<br />
24 ConsoleⅠ 1 31 Fusibile 1 63 Cavo accensione 1 1<br />
25 Console Ⅱ 1 32 Cavo 1 64 Cavo accensione 2 1<br />
26 Motore 2 33 Sensore battiti 2 65 Cavo accensione 1 2<br />
27 Trasduttore 1 54 Clip 1 66 Cavo accensione 2 1<br />
28 Filtro 1 60 Cavo controllo 1 1<br />
29 Induttore 1 61 Cavo controllo 2 1<br />
30 Interruttore 1 62 Cavo controllo 3 1<br />
- 24 -
<strong>My</strong> <strong>Power</strong> <strong>XL</strong> <strong>100</strong> USER<br />
MANUAL<br />
- 25 -
TABLE OF CONTENTS<br />
SAFETY PRECAUTIONS ———————————————————————————1<br />
FEATURES —————————————————————————————————2<br />
ASSEMBLY PART LIST ———————————————————————————3<br />
ASSEMBLY—————————————————————————————————4-6<br />
CONSOLE OPERATION ——————————————————————————— 7-8<br />
EXERCISE INSTRUCTIONS —————————————————————————9-14<br />
EXPLODED DRAWING ————————————————————————————15<br />
PARTS LIST —————————————————————————————————16<br />
CIRCUIT DIAGRAM —————————————————————————————17<br />
- 26 -
SAFETY PRECAUTIONS<br />
Thank you for your purchasing our products. Even though we go to great<br />
efforts to ensure the quality of each product, occasional errors, and /or<br />
omissions do occur. In any event should you find this product to be<br />
defective or missing a part please contact your place of purchase.<br />
Be sure to read the entire manual before assembly and operation. Also, please note<br />
following safety precautions:<br />
1. Before beginning any exercise program, consult your personal physician. If you<br />
experience any pain or tightness in your chest, irregular heartbeats, shortness of breath,<br />
faintness or other unusual discomfort while exercising, stop and consult your physician<br />
before continuing.<br />
2. In any event should you find this product to be defective please stop exercise and<br />
contact your place of purchase.<br />
3. Do not insert any object into any openings.<br />
4. No person weighing over 150 Kilograms should use this product.<br />
5. Only one person at a time should use this equipment.<br />
6. Always use this power plate on a clear and level surface. Do not use outdoors or near<br />
water.<br />
7. Leave the machine till it stops.<br />
8. Keep children and pets away from this equipment at all times.<br />
9. Do not use the machine, when you use aerobic equipment or spray.<br />
10. Inspect your machine prior to exercise to ensure that all nuts and bolts are fully<br />
tightened.<br />
11. Turn off the power switch after use.<br />
12. Most exercise equipment is not recommended for small children. Children should keep<br />
away from the power plate while exercising.<br />
CONTRAINDICATIONS:<br />
• Pregnancy<br />
• Acute thrombosis conditions<br />
• Cardio- vascular disease<br />
• Fresh wounds resulting from an operation or surgical intervention<br />
• Hip- and knee replacements<br />
• Acute hernia, discopathy, spondylolysis<br />
• Diabetes<br />
• Epilepsy<br />
• Heavy migraine<br />
• Wearing a pacemaker<br />
• Wearing recently fitted i.u. coils, metal pins, bolts or plates<br />
• Tumour<br />
- 27 -
FEATURES<br />
Straps<br />
Handlebar<br />
Heart Rate Contact<br />
Plate<br />
Console Ⅱ<br />
Cushion<br />
Console Ⅰ<br />
- 28 -<br />
Column
ASSEMBLY PART LIST<br />
HARDWARE PACK<br />
M8X25 Bolt(4)<br />
HARDWARE PACK<br />
6#<br />
13 and 16<br />
10 Washer(4)<br />
10 spring washer(4)<br />
- 29 -<br />
M10X70 Bolt(4)
Assembly Steps<br />
STEP 1- Install the Column to the Base Frame<br />
A/ As shown, Install the column to the base frame according to the steps.<br />
Base Frame<br />
- 30 -<br />
Column<br />
1<br />
2
B/ Attach the Column to the Base Frame using four M10 bolts, four Φ10 spring Washers and four Φ10<br />
Washers. Tighten it securely with wrench and then connect the electronic wires.<br />
Base Frame<br />
- 31 -<br />
Column<br />
M10 Bolt<br />
Φ10 Washer<br />
Φ10 Spring Washer
STEP 2- Install the handle bar to the column<br />
A/ Connect the pulse sensor wires and then make sure the holes alignment.<br />
B/ Install the handle bar to the column using four M8X25 bolts.<br />
Handle Bar<br />
- 32 -<br />
M8X25 Bolt
CONSOLE OPERATION<br />
CONSOLE:<br />
TIME:30S、60S、90S、180S<br />
FREQUENCY SET:35Hz、40Hz、45Hz、50Hz<br />
COUNT DOWN:180S~0S<br />
L FREQ / H FREQ SET:L/H<br />
PRE-SET PROGRAMS:P1~ P5<br />
- 33 -
GETTING STARTED<br />
1. Plug the power cord into the wall power outlet and turn on the power switch.<br />
2. Choose the TIME, the FREQUENCY and the H / L level then press the [ ], the machine will start.<br />
3. During the exercise, you can change the TIME,FREQUENCY and the H/L level.<br />
4. Press the [ ■ ] key the machine will stop.<br />
5. Press the “SWITCH” Key on the “CONSOLE Ⅱ”, you can use the “CONSOLE Ⅱ” to control the<br />
machine, press the “SWITCH” Key again, you can use the “CONSOLE Ⅰ” to control the machine.<br />
6. Hold the L&R Heart Rate Contact at the same time, 5~10s later, the window will show your heart rate.<br />
7. Press the [ ] key the machine will pause, then press the [ ] to restart the machine.<br />
PROGRAM<br />
Press the “PROG” Key, you can choose P1~P5 preset program and user program.<br />
USER PROGRAM<br />
When you get into the user program the window will show “USER”, then press the “USER PROG” key,<br />
the window will show the time, press the “Sec ∧ ∨” to set the time. Then press the “USER PROG” key<br />
again to enter the first level (there is totally 24 levels), the window will show the frequency, press the “Hz<br />
∧ ∨” to set the frequency, press the “USER PROG” to enter the next level. At last, press the [ ] to<br />
start the machine.<br />
MOVING MACHINE<br />
Hold both strap handle and then pull the machine as shown.<br />
- 34 -
EXERCISE INSTRUCTIONS<br />
A/ Strength<br />
A01 SQUAT<br />
Stand on the Plate with feet shoulder width apart. Keeping the<br />
back straight and knees slightly bent, gently squeeze the leg<br />
muscles. You should feel tension in your quadriceps, buttocks and<br />
back.<br />
A 02 Deep Squat<br />
Stand on the Plate with feet flat and shoulder width apart. Keeping<br />
the knees directly above the feet at a <strong>100</strong> degree angle, gently<br />
bend the legs and squeeze the leg muscles. Keeping the back<br />
straight, bend the upper body forward. This exercise aims to<br />
strengthen the back, buttocks and legs.<br />
A 03 Wide Stance Squat<br />
Stand on the Plate with legs wide apart and toes turned outward.<br />
Keeping the knees directly above the feet at a <strong>100</strong> degree angle,<br />
gently bend the legs. You should feel tension in the back, buttocks,<br />
quadriceps and inner thigh area.<br />
A 04 Lunge<br />
Place one foot in the middle of the Plate and step back with the<br />
other planting it firmly on the ground behind. Keeping the back<br />
straight and the knees directly above the toes, squeeze the leg<br />
muscles. You should feel tension in the hamstrings, quadriceps<br />
and buttocks.<br />
A 05 Calves<br />
Standing in the centre of the Plate, rise up on to the balls of the<br />
feet. Keeping your back straight and abdomen tight, you should<br />
begin to feel tension in your calf muscles. To add variation to the<br />
exercise, try bending your knees to 90 degrees.<br />
- 35 -
A 06 Triceps Dip<br />
Facing away from the Plate, firmly grip the edge and push<br />
upwards. Now bend the arms slightly and lower the hips toward the<br />
plate, squeezing the shoulder blades together. You should feel the<br />
tension in your upper arms and shoulders. For variation, repeat the<br />
exercise with your legs straight.<br />
A 07 Biceps Curl<br />
Position your toes slightly under the edge of the unit for support<br />
and hold the straps tightly at waist height. Knees should be slightly<br />
bent, back and wrists kept straight. Pull your arms upward. You<br />
should feel tension in the shoulders and biceps.<br />
A 08 Bent Over Pull<br />
Stand in front of the Plate. Pull the belts upward on the side of your<br />
body. Push your chest out and shoulder-blades together. Pull your<br />
arms backwards in a smooth motion and you should feel tension in<br />
your upper back and shoulder area.<br />
A 09 Front Raise<br />
Stand in front of the Plate, legs shoulder width apart and raise both<br />
arms horizontally in front of your torso. Keping your back straight<br />
and abdomen strong, pull the straps upward. For variation, perform<br />
the same exercise from a standing position on the Plate.<br />
A 10 Shoulder Press<br />
Position the body in a horizontal line parallel with the Plate. Hands<br />
should be shoulder width apart, legs and back straight, head<br />
raised. Using slow and controlled movements push your slightly<br />
bent arms toward the Plate, then return to the starting position.<br />
This exercise is perfect for shoulders and upper arms.<br />
- 36 -
A 11 Lower Abdominals<br />
Brace yourself on your elbows and hold onto the front edge of the<br />
Plate. Now, with a straight back, pull your buttocks up slowly as if you<br />
wanted to pull the Plate toward your feet. You should feel tension in<br />
your abdominal region. To vary the routine, perform the same<br />
exercise from a kneeling position.<br />
A 12 Standing Abdominals<br />
Stand in the center of the Plate, feet shoulder width apart, holding the<br />
railing at chest height. Keeping the back straight and legs slightly<br />
bent, push your upper torso down. Immediately you'll begin to feel<br />
tension in your abdominal muscles. To vary the exercise simply bend<br />
your arms further.<br />
A 13 Lateral Abdominals<br />
With one foot directly behind the other, place one elbow on the Plate<br />
and lean sideways. Keeping your head, torso and legs straight, push<br />
your shoulders down and tighten your torso simultaneously. This<br />
exercise works the lateral abdomen. To add variation try pushing<br />
your hips upward at the same time!<br />
A 14 Push Up<br />
Kneel in front of the Plate, placing hands on the plate shoulder width<br />
apart with fingers facing inward. With a straight back and strong<br />
abdomen, push off the Plate platform. This exercise will strengthen<br />
chest, shoulder muscles and triceps. For variation, try straightening<br />
your legs and lifting your knees.<br />
A 15 Abdominal Crunch<br />
Place a pillow under the small of your back, raise your legs and place<br />
your hands under your head for support making sure to keep your<br />
elbows parallel with the floor. Crunch your upper body toward your<br />
legs and feel the tension in the abdominals. Ensure your buttocks<br />
and lower back do not lose contact with the mat. To vary the routine,<br />
place your feet on the step.<br />
- 37 -
A 16 Lattisimus Dip<br />
Place the handles on the mat shoulder width apart. Keeping wrists<br />
and forearms straight, gently push off the handles. It is important to<br />
keep the hips straight and to push the shoulders downward. This<br />
exercise promotes muscular arms, shoulders and abdomen. Try<br />
doing the same exercise but this time keep your legs straight.<br />
B/ STRETCH<br />
B 01 Hamstring Stretch<br />
Position your body in a wide stance on the Plate, buttocks pushed<br />
backwards. Holding the handles, let your upper torso drop as far<br />
forward as possible. This exercise will stretch the buttock and<br />
hamstring muscle groups. Alternatively, stand up straight and let<br />
your upper torso and arms drop forward.<br />
B 02 Quadriceps Stretch<br />
Place one shin on the Plate ensuring the foot remains off the Plate!<br />
Keeping the upper body and back straight, tense your stomach. By<br />
pushing your pelvis forward you'll be stretching your quadriceps.<br />
Vary this exercise by pulling the rear leg forward.<br />
B 03 Calf Stretch<br />
Stand sideways on the Plate, with one leg in front of the other and<br />
toes facing forward. The front leg should be slightly bent, the rear leg<br />
is straight. Push the heel of the rear leg down and you should feel<br />
tension in your calves. To vary this exercise, keep your back straight<br />
and push your pelvis forward.<br />
B 04 Adductor Stretch<br />
Stand sideways on the Plate with your feet near the support column.<br />
Place the outside foot on the floor close to the plate so legs are<br />
apart. Bend the outside leg while keeping the other leg straight.<br />
Keeping the upper body straight, lower your buttocks to the floor.<br />
This exercise will stretch the insides of your thighs. Repeat on the<br />
opposite side.<br />
- 38 -
B 05 Shoulder Stretch<br />
Stand with your back to the Plate and use your left hand to pull the<br />
strap up to your buttocks. Your right hand placed on your head and<br />
pulling it slightly to the right. This shoulder stretch works best by<br />
alternating sides.<br />
B 06 Pectoral Stretch<br />
Sit with your back to the Plate. Now hold the Plate behind your back<br />
so that your fingers grip the edges. By pushing your shoulders down<br />
you'll stretch your chest and shoulders. You may also gently pull the<br />
straps on either side for optimum results.<br />
C/ MASSAGE<br />
C 01 Calf Massage<br />
Lie in front of the unit with both calves resting on the Plate, toes<br />
pointing toward the ceiling. The rest is easy, simply relax and enjoy<br />
an invigorating calf massage.<br />
C 02 Upper Arm Massage<br />
Lie sideways facing the unit, with legs slightly bent. Ensure the<br />
frontal mat extends slightly over the edge. Rest one arm on the Plate<br />
and relax.<br />
C 03 Adductor Massage<br />
Lie on your side facing the Plate. Slightly bend one leg and rest it on<br />
the Plate. Making sure your body does not touch the Plate. Now<br />
repeat the massage with the other leg.<br />
- 39 -
C 04 Abductor Massage<br />
Lie sideways on the Plate, with your legs pulled up to your hips. Use<br />
your elbow to support your upper body. Your back must be straight.<br />
You should feel the massage on the outside of your leg and hip.<br />
Repeat the same massage on your other side.<br />
D/ RELAXATION<br />
D 01 Shoulder & Neck Relaxer<br />
Kneel down in front of the Plate with your arms outstretched. Keep<br />
your back and neck straight. Now pull your upper body back while<br />
resting your arms on the plate. This exercise will relax your neck and<br />
shoulder area.<br />
D 02 Lower Back Relaxer<br />
Sit on the floor facing away from the Plate with your legs apart.<br />
Place the mat between your body and the Plate and hold the edge's<br />
for support. Relax during the vibration, targeted primarily in the lower<br />
back. As an alternative, angle your legs and push your body harder<br />
against the Plate.<br />
D 03 Upper Body Relaxer<br />
Sit facing away from the Plate, with your legs bent. Using your<br />
elbows for balance, raise your upper body off the Plate. Keeping<br />
your neck and back straight, pull your shoulders back. The vibration<br />
will relax your upper body.<br />
D 04 Back Relaxer<br />
Sit in the center of the Plate placing the cushion under your buttocks<br />
with legs apart. Allow your upper body to relax forward. You should<br />
feel a pleasant vibration relaxing the back, hip and thigh areas.<br />
- 40 -
EXPLODED DRAWING<br />
10<br />
9<br />
2<br />
6<br />
44 47<br />
45<br />
35<br />
16<br />
14<br />
17<br />
26 46 48 34<br />
23<br />
13<br />
45<br />
35<br />
27<br />
42<br />
14<br />
45 35<br />
40 21<br />
8<br />
15<br />
- 41 -<br />
52<br />
55 56 57<br />
40<br />
33<br />
37<br />
5<br />
6 44 47<br />
59<br />
53<br />
58<br />
28<br />
45 35<br />
29<br />
51 49 50<br />
11<br />
18<br />
4<br />
47 58<br />
36<br />
10<br />
8<br />
20<br />
19<br />
38<br />
22<br />
1<br />
43 46<br />
48<br />
7<br />
39<br />
25<br />
41<br />
24<br />
12<br />
22<br />
3<br />
54<br />
36<br />
32<br />
30<br />
31
PART LIST<br />
ITEM DESCRIPTION QTY ITEM DESCRIPTION QTY<br />
1 Base Frame 1 32 <strong>Power</strong> Cord 1<br />
2 Plate 1 33 Heart Rate Contact 2<br />
3 Column 1 34 M10X45 Hexagon Head Bolt 8<br />
4 Handle Bar 1 35 M10X15 Bolt 8<br />
5 Handle Fixed Bracket 1 36 M8x25 Bolt 4<br />
6 Strap Seat 2 37 ST4.0X20 self-Tapping screw 2<br />
7 <strong>Power</strong> Board 1 38 ST3.8X16 self-Tapping screw 5<br />
8 Cushion 5 39 ST3.8X16 self-Tapping screw 4<br />
9 Rope 4 40 ST3.8X8 self-Tapping screw 13<br />
10 Handle 2 41 ST3.8X10 self-Tapping screw 4<br />
11 Handle Bar Cover 2 42 Foam 1<br />
12 Column Mat 1 43 M10x70 Hexagon Head Bolt 4<br />
13 Motor Mat 4 44 M8 Locknut 4<br />
14 Plate Cushion 4 45 Φ10.5XΦ30 Washer 8<br />
15 Frame Cushion 4 46 Φ10 Washer 12<br />
16 Plate Antiskid Cushion 1 47 Φ8 Washer 4<br />
17 Mat 1 48 Φ10 Spring Washer 12<br />
18 Handle Bar Foam 1 49 Φ12 Spring Washer 1<br />
19 Cushion 1 50 Φ12 Washer 1<br />
20 Protect Ring 1 51 M12 Nut 1<br />
21 Wire Clip 9 52 Foam 1<br />
22 Foam 2 53 Φ8 Spring Washer 4<br />
23 Foam 1 54 Clip 1<br />
24 Console Ⅰ 1 55 M5x10 Bolt 4<br />
25 Console Ⅱ 1 56 Φ5 Washer 4<br />
26 AC Motor 2 57 Φ5 Spring Washer 4<br />
27 Transducer 1 58 M8x15 Bolt 8<br />
28 Filter 1 59 Φ8.5×Φ24×2 Washer 4<br />
29 Inductor 1<br />
30 Switch 1<br />
31 Fuse 1<br />
- 42 -
CIRCUIT DIAGRAM<br />
ITEM DESCRIPTION QTY ITEM DESCRIPTION QTY ITEM DESCRIPTION QTY<br />
24 ConsoleⅠ 1 31 Fuse 1 63 <strong>Power</strong> wire 1 1<br />
25 Console Ⅱ 1 32 <strong>Power</strong> cord 1 64 <strong>Power</strong> wire 2 1<br />
26 Motor 2 33 Heart Rate Contact 2 65 Pulse wire 1 2<br />
27 Transducer 1 54 Clip 1 66 Pulse wire 2 1<br />
28 Filter 1 60 Control wire 1 1<br />
29 Inductor 1 61 Control wire 2 1<br />
30 <strong>Power</strong> Switch 1 62 Control wire 3 1<br />
- 43 -
GLOBUS ITALIA S.R.L.<br />
www.globusitalia.com<br />
e-mail:info@globusitalia.com<br />
tel. 04387933<br />
fax. 0438793363<br />
- 44 -