Instrucciones de Manejo | PDF - Ansmann
Instrucciones de Manejo | PDF - Ansmann
Instrucciones de Manejo | PDF - Ansmann

Create successful ePaper yourself
Turn your PDF publications into a flip-book with our unique Google optimized e-Paper software.
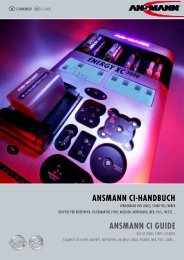
EnErgy xc 3000<br />
CHARGE<br />
Battery will be charged (battery icon is filled up from bottom<br />
to top); when the battery is fully charged, the charged<br />
capacity will be shown in the LCD display (3)<br />
DISCHARGE<br />
Battery will be discharged (battery icon is emptied from top<br />
to bottom); when the battery is discharged, the discharged<br />
capacity will be shown in the LCD display (3)<br />
BATTERY-TEST<br />
Battery will be charged, discharged and charged; when the<br />
battery is fully charged, the discharged capacity will be shown<br />
in the LCD display (3)<br />
CYCLE<br />
Battery will be charged and discharged with the adjusted<br />
number of cycles (1-10); the pre-adjustment of cycles is 3<br />
but by pushing the button ◂ (6), the number of cycles can<br />
be reduced and by pushing the button ▸ (7), the number<br />
of cycles can be increased. After the last cycle, the battery<br />
will be fully charged and the last discharged capacity will be<br />
shown in the LCD display (3)<br />
Description of the LcD display:<br />
The number “1…8” or battery type “9V” or “Li-Ion” above<br />
the battery icon indicates which battery currently is selected.<br />
The display (3) indicated value always refers to the currently<br />
selected battery. By pushing the button ◂ (6), the previous<br />
battery or by pushing the button ▸ (7) the next battery can<br />
be selected. After choosing the respective battery, it can be<br />
selected by pushing the “OK” (5) button. Then the icon of the<br />
selected battery and the currently indicated value in the LCD<br />
display (3) will flash. By pushing the button ◂ (6) or ▸ (7)<br />
another parameter can be indicated. The following parameters<br />
can be selected:<br />
VOLTAGE Indication of the current battery voltage in V<br />
CURRENT Indication of the current charge-/discharge current in mA<br />
CAPACITY Indication of the current charged/discharged capacity in mAh<br />
TIME Elapsed time of the current process<br />
While a charge program is running, always the VOLTAGE of<br />
the selected battery is indicated. When the charge program<br />
for one battery ends, the indication switches automatically<br />
in the view of this battery and shows the CAPACITY in the LCD<br />
display (3). Another battery can be selected at any time by<br />
pushing the button ◂ (6) or ▸ (7).<br />
Additional information<br />
The charger is cooled by built-in fans. The fans run when at<br />
least one round cell is charged or discharged. It is normal that<br />
batteries may become warm during charging. After charging<br />
of round cells and 9V E-Blocks is complete, the charger<br />
switches automatically to trickle charge.<br />
BATTEry TESTEr OPErATIOn<br />
Once the charger is connected to mains, the battery tester is<br />
ready for use. It is possible to charge rechargeable batteries<br />
in the charger and to test batteries or rechargeable batteries<br />
at the same time.<br />
How to make measurements:<br />
In the front of the charger is the test pin (1), which is only<br />
nee<strong>de</strong>d for testing of round cells.<br />
1. Select the appropriate test terminal for the battery un<strong>de</strong>r<br />
test (see picture A).<br />
2. Place the battery on the corresponding test terminal,<br />
paying attention to the polarity (both contacts must be<br />
connected). When checking round cells, the test pin (1)<br />
always has to be connected to the negative pole of the<br />
battery!<br />
3. After both poles of a battery are contacted, in the display<br />
(4) appears "CALC" (for about 2 seconds). Then the capacity<br />
of the battery will be shown in 10% steps for approx.<br />
2 seconds and for further 2 seconds the voltage of the<br />
battery will be shown. As long as the battery is contacted,<br />
the display changes between capacity and voltage (see<br />
picture D).<br />
Make sure that the contacts of the test terminals and the<br />
contacts of the batteries are clean. With a new battery it is<br />
possible that the full capacity may not be shown. The battery<br />
needs to “wake up”. In this case please repeat the test again.<br />
EnVIrOnMEnTAL cOMMEnTS<br />
Do not dispose of the <strong>de</strong>vice in the normal household waste.<br />
Please return it to your <strong>de</strong>aler or to your nearest recycling<br />
centre or collection point. Please recycle all packing materials<br />
for the sake of the environment.<br />
cArE & MAInTEnAncE<br />
To make sure that the charger works properly, please<br />
keep the contacts in the charging slots free from dust or<br />
contamination. To clean the unit, disconnect it from the mains<br />
and use only a dry cloth. Repair may only be un<strong>de</strong>rtaken by<br />
competent authorised <strong>de</strong>alers!<br />
TEcHnIcAL DATA<br />
Input voltage: 100-240V AC 50-60Hz (power supply)<br />
Output voltage: 8x 1.45V DC; 2x 10.15V DC; 1x 3.6-7.4V DC<br />
(charger)