importanti informazioni per la sicurezza simboli indice - E-milione E ...
importanti informazioni per la sicurezza simboli indice - E-milione E ...
importanti informazioni per la sicurezza simboli indice - E-milione E ...
You also want an ePaper? Increase the reach of your titles
YUMPU automatically turns print PDFs into web optimized ePapers that Google loves.
INDICE<br />
SIMBolI. . . . . . . . . . . . . . . . . . . . . . . . . . . . . . . . . . . . . . . . . . . . . . . . . . . . . . . . . . . . . . . . . . . . . . . . . . . . . . . . . . . . . . . . . . . . . . . . .1<br />
IMPoRtantI.InFoRMaZIonI.PER.<strong>la</strong>.SICUREZZa . . . . . . . . . . . . . . . . . . . . . . . . . . . . . . . . . . . . . . . . . . . . . . . . . . . . . . . .1<br />
ElEnCo.DEI.CoMPonEntI . . . . . . . . . . . . . . . . . . . . . . . . . . . . . . . . . . . . . . . . . . . . . . . . . . . . . . . . . . . . . . . . . . . . . . . . . . . . . .4<br />
IStRUZIonI.PER.l’USo. . . . . . . . . . . . . . . . . . . . . . . . . . . . . . . . . . . . . . . . . . . . . . . . . . . . . . . . . . . . . . . . . . . . . . . . . . . . . . . . . . .5<br />
PUlIZIa.E.ManUtEnZIonE. . . . . . . . . . . . . . . . . . . . . . . . . . . . . . . . . . . . . . . . . . . . . . . . . . . . . . . . . . . . . . . . . . . . . . . . . . . . . .7<br />
GaRanZIa . . . . . . . . . . . . . . . . . . . . . . . . . . . . . . . . . . . . . . . . . . . . . . . . . . . . . . . . . . . . . . . . . . . . . . . . . . . . . . . . . . . . . . . . . . . . . .8<br />
SPECIFIChE.tECnIChE. . . . . . . . . . . . . . . . . . . . . . . . . . . . . . . . . . . . . . . . . . . . . . . . . . . . . . . . . . . . . . . . . . . . . . . . . . . . . . . . . . .8<br />
SIMBOLI<br />
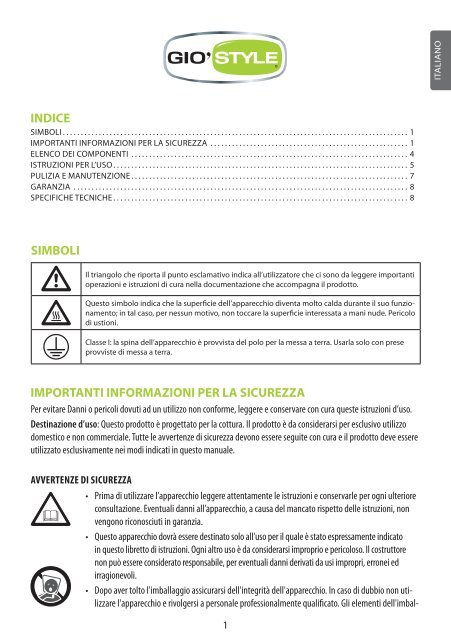
Il.triangolo.che.riporta.il.punto.esc<strong>la</strong>mativo.indica.all’utilizzatore.che.ci.sono.da.leggere.<strong>importanti</strong>.<br />
o<strong>per</strong>azioni.e.istruzioni.di.cura.nel<strong>la</strong>.documentazione.che.accompagna.il.prodotto .<br />
Questo.simbolo.indica.che.<strong>la</strong>.su<strong>per</strong>ficie.dell’apparecchio.diventa.molto.calda.durante.il.suo.funzionamento;.in.tal.caso,.<strong>per</strong>.nessun.motivo,.non.toccare.<strong>la</strong>.su<strong>per</strong>ficie.interessata.a.mani.nude<br />
..Pericolo.<br />
di.ustioni .<br />
C<strong>la</strong>sse.I:.<strong>la</strong>.spina.dell’apparecchio.è.provvista.del.polo.<strong>per</strong>.<strong>la</strong>.messa.a.terra ..Usar<strong>la</strong>.solo.con.prese.<br />
provviste.di.messa.a.terra .<br />
IMPORTANTI INFORMAZIONI PER LA SICUREZZA<br />
Per evitare Danni o <strong>per</strong>icoli dovuti ad un utilizzo non conforme, leggere e conservare con cura queste istruzioni d’uso.<br />
Destinazione d’uso: Questo prodotto è progettato <strong>per</strong> <strong>la</strong> cottura. Il prodotto è da considerarsi <strong>per</strong> esclusivo utilizzo<br />
domestico e non commerciale. Tutte le avvertenze di <strong>sicurezza</strong> devono essere seguite con cura e il prodotto deve essere<br />
utilizzato esclusivamente nei modi indicati in questo manuale.<br />
Avvertenze di sicurezzA<br />
• Prima di utilizzare l’apparecchio leggere attentamente le istruzioni e conservarle <strong>per</strong> ogni ulteriore<br />
consultazione. Eventuali danni all’apparecchio, a causa del mancato rispetto delle istruzioni, non<br />
vengono riconosciuti in garanzia.<br />
• Questo apparecchio dovrà essere destinato solo all'uso <strong>per</strong> il quale è stato espressamente indicato<br />
in questo libretto di istruzioni. Ogni altro uso è da considerarsi improprio e <strong>per</strong>icoloso. Il costruttore<br />
non può essere considerato responsabile, <strong>per</strong> eventuali danni derivati da usi impropri, erronei ed<br />
irragionevoli.<br />
• Dopo aver tolto l'imbal<strong>la</strong>ggio assicurarsi dell'integrità dell'apparecchio. In caso di dubbio non utilizzare<br />
l'apparecchio e rivolgersi a <strong>per</strong>sonale professionalmente qualificato. Gli elementi dell'imbal-<br />
1<br />
ItalIano
ItalIano<br />
<strong>la</strong>ggio (sacchetti in p<strong>la</strong>stica, polistirolo espanso, chiodi ecc.) non devono essere <strong>la</strong>sciati al<strong>la</strong> portata<br />
dei bambini in quanto potenziali fonti di <strong>per</strong>icolo.<br />
• Si raccomanda di non gettare nei rifiuti domestici i materiali costituenti l’imbal<strong>la</strong>ggio, ma<br />
consegnarli negli appositi centri di raccolta o smaltimento dei rifiuti, chiedendo eventualmente<br />
<strong>informazioni</strong> al gestore del<strong>la</strong> nettezza urbana del proprio comune di residenza.<br />
• L'instal<strong>la</strong>zione deve essere effettuata secondo le istruzioni del costruttore. Una errata instal<strong>la</strong>zione<br />
può causare danni a <strong>per</strong>sone, animali o cose, nei confronti dei quali il costruttore non può essere<br />
considerato responsabile.<br />
• Prima di collegare l'apparecchio accertarsi che i dati di targa siano compatibili con quelli del<strong>la</strong><br />
alimentazione elettrica.<br />
• Questo apparecchio è stato concepito <strong>per</strong> un solo uso domestico.<br />
Non utilizzare <strong>per</strong> USO COMMERCIALE.<br />
• In caso di incompatibilità tra <strong>la</strong> presa e <strong>la</strong> spina dell'apparecchio fare sostituire <strong>la</strong> presa con altra di<br />
tipo adatto da <strong>per</strong>sonale professionalmente qualificato. Quest'ultimo, in partico<strong>la</strong>re, dovrà anche<br />
accertare che <strong>la</strong> sezione dei cavi del<strong>la</strong> presa sia idonea al<strong>la</strong> potenza assorbita dall'apparecchio.<br />
Questo apparecchio non deve essere utilizzato con adattatori, prese multiple e/o prolunghe.<br />
• Prima di ogni utilizzo, svolgere completamente il cavo elettrico. Non <strong>per</strong>mettere che il cavo tocchi le<br />
parti calde dell’apparecchio.<br />
• SOLO PER USO INTERNO<br />
• L'uso di un qualsiasi apparecchio elettrico comporta l'osservanza di alcune regole fondamentali.<br />
In partico<strong>la</strong>re:<br />
• Non utilizzare l'apparecchio con mani bagnate o umide.<br />
• Non usare l'apparecchio a piedi nudi.<br />
• Non collocare l'apparecchio all’esterno, evitare esposizioni ad agenti atmosferici<br />
(pioggia, sole, ecc.)<br />
• Non <strong>per</strong>mettere che l'apparecchio sia usato da bambini o da incapaci, senza sorveglianza.<br />
• Non sottoporre l’apparecchio ad urti, previo danneggiamento.<br />
• Non mettere l’apparecchio sopra o vicino a fonti di calore.<br />
• Non trasportare l'apparecchio quando è in funzione.<br />
• Non utilizzare l’apparecchio come unità di riscaldamento ausiliario.<br />
• Non ostruire le a<strong>per</strong>ture di venti<strong>la</strong>zione e di smaltimento calore.<br />
• Proteggere l’apparecchio da spruzzi di liquidi.<br />
• Per evitare il rischio di scosse elettriche mai immergere il cavo, <strong>la</strong> spina o l’apparecchio in acqua od<br />
in altro liquido.<br />
• Non <strong>la</strong>sciare l'apparecchio inutilmente inserito; staccare <strong>la</strong> spina dal<strong>la</strong> presa di alimentazione<br />
quando l'apparecchio non è utilizzato.<br />
• In caso di guasto e/o di cattivo funzionamento dell'apparecchio, spegnerlo e non aprirlo o manometterlo.<br />
Per l'eventuale riparazione rivolgersi so<strong>la</strong>mente ad un centro autorizzato dal costruttore e<br />
richiedere l'utilizzo di ricambi originali.<br />
• Il mancato rispetto di quanto sopra può compromettere <strong>la</strong> <strong>sicurezza</strong> dell'apparecchio.<br />
• In caso di danneggiamento del cavo, non utilizzare l’apparecchio e provvedere tempestivamente<br />
2
al<strong>la</strong> sua sostituzione, rivolgendosi esclusivamente ai centri autorizzati.<br />
• Questo apparecchio non è adatto all’utilizzo da parte di <strong>per</strong>sone (compresi i bambini) con capacita<br />
fisiche, sensoriali o mentali ridotte. Gli utenti che manchino di es<strong>per</strong>ienza e conoscenza dell’apparecchio<br />
oppure ai quali non siano state date istruzioni re<strong>la</strong>tive all’utilizzo dell’apparecchio dovranno<br />
essere soggette al<strong>la</strong> su<strong>per</strong>visione da parte di una <strong>per</strong>sona responsabile del<strong>la</strong> loro <strong>sicurezza</strong>.<br />
• In caso di principio di incendio dell’apparecchio o di alcune sue parti, non gettare acqua <strong>per</strong> spegnere<br />
il fuoco. Soffocare le fiamme con uno straccio umido.<br />
• Durante il funzionamento le parti metalliche ed il vetro sono caldi: o<strong>per</strong>are sull’apparecchio toccando<br />
solo <strong>la</strong> maniglia del<strong>la</strong> porta.<br />
• Non posate niente sullo sportello quando è a<strong>per</strong>to.<br />
• Utilizzare il forno so<strong>la</strong>mente <strong>per</strong> <strong>la</strong> cottura degli alimenti.<br />
• Non mettere canovacci nè piatti sopra l’apparecchio.<br />
• Evitare di <strong>la</strong>sciare sulle su<strong>per</strong>fici sostanze acide (succo di limone, aceto…). Sostanze acide quali<br />
succo di limone, conserva di pomodoro, aceto e simili, se <strong>la</strong>sciate a lungo, intaccano lo smalto<br />
rendendolo opaco.<br />
• Allorché si decida di non utilizzare più un apparecchio di questo tipo si raccomanda di renderlo<br />
ino<strong>per</strong>ante tagliandone il cavo di alimentazione dopo aver staccato <strong>la</strong> spina dal<strong>la</strong> presa di corrente.<br />
Si raccomanda inoltre di collocare il prodotto, in modo da non costituire fonte di <strong>per</strong>icolo alcuno,<br />
specialmente <strong>per</strong> i bambini che potrebbero servirsene <strong>per</strong> i propri giochi.<br />
• Il prodotto non va alimentato attraverso timer esterni o con impianti separati comandati a distanza.<br />
Avvertenze d'usO<br />
• L’apparecchio deve essere usato solo <strong>per</strong> scaldare<br />
alimenti, solo da <strong>per</strong>sone adulte e secondo le istruzioni<br />
riportate in questo libretto.<br />
• Introdurre nel forno so<strong>la</strong>mente cibi, senza confezione o<br />
incarti, previo <strong>per</strong>icolo di incendi.<br />
• Utilizzare sempre il vassoio in dotazione, in quanto è<br />
necessario proteggere le resistenze di riscaldamento da<br />
possibili contatti con oli, liquidi ecc.<br />
• Non rivestire il fondo o qualsiasi altra parte del forno con<br />
fogli di alluminio. Questo può causare il surriscaldamento<br />
dell’apparecchio.<br />
• L'apparecchio può essere riposto solo quando è<br />
completamente freddo.<br />
• Questo apparecchio ha lo sportello in vetro tem<strong>per</strong>ato<br />
di <strong>sicurezza</strong>, che è molto più resistente del normale<br />
vetro alle alte tem<strong>per</strong>ature e alle rotture. Fare molta<br />
attenzione a non graffiarlo o segnarlo. Non utilizzare<br />
l’apparecchio se il vetro è segnato o ha piccole crepe.<br />
• Evitate assolutamente di usare il forno spento come<br />
3<br />
spazio <strong>per</strong> riporre carta, cibi o recipienti: in caso di<br />
accensione involontaria, questo comportamento può<br />
essere causa di danni ed incidenti.<br />
• Assicurarsi che nelle immediate vicinanze del punto<br />
di instal<strong>la</strong>zione dell’apparecchio non vi siano tendaggi,<br />
materiali infiammabili, scaffali e fonti di calore in<br />
genere; comprometterebbero <strong>la</strong> <strong>sicurezza</strong> di questo<br />
apparecchio, con <strong>per</strong>icolo di incendi.<br />
• Posizionare l’apparecchio su di una su<strong>per</strong>ficie stabile<br />
e piana ad un’altezza di almeno 85 cm, fuori dal<strong>la</strong><br />
portata dei bambini.<br />
• Mantenere una distanza di almeno 10 cm tra<br />
l’apparecchio e gli oggetti che lo circondano, 60 cm<br />
<strong>per</strong> gli oggetti sopra l’apparecchio. Posare il forno su<br />
un piano di <strong>la</strong>voro o un mobile da cucina che sopporti<br />
una tem<strong>per</strong>atura di almeno 90 °C.<br />
• Durante il funzionamento, o immediatamente dopo,<br />
le parti metalliche ed il vetro diventano molto calde:<br />
o<strong>per</strong>are sull’apparecchio toccando solo le manopole<br />
e <strong>la</strong> maniglia frontale. Usare i appositi guanti, non<br />
ItalIano
ItalIano<br />
inclusi, se necessario.<br />
• Usare sempre l’apposita impugnatura <strong>per</strong> spostare il<br />
vassoio o <strong>la</strong> griglia.<br />
• ATTENZIONE! Fare molta attenzione quando si spostano<br />
liquidi bollenti.<br />
• Non appoggiare nul<strong>la</strong> sull’apparecchio, (abiti, stracci,<br />
pentole, ecc.), o sul vetro reclinato. Il calore può essere<br />
causa di deformazioni, screpo<strong>la</strong>ture, incendi. Non inserire<br />
niente nello spazio tra il piano d’appoggio e <strong>la</strong> parte<br />
inferiore dell’apparecchio.<br />
ELENCO DEI COMPONENTI<br />
1. Sca<strong>la</strong>natura <strong>per</strong> vassoio<br />
2. Resistenza<br />
3. Doppio vetro di <strong>sicurezza</strong><br />
termoiso<strong>la</strong>to<br />
4. Maniglia<br />
5. Timer 60 minuti<br />
6. Selettore tem<strong>per</strong>ature<br />
7. Spia di funzionamento<br />
8. Selettore elementi riscaldanti<br />
9. Cavo elettrico<br />
4<br />
• Quando il forno è caldo, non gettare acqua sul vetro<br />
dello sportello. Il vetro potrebbe rom<strong>per</strong>si!<br />
• Inserire completamente <strong>la</strong> spina del forno nel<strong>la</strong> presa<br />
di corrente, <strong>per</strong> evitare un eventuale surriscaldamento<br />
anormale del<strong>la</strong> stessa.<br />
• Il forno deve essere sempre collegato direttamente<br />
alle prese di corrente di potenza, dedicate usualmente<br />
agli elettrodomestici. Non connettere più di<br />
una spina nel<strong>la</strong> stessa fonte da cui si trae energie<br />
elettrica.<br />
10. Griglia<br />
11. Gancio<br />
12. Vassoio
ISTRUZIONI PER L’USO<br />
PriMA AccensiOne<br />
Effettuare un ciclo di cottura “a vuoto” in modo da togliere l’odore ed il fumo che le sostanze protettive presenti sulle<br />
parti metalliche possono sviluppare.<br />
1. Lavare con cura tutti gli accessori. Pulire l’interno con un panno umido ed asciugare bene.<br />
2. Accendere il forno ruotando <strong>la</strong> manopo<strong>la</strong> sul simbolo , impostare <strong>la</strong> tem<strong>per</strong>atura al massimo ed il timer su 15 minuti.<br />
3. Lasciare funzionare l’apparecchio con lo sportello a<strong>per</strong>to in ambiente areato.<br />
Durante questa o<strong>per</strong>azione è normale l’emissione di fumo dalle parti metalliche e dalle feritoie <strong>la</strong>terali.<br />
Dopo questa o<strong>per</strong>azione, aerare il locale.<br />
ALiMentAziOne<br />
Collegare <strong>la</strong> spina dell’apparecchio a una presa a muro con tensione di 230 V ~ 50 Hz, dotata di efficace messa a terra.<br />
Per nessun motivo collegare l’apparecchio ad una tensione diversa. Control<strong>la</strong>re che il cavo elettrico di alimentazione<br />
non sia a contatto con parti calde.<br />
AttenziOne: Utilizzare sempre il vassoio <strong>per</strong> proteggere le resistenze di riscaldamento inferiori dai<br />
grassi che co<strong>la</strong>no durante <strong>la</strong> cottura.<br />
• Posizionare il forno su un piano pari e resistente al calore, inserire <strong>la</strong> spina in una presa di corrente compatibile.<br />
• Preriscaldare il forno <strong>per</strong> circa 5-10 minuti prima di inserire gli alimenti (vedi capitolo re<strong>la</strong>tivo).<br />
• Sistemare gli alimenti nell’apposito vassoio.<br />
• Rego<strong>la</strong>re <strong>la</strong> tem<strong>per</strong>atura (100° - 250° C), selezionare gli elementi riscaldanti appropriati (vedi Tabel<strong>la</strong> A) e adattare<br />
<strong>la</strong> posizione del<strong>la</strong> griglia a seconda del cibo da cuocere.<br />
• Attivare il timer impostando il tempo di cottura (max 60 minuti).<br />
• Questo forno ha <strong>la</strong> funzione venti<strong>la</strong>zione, che <strong>per</strong>mette un riscaldamento uniforme.<br />
La funzione si attiva automaticamente all’accensione.<br />
• Quando si cuoce con <strong>la</strong> griglia, utilizzare sempre il vassoio <strong>per</strong> proteggere <strong>la</strong> resistenza inferiore.<br />
• Control<strong>la</strong>re <strong>per</strong>iodicamente lo stato di cottura degli alimenti. È consigliabile aprire lo sportello lo stretto necessario<br />
<strong>per</strong> evitare inutili dis<strong>per</strong>sioni di calore con conseguente allungamento dei tempi di cottura.<br />
• Al termine del<strong>la</strong> cottura spegnere l’apparecchio portando tutti i comandi su “OFF” o “0” e staccare <strong>la</strong> spina.<br />
AttenziOne: Non introdurre nel<strong>la</strong> griglia di venti<strong>la</strong>zione oggetti come forbici o coltelli<br />
che potrebbero danneggiare l’apparecchio.<br />
PreriscALdAMentO<br />
• Selzionare il tipo di riscaldamento “FORNO + GRILL” (vedi Tabel<strong>la</strong> A).<br />
• Girare in senso orario <strong>la</strong> manopo<strong>la</strong> del termostato selezionando <strong>la</strong> tem<strong>per</strong>atura desiderata.<br />
• Impostare con <strong>la</strong> manopo<strong>la</strong> del timer 5 o 10 minuti a seconda del<strong>la</strong> tem<strong>per</strong>atura di utilizzo. Per tem<strong>per</strong>ature basse<br />
sono sufficienti 5 minuti mentre <strong>per</strong> tem<strong>per</strong>ature medio-alte 10 minuti. La luce interna si accenderà ed il forno<br />
inizierà a scaldarsi.<br />
• Al trillo del timer, che segna<strong>la</strong> il termine del tempo impostato, il forno ha raggiunto <strong>la</strong> tem<strong>per</strong>atura impostata.<br />
5<br />
ItalIano
ItalIano<br />
cOtturA<br />
• Selezionare il tipo di riscaldamento desiderato (vedi Tabel<strong>la</strong> A).<br />
• Girare in senso orario il selettore del termostato selezionando <strong>la</strong> tem<strong>per</strong>atura desiderata (vedi Tabel<strong>la</strong> B).<br />
• Impostare il timer a seconda del<strong>la</strong> pietanza che si vuole cuocere. Il forno si spegne automaticamente al trillo del<br />
timer, che segna<strong>la</strong> il termine del tempo impostato.<br />
Nota: Se si desidera continuare <strong>la</strong> cottura è necessario reimpostare il timer.<br />
• Ultimata <strong>la</strong> cottura portare tutti i comandi in posizione “OFF” e “0” e staccare <strong>la</strong> spina.<br />
Nota: Il forno può essere spento manualmente durante <strong>la</strong> cottura, ruotando <strong>la</strong> manopo<strong>la</strong> del timer nel<strong>la</strong> posizione “0”.<br />
Tabel<strong>la</strong> A<br />
Funziona solo <strong>la</strong> resistenza inferiore.<br />
Adatto <strong>per</strong> cuocere pizze o <strong>per</strong> scaldare cibi precotti.<br />
Funziona solo <strong>la</strong> resistenza su<strong>per</strong>iore.<br />
Adatto <strong>per</strong> completare <strong>la</strong> doratura dei cibi già cotti.<br />
Funzionano entrambe le resistenze, adatto <strong>per</strong>:<br />
• Sconge<strong>la</strong>re o mantenere in caldo a tem<strong>per</strong>ature basse;<br />
• Cotture complete di pasta al forno torte ecc. a tem<strong>per</strong>ature medio, alte.<br />
OFF Le resistenze sono spente.<br />
AttenziOne: Il forno è spento se <strong>la</strong> manopo<strong>la</strong> del Timer è in corrispondenza dello zero.<br />
Alimento<br />
Tabel<strong>la</strong> B<br />
Tem<strong>per</strong>atura (°C) Funzione Tempo di cottura (minuti)<br />
Pane, pizza e focaccie (500 g) 200 – 230 25 ~ 30 min<br />
Torte, crostate (500 g) 170 – 190 30 ~ 40 min<br />
Pesce (1 kg) 190 – 210 30 ~ 40 min<br />
Arrosti di carne (1 kg) 200 – 230 30 ~ 45 min<br />
Spiedini, carne in pezzi (500 g) 190 – 210 30 ~ 45 min<br />
Carne, verdura, pesce grat. (500 g) 200 – 230 20 ~ 30 min<br />
Biscotti, picco<strong>la</strong> pasticceria (200 g) 150 – 170 10 ~ 15 min<br />
Nota: I valori dei tempi di cottura sono minimi e puramente indicativi in quanto dipendono dalle dimensioni del cibo,<br />
dallo stato in cui si trova e dal gusto <strong>per</strong>sonale di cottura.<br />
6
cOnsiGLi GenerALi<br />
• Nelle cotture con forno tradizionale, è consigliabile preriscaldare sempre il forno al<strong>la</strong> tem<strong>per</strong>atura prescelta,<br />
al fine di ottenere i migliori risultati di cottura.<br />
• I tempi di cottura dipendono dal<strong>la</strong> qualità dei prodotti, dal<strong>la</strong> tem<strong>per</strong>atura degli alimenti e da quel<strong>la</strong> impostata sul<br />
forno, e dal gusto <strong>per</strong>sonale di ciascuno. I tempi indicati nel<strong>la</strong> tabel<strong>la</strong> sono solo indicativi e suscettibili di variazioni e<br />
non tengono conto del tempo necessario <strong>per</strong> preriscaldare il forno.<br />
• Per <strong>la</strong> cottura di cibi surge<strong>la</strong>ti consultare i tempi consigliati nelle confezioni dei prodotti.<br />
PULIZIA E MANUTENZIONE<br />
AttenziOne: Non immergere mai il corpo del prodotto, <strong>la</strong> spina ed il cavo elettrico in acqua o altri<br />
liquidi, usare un panno umido <strong>per</strong> <strong>la</strong> loro pulizia.<br />
Prima di effettuare qualsiasi o<strong>per</strong>azione di pulizia del forno, spegnerlo, staccare <strong>la</strong> spina di alimentazione<br />
ed attendere che l’apparecchio si raffreddi.<br />
Griglia, e vassoio si <strong>la</strong>vano come normali stoviglie, sia a mano che in <strong>la</strong>vastoviglie.<br />
Per <strong>la</strong> pulizia del<strong>la</strong> su<strong>per</strong>ficie esterna utilizzare sempre una spugna umida. Evitare l’impiego di prodotti abrasivi che<br />
danneggerebbero <strong>la</strong> vernice. Fare attenzione affinché non penetri acqua o sapone liquido all’interno delle feritoie poste<br />
sopra il forno.<br />
Per <strong>la</strong> pulizia dell’interno del forno, non utilizzare mai prodotti corrosivi e non grattare le pareti con oggetti appuntiti o<br />
taglienti. Non pulire mai gli elementi riscaldanti. Non utilizzare il vapore o apparecchi a vapore <strong>per</strong> pulire l'apparecchio.<br />
Tenete sempre ben pulito l’apparecchio e i suoi accessori, i residui di cibo possono causare rischi di incendio.<br />
ATTENZIONE: Asciugare preferibilmente con un panno morbido. Sostanze acide quali succo di limone, conserva di<br />
pomodoro, aceto e simili, se <strong>la</strong>sciate a lungo, intaccano lo smalto rendendolo opaco.<br />
• Non conservare il prodotto vicino a fonti di calore.<br />
• Conservare il prodotto in un luogo sicuro e asciutto lontano dal<strong>la</strong> portata dei bambini.<br />
7<br />
ItalIano
ItalIano<br />
GARANZIA<br />
La garanzia decade se l’apparecchio non è usato in modo conforme a quanto indicato nelle istruzioni.<br />
La garanzia esclude i danni dovuti a cause non riferibili all’apparecchio. In partico<strong>la</strong>re <strong>la</strong> garanzia decade se l’apparecchio<br />
ha subito danni a causa di cadute, di collegamenti non conformi a quelli indicati nelle istruzioni, di temporali, di<br />
sovraccarichi, di esposizione a fonti di calore, all’umidità o al gelo.<br />
Questa garanzia dà specifici diritti a voi, e potete anche avere altri diritti che variano da stato a stato.<br />
Se <strong>per</strong> qualsiasi motivo, questo prodotto deve essere restituito al negozio dove è acquistato, deve essere imbal<strong>la</strong>to nel<strong>la</strong><br />
sua scato<strong>la</strong>/pacchetto originale.<br />
Alimentazione<br />
Rating Supply<br />
Potenza<br />
Power<br />
Dimensioni mm.: L x H x P<br />
Dimensions mm.: W x H x D<br />
Questo prodotto è stato costruito secondo <strong>la</strong> normativa A12 e le direttive CE.<br />
sMALtiMentO<br />
Il bidone barrato indica che il prodotto risponde ai requisiti richiesti dalle nuove direttive introdotte a tute<strong>la</strong><br />
dell’ambiente (2002/96/EC, 2003/108/EC, 2002/95/EC) e che deve essere smaltito in modo appropriato<br />
al termine del suo ciclo di vita. Chiedere <strong>informazioni</strong> alle autorità locali in merito alle zone dedicate allo<br />
smaltimento dei rifiuti.<br />
Chi non smaltisce il prodotto seguendo quanto indicato in questo paragrafo ne risponde secondo le norme vigenti.<br />
Il produttore si riserva il diritto di apportare su questo apparecchio modifiche ELETTRICHE - TECNICHE - ESTETICHE e/o sostituire parti<br />
senza alcun preavviso, ove lo ritenesse più opportuno, <strong>per</strong> offrire sempre un prodotto affidabile, di lunga durata e con tecnologia<br />
avanzata.<br />
MaDE.In.P .R .C .<br />
SERVIZIO GARANZIA<br />
(+39) 055-4206052<br />
AssistenzA tecnicA prodotti<br />
Chiama direttamente il nostro numero <strong>per</strong> l’assistenza post vendita,<br />
i nostri o<strong>per</strong>atori risolveranno i tuoi problemi!<br />
8<br />
Capacità<br />
Capacity<br />
Peso<br />
Weight<br />
AC 220-240 V ~ 50 Hz 1380 W 445 (l) x 285 (h) x 285 (p) 18 ℓ 4.7 kg<br />
.è.distribuito.su.licenza.Gio’Style.lifestyle.S .p .a ..da:.Dmedia Commerce S.p.A.<br />
Sede legale:.via.aretina.25,.50065.Sieci.·.Pontassieve.(FI).·.Italy<br />
Sede Logistica e post vendita:.viale.Gramsci.88/b,.50031.·.Barberino.di.Mugello.(FI).·.Italy
CONTENTS<br />
SyMBolS. . . . . . . . . . . . . . . . . . . . . . . . . . . . . . . . . . . . . . . . . . . . . . . . . . . . . . . . . . . . . . . . . . . . . . . . . . . . . . . . . . . . . . . . . . . . . . . .9<br />
IMPoRtant.SaFEGUaRDS. . . . . . . . . . . . . . . . . . . . . . . . . . . . . . . . . . . . . . . . . . . . . . . . . . . . . . . . . . . . . . . . . . . . . . . . . . . . . . .9<br />
DESCRIPtIon.oF.thE.aPPlIanCE . . . . . . . . . . . . . . . . . . . . . . . . . . . . . . . . . . . . . . . . . . . . . . . . . . . . . . . . . . . . . . . . . . . . . .12<br />
oPERatInG.InStRUCtIonS. . . . . . . . . . . . . . . . . . . . . . . . . . . . . . . . . . . . . . . . . . . . . . . . . . . . . . . . . . . . . . . . . . . . . . . . . . . . .12<br />
ClEanInG.anD.MaIntEnanCE . . . . . . . . . . . . . . . . . . . . . . . . . . . . . . . . . . . . . . . . . . . . . . . . . . . . . . . . . . . . . . . . . . . . . . . . .15<br />
WaRRanty. . . . . . . . . . . . . . . . . . . . . . . . . . . . . . . . . . . . . . . . . . . . . . . . . . . . . . . . . . . . . . . . . . . . . . . . . . . . . . . . . . . . . . . . . . . . .16<br />
FEatURES. . . . . . . . . . . . . . . . . . . . . . . . . . . . . . . . . . . . . . . . . . . . . . . . . . . . . . . . . . . . . . . . . . . . . . . . . . . . . . . . . . . . . . . . . . . . . .16<br />
SyMBOLS<br />
the.triangle.with.the.exc<strong>la</strong>mation.point,.inside.an.equi<strong>la</strong>teral.triangle,.reminds.the.user.to.read.the.<br />
important.o<strong>per</strong>ation.and.maintenance.instructions.in.this.owner’s.guide<br />
this.symbol.means.the.surface.of.the.appliance.and.the.g<strong>la</strong>ss.became.very.hot.during.o<strong>per</strong>ation;.<br />
for.this.reason,.never.touch.the.surface.or.the.g<strong>la</strong>ss.with.hands ..DanGER.oF.BURnS!.<br />
C<strong>la</strong>ss.I:.these.appliances.have.their.chassis.connected.to.electrical.earth.by.an.earth.conductor ..<br />
always.plug.the.appliance.to.grounded.electrical.outlet .<br />
IMPORTANT SAFEGUARDS<br />
To avoid damage or danger by impro<strong>per</strong> use, these users’ instructions should be followed and carefully kept. If you give<br />
the appliance to another <strong>per</strong>son, also supply them with the instruction for use.<br />
Intended use: This appliance is suited for cooking. Only use the appliance for domestic purpose - the appliance is<br />
not suited for commercial use. The safeguards must be followed closely and the appliance has to be used in the way<br />
indicated in these instructions.<br />
GenerAL sAfety instructiOns<br />
• Before using the appliance for the first time, read all the instructions carefully and keep them for<br />
future reference. The warranty does not cover damages due to non observance of these instructions.<br />
• This appliance must be used only as described in the o<strong>per</strong>ating instructions. Any other use is<br />
deemed to be impro<strong>per</strong> and dangerous. The manufacturer will not accept any liability for damages<br />
deriving from misuse.<br />
• Carefully unpack your appliance. Save all packing materials for a possible future use. To avoid any<br />
danger of suffocation, do not let the children p<strong>la</strong>y with the packing materials. Check if the product<br />
is damaged. Do not attempt to use it or fix it if any part appears damaged. Refer servicing to<br />
qualified <strong>per</strong>sonnel only in case you need to repair it.<br />
9<br />
EnGlISh
EnGlISh<br />
• Packing must be disposed promptly and responsibly. Ask to your local authorities where to find<br />
pro<strong>per</strong> disposal.<br />
• This appliance must be used only as indicated in this owner’s guide. Any other different use is<br />
incorrect and could be dangerous. The manufacturer is not responsible for the risks of damages<br />
result from an incorrect use.<br />
• Before plugging it, check the rating <strong>la</strong>bel of the item to control the power rating is identical to your<br />
domestic power supply. Do not plug if the technical features are different.<br />
• This appliance is designed for HOME USE ONLY and may not be used for commercial or industrial<br />
purposes.<br />
• In case technical features of the plug are different to the socket-outlet, change the socket-outlet<br />
only by referring to qualified <strong>per</strong>sonnel. It is not recommended to use extension cables or adaptors.<br />
• Before using the appliance, extend the power cord completely. Keep power cord away from the hot<br />
surfaces of this appliance.<br />
• ONLY FOR INDOOR USE.<br />
• When using electrical appliances following important precautions must be taken:<br />
• Do not touch the appliance with wet hands or barefoot.<br />
• Never leave the appliance exposed to the elements (rain, sun, etc....).<br />
• Children should be su<strong>per</strong>vised to ensure that they do not p<strong>la</strong>y with the appliance.<br />
• Do not drop or hit the appliance as it may be damaged.<br />
• Do not p<strong>la</strong>ce the appliance near heat sources.<br />
• Do not move the appliance when it is o<strong>per</strong>ating.<br />
• Do not use this oven as an auxiliary heating unit.<br />
• Do not insert any object into the venti<strong>la</strong>tion openings.<br />
• Keep the appliance away from liquids.<br />
• To reduce the risk of electric shock, never immerse the power cord, the plug or the appliance in<br />
water or other liquids.<br />
• Do not leave the appliance plugged when not in use; be sure to unplug it after use.<br />
• In case of failure and/or malfunctioning, turn the power off and do not disassemble or tam<strong>per</strong><br />
with the appliance. Return the appliance to the nearest authorized Service Centre for repair. Ask for<br />
original parts.<br />
• Non-observance of the instructions may decrease the safety of the appliance.<br />
• Never use the appliance if it is damaged and/or in case of short-circuit. In no case try to repair<br />
the appliance yourself in order to avoid all the risks caused by electricity. Refer servicing to an<br />
Authorized Service Centre and ask for original spare parts only. Not following this warning shall<br />
compromise the safety of the apparatus.<br />
• This appliance is not intended for use by <strong>per</strong>sons (including children) with reduced physical,<br />
sensory or mental capabilities, or <strong>la</strong>ck of ex<strong>per</strong>ience and knowledge, unless they have been given<br />
su<strong>per</strong>vision or instruction concerning use of the appliance by a <strong>per</strong>son responsible for their safety.<br />
Children should be su<strong>per</strong>vised to ensure that they do not p<strong>la</strong>y with the appliance.<br />
• In case the appliance catches fire, do not use water for extinguishing the fire. Extinguish the fire<br />
with a damp cloth.<br />
10
• During o<strong>per</strong>ation, the metal parts and g<strong>la</strong>ss become hot: only touch the door handle at this time.<br />
• Do not p<strong>la</strong>ce anything on the door when it is open.<br />
• Only use the appliance for cooking purposes.<br />
• Do not p<strong>la</strong>ce dish cloths or p<strong>la</strong>tes on the appliance.<br />
• The appliance shall be p<strong>la</strong>ced against a wall when use.<br />
• Do not allow acid substances (lemon juice, vinegar, etc.) to remain on the appliance. Acidic as lemon<br />
juice, tomato sauce, vinegar or simi<strong>la</strong>r, if leaved for long time, may harm the enamel, making<br />
it opaque.<br />
• In the event that you decide to dispose of the appliance, we recommend you to make it ino<strong>per</strong>ative<br />
by cutting off the power cord. We also recommend that any parts that could be dangerous be<br />
rendered harmless, especially for children, who may p<strong>la</strong>y with the appliance or its parts.<br />
• The appliance is not intended to be o<strong>per</strong>ated by means of an external timer or separate remotecontrol<br />
system.<br />
WArninGs fOr use<br />
• This appliance must be used for heating food only.<br />
• This appliance must be used by adults strictly as described<br />
in the o<strong>per</strong>ating instructions.<br />
• To prevent fires, put unpackaged food only inside the<br />
oven.<br />
• Always use the provided backing tray in order to protect<br />
the heating elements from contact with oil, liquids, etc.<br />
• Do not cover the base of the oven or any other part with<br />
aluminum foil. This will cause overheating.<br />
• Store the appliance only after it has cooled down<br />
completely.<br />
• The door of this appliance is made of tem<strong>per</strong>ed safety<br />
g<strong>la</strong>ss, much more resistant to high tem<strong>per</strong>atures and<br />
breakage than regu<strong>la</strong>r g<strong>la</strong>ss. Be extremely careful not to<br />
scratch or mark the g<strong>la</strong>ss. Do not use the appliance if the<br />
g<strong>la</strong>ss is marked or cracked.<br />
• Never store pa<strong>per</strong>, food or containers inside the oven<br />
when not in use: accidentally turning on the oven could<br />
cause damages and injuries.<br />
• Check that there are no curtains, f<strong>la</strong>mmable materials,<br />
shelves, or heat sources near the appliance: its safety<br />
might be affected creating a risk of fire.<br />
• P<strong>la</strong>ce the oven at least 85 cm above the floor-level out of<br />
reach of children.<br />
• The oven becomes hot during o<strong>per</strong>ation; choose a safe,<br />
heat-resistant surface before installing it. Following<br />
11<br />
minimum distances must be maintained from the<br />
wall or other objects: 10 cm at the sides and rear and<br />
60 cm at the top of the appliance. P<strong>la</strong>ce the oven on a<br />
work top or kitchen cabinet capable of withstanding<br />
a tem<strong>per</strong>ature of at least 90 °C and leave some room<br />
above it.<br />
• During o<strong>per</strong>ating, the g<strong>la</strong>ss and the metallic parts<br />
become hot; do not touch: danger of burns! Always<br />
use the handle and knobs, which are heat-resistant,<br />
when handling the appliance during o<strong>per</strong>ation.<br />
• Carry the backing tray and the griddle using the<br />
provided handle.<br />
• WARNING! Pay special attention when removing pots<br />
with hot liquids from the oven.<br />
• Do not p<strong>la</strong>ce anything (linen, clothes, pans, etc.) on<br />
the appliance or on the open door. Heating could<br />
cause deformations, cracks and/or fires. Do not p<strong>la</strong>ce<br />
anything in between the counter and the bottom of<br />
the appliance.<br />
• Do not wet the g<strong>la</strong>ss door with water when the oven<br />
is hot. The g<strong>la</strong>ss door could break!<br />
• To prevent abnormal overheating of the power plug,<br />
be sure it is fully inserted into the electrical outlet.<br />
• Plug the oven into an electrical outlet suitable for<br />
powering home appliances. Do not plug more than<br />
one appliance into the same power outlet.<br />
EnGlISh
EnGlISh<br />
DESCRIPTION OF THE APPLIANCE<br />
1. Cooking shelves<br />
2. Heating element<br />
3. Double insu<strong>la</strong>ted safety g<strong>la</strong>ss<br />
4. Handle<br />
5. 60 Minutes Timer<br />
6. Thermostat<br />
7. Indicator light<br />
8. Heating elements control knob<br />
9. Power cord<br />
10. Grid<br />
OPERATING INSTRUCTIONS<br />
usinG fOr tHe first tiMe<br />
Carry out an ”empty” cooking cycle so as to remove any smell and smoke from the protective coatings applied to metal parts:<br />
1. Carefully clean all accessories. Use a soft damp cloth to clean the inner side of the appliance, then dry it thoroughtly.<br />
2. Switch on the oven by turning the dial to the symbol ; set the tem<strong>per</strong>ature to the maximum and the timer to 15<br />
minutes.<br />
3. Leave the appliance to o<strong>per</strong>ate with the door open in a well-aired environment.<br />
During this o<strong>per</strong>ation, it is usual for smoke to come off metal parts and side openings.<br />
After this o<strong>per</strong>ation, venti<strong>la</strong>te the room.<br />
12<br />
11. Baking tray handle<br />
12. Baking tray
POWer<br />
The oven must be plugged into a 230 V ~ 50 Hz grounded electrical outlet.<br />
Never use electrical outlets providing higher or lower voltage. Do not let the power cord touch hot surfaces.<br />
WArninG: When cooking, always use the backing tray to prevent grease dripping<br />
onto the lower heating elements.<br />
• P<strong>la</strong>ce the oven in a f<strong>la</strong>t and stable surface and plug it into a wall socket (230 V ~ 50 Hz).<br />
• Pre-heat the oven for 5-10 minutes before putting the food to be cooked (see “Pre-heating” paragraph).<br />
• P<strong>la</strong>ce the food on the tray.<br />
• Set the tem<strong>per</strong>ature (100° - 250° C), select the desired heating function by using the control knob (see table A) then<br />
p<strong>la</strong>ce the grid to the desired cooking shelf (according to the food to be cooked).<br />
• Set the cooking time by using the timer (max. 60 minutes). The indicator light will switch on.<br />
• This oven is provided with a venti<strong>la</strong>tion system, which allows the heat to spread evenly on the cooking compartment.<br />
This function will be automatically activated once the oven is switched on.<br />
• When using the grid for cooking, always p<strong>la</strong>ce the tray under it, to protect the heating elements from fat.<br />
• Food must be frequently checked during cooking process. Open the door partially in order to avoid heat dis<strong>per</strong>sion,<br />
which may lengthen cooking times.<br />
• Once finished cooking, switch off the appliance by setting all control knobs to “OFF” or “0” and disconnect the oven<br />
from the power supply.<br />
WArninG: Do not insert scissors or knifes into the venti<strong>la</strong>tion slits,<br />
as this may cause damage to the item.<br />
WArninG! HOt surfAce: Do not touch the g<strong>la</strong>ss door or the oven surface<br />
while it is o<strong>per</strong>ating or right after use.<br />
PreHeAtinG<br />
• Select “Oven + Grill” heating function by using the control knob (see table A).<br />
• Turn the thermostat in a clockwise direction to select the desired cooking tem<strong>per</strong>ature.<br />
• Set the cooking time to 5 or 10 minutes, according to the cooking tem<strong>per</strong>ature of the food. For low cooking<br />
tem<strong>per</strong>atures 5 minutes are enough, while for high cooking tem<strong>per</strong>atures 10 minutes are required for preheating.<br />
• The oven will emit a “beep” sound once the set time has e<strong>la</strong>psed and the required tem<strong>per</strong>ature has been reached.<br />
13<br />
EnGlISh
EnGlISh<br />
cOOKinG<br />
• Select the desired heating function (see table A).<br />
• Turn the thermostat in a clockwise direction to select the desired cooking tem<strong>per</strong>ature (see table B).<br />
• Set the required cooking time according to the food to be cooked. The oven will automatically switch off once the set<br />
time has e<strong>la</strong>psed (“beep” sound).<br />
Note: If you want to continue cooking process, set the desired cooking time.<br />
• Once finished cooking, switch off the appliance by setting all control knobs to “OFF” and “0” and disconnect the oven<br />
from the power supply.<br />
Note: It is possible to stop cooking process at any time by setting the Timer to “0”.<br />
Table A<br />
Only the lower heating element will o<strong>per</strong>ate, suitable for pizza and for reheating food.<br />
Only the up<strong>per</strong> heating element will o<strong>per</strong>ate, suitable to brown baked food.<br />
Both heating elements will o<strong>per</strong>ate, suitable for:<br />
• Defrost or warming food<br />
• Cooking pastry or pasta (medium-high tem<strong>per</strong>ature)<br />
OFF The appliance is off<br />
WArninG: This oven is off when the timer control is in the “zero” position<br />
Table B<br />
Food Tem<strong>per</strong>atur (°C) Functions Cooking times (minutes)<br />
Bread, pizza and focaccia (500 g) 200 – 230 25 ~ 30 min<br />
Cakes, pastries (500 g) 170 – 190 30 ~ 40 min<br />
Roast fish (1 kg) 190 – 210 30 ~ 40 min<br />
Meat roasts (1 kg) 200 – 230 30 ~ 45 min<br />
Brochettes, chopped meats (500 g) 190 – 210 30 ~ 45 min<br />
Meat, vegetable, fish gratin (500 g) 200 – 230 20 ~ 30 min<br />
Biscuits, small pastries (200 g) 150 – 170 10 ~ 15 min<br />
Note: Cooking times depend on the food quality, on food cooking tem<strong>per</strong>ature and individual taste.<br />
14
HeLPfuL Hints<br />
• For best results when cooking using a traditional oven, we suggest preheating the oven to the desired tem<strong>per</strong>ature.<br />
• Cooking times depend on food quality, on food and oven tem<strong>per</strong>ature as well as on individual taste. Cooking times<br />
given in the Table are indicative and may vary. They do not account for oven preheating time.<br />
• To cook frozen food, set the timer according to the instructions indicated on the food package.<br />
CLEANING AND MAINTENANCE<br />
WARNING! Never p<strong>la</strong>ce the appliance body, plug or power cord in water or other liquids; always wipe<br />
clean with a damp cloth.<br />
Disconnect the oven form the power supply and wait till it has cooled down<br />
completely before cleaning.<br />
Grid and tray may be cleaned with hot water and mild detergent, they may also be washed in the dishwasher.<br />
Use only a soft damp cloth to clean the surface of the oven. Do not use harsh cleaning solutions, as these may damage<br />
the appliance. Do not let water or liquid soap penetrate through the venti<strong>la</strong>tion slits.<br />
Clean the inner surface of the oven by using a soft damp cloth or a sponge soaked in warmed soapy water, then dry<br />
thoroughtly. Never use abrasives or sharp-edged and pointed objects.<br />
Keep the appliance and its accessories clean. Food crumbs and scraps can cause a fire.<br />
IMPORTANT: Dry with a soft cloth. Acidic substances such as lemon juice, tomato purée, vinegar or simi<strong>la</strong>r can damage<br />
the enamel, making it lose shine.<br />
• Do not store the appliance near heat sources.<br />
• Store the appliance in a safe dry p<strong>la</strong>ce out of the reach of children.<br />
15<br />
EnGlISh
EnGlISh<br />
WARRANTy<br />
The warranty is valid for normal use of the device as defined in the user’s guide.<br />
Excluded from this warranty, damage due to a cause unre<strong>la</strong>ted to the device. In particu<strong>la</strong>r, the warranty does not apply<br />
if the unit has been damaged following a collision or a fall, a false move, a connection that does not comply with the<br />
instructions or requirements specified in this manual, the effect of lightning overvoltage sector, inadequate protection<br />
against heat, moisture or frost.<br />
This warranty gives you specific rights, and you may also have other rights that vary from state to state. If for any<br />
reason this product needs to be returned to the store where purchased it must be packed in its original carton/package.<br />
Rating Supply<br />
Alimentazione<br />
Power<br />
Potenza<br />
Dimensions mm.: W x H x D<br />
Dimensioni mm.: L x H x P<br />
This appliance is tested according to A12 legis<strong>la</strong>tion and is built to EC directives.<br />
disPOsAL<br />
Notice for environmental: If at any time in the future you should need to dispose of this product please note<br />
that waste electrical products should not be disposed of with household waste. The symbol (on the right) on<br />
the packing is indicating it.Please recycle where facilities exist. Check with your local authority or retailer for<br />
recycling advice. (Waste Electrical and Electronical Equipment Directive)<br />
As part of its policy of improving products technology and reliability, the manufacturer reserves the right to change and modify the<br />
design as well as the technical and electrical specifications of this appliance without notice.<br />
16<br />
Capacity<br />
Capacità<br />
Weight<br />
Peso<br />
AC 220-240 V ~ 50 Hz 1380 W 445 (w) x 285 (h) x 285 (d) 18 ℓ 4.7 kg<br />
WARRANTY SERVICE<br />
(+39) 055-4206052<br />
cUstoMer serVice depArtMent<br />
Call us for the after sale service<br />
MaDE.In.P .R .C .<br />
.is.distributed.under.Gio’Style.lifestyle.S .p .a ..license.by:.Dmedia Commerce S.p.A.<br />
Headquarters:.via.aretina.25,.50065.Sieci.·.Pontassieve.(FI).·.Italy<br />
Logistic and customer service:.viale.Gramsci.88/b,.50031.·.Barberino.di.Mugello.(FI).·.Italy


