- Page 1 and 2:
2013 Lighting Components La tradizi
- Page 3 and 4:
Catalogo Relco 2013 Relco Catalogue
- Page 5 and 6:
Sommario - Summary 18 56 79 162 212
- Page 7 and 8:
www.relco.it Intervallo di carico a
- Page 9 and 10:
Marchi di approvazione - Approval m
- Page 11 and 12:
Introduzione Introduction Tabella d
- Page 13 and 14:
Tabella di scelta Choice Table www.
- Page 15 and 16:
Introduzione Introduction www.relco
- Page 17 and 18:
Tabella di scelta Choice table Tabe
- Page 19 and 20:
www.relco.it RT27PS - 706 plus - 20
- Page 21 and 22:
Modulo offerta Offer module www.rel
- Page 23 and 24:
www.relco.it 19 Alimentatori per la
- Page 25 and 26:
Articolo Article Reattore a 3 fili
- Page 27 and 28:
KIT... www.relco.it Complessi di al
- Page 29 and 30:
EN61347-1 (2009) www.relco.it Refer
- Page 31 and 32:
www.relco.it 27 Alimentatori per la
- Page 33 and 34:
P = Reattore provvisto di protezion
- Page 35 and 36:
Fig. A Fig. B Fig. C 6 P1 12 P Larg
- Page 37 and 38:
ACCENDITORI - IGNITORS TECHNICAL DA
- Page 39 and 40:
Condensatori - Capacitors Condensat
- Page 41 and 42:
MATRIX 1P MATRIX IES MATRIX 1B MEGA
- Page 43 and 44:
Serie URI - UR - MATRIX Temperature
- Page 45 and 46:
UR Articolo Article Contenitore pla
- Page 47 and 48:
Articolo Article www.relco.it P 400
- Page 49 and 50:
Serie MEGA URC - RAIN EN61347-1 (20
- Page 51 and 52:
RAIN TUBE 35>600W Articolo Article
- Page 53 and 54:
www.relco.it 49 Alimentatori per la
- Page 55 and 56:
L www.relco.it F3L P 2 ESM150-F3L P
- Page 57 and 58:
www.relco.it 53 Alimentatori per la
- Page 59 and 60:
www.relco.it 55 TRASFORMATORI elett
- Page 61 and 62:
Simboli trasformatori elettronici -
- Page 63 and 64:
HOLE Articolo Article www.relco.it
- Page 65 and 66:
MICRO MICRO 60 PFS Articolo Article
- Page 67 and 68:
FOX FOX 160 PFS TH FOX 200 PFS TH M
- Page 69 and 70:
ICE MINIICE ICE 150 PFS TH Articolo
- Page 71 and 72:
ELEPH Articolo Article www.relco.it
- Page 73 and 74:
WIND DATI TECNICI -TECHNICAL DATA F
- Page 75 and 76:
TORO 300 TORO 300 DT Articolo Artic
- Page 77 and 78:
SS un - Soft-Start SSun RO0699 SS u
- Page 79 and 80:
TOR TP68..DT - BIG BOX IP68 BIG BOX
- Page 81 and 82:
TMS...P TMS 20W P Articolo Article
- Page 83 and 84:
LEDs DRIVERS www.relco.it PTDCMD/35
- Page 85 and 86:
www.relco.it 81 since 1967
- Page 87 and 88:
DIM Powerled POWERLED DIM - 18W Pag
- Page 89 and 90:
Identificazione Alimentatori per LE
- Page 91 and 92:
Esempi applicativi - Application ex
- Page 93 and 94:
Alimentatori NON Dimmerabili con se
- Page 95 and 96:
Alimentatori NON Dimmerabili con se
- Page 97 and 98:
Alimentatori NON Dimmerabili con se
- Page 99 and 100:
Fig. 1 - Comando con pulsante - Pus
- Page 101 and 102:
Fig. 1 - Comando con pulsante - Pus
- Page 103 and 104:
Fig. 1 - Comando con pulsante - Pus
- Page 105 and 106:
www.relco.it 6 5 4 3 2 1 SEC LED +
- Page 107 and 108:
MINIPOWERLED - 6W Dimensioni (mm) -
- Page 109 and 110:
PTDCM/30 - 30W Dimensioni (mm) - Di
- Page 111 and 112:
JOLLY POWERMINILED 65 - 65W Dimensi
- Page 113 and 114:
PTDCC/3 - POWERLED - 3W - 6W Dimens
- Page 115 and 116:
POWERLED 6W - PTDCC/10 - 9W - 10W D
- Page 117 and 118:
POWERLED - 12W Dimensioni (mm) - Di
- Page 119 and 120:
POWERLED SLIM - 14W - 15W Dimension
- Page 121 and 122:
PTDCC/15 - 17W Dimensioni (mm) - Di
- Page 123 and 124:
POWERLED - 20W Dimensioni (mm) - Di
- Page 125 and 126:
PTDCC/40 - 38W Dimensioni (mm) - Di
- Page 127 and 128:
www.relco.it 123 Multi Powerled Pro
- Page 129 and 130:
POWERLED - 12W - 15W - 25W Dimensio
- Page 131 and 132:
POWERLED - 15W Dimensioni (mm) - Di
- Page 133 and 134:
POWERLED DIM - 18W Dimensioni (mm)
- Page 135 and 136:
POWERLED DIM - 36W Dimensioni (mm)
- Page 137 and 138:
Extreme LED www.relco.it Vedi “Ca
- Page 139 and 140:
PTDCCD/15/S10 - 17W Dimensioni (mm)
- Page 141 and 142:
PTDC/3 - 3W Dimensioni (mm) - Dimen
- Page 143 and 144:
PTDCL - 8W - 9W - 10W Dimensioni (m
- Page 145 and 146:
PTDC/10 - 9W - 10W Dimensioni (mm)
- Page 147 and 148:
MINILED FLAT - 15W Dimensioni (mm)
- Page 149 and 150:
MINILED SLIM - 30W Dimensioni (mm)
- Page 151 and 152:
PTDC/40W - 60W - 80W - 90W Dimensio
- Page 153 and 154:
MINILED - 50W - 75W - 90W Dimension
- Page 155 and 156:
www.relco.it 151 Multi Miniled Prog
- Page 157 and 158:
PTDC/80/100 - 80W - 100W Dimensioni
- Page 159 and 160:
PTDCD/40 - 42W Dimensioni (mm) - Di
- Page 161 and 162:
www.relco.it 157 DIM Multi Miniled
- Page 163 and 164:
Fig. 2 - Comando con DIM34 - Contro
- Page 165 and 166:
PTDCC/12-24/S - CONVERLED Dimension
- Page 167 and 168:
www.relco.it 163 Alimentatori per l
- Page 169 and 170:
172 S/BCFE/2x21/B 171 MS14-24 - RN2
- Page 171 and 172:
EBS1x COMPACT LAMPS EBS2x... COMPAC
- Page 173 and 174:
www.relco.it 169 Alimentatori per l
- Page 175 and 176:
Articolo Article MS4-8 230÷240 0,0
- Page 177 and 178:
BCFE Articolo Article TYPE OSRAM BC
- Page 179 and 180:
BCFE/40 Articolo Article TYPE OSRAM
- Page 181 and 182:
BCFEIC Articolo Article TYPE OSRAM
- Page 183 and 184:
www.relco.it 179 Alimentatori per l
- Page 185 and 186:
172 193 193 184 184 184 184 171 171
- Page 187 and 188:
BT5HL.. - BT5QL.. Articolo Article
- Page 189 and 190:
EB2x..G5 EB2x...G5 EN61347-2-3 EN61
- Page 191 and 192:
EB2x..G5/E EB2x...G5 EN61347-2-3 EN
- Page 193 and 194:
EB2x..G13 - EB4x18G13 H P H P 4,2 4
- Page 195 and 196:
BCFR1 Articolo Article S/BCFR1/M18
- Page 197 and 198:
BT5H.. Articolo Article TYPE OSRAM
- Page 199 and 200:
BT8.. Articolo Article TYPE OSRAM S
- Page 201 and 202:
Sistema di regolazione 1÷10V - Reg
- Page 203 and 204:
www.relco.it 199 Alimentatori per l
- Page 205 and 206:
DIML1x... Articolo Article DIML1840
- Page 207 and 208:
DIM1x... Articolo Article DIM118 05
- Page 209 and 210:
FC... Articolo Article FC4 FC9 FC13
- Page 211 and 212:
FP.. FP113 FP118 FP126 Dimensioni (
- Page 213 and 214:
UF.. EEI=B2 UF218.AR UF226.AR Dimen
- Page 215 and 216:
www.relco.it 211 Alimentatori per l
- Page 217 and 218:
www.relco.it Presenza di rete Mains
- Page 219 and 220:
KIT EMER 2 - UF EMER..AR www.relco.
- Page 221 and 222:
KIT EMER 3 KIT EMER 3 Emergenza Eme
- Page 223 and 224:
www.relco.it 219 since 1967 FLUO Si
- Page 225 and 226:
Articolo Article Autonomy (h) enerB
- Page 227 and 228:
EnerBI LED SELV IP20 - - + L N N1L1
- Page 229 and 230:
Fig. 1 Schema di collegamento INVER
- Page 231 and 232:
INVERLUX OB SA-SE Supporto per Inve
- Page 233 and 234:
www.relco.it TC - T/E TC - DDE FC -
- Page 235 and 236:
Tabella 2 - Table 2 - KIT INVERLUX
- Page 237 and 238:
S = Starter LF1 = Lampada fluoresce
- Page 239 and 240:
(*): Quando si parla di azzeramento
- Page 241 and 242:
INVERLUX AUTOTEST DATI TECNICI - TE
- Page 243 and 244:
Punti di forza della gamma sono Fle
- Page 245 and 246:
SIRIO AUTOTEST - VENERE AUTOTEST Ar
- Page 247 and 248:
VENERE 8W VENERE 24W Articolo Artic
- Page 249 and 250:
SIRIO LED - VENERE LED - (SA - SUST
- Page 251 and 252:
1) Kit deflettore per ottica asimme
- Page 253 and 254:
10) Accessorio per l’installazion
- Page 255 and 256:
Articolo - Article Fig. Codice - Co
- Page 257 and 258:
Fig. 1 A Fig. 1 B Fig. 1 C SIGNUM -
- Page 259 and 260:
www.relco.it The solution for all n
- Page 261 and 262:
SERIE SURF - Introduzione SURF RANG
- Page 263 and 264:
Apparecchi di comando non automatic
- Page 265 and 266:
Prodotti abitualmente forniti in as
- Page 267 and 268:
Prodotti abitualmente forniti in as
- Page 269 and 270:
Prodotti abitualmente forniti in as
- Page 271 and 272:
Prese coassiali TV e SAT TV and SAT
- Page 273 and 274:
Prodotti abitualmente forniti in as
- Page 275 and 276:
Prodotti abitualmente forniti in as
- Page 277 and 278:
Apparecchi di comando regolatori Di
- Page 279 and 280:
www.relco.it Perchè a volte basta
- Page 281 and 282:
www.relco.it 2610-L Tasto intercamb
- Page 283 and 284:
www.relco.it 2610-3-C Tasto interca
- Page 285 and 286:
Contenitori da parete Surface mount
- Page 287 and 288:
Placche 3 moduli serie ronde in tec
- Page 289 and 290:
Placche 2 moduli serie carrèe in t
- Page 291 and 292:
Placche 4 moduli serie carrèe in t
- Page 293 and 294:
Materiale pop Comunication system E
- Page 295 and 296:
GAMMA COLORI- Placche serie ronde C
- Page 297 and 298:
Apparecchi di comando non automatic
- Page 299 and 300:
Prese coassiali TV TV coaxial socke
- Page 301 and 302:
SERIE JOLLY - Introduzione JOLLY RA
- Page 303 and 304:
PRODOTTI DA INSTALLAZIONE - Introdu
- Page 305 and 306:
Scatole di derivazione Distribution
- Page 307 and 308:
www.relco.it C-2007 Coperchio con v
- Page 309 and 310:
www.relco.it C-2271 Coperchio in Te
- Page 311 and 312:
www.relco.it 307 Prodotti da INSTAL
- Page 313 and 314:
Apparecchi elettrici per utilizzo d
- Page 315 and 316:
Espositore da terra IN OMAGGIO per
- Page 317 and 318:
Prodotti abitualmente forniti busta
- Page 319 and 320:
Programmatori a spina Plug programm
- Page 321 and 322:
Prodotti abitualmente forniti busta
- Page 323 and 324:
www.relco.it 319 APPARECCHI ELETTRI
- Page 325 and 326:
Multiprese LINGOTTO Multisocket LIN
- Page 327 and 328:
Avvolgicavo per uso domestico (esec
- Page 329 and 330:
Cavi di collegamento per batterie e
- Page 331 and 332:
Accessori telefonici Telephone acce
- Page 333 and 334:
RT78.. - RT99.. Pag. 446 BRAVO SC P
- Page 335 and 336:
www.relco.it 331 VARIALUCE e dispos
- Page 337 and 338:
3 2 1 IR 3 2 1 D 3 2 Rosso www.relc
- Page 339 and 340:
Trasformatori elettronic Electronic
- Page 341 and 342:
Trasformatori elettronici Electroni
- Page 343 and 344:
“SHUI” Varialuce - Dimmer Artic
- Page 345 and 346:
“SHUI” Interruttore - Switch Ar
- Page 347 and 348:
Varialuce per lampade fluorescenti
- Page 349 and 350:
LAMPADE A RISPARMIO ENERGETICO COMP
- Page 351 and 352:
DIMLED.. DATI TECNICI - TECHNICAL D
- Page 353 and 354:
Articolo Article RTS34DMA Magic 40
- Page 355 and 356:
Varialuce con comando deviatore e L
- Page 357 and 358:
Varialuce per ballast elettronici d
- Page 359 and 360:
TABELLA DI COMPATIBILITÀ - BALLAST
- Page 361 and 362:
RM34D.. DATI TECNICI - TECHNICAL DA
- Page 363 and 364:
Fig. 1 Inserire il copriforo nel su
- Page 365 and 366:
LT 2 UN Lampade compatibili Compati
- Page 367 and 368:
RHUN DATI TECNICI - TECHNICAL DATA
- Page 369 and 370:
RTS UN 1000 DATI TECNICI - TECHNICA
- Page 371 and 372: RT UN/dp DATI TECNICI - TECHNICAL D
- Page 373 and 374: RT ES UN/dp DATI TECNICI - TECHNICA
- Page 375 and 376: RMUN DATI TECNICI - TECHNICAL DATA
- Page 377 and 378: RTSUN DATI TECNICI - TECHNICAL DATA
- Page 379 and 380: RLUN DATI TECNICI - TECHNICAL DATA
- Page 381 and 382: Serie OMEGA DATI TECNICI - TECHNICA
- Page 383 and 384: Fig. 9 - MINIMASTER Omega + RH Omeg
- Page 385 and 386: ANALOG Omega DATI TECNICI - TECHNIC
- Page 387 and 388: RTM omega P DATI TECNICI - TECHNICA
- Page 389 and 390: JOLLY Omega DATI TECNICI - TECHNICA
- Page 391 and 392: Fig. 9 - JOLLY Omega - Comando sinc
- Page 393 and 394: Varialuce con comando rotativo Rota
- Page 395 and 396: Varialuce con deviatore incorporato
- Page 397 and 398: RTM65DOA - RTM65DAK DATI TECNICI -
- Page 399 and 400: Accessori per limitazione e protezi
- Page 401 and 402: Regolatore industriale - Industrial
- Page 403 and 404: Regolatore industriale - Comando 0
- Page 405 and 406: Dima di fissaggio Fixing model RTS3
- Page 407 and 408: VTN02 DATI TECNICI - TECHNICAL DATA
- Page 409 and 410: Fig. 1 Fig. 2 R S T N Fig. 3 Fig. 4
- Page 411 and 412: REX A DATI TECNICI - TECHNICAL DATA
- Page 413 and 414: Varialuce da terra o tavolo, con co
- Page 415 and 416: Varialuce da tavolo - Table dimmer
- Page 417 and 418: BRIDGE - Comando rotativo - Rotary
- Page 419 and 420: RTS1 - Comando rotativo - Rotary co
- Page 421: www.relco.it 417 VARIALUCE e dispos
- Page 425 and 426: RONDÓ OPTION - Comando a cursore -
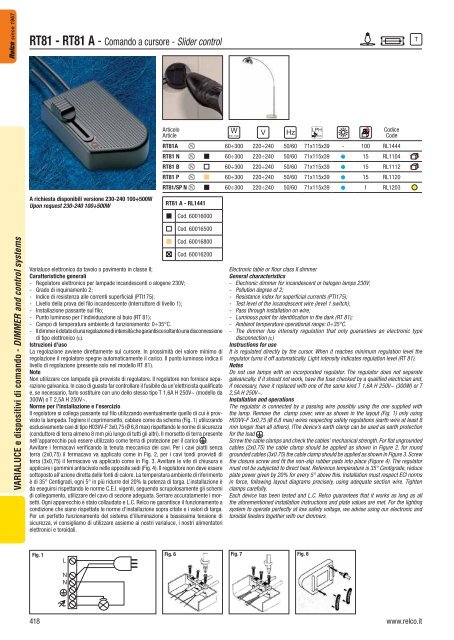
- Page 427 and 428: DD - Comando a cursore - Slider con
- Page 429 and 430: www.relco.it 425 VARIALUCE e dispos
- Page 431 and 432: D1 - Comando a pulsante - Push-butt
- Page 433 and 434: Installazione Il funzionamento avvi
- Page 435 and 436: Lampade compatibili Compatible lamp
- Page 437 and 438: Lampade compatibili Compatible lamp
- Page 439 and 440: 101 S - Comando sensoriale - Sensor
- Page 441 and 442: Con potenziometro 470K separato Wit
- Page 443 and 444: RONDÓ 4F Fig. 1 www.relco.it 220-2
- Page 445 and 446: ZWEILICHT Fig. 1 www.relco.it Artic
- Page 447 and 448: www.relco.it 443 VARIALUCE e dispos
- Page 449 and 450: TOUCH SOLE TOUCH SOLE RTM99SC Artic
- Page 451 and 452: Articolo Article RT99SCG N 40÷300
- Page 453 and 454: RT78PC DATI TECNICI - TECHNICAL DAT
- Page 455 and 456: BRAVO SC - SPACE SC Referenze - Sta
- Page 457 and 458: 5500 SC - 5501 PSC 5500 - 5501 Arti
- Page 459 and 460: 5500 - 7160 www.relco.it 5500 7500
- Page 461 and 462: DUELUCI - DOPPEL - 2BT/PS www.relco
- Page 463 and 464: Progetti speciali - Special project
- Page 465 and 466: Sensore Micro-Onde - Micro-Wawe sen
- Page 467 and 468: SENT RELE’ PLUS DATI TECNICI - TE
- Page 469 and 470: MOBY SENT Esempio applicativo Ante
- Page 471 and 472: MOBY SENT CLOSED Esempio applicativ
- Page 473 and 474:
Luce d’emergenza a spina con LED
- Page 475 and 476:
Gestione illuminotecnica via BUS -
- Page 477 and 478:
La soluzione via BUS, rispetto a qu
- Page 479 and 480:
Bus DIML.. DIM.. SPLASH BIO LIFE ww
- Page 481 and 482:
Apparecchi modulari Il presente fas
- Page 483 and 484:
MTP - Interruttori magnetotermici.
- Page 485 and 486:
DKN www.relco.it DKN 2 POLI Norme -
- Page 487 and 488:
EMM... DATI TECNICI - TECHNICAL DAT
- Page 489 and 490:
Relè monostabile contattore Single
- Page 491 and 492:
Relè luce scale 3 e 4 fili - Light
- Page 493 and 494:
Sistemi onde radio Radio-wave syste
- Page 495 and 496:
TELOS modular ® RICE RADIO UN TELO
- Page 497 and 498:
RICE RADIO UN DATI TECNICI - TECHNI
- Page 499 and 500:
RICE RADIO UN TONDO DATI TECNICI -
- Page 501 and 502:
TELOS RICE OMEGA DATI TECNICI - TEC
- Page 503 and 504:
TELOS RICE PLUS DATI TECNICI - TECH
- Page 505 and 506:
TELOS 4 CH muro DATI TECNICI - TECH
- Page 507 and 508:
TELOS 4 CH DATI TECNICI - TECHNICAL
- Page 509 and 510:
Memorizzazione del codice del trasm
- Page 511 and 512:
TELOS 999 CH DATI TECNICI - TECHNIC
- Page 513 and 514:
Modi di funzionamento Sequenziale:
- Page 515 and 516:
TELOS TX RETE DATI TECNICI - TECHNI
- Page 517 and 518:
www.relco.it 513 Trasformatori di P
- Page 519 and 520:
Fig. 1 Potenza Power (kVA) www.relc
- Page 521 and 522:
Power supply of automatisms To dete
- Page 523 and 524:
Trasformatori monofase di comando e
- Page 525 and 526:
Trasformatori monofase di isolament
- Page 527 and 528:
Trasformatori monofase per uso illu
- Page 529 and 530:
Trasformatori trifase di comando e
- Page 531 and 532:
Trasformatori trifase di isolamento
- Page 533 and 534:
Trasformatori trifase di isolamento
- Page 535 and 536:
Box in metallo per trasformatori ed
- Page 537 and 538:
www.relco.it Catalogo 2013 - Catalo
- Page 539 and 540:
Indice per articolo - Article index
- Page 541 and 542:
Indice per articolo - Article index
- Page 543 and 544:
Indice per articolo - Article index
- Page 545 and 546:
Indice per articolo - Article index
- Page 547 and 548:
Indice per articolo - Article index
- Page 549 and 550:
Indice per articolo - Article index
- Page 551 and 552:
Indice per articolo - Article index
- Page 553 and 554:
Indice per articolo - Article index
- Page 555 and 556:
Indice per codice - Code index Codi
- Page 557 and 558:
Indice per codice - Code index Codi
- Page 559 and 560:
Indice per codice - Code index Codi
- Page 561 and 562:
Indice per codice - Code index Codi
- Page 563 and 564:
Indice per codice - Code index Codi
- Page 565 and 566:
Indice per codice - Code index Codi
- Page 567 and 568:
Indice per codice - Code index Codi
- Page 569 and 570:
Indice per codice - Code index Codi
- Page 571 and 572:
Indice per codice - Code index Codi
- Page 573 and 574:
Organizzazione Vendita Italia - Gro