DIMMER - Relco
DIMMER - Relco
DIMMER - Relco

Create successful ePaper yourself
Turn your PDF publications into a flip-book with our unique Google optimized e-Paper software.
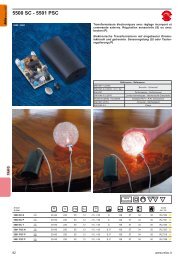
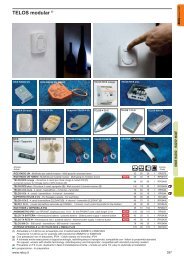
FLUORESCENTI VARIALUCE - - FLUORESCENT<br />
<strong>DIMMER</strong><br />
since 1967<br />
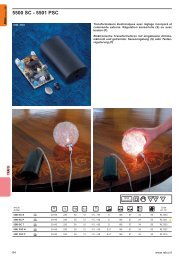
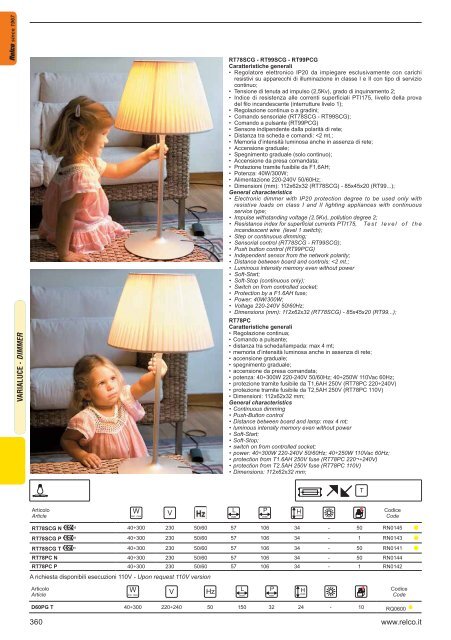
RT78SCG - RT99SCG - RT99PCG<br />
Caratteristiche generali<br />
• Regolatore elettronico IP20 da impiegare esclusivamente con carichi<br />
resistivi su apparecchi di illuminazione in classe I e II con tipo di servizio<br />
continuo;<br />
• Tensione di tenuta ad impulso (2,5Kv), grado di inquinamento 2;<br />
• Indice di resistenza alle correnti superficiali PTI175, livello della prova<br />
del filo incandescente (interrutture livelo 1);<br />
• Regolazione continua o a gradini;<br />
• Comando sensoriale (RT78SCG - RT99SCG);<br />
• Comando a pulsante (RT99PCG)<br />
• Sensore indipendente dalla polarità di rete;<br />
• Distanza tra scheda e comandi:
since 1967<br />
Articolo<br />
Article<br />
Codice<br />
Code<br />
RT99SCG N 40÷300 230 50/60 46 87 21 - 100 RN0151<br />
RT99SCG P 40÷300 230 50/60 46 87 21 - 100 RN0152<br />
RT99SCG T 40÷300 230 50/60 46 87 21 - 100 RN0154<br />
RT99PCG N 40÷300 230 50/60 46 87 21 - 100 RN0147<br />
RT99PCG P 40÷300 230 50/60 46 87 21 - 100 RN0148<br />
RT78...<br />
D60PGT<br />
RT99...<br />
FLUORESCENTI VARIALUCE - - FLUORESCENT<br />
<strong>DIMMER</strong><br />
N<br />
Nero - Black<br />
Indicazione sigla prodotto - Product plate indication<br />
C<br />
Continua - Continuous<br />
P<br />
Paglierino - Gold<br />
G<br />
Gradini - Step<br />
T<br />
Trasparente - Transparent<br />
P<br />
S<br />
Pulsante - Push-button<br />
Sensoriale - Sensorial<br />
www.relco.it<br />
361
since 1967<br />
RT78SCG - RT99SCG - RT99PCG<br />
DATI TECNICI - TECHNICAL DATA<br />
Tabella 1 Classe I Classe II<br />
Cavo di rete 3x0,75 2x0,75<br />
Lato carico RT78SCG/RT99SCG 4x0,75 3x0,75<br />
Lato carico RT99PCG 5x0,75 4x0,75<br />
Attenzione!:<br />
L’installazione e la sostituzione del fusibile in caso di guasto, deve essere<br />
effettuata solo ed esclusivamente da un elettricista qualificato. Qual ora si<br />
rende necessaria la sostituzione del fusibile, sostituirlo con uno dello stesso<br />
tipo (F1, 6AH250V).<br />
Note<br />
L’utilizzo del regolatore con comando sensoriale richiede, per un corretto<br />
funzionamento, il rispetto di alcune norme:<br />
• Il corpo illuminante da tavolo o pavimento deve essere provvisto di supporti<br />
isolanti di altezza minimo 5 mm.<br />
• Il conduttore del sensore deve essere separato da ogni parte in tensione<br />
da un isolamento doppio o rinforzato.<br />
• La superficie sensoriale, qualora venga utilizzato l’intero corpo lampada,<br />
deve avere una buona conduzione elettrica tra tutte le sue parti (base,<br />
stelo, ecc.). La laccatura della lampada riduce la sensibilità e la conduzione<br />
elettrica tra le parti.<br />
• Il corpo illuminante deve essere provvisto di un dispositivo di ancoraggio<br />
per il conduttore del sensore che assicuri una buona tenuta meccanica e<br />
conduzione elettrica con il corpo lampada.<br />
• Al momento dell’inserzione della spina di rete il dispositivo regola<br />
automaticamente la sensibilità del sensore, non toccare la lampada durante<br />
questa operazione. Se si varia la superficie d’appoggio della lampada la<br />
sensibilità potrebbe variare.<br />
Modalità d’uso<br />
Determinare la modalità di funzionamento per mezzo dei jumper colorati posizionati<br />
sulla scheda come infigura 1 secondo la tabella riportata di seguito.<br />
Table 1 Class I Class II<br />
Power cable 3x0,75 2x0,75<br />
Load side RT78SCG/RT99SCG 4x0,75 3x0,75<br />
Load side RT99PCG 5x0,75 4x0,75<br />
Attention!<br />
Installation and replacement of a fuse in case of fault, must be carried<br />
out exclusively by a qualified electrician. If necessary to replace the<br />
fuse, use the same type (F1. 6AH250V)..<br />
Note<br />
The following standards must be respected in order to use the sensorial<br />
dimmer:<br />
• The table or floor lamp must have insulating supports of a minimum<br />
height of 5 mm.<br />
• The sensor wire must be separated from the power cable or lamp and<br />
must have double insulation or be reinforced.<br />
• The sensorial surface , when used on the entire lamp, must have<br />
good electrical conduction amongst all parts (base , stand, etc.). The<br />
lamp coating reduces the sensitivity and electric conduction amongst<br />
the parts.<br />
• The lamp must be provided with an anchorage device for the sensor<br />
wire that ensures a good mechanical withstanding and electric<br />
conduction with the sensorial parts of the lamp.<br />
• When inserting the plug into the socket, the device automatically dims<br />
the sensor sensitivity. do not touch the lamp during this operation. If<br />
the lamp support surface varies, the sensitivity may vary.<br />
How to use<br />
Determine the function mode by using the coloured jumpers positioned<br />
on the board as shown in figure 1, according to the table reported<br />
below.<br />
FLUORESCENTI VARIALUCE - - FLUORESCENT<br />
<strong>DIMMER</strong><br />
Jumper Inserito Escluso<br />
Rosso Spento Memoria<br />
Nero Regolazione a gradini Regolazione continua<br />
La configurazione di default è con entrambi i jumper inseriti, quindi regolazione<br />
a gradini senza accensione da presa comandata. Eseguire le operazioni<br />
di inserzione o disinserzione dei jumper in assenza di tensione di rete,<br />
diversamente le funzioni non verranno abilitate.<br />
Funzionamento a gradini<br />
L’accensione avviene tramite un breve tocco sulla parte sensoriale/<br />
pulsante della lampada. Per ottenere la regolazione dell’intensità luminosa<br />
agire ripetutamente sulla parte sensoria-le/pulsante della lampada sino<br />
a raggiungere il livello d’intensità luminosa desiderata. Per spegnere da<br />
qualsiasi livello di regolazione mantenere il contatto con la parte sensoriale/<br />
pulsante della lampada per circa 1 secondo. Se viene tolto il jumper rosso<br />
viene abilitata la funzione memoria da presa comandata.Sequenza luminosa:<br />
Spento, Massimo, Medio, Minimo, Luce notturna, Spento.<br />
Funzionamento continuo<br />
La regolazione avviene agendo direttamente sulla parte sensoriale/pulsante<br />
della lampada. L’accensione avviene tramite un breve tocco sulla parte<br />
sensoriale/pulsante della lampada. Per ottenere la regolazione dell’intensità<br />
luminosa mantenere il contatto con la parte senso-riale/pulsante della lampada<br />
sino a raggiungere il livello d’intensità luminosa desiderata: a livello raggiunto<br />
interrompere il contatto. Qualora si desideri invertire il senso di regolazione<br />
interrompere il contatto e ripristinarlo. Lo spegnimento avviene agendo<br />
nuovamente con un breve tocco sulla parte sensoriale/pulsante. Al momento<br />
dello spegnimento il valore dell’intensità luminosa viene memorizzato per<br />
essere ripristinato alla nuova accensione. Un tocco leggermente prolungato al<br />
momento dell’accensione permette di ottenere diret-tamente il massimo della<br />
luminosità. Se viene abilitata la funzione di accensione da presa comandata<br />
(jumper rosso escluso) il regolatore si accenderà con la luminosità impostata<br />
prima di essere spento.<br />
Jumper Inserted Excluded<br />
Red Off Memory<br />
Black Step dimming Continuous dimming<br />
Insert both jumpers for default configuration, i.e. step dimming without<br />
switch on from the controlled socket. Disconnect the power supply<br />
before inserting and disconnecting the jumpers, otherwise the functions<br />
will not be enabled.<br />
Step function<br />
Touch briefly the sensorial part of the lamp or the push button to switch<br />
on. To dim the luminous intensity, act repeatedly on the sensorial part of<br />
the lamp or the push button until the desired luminous intensity is reached.<br />
To switch off any dimming level hold the contact using the sensorial part<br />
of the lamp or the push button, for approximately 1 second. If the red<br />
jumper is removed, the memory function from the controlled socket is<br />
enabled. Lighting sequence as follows: Off, Maximum, Medium, Minimum,<br />
Night light, Off.<br />
Continuous function<br />
To dim use the sensorial part of the lamp or the push button. Touch<br />
briefly the sensorial part of the lamp or the push button to switch on. To<br />
dim the luminous intensity, act repeatedly on the sensorial part of the<br />
lamp or the push button until the desired luminous intensity is reached.<br />
When the level is reached, interrupt the contact. If the dimming<br />
direction is to be changed, interrupt the contact and reset the direction.<br />
To switch off, briefly press the sensorial part of the lamp or the push<br />
button again. At switch off, the luminous intensity is memorised and is<br />
reset when switched on again. A prolonged touch at switch on obtains<br />
directly maximum luminosity. If switch on from the controlled socket is<br />
enabled (red jumper excluded), the dimmer switches on with the luminosity<br />
set before switch off.<br />
362 www.relco.it
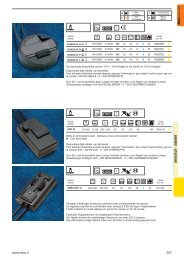
since 1967<br />
L<br />
N<br />
L<br />
Pulsante<br />
NA<br />
Push button<br />
N<br />
RT78SCG<br />
Sensore<br />
Sensor<br />
N<br />
RT799PCG<br />
Posizionare il Jumper per selezionare<br />
la modalità d’uso<br />
Position the jumper to select the user<br />
mode<br />
Staccare la spina<br />
Pull out the plug<br />
SERIE RT78PC<br />
DATI TECNICI - TECHNICAL DATA<br />
Tabella 1 Classe I Classe II<br />
Cavo di rete 3x0,75 2x0,75<br />
Lato carico RT78PC 5x0,75 4x0,75<br />
Funzionamento<br />
La regolazione avviene agendo direttamente sul pulsante. L’accensione<br />
avviene per il tramite di un breve tocco sul pulsante della lampada. Per<br />
ottenere la regolazione dell’intensità luminosa mantenere premuto il<br />
pulsante della lampada sino a raggiungere il livello d’intensità luminosa<br />
desiderata: a livello raggiunto interrompere il contatto. Qualora si desideri<br />
invertire il senso di regolazione interrompere il contatto e ripristinarlo. Lo<br />
spegnimento avviene agendo nuovamente con un breve tocco sul pulsante.<br />
Al momento dello spegnimento il valore dell’intensità luminosa viene<br />
memorizzato per essere ripristinato alla nuova accensione. A seconda<br />
dei mercati, il circuito può essere provvisto di un buzzer che indicherà<br />
la dimmerazione.<br />
Fig. 1 - RT78PC<br />
Table 1 Class I Class II<br />
Power cable 3x0,75 2x0,75<br />
Load side RT78PC 5x0,75 4x0,75<br />
Function<br />
Act directly on the push button to dim. Briefly touch the lamp’s push<br />
button to switch on. To dim the luminous intensity, act repeatedly on the<br />
sensorial part of the lamp or the push button until the desired luminous<br />
intensity is reached. When the level is reached, interrupt the contact. If<br />
the dimming direction is to be changed, interrupt the contact and reset<br />
the direction. To switch off, briefly press the push button again. At switch<br />
off, the luminous intensity is memorised and is reset when switched on<br />
again. Depending on the markets, the circuit could be provided with a<br />
buzzer that indicates the dimmer function<br />
Fig. 2 - RT78PC<br />
max 4mt<br />
FLUORESCENTI VARIALUCE - - FLUORESCENT<br />
<strong>DIMMER</strong><br />
N<br />
N<br />
L<br />
PULSANTE<br />
PUSH-BUTTON<br />
max 4mt<br />
Fig. 3 - RT78PC<br />
max 4mt<br />
max 4mt<br />
www.relco.it<br />
363