526LT-ALT - R16 - V-Tech Garage Equipment
526LT-ALT - R16 - V-Tech Garage Equipment
526LT-ALT - R16 - V-Tech Garage Equipment

Create successful ePaper yourself
Turn your PDF publications into a flip-book with our unique Google optimized e-Paper software.
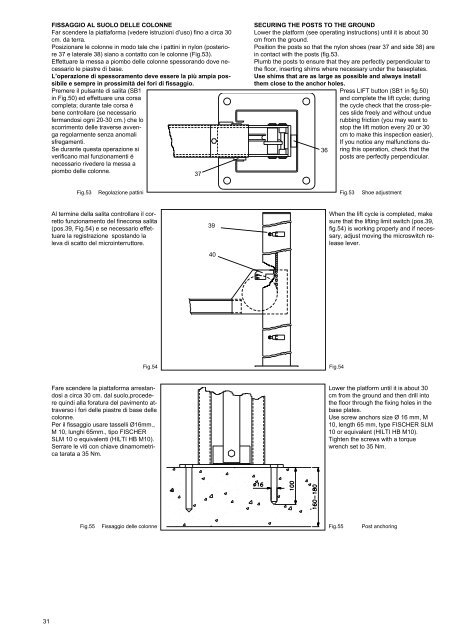
FISSAGGIO AL SUOLO DELLE COLONNE<br />
Far scendere la piattaforma (vedere istruzioni d’uso) fino a circa 30<br />
cm. da terra.<br />
Posizionare le colonne in modo tale che i pattini in nylon (posteriore<br />
37 e laterale 38) siano a contatto con le colonne (Fig.53).<br />
Effettuare la messa a piombo delle colonne spessorando dove necessario<br />
le piastre di base.<br />
L’operazione di spessoramento deve essere la più ampia possibile<br />
e sempre in prossimità dei fori di fissaggio.<br />
Premere il pulsante di salita (SB1<br />
in Fig.50) ed effettuare una corsa<br />
completa; durante tale corsa é<br />
bene controllare (se necessario<br />
fermandosi ogni 20-30 cm.) che lo<br />
scorrimento delle traverse avvenga<br />
regolarmente senza anomali<br />
sfregamenti.<br />
Se durante questa operazione si<br />
verificano mal funzionamenti é<br />
necessario rivedere la messa a<br />
piombo delle colonne.<br />
37<br />
SECURING THE POSTS TO THE GROUND<br />
Lower the platform (see operating instructions) until it is about 30<br />
cm from the ground.<br />
Position the posts so that the nylon shoes (rear 37 and side 38) are<br />
in contact with the posts (fig.53.<br />
Plumb the posts to ensure that they are perfectly perpendicular to<br />
the floor, inserting shims where necessary under the baseplates.<br />
Use shims that are as large as possible and always install<br />
them close to the anchor holes.<br />
Press LIFT button (SB1 in fig.50)<br />
and complete the lift cycle; during<br />
the cycle check that the cross-pieces<br />
slide freely and without undue<br />
rubbing friction (you may want to<br />
stop the lift motion every 20 or 30<br />
cm to make this inspection easier).<br />
If you notice any malfunctions during<br />
this operation, check that the<br />
36<br />
posts are perfectly perpendicular.<br />
Fig.53<br />
Regolazione pattini<br />
Fig.53<br />
Shoe adjustment<br />
Al termine della salita controllare il corretto<br />
funzionamento del finecorsa salita<br />
(pos.39, Fig.54) e se necessario effettuare<br />
la registrazione spostando la<br />
leva di scatto del microinterruttore.<br />
39<br />
40<br />
When the lift cycle is completed, make<br />
sure that the lifting limit switch (pos.39,<br />
fig.54) is working properly and if necessary,<br />
adjust moving the microswitch release<br />
lever.<br />
Fig.54<br />
Fig.54<br />
Fare scendere la piattaforma arrestandosi<br />
a circa 30 cm. dal suolo,procedere<br />
quindi alla foratura del pavimento attraverso<br />
i fori delle piastre di base delle<br />
colonne.<br />
Per il fissaggio usare tasselli Ø16mm.,<br />
M 10, lunghi 65mm., tipo FISCHER<br />
SLM 10 o equivalenti (HILTI HB M10).<br />
Serrare le viti con chiave dinamometrica<br />
tarata a 35 Nm.<br />
Lower the platform until it is about 30<br />
cm from the ground and then drill into<br />
the floor through the fixing holes in the<br />
base plates.<br />
Use screw anchors size Ø 16 mm, M<br />
10, length 65 mm, type FISCHER SLM<br />
10 or equivalent (HILTI HB M10).<br />
Tighten the screws with a torque<br />
wrench set to 35 Nm.<br />
Fig.55<br />
Fissaggio delle colonne<br />
Fig.55<br />
Post anchoring<br />
31