Create successful ePaper yourself
Turn your PDF publications into a flip-book with our unique Google optimized e-Paper software.
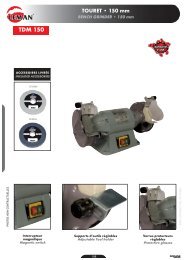
PROTOOL • <strong>DGP</strong> <strong>30</strong>-8 E • 00625033 • OSW<br />
<strong>DGP</strong> <strong>30</strong>-8 E.<strong>book</strong> Seite 8 Montag, 27. Januar 2003 2:40 14<br />
Putting into Operation<br />
The voltage specifications on the rating plate must<br />
correspond with the mains voltage. Equipment<br />
marked with 2<strong>30</strong> V can also be connected to 220 V/<br />
240 V.<br />
Switching On and Off<br />
Switching on:<br />
Slide On/Off switch (1) forwards and depress at the<br />
front until switch locks into position.<br />
Switching off:<br />
Depress On/Off switch (1) at the rear-switch jumps<br />
back to its initial position.<br />
RPM Preselection (electronic)<br />
The desired rotational speed can be preselected with<br />
the thumbwheel (9) (also possible during operation).<br />
The rotational speed to be used depends upon<br />
the material and can be determined in actual practice.<br />
For higher loading of the machine, always set the<br />
control (9) to the maximum speed.<br />
To prevent damage, the machine should not be<br />
operated at low speed settings without load.<br />
Wear protective goggles!<br />
Optimum grinding results are obtained when the<br />
abrasive wheel is moved uniformly back and forth<br />
under light pressure. Excessive pressure reduces the<br />
efficiency of the machine and the abrasive wheel<br />
wears out quicker.<br />
Discontinue using abrasive wheels which are out of<br />
true: dress with a whetstone or replace. Clamp the<br />
clamping sleeve with the holding clamps (accessory)<br />
in a vice and attach the grinder on the clamping<br />
flange (43 mm dia.).<br />
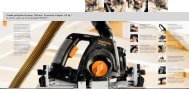
Mounting the Grinding Tools<br />
Hold the grinder spindle at the front with one of the<br />
two spanners (8).<br />
Loosen the clamping nut (5) with the second spanner<br />
(8).<br />
Insert the clamping shaft of the grinding tool as far<br />
as possible into the collet (7). The grinding tool<br />
must not protrude from the collet (7) more that the<br />
dimension l.<br />
The dimensions for tools with a = 6 mm are given<br />
in the following table:<br />
d<br />
d (mm)<br />
12<br />
16<br />
20<br />
25<br />
Tighten the clamping nut (5).<br />
Test run the new grinding tool unloaded for approx.<br />
one minute.<br />
Use only well balanced grinding tools of high<br />
quality.<br />
Maintenance<br />
l<br />
l (mm)<br />
50<br />
50<br />
40<br />
35<br />
❑ The ventilation slots on the motor casing should<br />
be cleaned out from time to time.<br />
After an operating period of approx. 100 hours, the<br />
following maintenance work must be performed:<br />
❑ Check the motor brushes and replace if necessary.<br />
Clean the motor housing.<br />
To verify that the protective insulation<br />
remains intact, the machine must be subjected<br />
to a technical safety test afterwards.<br />
For this reason, this work must be performed<br />
exclusively by a professional electro-workshop.<br />
a<br />
8