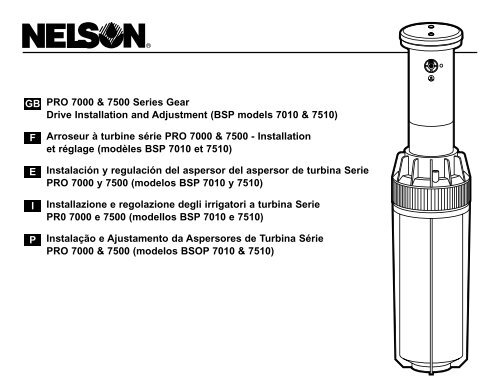
GB F E I P PRO 7000 & 7500 Series Gear Drive Installation and ...
GB F E I P PRO 7000 & 7500 Series Gear Drive Installation and ...
GB F E I P PRO 7000 & 7500 Series Gear Drive Installation and ...

You also want an ePaper? Increase the reach of your titles
YUMPU automatically turns print PDFs into web optimized ePapers that Google loves.
®<strong>GB</strong>FEIP<strong>PRO</strong> <strong>7000</strong> & <strong>7500</strong> <strong>Series</strong> <strong>Gear</strong><strong>Drive</strong> <strong>Installation</strong> <strong>and</strong> Adjustment (BSP models 7010 & 7510)Arroseur à turbine série <strong>PRO</strong> <strong>7000</strong> & <strong>7500</strong> - <strong>Installation</strong>et réglage (modèles BSP 7010 et 7510)Instalación y regulación del aspersor del aspersor de turbina Serie<strong>PRO</strong> <strong>7000</strong> y <strong>7500</strong> (modelos BSP 7010 y 7510)Installazione e regolazione degli irrigatori a turbina SeriePR0 <strong>7000</strong> e <strong>7500</strong> (modellos BSP 7010 e 7510)Instalação e Ajustamento da Aspersores de Turbina Série<strong>PRO</strong> <strong>7000</strong> & <strong>7500</strong> (modelos BSOP 7010 & 7510)
THIS SIDE UP<strong>GB</strong>®<strong>PRO</strong> <strong>7000</strong> & <strong>7500</strong> <strong>Series</strong> <strong>Gear</strong><strong>Drive</strong> <strong>Installation</strong> <strong>and</strong> Adjustment(BSP models 7010 & 7510),,,,,,,,,,,,,,,,,,,,,,,,,,,,,,,,,,,,,,,,,,,6. PART CIRCLE ADJUSTMENTA. Remove Click-Set ® disk <strong>and</strong> manually turnsprinkler until nozzle points to the center of thedesired watering area.6.THIS SIDE UPFULL CIRCLE1. ATTACH TO UNDERGROUND PIPECAUTION: do not use pipe dope1.B. Place Click-Set ® disk in position gray side up,adjust collars to desired angle.THIS SIDE UPPART CIRCLENote: For easiest installation,install nozzle <strong>and</strong> adjust arc aftersprinkler is in ground.2. CLAMP IN “UP” POSITIONA. <strong>7000</strong> - Insert wrench at pull up point on cap plateat either end of the Nelson logo. Pull up until allthree nozzle openings appear; slip clamp in place.B. <strong>7500</strong> - Insert wrench on stainless steel plateunder cap <strong>and</strong> pull up until all three nozzleopenings appear; slide clamp in place.3. REMOVE CAPRemove two phillips screws in rubber cap <strong>and</strong> liftcap off.4. SELECT AND INSTALL NOZZLEBack out nozzle retaining screw until nozzle holeis cleared. Slip nozzle into hole <strong>and</strong> tighten screw.Make sure screw is driven in far enough to holdthe nozzle in place. For maximum distance, donot diffuse spray with screw.For heads at the bottom of slopes an ADV disk canbe installed to reduce run-off when the system is off.2.4.3.C. Memory ring protection. If sprinkler is manuallyturned past the set pattern, the memory ring willtemporarily pop out of position while the sprinklerrotates around to its original part circle pattern. If thememory ring gets out of position while setting the pattern,remove the disk <strong>and</strong> rotate the ring with yourfingers until the tab clicks into place.7. CHECK WITH WATER ONCheck part circle patterns. Turn nozzle retainingscrew clockwise to diffuse spray as needed.CAUTION: Turn water on SLOWLY to bleed airduring initial start-up. We recommend a velocity fillrate of less than 2 feet per second.8. REPLACE CAPReplace cap with indicator pointing in direction ofnozzle <strong>and</strong> install screws. Pull up piston slightlywith wrench to remove clamp. Let piston down<strong>and</strong> remove wrench.9. EASY MAINTENANCETo clean filter or service sprinkler; unscrewcanister top <strong>and</strong> remove sprinkler. Note: Theplate on top of the piston should not be removed.Remove filter by pulling center knob or sidetabs with pliers.UPNormal7.UPOut of Position8.5. FULL CIRCLE ADJUSTMENTFor FULL CIRCLE; leave black side up. No needto set collars.9.5.FULL CIRCLE2
FArroseur ò turbine série <strong>PRO</strong> <strong>7000</strong>& <strong>7500</strong> - <strong>Installation</strong> et réglage(modèles BSP 7010 et 7510)®,,,,,,,,,,,,,,,,,,,,,,,,,,,,,,,,,,,,,,,,,,,6. REGLAGE DU SECTEURA. Retirer le disque Click-Set ® et fairetourner I’arroseur à la main pour diriger la buse surle centre de la zone d’arrosage souhaitée.6.THIS SIDE UPFULL CIRCLE1. RACCORDEMENT A LA TUYAUTERIE SOUTERRAINEATTENTION: Ne pas employer d’enduit d’enrobageRemarque: Pour faciliter l'installation,installer la buse et réglerle secteurd’arrosage une fois l'arroseur rotatifdans le sol.2. SOULEVEMENT DU PISTONA. Modèle <strong>7000</strong> - Insérer la clé sous le décrochagedu couvercle d’un côté ou de I’autre du symboleNelson. Tirer pour faire apparaître les troisouvertures du gicleur; glisser le crampon en place.B. Modèle <strong>7500</strong> - Insérer la c16 sur la plaque enacier inoxydable sous le couvercle et tirer pourfaire apparaîre les trois ouvertures du gicleur;glisser le crampon en place.3. RETIRER LE COUVERCLERetirer les deux vis cruciformes du couvercle encaoutchouc et le soulever.4. SELECTIONNER ET METTRE EN PLACE LA BUSEDégager la vis de fixation de la buse. Faire glisserla buse dans l’ouverture et serrer la vis. Cettedernière doit être vissée suffisammentprotondément pour maintenir la buse en place.Pour une distance maximum, ne pas brider le jet àI’aide de la vis.Pour les turbines installées en bas de talus, unclapet antividange peut être installé afin de réduirele flaquage lorsque le système s'arrête.2.4.1.3.B. Mettre le disque Click-Set ® en place, la partiegrise dirigee vers le haut. Régler les colliers enfonction de I’angle souhaité.C. Protection de l’anneau memoire. Si I’arroseurest tourné à la main au-delà du schéma d’arrosagepour lequel il est réglé, I’anneau mémoire va sedéplacer temporairement pendant que I’arroseurtourne autour de son schéma de rotation partielle. SiI’anneau mémoire se déplace au cours du réglage duschéma d’arrosage, retirer le disque et faire tournerI’anneau à la main pour enclencher la lame.7. <strong>PRO</strong>CEDER A UN ESSAIVérifier le réglage des schémas d’arrosage enrotation partielle. Tourner la vis de fixation de la busedans le sens des aiguilles d’une montre pourdiffuser le jet en position souhaitée.ATTENTION: Ouvrir l'eau LENTEMENT pourévacuer l'air au cours demarrage initial. Nousrecomm<strong>and</strong>ons une vélocité inférieure à 0.6 m/s.8. REMETTRE LE COUVERCLE EN PLACERemettre en place le couvercle, le repère dirigévers la buse et installer les vis. Tirer légèrement surle piston avec la clé àvis pour retirer le crampon.Laisser descendre le piston et retirer la clé.9. ENTRETIEN FACILEPour nettoyer le filtre ou procéder à la maintenancede I’arroseur, dévisser I’écrou du boîtier et retirerI’arroseur. Remarque: La plaque située en haut dupiston ne doit pas être démontée. Retirer le filtre entirant sur le bouton situé au centre ou sur les lameslatérales avec des pinces.UPTHIS SIDE UPPART CIRCLEPosition normale7.9.UPHors position8.5. REGLAGE EN PLEIN CERCLE Pour réglerI’appareil sur ROTATION INTEGRALE, laisser lecôté noir en position visible; il n’est pas nécessairede régler les colliers.5.THIS SIDE UPFULL CIRCLE3
E®Instalación y ajuste del sector delos aspersores serie<strong>PRO</strong> <strong>7000</strong> y <strong>7500</strong>(modelos BSP 7010 y 7510)1. ENRROSQUE EL ASPERSOR EN LA TUBERIA, O BOBINAiCUIDADO!: No utilice pegalento,,,,,,,,,,,,,,,,,,,,,,,,,,,,,,,,,,,,,,,,,,,1.6. AJUSTE DEL CIRCULO PARCIALA. Retire el disco Click-Set ® y haga girarmanualmente el aspersor hasta que la boquillaapunte hacia el centro del área de riego deseada.B. Coloque el disco Click-Set ® con la posiciongris hacia arriba y ajuste los anillos hasta obtener elángulo deseado.6.THIS SIDE UPPART CIRCLETHIS SIDE UPFULL CIRCLENota: Para facilitar la instalación, instale laboquilla y ajuste el arco después de colocar elaspersor sobre el terreno.2. COLOQUE LA LLAVE EN LA POSICION VERTICALA. <strong>7000</strong>. Inserte la llave en el punto de extracciónde la tapa, en cualquiera de los extremos dellogotipo de Nelson. Tire hacia arriba, hasta queaparezcan las tres aberturas del la boquilla;desplace la llave hasta la posición correcta.B. <strong>7500</strong>. Inserte la llave en la placa de aceroinoxidable que se encuentra bajo la tapa y tirehacia arriba, hasta que aparezcan las tresaberturas de la boquilla; desplace la abrazaderahasta la posición correcta.3. RETIRE LA TAPASaque los dos tornillos Phillips de la tapa de gomay extraiga la tapa.4. SELECCIONE LA BOQUILLA E INSTALELOAfloje el tornillo de retén de la boquilla hasta queel orificio del mismo esté despejado. Deslice laboquilla dentro del orificio y vuelva a ajustar el tornillo. Asegúrese de que el tornillo mantenga laboquilla en su posición. Para alcanzar la máximadistancia posible, no difunda el chorro con eltornillo.Para cabezales ubicados al pie de una pendiente,se puede instalar un disco ADV para evitar laacumulación de líquido cu<strong>and</strong>o el sistema seencuentre apagado2.4.5.3.THIS SIDE UPFULL CIRCLEC. Proteccion del anillo de memoria. Si se hacegirar el aspersor màs allà de la posición establecida,el anillo de memoria se saldrá temporalamente delugar mientras el aspersor gira hacia la parte del ciclooriginal. Si el anillo de memoria se sale de lugar aldefinir la posición, retire el disco y haga girar manualmenteel anillo hasta que la lengüeta se coloque enla posición correcta.7. CONTROLE LOS AJUSTES EFECTUADOSCON AGUAControle los patrones de círculos parciales. Hagagirar el tornillo de retén del aspersor hacia laderecha para difundir el chorro.iCUIDADO!: Ábra el agua DESPACIO parainyectar aire durante el encendido inicial. Serecomienda una velocidad de llenado de menos de0,6 metros por segundo8. VUELVA A COLOCAR LA TAPAVuelva a colocar la tapa con el indicador apunt<strong>and</strong>ohacia el aspersor e inserte los tornillos. Paraextraer la abrazadera, utilice una llave para tirarligeramente hacia arriba el piston. Deje caer elpistón y retire la llave.9. FACIL MANTENIMIENTOPara limpiar el filtro o prestar servicio a laaspersor; desatornille el extremo de la cubierta yextraiga la aspersor. Nota: la placa que se hallaencima del pistón no debe ser extraída. Paraextraer el filtro, tire de la perilla central o de laslengüetas laterales con pinzas.UPPosición normal7.9.UPFuera de su posiciónnormal8.45. AJUSTE DEL CIRCULO COMPLETOPara FULL CIRCLE, deje el lado negro hacia arriba. No es necesarioajustar los anillos.
IInstallazione e regolazionedegli irrigatori a turbina Serie<strong>PRO</strong> <strong>7000</strong> e <strong>7500</strong>(modellos BSP 7010 e 7510)1. COLLEGARE ALLA CONDUTTURA SOTTERRANEAATTENZIONE: non utilizzare materiali sigillanti per raccordi®,,,,,,,,,,,,,,,,,,,,,,,,,,,,,,,,,,,,,,,,,,,1.6. REGOLAZIONE DELL ´ANGOLOA. Rimouvere il disco Click-Set ® e far girareI’ugello manualmente verso il centro della zona dairrigare.B. Collocare il disco Click-Set ® con il lato grigiorivolto verso l’alto, regolare gli anelli distanziatoriper ottenere I’angolo desiderato.6.THIS SIDE UPPART CIRCLETHIS SIDE UPFULL CIRCLENota: per una più facile installazione, installareI’ugello e regolare I’angolo di lavoro dopo avercollocato l’irrigatore nel terreno.2. ESTARRE LA TORRETTA FISSARE IL COLLAREA. <strong>7000</strong> - Inserire la chiave nel punto di sporgenzadel coperchio in corrispondenza di una delleestremita `del logo Nelson. Tirare verso I’altro finoa qu<strong>and</strong>o non compaiano tutti e tre i fori degliugelli; posizionare il collare.B. <strong>7500</strong> - Inserire la chiave sulla piastra in acciaioinossiclabile sotto il copriugello e tirare verso I’altofino a qu<strong>and</strong>o non compaiano tutti e tre i fori degliugelli; posizionare il collare.2.C. Anello di memoria. Se l’irrigatore viene spostatoinavvertitamente al di fuori dello schema impostato,I’anello di memoria viene temporaneamente dalla suasede, mentre l’irrigatore ritorna allo schema adangolo originale. Se I’anello esce dalla sua sededurante l’impostazione dello schema, togliere il discoe far girare I’anello manualmente per far scattare lalinguetta nella sede.7. VERIFICA DEL FUNZIONAMENTO:Verificare Iángolo di lavaro preimpostato. Avvitarela vite rompigetto per ottenere la diffusione delgetto desiderata.ATTENZIONE: aprire I’acqua LENTAMENTE perfar fuoriuscire I’aria all’avvio iniziale. Si consiglia unavelocità di riempimento inferiore a 60 cm al secondoUPNormaleUPDislocato dalla sede3. RIMUOVERE IL COPRIUGELLO Svitare le dueviti con testa a croce dal copriugello in gomma easportare il copriugello.4. SELEZIONARE E INSTALLARE L’UGELLOEstrarre la vite di tenuta dell’ugello per liberare ilforo dell’ugello. Inserire I’ugello nel foro e stringerela vite. Verificare che la vite sia inseritasufficientemente per fissare I’ugello. Per le gittatepiù lunghe, non sfrangiare il getto con la vite.Gli irrigatori posti in fondo a pendii possono esseredotati di valvola ADV per ridurre il deflusso durante iperiodi di inattività del sistema.5. REGOLAZIONE A CERCHIO INTEROPer la REGOLAZIONE A CERCHIO INTERO,Lasciare it disco CLICK-SET ® con la parte nerarivolta verso I’alto. Non é necessario regolare glianelli distanziatori.4.5.3.THIS SIDE UPFULL CIRCLE8. INSTALLARE IL COPRIUGELLOInstallare il copriugello in modo che l’indicatore siarivolto verso I’ugello e riavvitare le viti. Tirareleggermente il pistone verso I’alto con la chiave perrimuovere il collare. Lasciar scendere il pistonenella posizione originale e rimuovere la chiave.9. FACILE MANUTENZIONEPer pulire il filtro o effettuare la manutenzionedell’irrigatore, svitare la ghiera dal corpo inferioreed estrarre I’irrigatore. Nota: non rimuovere ilcoperchio collocata sull’estremità superiore delpistone. Con un paio di pinze, estrarre il filtrotir<strong>and</strong>o la sporgenza centrale oppure le linguettelaterali.7.9.8.5
PInstalação e Ajustamento daAspersores de Turbina SériePro <strong>7000</strong> & <strong>7500</strong>(modelos BSP 7010 & 7510)1. LIGUE AO CANO SUBTERRÂNEOCUIDADO: Não use "Linho"®,,,,,,,,,,,,,,,,,,,,,,,,,,,,,,,,,,,,,,,,,,,1.6. AJUSTE PARA UM CÍRCULO PARCIALA. Retire o disco configuração de clique e rode oaspersor manualmente até o bocal apontar para ocentro da área que se deseja irrigar.B. Coloque o disco de configuração de cliquecom o lado cinzento virado para cima, ajuste osanéis para o ângulo desejado.6.THIS SIDE UPPART CIRCLETHIS SIDE UPFULL CIRCLENota: Para uma instalação mais fácil, instaleo bicol e ajuste o arco qu<strong>and</strong>o o aspersorestá no colocado no solo.2. FIXE O GRAMPO POSICIONADO PARA CIMA “UP”A. <strong>7000</strong> - Introduza a chave inglesa no ponto dearrancar na chapa da cobertura numa dasextremidades do logo Nelson. Puxe para cima atéaparecerem todas as três aberturas do bico; deslizeo grampo coloc<strong>and</strong>o-o na sua posição.B. <strong>7500</strong> - Introduza a chave inglesa na chapa deaço inoxidável sob a cobertura e puxe para cimaaté aparecerem todas as três aberturas do bico;deslize a grampo coloc<strong>and</strong>o-o na sua posição.3. RETIRE A COBERTURARetire os dois parafusos Phillips na cobertura deborracha e levante a cobertura.4. SELECCIONE E INSTALE O BICODesaparafuse o parafuso retentor do bicol até oorifício do bicol ficar desimpedido. Coloque o bicono orifício e aperte o parafuso. Assegure-se que oparafuso está suficientemente aparafusado, a fimde manter o bicol em posição.Para cabeças nos sopés de encostas, pode-seinstalar um disco ADV para reduzir o escoamentode água qu<strong>and</strong>o o sistema está desligado.5. AJUSTE PARA UM CÍRCULO COMPLETOPara obter UM CÍRCULO COMPLETO; deixe aparte preta virada para cima. Não é necessárioregular os anéis.2.4.5.3.THIS SIDE UPFULL CIRCLEC. Protecção do anel da memória. Se o aspersorfor rodado manualmente para além da configuraçãoestabelecida, o anel da memória ressaltarátemporariamente da sua posição enquanto oaspersor roda à volta para a sua configuração decírculo parcial original.7. VERIFIQUE COM A ÁGUA LIGADAVerifique as configurações de círculo parcial. Rode oparafuso retentor do bico no sentido dos ponteiros dorelógio para difundir o jacto conforme necessário.CUIDADO: Abra a torneira da água LENTAMENTEpara purgar o ar durante o arranque inicial.Recomendamos um volume de água a uma taxa deenchimento de velocidade inferior a 2 péspor segundo.8. REPONHA A COBERTURAColoque a cobertura com o indicador apontado nadirecção do bico e instale o parafuso. Puxe o pistãoligeiramente para cima com a chave inglesa pararetirar o grampo. Deixe o pistão baixar e retire achave inglesa.9. FÁCIL MANUTENÇÃOPara limpar o filtro ou para prestar assistênciatécnica ao aspersor; desaparafuse o topo da caixa eretire o aspersor. Nota: Não deve retirar a chapa quese encontra por cima do pistão. Retire o filtro aopuxar o botão central ou as patilhas laterais com umalicate.UPPosição normal7.9.UPFora de posição8.6
®<strong>GB</strong>FEIP<strong>PRO</strong> <strong>7000</strong> & <strong>7500</strong> <strong>Series</strong> <strong>Gear</strong> <strong>Drive</strong> Nozzle PerformanceTurbine série <strong>PRO</strong> <strong>7000</strong> & <strong>7500</strong> - Performance des busesRendimiento de las toberas de los aspersores de turbina series <strong>PRO</strong> <strong>7000</strong> & <strong>7500</strong>Prestazioni degli ugelli per irrigatori a turbina Serie <strong>PRO</strong> <strong>7000</strong> & <strong>7500</strong>Aspersores de Turbina series <strong>PRO</strong> <strong>7000</strong> & <strong>7500</strong> Performance dos Bicos<strong>PRO</strong> <strong>7000</strong> SERIES ACU-COVER NOZZLE PERFORMANCEPressure • Pression • Presión •Pressione • PressãoMax Radius • Rayon maximum •Radio máximo • Gittata max. • Raio de alcance máximoMin Radius • Rayon minimum • Radio mínimo •Gittata min. • Raio de alcance mínimoDischarge • Débit • Descarga • Portata •DébitoPrecipitation rate 1 • Pluviométrie 1 •Tasa de precipitación 1 • Tasso di precipitazione 1 •Taxa de precipitação 1Nozzle Number • Numéro de la buse •Número de surtidor • Numero ugelli • Número de bicoPSI FT FT GPM IN/HR■ IN/HR▲ BAR kPa m m L/min m 3 hr mm/hr■ mm/hr▲45 46 35 6.7 0.61 .076 3.2 311 14.0 10.5 25.4 1.52 15.5 19.360 47 35 7.7 0.67 0.84 4.2 414 14.3 10.8 29.1 1.75 17.1 21.375 48 36 8.4 0.70 0.88 1 5.3 518 14.6 11.0 31.8 1.91 17.8 22.290 48 36 9.4 0.79 0.98 6.3 621 14.6 11.0 35.6 2.13 20.0 24.945 50 38 8.0 0.62 0.77 3.2 311 15.3 11.4 30.3 1.82 15.7 19.560 51 38 9.1 0.67 0.84 4.2 414 15.6 11.7 34.4 2.07 17.1 21.375 52 39 10.0 0.71 0.8925.3 518 15.9 11.9 37.9 2.27 18.1 22.690 52 39 11.1 0.79 0.99 6.3 621 15.9 11.9 42.0 2.52 20.1 25.045 54 41 9.7 0.64 0.80 3.2 311 16.5 12.4 36.7 2.20 16.3 20.360 55 41 11.1 0.71 0.88 4.2 414 16.8 12.6 42.0 2.52 18.0 22.475 57 43 12.7 0.75 0.9435.3 518 17.4 13.0 48.1 2.88 19.1 23.890 59 44 13.7 0.76 0.95 6.3 621 18.0 13.5 51.9 3.11 19.3 24.045 56 42 11.7 0.72 0.90 3.2 311 17.1 12.8 44.3 2.66 18.3 22.860 60 45 13.7 0.73 0.91 4.2 414 18.3 13.7 51.9 3.11 18.6 23.2475 62 47 15.4 0.77 0.96 5.3 518 18.9 14.2 58.3 3.50 19.6 24.490 62 47 17.0 0.85 1.06 6.3 621 18.9 14.2 64.3 3.86 21.6 27.045 56 42 12.7 0.78 0.97 3.2 311 17.1 12.8 48.1 2.88 19.8 24.760 61 46 14.8 0.77 0.96 4.2 414 18.6 14.0 56.0 3.36 19.5 24.3575 63 47 16.7 0.81 1.01 5.3 518 19.2 14.4 63.2 3.79 20.6 25.790 64 48 184 0.87 1.08 6.3 621 19.5 14.6 69.6 4.18 22.0 27.4Pressure • Pression • Presión •Pressione • PressãoMax Radius • Rayon maximum •Radio máximo • Gittata max. • Raio de alcance máximoMin Radius • Rayon minimum • Radio mínimo •Gittata min. • Raio de alcance mínimoDischarge • Débit • Descarga • Portata •DébitoPrecipitation rate 1 • Pluviométrie 1 •Tasa de precipitación 1 • Tasso di precipitazione 1 •Taxa de precipitação 1<strong>PRO</strong> <strong>7500</strong> SERIES ACU-COVER NOZZLE PERFORMANCEPressure • Pression • Presión •Pressione • PressãoMax Radius • Rayon maximum •Radio máximo • Gittata max. • Raio de alcance máximoMin Radius • Rayon minimum • Radio mínimo •Gittata min. • Raio de alcance mínimoDischarge • Débit • Descarga • Portata •DébitoPrecipitation rate 1 • Pluviométrie 1 •Tasa de precipitación 1 • Tasso di precipitazione 1 •Taxa de precipitação 1Nozzle Number • Numéro de la buse •Número de surtidor • Numero ugelli • Número de bicoPSI FT FT GPM IN/HR■ IN/HR▲ BAR kPa m m L/min m 3 hr mm/hr■ mm/hr▲45 53 40 9.4 0.64 0.80 3.1 311 16.2 12.1 35.6 2.13 16.4 20.460 56 42 10.9 0.67 0.83 4.1 414 17.1 12.8 41.3 2.47 17.0 21.275 57 43 12.2 0.72 0.90 3 5.2 518 17.4 13.0 46.2 2.77 18.4 22.990 58 44 13.4 0.77 0.96 6.3 621 17.7 13.3 50.7 3.04 19.5 24.345 54 41 11.4 0.75 0.94 3.1 311 16.5 12.4 43.1 2.59 19.1 23.860 59 44 13.2 0.73 0.91 4.1 414 18.0 13.5 50.0 3.00 18.6 23.175 61 46 14.9 0.77 0.9645.2 518 18.6 14.0 56.4 3.38 19.6 24.490 62 47 16.4 0.82 1.02 6.3 621 18.9 14.2 62.1 3.72 20.9 26.045 57 43 12.3 0.73 0.91 3.1 311 17.4 13.0 46.6 2.79 18.5 23.160 61 46 14.4 0.75 0.93 4.1 414 18.6 14.0 54.5 3.27 18.9 23.675 65 49 16.2 0.74 0.9255.2 518 19.8 14.9 61.3 3.68 18.8 23.490 66 50 17.8 0.79 0.98 6.3 621 20.1 15.1 67.4 4.04 20.0 24.960 64 48 17.5 0.82 1.03 4.1 414 19.5 14.6 66.2 3.97 20.9 26.175 68 51 20.0 0.83 1.04 5.2 518 20.7 15.6 75.7 4.54 21.2 26.4690 68 51 22.1 0.92 1.15 6.3 621 20.7 15.6 83.6 5.02 23.4 29.260 65 49 19.6 0.89 1.11 4.1 414 19.8 14.9 74.2 4.45 22.7 28.375 69 52 21.3 0.86 1.07 5.2 518 21.0 15.8 80.6 4.84 21.9 27.3790 73 55 24.6 0.89 1.11 6.3 621 22.3 16.7 93.1 5.58 22.6 28.260 66 50 21.8 0.96 1.20 4.1 414 20.1 15.1 82.5 4.95 24.5 30.575 71 53 24.8 0.95 1.18 5.2 518 21.7 16.2 93.9 5.63 24.1 30.0890 74 56 27.5 0.97 1.21 6.3 621 22.6 16.9 104.1 6.24 24.6 30.6Pressure • Pression • Presión •Pressione • PressãoMax Radius • Rayon maximum •Radio máximo • Gittata max. • Raio de alcance máximoMin Radius • Rayon minimum • Radio mínimo •Gittata min. • Raio de alcance mínimoDischarge • Débit • Descarga • Portata •DébitoPrecipitation rate 1 • Pluviométrie 1 •Tasa de precipitación 1 • Tasso di precipitazione 1 •Taxa de precipitação 11 Precipitation rates for square <strong>and</strong> triangular spacing calculated at 50% of diameter for half-circle operation. Assumes zero wind. Adjust for local conditions.1 Les taux de précipitation pour un espacement carré et triangulaire sont calculés à 50 % du diamètre pour un fonctionnement en plain cercle. Ces chiffres ne tiennent pas compte du vent. Régler en fonction des conditions locales.1 Las tasas de precipitatión para espaciamento triangular y cuadrado se han calculado al 50% del diámetro, para el funcionamiento de la mitad del círculo. Se supone cero. Ajuste este valor según las condiciones locales1 I tassi di precipitazione per disposizioni in quadrato ed in triangolo sono calcolati at 50% del diametro per schemi a mezzo cerchio. I valori sono calcolati in assenza di vento. Effettuare la regolazione secondo le condizioni atmosferiche locali.1 Taxas de precipitação para espaçamentos triangulares e quadrados calculadas a 50% do diâmetro para uma operação de meio-círculo. Assuma que o vento zero. Ajuste de acordo com as condições locais.7
®<strong>GB</strong>FEIP<strong>PRO</strong> 7503/7513 <strong>Series</strong> <strong>Gear</strong> <strong>Drive</strong> Nozzle Performance (BSP high speed)Turbine série <strong>PRO</strong> 7503/7513 - Performance des buses (rotation rapide - BSP)Rendimiento de las toberas de los aspersores de turbina serie <strong>PRO</strong> 7503/7513 (alta velocidad - BSP)Prestazioni degli ugelli per irrigatori a turbina Serie <strong>PRO</strong> 7503/7513 (rotation veloce - BSP)Aspersores de Turbina series <strong>PRO</strong> 7503 & 7513 Performance (alta rotação)<strong>PRO</strong> 7503/7513 SERIES ACU-COVER NOZZLE PERFORMANCEPressure • Pression • Presión •Pressione • PressãoMax Radius • Rayon maximum •Radio máximo • Gittata max. • Raio de alcance máximoMin Radius • Rayon minimum • Radio mínimo •Gittata min. • Raio de alcance mínimoDischarge • Débit • Descarga • Portata •DébitoPrecipitation rate 1 • Pluviométrie 1 •Tasa de precipitación 1 • Tasso di precipitazione 1 •Taxa de precipitação 1Nozzle Number • Numéro de la buse •Número de surtidor • Numero ugelli • Número de bicoPSI FT FT GPM IN/HR■ IN/HR▲ BAR kPa m m L/min m 3 hr mm/hr■ mm/hr▲45 48 36 9.4 0.79 0.98 3.1 311 14.6 11.0 35.6 2.13 20.0 24.960 50 38 10.9 0.84 1.05 4.1 414 15.2 11.4 41.3 2.47 21.3 26.675 50 38 12.2 0.94 1.17 3 5.2 518 15.2 11.4 46.2 2.77 23.9 29.890 53 40 13.4 0.92 1.15 6.3 621 16.2 12.1 50.7 3.04 23.3 29.145 51 38 11.4 0.84 1.05 3.1 311 15.6 11.7 43.1 2.59 21.4 26.760 54 40 13.2 0.87 1.09 4.1 414 16.5 12.4 50.0 3.00 22.1 27.675 55 41 14.9 0.95 1.1845.2 518 16.8 12.6 56.4 3.38 24.1 30.090 55 41 16.4 1.04 1.30 6.3 621 16.8 12.6 62.1 3.72 26.5 33.145 52 39 12.3 0.88 1.09 3.1 311 15.9 11.9 46.6 2.79 22.3 27.860 55 41 14.4 0.92 1.14 4.1 414 16.8 12.6 54.5 3.27 23.3 29.075 57 43 16.2 0.96 1.2055.2 518 17.4 13.0 61.3 3.68 24.4 30.490 58 44 17.8 1.02 1.27 6.3 621 17.7 13.3 67.4 4.04 25.9 32.3Pressure • Pression • Presión •Pressione • PressãoMax Radius • Rayon maximum •Radio máximo • Gittata max. • Raio de alcance máximoMin Radius • Rayon minimum • Radio mínimo •Gittata min. • Raio de alcance mínimoDischarge • Débit • Descarga • Portata •DébitoPrecipitation rate 1 • Pluviométrie 1 •Tasa de precipitación 1 • Tasso di precipitazione 1 •Taxa de precipitação 160 58 44 17.5 0.97 1.25 4.1 414 17.7 13.3 66.2 3.97 24.6 30.775 60 45 20.0 1.07 1.33 5.2 518 18.3 13.7 75.7 4.54 27.2 33.9690 61 46 22.1 1.14 1.43 6.3 621 18.6 14.0 83.6 5.02 29.1 36.260 58 44 19.6 1.12 1.40 4.1 414 17.7 13.3 74.2 4.45 28.5 35.575 60 45 21.3 1.14 1.42 5.2 518 18.3 13.7 80.6 4.84 28.9 36.1790 63 47 24.6 1.19 1.49 6.3 621 19.2 14.4 93.1 5.58 30.3 37.860 59 44 21.8 1.21 1.50 4.1 414 18.0 13.5 82.5 4.95 30.6 38.275 61 46 24.8 1.28 1.60 5.2 518 18.6 14.0 93.9 5.63 32.6 40.7890 64 48 27.5 1.29 1.61 6.3 621 19.5 14.6 104.1 6.24 32.8 41.01 Precipitation rates for square <strong>and</strong> triangular spacing calculated at 50% of diameter for half-circle operation.Assumes zero wind. Adjust for local conditions.1 Les taux de précipitation pour un espacement carré et triangulaire sont calculés à 50 % du diamètre pour unfonctionnement en plain cercle. Ces chiffres ne tiennent pas compte du vent. Régler en fonction des conditions locales.1 Las tasas de precipitatión para espaciamento triangular y cuadrado se han calculado al 50% del diámetro, parael funcionamiento de la mitad del círculo. Se supone cero. Ajuste este valor según las condiciones locales1 I tassi di precipitazione per disposizioni in quadrato ed in triangolo sono calcolati at 50% del diametro per schemia mezzo cerchio. I valori sono calcolati in assenza di vento. Effettuare la regolazione secondo le condizioniatmosferiche locali.1 Taxas de precipitação para espaçamentos triangulares e quadrados calculadas a 50% do diâmetro para umaoperação de meio-círculo. Assuma que o vento zero. Ajuste de acordo com as condições locais.L.R. Nelson Corporation 2-99One Spinkler Lane P/N 900-03918Peoria, Illinois 61515 U.S.A.Printed in U.S.A.Tel. (309) 690-2200www.lrnelson.com© 1999, L.R. Nelson Corporation