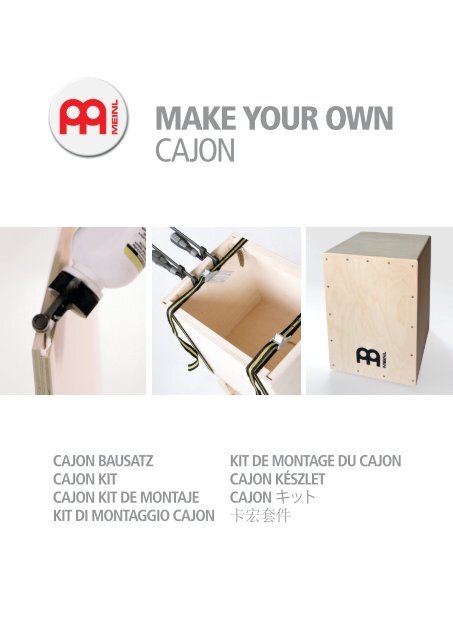
MAKE YOUR OWN CAJON - Australian Treasures
MAKE YOUR OWN CAJON - Australian Treasures
MAKE YOUR OWN CAJON - Australian Treasures
- No tags were found...

Create successful ePaper yourself
Turn your PDF publications into a flip-book with our unique Google optimized e-Paper software.
DeutschBAUANLEITUNGBevor Sie mit der Montage beginnen, sollten Sie sich die Bauanleitung gründlich und komplett durchlesen, sowie alle benötigtenWerkzeuge bereitlegen und alle Bauteile sortieren. Weiterhin möchten wir darauf hinweisen, dass eine plane Arbeitsfläche diefolgenden Arbeitsschritte wesentlich erleichtern wird.11 4 582 3967111012 13Lieferumfang1 x Montageanleitung1 2 x Seitenelement2 1 x Bodenelement3 1 x Deckenelement4 1 x Rückwand5 1 x Schlagfläche(mit MEINL Logo)6 2 x Seitenleiste7 1 x Boden- und1 x Deckenleiste8 1 x Befestigungsleistefür Snare9 1 x Snare101112134 x Gummifüße15 x Schrauben 3 x 20 mm(für Schlagfläche)4 x Schrauben 4 x 15 mm(für Gummifüße)2 x Schrauben 3 x 12 mm(für Snare)Benötigte Werkzeuge› Holzleim› 4 x Schraubzwingen 600 mm oder 2 x Spannbänder› 2 bis 6 x kleine Schraubzwingen, alternativ Leimzwingen› Akkuschrauber, Bohrmaschine oder Handbohrer› Holzbohrer 3 mm und 10 mm› Kreuzschlitzschraubendreher› Senker› Verschieden gekörntes Schleifpapier› Schleifklotz› Laubsäge› Bleistift, Winkel, Lineal› Klebeband› 2 x Montagehölzer, ca. 25 x 25 x 300 mm› Multiplexplatte (oder ähnliches) mind. 310 x 455 mm12Korpus verleimenBeim ersten Arbeitsschritt werden die vier Korpus-Elemente zusammengestecktund verleimt. Den Leim bitte in die Nut und auf die äußere Leiste anbringen, sieheBild 1. Es empfiehlt sich, diese vier Elemente vor dem Verleimen kurz zusammenzustecken,um eventuelle Verwechslungen zu vermeiden. Um den nötigen Druck fürdas Verleimen aufzubauen, werden die 600 mm Schraubzwingen oder die beidenSpannbänder benötigt, siehe Bild 2. Es ist auf die Bündigkeit der Elemente und aufden Winkel wie im Bild 2 zu achten. Überschüssiger Leim kann mit einem feuchtenTuch entfernt werden. Der Leim sollte mindestens 120 Minuten trocknen, bevor diePressverspannung gelöst werden kann.Leisten verleimenIm nächsten Arbeitsschritt werden die vier Seitenleisten bündig an der Vorderseiteder Cajon verleimt. Hierzu werden die Schraubzwingen oder Leimzwingen wie aufBild 3 benötigt. Das Trocknen des Leimes wird ca. 60 bis 80 Minuten betragen.3
4 5Korpus verschleifenDie Montage der Snare erfolgt, wie auf Bild 4 zu sehen, mittig auf der Hypotenuseder Dreiecksleiste. Zur Montage werden die beiden Schrauben 3 x 12 mm benötigt.Die Snare wie auf Bild 4 mit der Lötseite nach oben montieren. Nun werden dieÜbergänge auf der Front und Rückseite des Korpus verschliffen. Hier ist es wichtigdie Übergänge plan zu schleifen, um eine ideale Auflagefläche für die Front undRückwand zu schaffen. Anschließend wird die Dreiecksleiste mit der bereits vormontiertenSnare mittig, wie auf Bild 5 zu sehen, verklebt. Zum Fixieren wird einekleine Schraubzwinge oder Leimklemme benötigt. Die Trockenzeit des Leimesbeträgt hier ca. 60 Minuten.6Rückwand verleimenUm ein ideales Verleimen der Rückwand zu garantieren, empfehlen wir eineMultiplexplatte (oder etwas ähnliches), welche ca. je 10 bis 20 mm größer ist alsdie Rückwand, zu verwenden. Die beiden Holzleisten (ca. 25 x 25 x 300 mm)erleichtern die Verspannung mit den Schraubzwingen oder Spannbändern. Aufder kompletten Rückseite des Korpus wird nun Leim aufgebracht. Achtung: DieRückseite ist die Seite ohne die bereits angebrachten Leisten. Die Rückwandwird auf die Multiplexplatte gelegt und diese dann auf die zwei Leisten (Bild 6),welche als Montagehilfe verwendet werden. Die Rückwand wird mit Hilfe einesKlebebandes fixiert, sodass die sie an jeder Seite etwas Überstand zum Korpushat. Anschließend wird mit Hilfe der Schraubzwingen oder Spannbänder dieRückwand angepresst, wie auf Bild 6 zu sehen ist. Nun nochmals die Positionierungder Rückwand prüfen und den Leim für ca. 120 Minuten trocknen lassen.7Frontplatte verschraubenAuf der Rückseite dieser Bauanleitung ist ein Plan für die 15 Bohrlöcher zumFixieren der Frontplatte abgebildet. Wir empfehlen diese genau auf der Frontplatteabzumessen, siehe Bild 7. Die Bohrung der 15 Löcher erfolgt mit dem 3 mm Bohrer.Achtung: Um Schäden auf der Arbeitsfläche zu vermeiden, werden wiederholtdie Montageleisten benötigt. Mit Hilfe des Handsenkers oder eines 12 mmStahlbohrers werden die Bohrlöcher nun so eingesenkt, dass die Schraubenköpfenach der Montage plan eingedreht sind. Die Frontplatte wird mit 15 Stück 3 x 20mm Schrauben auf dem Korpus fixiert. Achtung: Hier auch auf den gleichmäßigenÜberstand achten (wie auch bei der Rückwand) und mit Hilfe des Klebebandesvorfixieren. Verschraubt wird die Frontplatte am besten über die vier Ecken unddurch Vorbohren der Löcher mit dem 3 mm Holzbohrer, ca. 6 bis 8 mm tief.89Verschleifen, Montage der GummifüßeDas Verschleifen der Überstände der Front- und Rückwand ist der nächste Arbeitsschritt.Hierzu empfehlen wir anfangs ein grobes und dann ein feines Schleifpapierzu verwenden. Mit dem feinen Schleifpapier wird dann auch der komplette Korpusder Cajon verschliffen. Für einen besseren Spiel- und Sitzkomfort empfehlen wiralle Kanten so zu verschleifen, dass diese komfortabel abgerundet sind. Die Befestigungder Gummifüße erfolgt mit den 4 x 15 mm Schrauben. Wir empfehlen füreinen guten Stand der Cajon die Gummifüße mit einem Abstand von ca. 25 mmnach innen von der Front- und Seitenplatte entfernt zu befestigen. Das Anbringenerfolgt nach der Endbehandlung der Cajon.Cajon FinishDem Finish der Cajon sind keine Grenzen gesetzt. Ölen, lackieren, wachsen oderwarum nicht auch nach eigenen Vorstellungen ganz individuell bemalen.10 11Für ein komfortableres Sitzen auf dernun fertig gestellten Cajon empfehlen wirunser MEINL Cajon Pad (CAJ-PAD).Reklamationen werden nur anerkannt, wenn mit der Montage des Bausatzes noch nicht begonnen wurde. Weiterhin übernimmt die Firma Roland Meinl Musikinstrumente GmbH & Co. KGkeine Haftung für Schäden, welche bei oder durch die Montage entstehen oder entstehen könnten. Irrtum und Änderungen vorbehalten. Version Mai 2013.
EnglishASSEMBLY INSTRUCTIONSBefore starting to assemble your bongo cajon, you should carefully read through all the assembly instructions, gather together all therequisite tools and organise all the components. It should also be noted that a good, level work surface will make the various steps ofthe assembly process considerably easier.11 4 582 3967111012 13Kit comprises1 x assembly instructions1 2 x side panels2 1 x base panel3 1 x top panel4 1 x rear panel5 1 x playing surface(with MEINL logo)6 2 x side battens7 1 x base & 1 x top batten8 1 x securing battenfor the snare9 1 x snare101112134 x rubber feet15 x screws 3 x 20 mm(for playing surface)4 x screws 4 x 15 mm(for rubber feet)2 x screws 3 x 12 mm(for snare)Tools required› Wood glue› 4 x screw clamps 600 mm or 2 x belt clamps› 2 to 6 x small screw clamps, or alternatively glue clamps› Cordless screwdriver, drill or hand drill› Wood drill bits 3 mm and 10 mm› Cross-head screwdriver› Countersink› Sandpaper, various grades› Sanding block› Fretsaw› Pencil, square, ruler› Adhesive tape› 2 x assembly blocks, approx. 25 x 25 x 300 mm› Multiplex board (or similar) min. 310 x 455 mm1 2Gluing the bodyThe first step is to fit and glue together the four panels making up the main bodyof the cajon. The glue should be applied within the groove and on the outerbatten, see Fig. 1. It is advisable to fit these four panels together briefly beforethe adhesive is applied to ensure that they are joined in the right order. To create thenecessary pressure for adhesion, the 600 mm screw clamps or the two belt clampsmust be used, see Fig. 2. Make sure that the panels fit together flush and at thecorrect angle, see Fig. 2. Any excess glue can be removed with a damp cloth. Theglue must be allowed to dry for at least 120 minutes before the compressive forceis released.Gluing the battensThe next step is to glue the four side battens on flush with the cajon‘s front surface.You will need the screw clamps or glue clamps at this point, see Fig. 3. Theglue must be left for around 60 to 80 minutes to dry.3
4 5Sanding the bodyThe snare is fitted as shown in Fig. 5, in the middle of the hypotenuse of thetriangular batten. The snare should be mounted using the two 3 x 12 mm screws.Mount the snare with its soldered side facing up as illustrated in Fig. 5. Next, thesurfaces for joining the front and rear panels of the cajon body should be sanded.It is important that the joining surfaces should be sanded smooth in order to createa perfect seat for the front and rear panels. Next, the triangular batten, to whichthe snare has already been attached, is glued centrally as shown in Fig. 6. A smallscrew clamp or glue clamp will be needed here to secure the batten. For this step,the glue must be allowed to dry for approx. 60 minutes.6Gluing the rear panelTo ensure that the rear panel will be securely bonded, we recommend the use of amultiplex board or similar; this should be approximately 10 - 20 mm larger than therear panel. The two wooden battens (approx. 25 x 25 x 300 mm) make it easier toapply the necessary pressure with the screw clamps or belt clamps. Glue is nowapplied all over the rear side of the cajon body. Important: the rear side is the sidethat has no battens already attached. The rear panel is laid down on the multiplexboard, which in turn is laid on the two battens, see Fig. 7, which are used as anassembly aid. The rear panel is secured using adhesive tape with a slight overhangbeyond the cajon body on all four sides. Next, the screw clamps or belt clamps areused to apply pressure to the rear panel as shown in Fig. 7. The positioning of therear panel should now be checked again, and then the glue should be allowed todry for approx. 120 minutes.7Screwing the front panel onA diagram showing the positions of the 15 holes for securing the front panel can befound overleaf. We recommend that the holes are measured out accurately on thefront panel, see Fig. 8. The 15 holes are drilled using the 3 mm drill bit. Important:the assembly battens should be used when each hole is drilled to avoid damageto the work surface. Using either the manual countersink or a 12 mm metal drill bit,the holes should now be countersunk to allow the screw heads to end up flush withthe surface. The front panel is screwed to the body using 15 screws (3 x 20 mm).Important: again make sure that the overhang is even (as for the rear panel) and useadhesive tape to initially secure the panel. The best way to screw the front panel onis to use the four corners and pre-drill the holes with the 3 mm wood drill bit to adepth of approx. 6 to 8 mm.89Sanding, then fitting the rubber feetThe next step is to sand down the overhangs on the front and rear panels. For thispurpose, we recommend using coarse sandpaper first followed by fine sandpaper.The fine sandpaper can then be used to sand the entire body of the cajon. In orderto make the instrument more comfortable to play and to sit on, we recommendsanding all the edges until they are nicely rounded. The rubber feet are securedwith the 4 x 15 screws. To ensure that the cajon will stand securely on its feet, werecommend attaching the rubber feet approx. 25 mm inside the front and sidepanels. The feet are attached after the cajon has been given its finish.Cajon finishWhen it comes to applying a finish to your cajon, the sky‘s the limit. It can be oiled,lacquered, waxed, or why not even paint it with an entirely original design?10 11Now that you have finished constructingyour cajon, you can add to the comfortwhen sitting on it with our MEINL cajonpad (CAJ-PAD).Warranty claims will only be considered if the assembly process has not been started. Furthermore, Roland Meinl Musikinstrumente GmbH & Co. KG will not accept liability for any damageincurred or possibly incurred in the course of or as a result of the assembly process. Subject to corrections and changes. Version dated May 2013.
EspañolINSTRUCCIONES DE MONTAJEAntes de comenzar con el montaje, debería leer atentamente estas instrucciones de montaje completas, preparar todas lasherramientas necesarias y ordenar todas las piezas. Además, recuerde que disponer de una superficie de trabajo llana facilitanotablemente la realización de los siguientes pasos de trabajo.11 4 582 3967111012 13Suministro1 instrucciones de montaje1 2 elementos laterales2 1 elemento de fondo3 1 elemento de tapa4 1 panel posterior5 1 superficie de golpeo(con el logo MEINL)6 2 listones laterales7 1 listón para el fondo y1 listón para la tapa8 1 listón de fijación parala bordonera9 1 bordonera101112134 pies de goma15 tornillos 3 x 20 mm(para la superficie de golpeo)4 tornillos 4 x 15 mm(para los pies de goma)2 tornillos 3 x 12 mm(para la bordonera)Herramientas necesarias› Cola blanca› 4 sargentos de 600 mm o 2 cintas de apriete› 2 a 6 sargentos pequeños, alternativamente prensatornillos› Atornilladora a batería, máquina de taladrar o taladro manual› Brocas para madera de 3 mm y 10 mm› Destornillador de ranura de cruz› Avellanador› Papel de lija de distintos granos› Taco de lijar› Segueta› Lápiz, escuadra, regla› Cinta adhesiva› 2 listones de madera para el montaje,aprox. 25 x 25 x 300 mm› Placa de contrachapado multicapa (o similar)de al menos 310 x 455 mm1 2Encolar el cuerpoEn el primer paso de trabajo se encajan y encolan los cuatro elementos del cuerpo.Aplicar la cola en la ranura y en el listón exterior, véase la figura 1. Es recomendableencajar a modo de prueba estos cuatro elementos antes de encolarlos para evitarposibles equivocaciones. Para poder generar la presión necesaria para el encoladose necesitan los sargentos de 600 mm o ambas cintas de apriete, véase la figura 2.Debe tenerse en cuenta que los elementos deben quedar enrasados y con elángulo adecuado según la figura 2. El exceso de cola puede retirarse con un pañohúmedo. La cola debería secar al menos 120 antes de aliviar la presión de apriete.Encolar los listonesEn el siguiente paso de trabajo se encolan los cuatro listones laterales enrasadoscon la parte frontal del cajón. Para ello se necesitan los sargentos o los prensatornilloscomo se muestra en la figura 3. La cola debe secar de 60 a 80 minutos.3
4 5Lijar el cuerpoEl montaje de la bordonera se realiza como se muestra en la figura 4, centrada enla hipotenusa del listón triangular. Para el montaje se necesitan ambos tornillos de3 x 12 mm. La bordonera se monta como se muestra en la figura 4 con la partesoldada hacia arriba. Ahora se lijan las transiciones de la parte frontal y posteriordel cuerpo. Es importante lijar las transiciones planas para conseguir una superficiede apoyo ideal para los paneles frontal y posterior. A continuación, se encola ellistón triangular con la bordonera premontada centrado como se ve en la figura5. Para fijarlo se necesita un sargento o un prensatornillo pequeño. El tiempo desecado de la cola es de unos 60 minutos.6Encolar el panel posteriorPara garantizar un encolado ideal del panel posterior, recomendamos utilizar unpanel contrachapado multicapa (o un elemento similar) que debe ser 10 - 20 mmmayor que el panel posterior. Ambos listones de madera (aprox. 25 x 25 x 300 mm)facilitan el apriete con los sargentos o las cintas de apriete. Se aplica cola a todala parte posterior del cuerpo. Atención: la parte posterior es la parte que no llevalistones instalados. El panel posterior se coloca sobre el tablero multicapa y estesobre los dos listones (figura 6), que sirven como ayuda de montaje. El panel posteriorse fija con ayuda de cinta adhesiva de manera que sobresalga por todos loslados ligeramente del cuerpo. A continuación, el panel posterior se comprime conayuda de los sargentos o las cintas de apriete como se ve en la figura 6. Comprobarde nuevo el posicionamiento del panel posterior y dejar secar la cola duranteaproximadamente 120 minutos.7Atornillar el panel frontalEn la última página hay un croquis con los 15 taladros para fijar panel frontal.Recomendamos reproducirlo exactamente en el panel frontal, véase la figura 7. Los15 taladros se realizan con la broca de 3 mm. Atención: para evitar causar dañosen la superficie de trabajo, deben utilizarse repetidamente los listones de montaje.Con ayuda del avellanador o una broca de acero de 12 mm se rebajan los taladrosde manera que las cabezas de los tornillos queden atornilladas a ras tras el montaje.El panel frontal se fija con 15 tornillos 3 x 20 mm al cuerpo. Atención: paraello, asegurarse de que sobresale de forma homogénea (como el panel posterior) yfijarlo con cinta adhesiva. Los mejor es atornillar el panel frontal empezando por lascuatro esquinas y taladrando previamente con la broca de madera de 3 mm hastauna profundidad de entre 6 y 8 mm.89Lijar y montar los pies de gomaEl lijado de los salientes del panel frontal y el panel posterior es el siguiente pasode trabajo. Para ello, recomendamos empezar con un papel de lija de grano gruesoy acabar con uno de grano de fino. Con el papel de grano fino se lija también elcuerpo del cajón completo. Para mejorar la comodidad de asiento y a la hora detocar, recomendamos lijar todos los cantos de manera que queden redondeados.Los pies de goma se fijan con los tornillos de 4 x 15 mm. Para una buena estabilidaddel cajón, recomendamos fijar los pies de goma a una distancia de unos 25mm hacia dentro respecto a los paneles frontal y laterales. Se montan después dehaber acabado el cajón.zirkelAcabar el cajónEl acabado del cajón no tiene límites. Puede tratarse con aceite, barnizarse, encerarseo, ¿por qué no?, también pintarse de forma completamente original según lospropios gustos.10 11Para sentarse cómodamente en el cajónque ha preparado recomendamos nuestroMEINL Cajon Pad (CAJ-PAD).Solo se aceptan reclamaciones antes de haber comenzado el montaje del juego. Además, la empresa Roland Meinl Musikinstrumente GmbH & Co. KG no acepta responsabilidad ningunapor daños causados o que pudieran causarse durante ni debido al montaje. Sujeto a errores y modificaciones. Versión Mayo 2013.
ItalianoISTRUZIONI DI MONTAGGIOPrima di iniziare con il montaggio, si devono leggere accuratamente e completamente le istruzioni di costruzione e montaggio,preparare tutti gli utensili necessari ed ordinare tutti i componenti. Inoltre desideriamo richiamare l'attenzione sul fatto che unasuperficie di lavoro piana agevola notevolmente le fasi di lavoro.11 4 582 3967111012 13Confezione1 istruzioni di montaggio1 2 elementi laterali2 1 elemento di base3 1 elemento di copertura4 1 pannello posteriore5 1 superficie di percussione(con logo MEINL)6 2 listelli laterali7 1 listello di base e1 listello di soffitto8 1 listello di rinforzoper la piattina9 1 piattina101112134 piedini di gomma15 viti 3 x 20 mm (per lasuperficie di percussione)4 viti 4 x 15 mm(per i piedini di gomma)2 viti 3 x 12 mm(per la piattina)Utensili necessari› Colla da legno› 4 morsetti a vite 600 mm o 2 nastri di serraggio› Da 2 a 6 piccoli morsetti a vite, in alternativa morsetti da falegname› Avvitatore a batteria, trapano o trapano a mano› Punte da legno 3 mm e 10 mm› Cacciavite a stella› Allargatore› Carta abrasiva di diversa grana› Blocchetto abrasivo› Seghetto da traforo› Matita, squadra, riga› Nastro adesivo› 2 legni di montaggio, circa 25 x 25 x 300 mm› Compensato multiplex (o simile) almeno 310 x 455 mm1 2Incollaggio della cassaCon la prima fase di lavoro vengono innestati insieme e incollati i quattro elementiche formano la cassa. Applicare la colla nella scanalatura e sul listello esterno,vedere figura 1. Si consiglia di innestare brevemente insieme questi quattro elementiprima dell'incollaggio, per evitare eventuali confusioni. Per creare la necessariapressione di incollaggio, si usano i morsetti a vite da 600 mm o i due nastri diserraggio, vedere figura 2. Occorre prestare attenzione che gli elementi siano benea raso e formino un angolo retto come illustrato nella figura 2. La colla in eccessopuò essere rimossa con un panno umido. La colla deve asciugare per almeno 120minuti prima di rimuovere gli elementi di serraggio.Incollaggio dei listelliNella successiva fase di lavoro vengono incollati i quattro listelli laterali a raso sullafacciata anteriore del Cajón. A questo proposito sono necessari i morsetti a vite o imorsetti da falegname come indicato nella figura 3. L'asciugatura della colla richiedeall'incirca da 60 a 80 minuti.3
4 5Carteggiatura della cassaIl montaggio della piattina viene eseguito centralmente sull'ipotenusa del listellotriangolare, come illustrato nella figura 4. Per il montaggio sono necessarie ledue viti 3 x 12 mm. Montare la piattina come indicato nella figura 4, con il lato dibrasatura verso l'alto. Ora vengono carteggiati i punti di passaggio sul lato anterioree posteriore della cassa. In questo punto è importante che i punti di passaggiosiano carteggiati in modo livellato, così da creare una superficie di appoggio idealeper il pannello anteriore e posteriore. Successivamente incollare centralmente illistello triangolare con la piattina già premontata, come illustrato nella figura 5. Per ilfissaggio si utilizza un piccolo morsetto a vite o un morsetto da falegname. Il tempodi asciugatura della colla è in questo caso di circa 60 minuti.6Incollaggio del pannello posteriorePer garantire un incollaggio ideale del pannello posteriore, consigliamo di utilizzareun compensato multiplex (o qualcosa di simile) che sia circa 10-20 mm più grandedel pannello posteriore. I due listelli di legno (ca. 25 x 25 x 300 mm) agevolano ilbloccaggio con i morsetti a vite o i nastri di serraggio. A questo punto si applicala colla sull'intero lato posteriore della cassa. Attenzione: il lato posteriore è il latosenza i listelli già applicati. Il pannello posteriore viene collocato sul compensatomultiplex e questi sono poi posti sui due listelli (figura 6) che vengono utilizzaticome aiuto nel montaggio. Fissare il pannello posteriore usando un nastro adesivo,in maniera tale che il pannello posteriore abbia un po' di sporgenza su ogni latorispetto alla cassa. Successivamente, con l'aiuto dei morsetti a vite o dei nastri diserraggio pressare il pannello posteriore, come illustrato nella figura 6. A questopunto controllare ancora una volta il posizionamento del pannello posteriore elasciare asciugare la colla per circa 120 minuti.7Avvitamento del pannello anterioreSul retro è presente uno schema dei 15 fori per il fissaggio del pannello anteriore.Si consiglia di misurarli esattamente sul pannello anteriore, vedere figura 7.L'esecuzione dei 15 fori è da effettuarsi con la punta da trapano da 3 mm. Attenzione:per evitare danni sulla superficie di lavoro sono più volte necessari i listelli dimontaggio. Con l'aiuto dell’allargatore manuale o di una punta di acciaio per trapanoda 12 mm, allargare i fori in maniera tale che dopo il montaggio le teste delleviti risultino avvitate a raso. Fissare il pannello anteriore sulla cassa con 15 viti 3 x20 mm. Attenzione: anche qui prestare attenzione che la sporgenza sia uniforme (alpari del pannello posteriore) ed effettuare un fissaggio preliminare usando il nastroadesivo. La soluzione migliore è quella di avvitare il pannello anteriore sui quattroangoli e con una pre-esecuzione dei fori con la punta da legno da 3 mm, ad unaprofondità di circa 6 - 8 mm.89Carteggiatura, montaggio dei piedini di gommaLa fase di lavoro successiva è la carteggiatura delle sporgenze dei pannelli anterioree posteriore. A questo scopo si consiglia di utilizzare inizialmente una carta a-brasiva grossolana e poi una fine. Con la carta abrasiva fine carteggiare poi anchel'intera cassa del Cajón. Per un migliore comfort da seduti e nell'utilizzo dellostrumento, si consiglia di carteggiare tutti i bordi, in modo che risultino arrotondatie non diano fastidio. Effettuare il fissaggio dei piedini di gomma con le viti da 4 x15 mm. Affinché il Cajón sia adeguatamente stabile, si consiglia di fissare i piedinidi gomma ad una distanza di circa 25 mm dai pannelli anteriore e laterali, versol'interno. L'applicazione deve essere effettuata dopo il trattamento finale del Cajón.Finitura del CajónAlla finitura del Cajón non sono posti limiti. Oli, verniciatura, cera o perché no,anche una pittura totalmente personalizzata.10 11Per stare seduti comodamente sul Cajónfinito, si consiglia di utilizzare il nostroMEINL Cajon Pad (CAJ-PAD).Saranno accettati reclami soltanto se non è ancora stato iniziato il montaggio del kit. Inoltre, la ditta Roland Meinl Musikinstrumente GmbH & Co KG non si assume alcuna responsabilitàper danni che si verificano o potrebbero verificarsi durante o a causa del montaggio. Con riserva di errori e modifiche. Versione maggio 2013.
FrançaisNOTICE DE MONTAGEAvant de procéder au montage, il est conseillé de lire attentivement cette notice de montage dans son intégralité, de préparer tous lesoutils nécessaires et de trier les différentes pièces. Nous aimerions également souligner que les opérations suivantes seront beaucoupplus faciles à réaliser sur une surface plane.11 4 582 3967111012 13Matériel livré1 notice de montage1 2 plaques latérales2 1 fond3 1 dessus4 1 dos5 1 surface de frappe(avec logo MEINL)6 2 tasseaux latéraux7 1 tasseau pour le fond et1 tasseau pour le dessus8 1 tasseau de fixationpour le timbre9 1 timbre101112134 pieds en caoutchouc15 vis 3 x 20 mm(pour la surface de frappe)4 vis 4 x 15 mm (pour lespieds en caoutchouc)2 vis 3 x 12 mm(pour le timbre)Outillage nécessaire› Colle à bois› 4 serre-joints à vis 600 mm ou 2 sangles de serrage› 2 à 6 petits serre-joints à vis ou pinces serre-joints› Visseuse, perceuse ou chignole› Mèches à bois de 3 mm et 10 mm› Tournevis cruciforme› Fraise à lamer› Papier abrasif de différents grains› Cale à poncer› Scie à chantourner› Crayon, équerre, règle› Ruban adhésif› 2 barres d’aide au montage en bois, env. 25 x 25 x 300 mm› Contreplaqué multiplis (ou équivalent) d’au moins 310 x 455 mm1 2Collage du corpsLa première étape consiste à assembler et coller les quatre éléments constituantle corps. Appliquer la colle dans la rainure et sur le bord extérieur, voir photo 1. Ilest conseillé de faire un essai d’assemblage de ces quatre éléments avant de lescoller pour éviter toute interversion éventuelle. Pour appliquer la pression nécessairepour le collage, utiliser les serre-joints à vis de 600 mm ou les deux sanglesde serrage, voir photo 2. Veiller à ce que les bords soient alignés et que l’angle soitcorrect comme illustré sur la photo 2. La colle en excès peut être retirée avec unchiffon humide. Laisser sécher la colle au moins 120 minutes avant de relâcher lapression.Collage des tasseauxL’étape suivante consiste à coller les quatre tasseaux latéraux de niveau avec laface avant du cajon. Pour cela, utiliser les serre-joints à vis ou les pinces serrejointscomme illustré sur la photo 3. Le séchage de la colle nécessite 60 à 80minutes environ.3
4 5Ponçage du corpsLe timbre se monte comme illustré sur la photo 4, c’est-à-dire au milieu del’hypoténuse du tasseau triangulaire. Le timbre s’installe avec le côté à braserorienté vers le haut, comme illustré sur la photo 4, et est fixé à l’aide des deux vis3 x 12 mm. Les jonctions avec la face avant et le dos du corps sont ensuite poncées.Il est ici important de poncer les jonctions afin d‘obtenir une surface d‘appuiidéale pour la face avant et le dos. Il convient ensuite de coller au milieu le tasseautriangulaire avec le timbre préinstallé, comme illustré sur la photo 5. Pour le serrage,utiliser un petit serre-joint à vis ou une pince serre-joint. Le temps de séchage de lacolle s’élève ici à environ 60 minutes.6Collage du dosAfin de garantir un collage idéal du dos, nous conseillons d’utiliser une plaquede contreplaqué multiplis (ou quelque chose d’équivalent) qui soit environ 10 à20 mm plus grande que le dos de chaque côté. Les deux barres de bois (approx.25 x 25 x 300 mm) facilitent le serrage au moyen des serre-joints à vis ou dessangles de serrage. Appliquer maintenant de la colle sur tout l‘arrière du corps.Attention : l’arrière correspond au côté sans tasseaux déjà montés. Poser le dossur la plaque de contreplaqué multiplis et installer cette dernière sur les deuxbarres servant d’aide au montage (photo 6). Le dos est fixé à l’aide de rubanadhésif : il doit dépasser légèrement de chaque côté du corps. Mettre ensuite enplace le serrage à l’aide des serre-joints à vis ou des sangles de serrage, commeillustré sur la photo 6. Vérifier une nouvelle fois le positionnement du dos, puislaisser la colle sécher pendant environ 120 minutes.7Vissage de la face avantUn schéma se trouve au dos avec les 15 trous de perçage permettant de fixer laface avant. Nous conseillons de mesurer exactement l’emplacement des trous surla face avant (voir photo 7). Le perçage des 15 trous se fait avec la mèche de 3 mm.Attention : pour éviter d’endommager la surface de travail, utiliser de nouveau lesbarres de montage. Chambrer les trous de perçage à l’aide de la fraise à lamermanuelle ou d’une mèche métallique de 12 mm de façon à ce que les têtes devis soient affleurantes une fois installées. Fixer la face avant au corps à l’aide de15 vis 3 x 20 mm. Attention : veiller ici aussi à ce que la face avant dépasse de lamême manière de tous les côtés (comme pour le dos) et la préfixer avec du rubanadhésif. Le mieux est de visser la face avant par les quatre coins en préperçantdes trous de 6 à 8 mm environ avec la mèche à bois de 3 mm.89Ponçage, montage des pieds en caoutchoucL’étape suivante consiste à poncer les parties qui dépassent de la face avant etdu dos. Nous conseillons pour cela de commencer avec un papier abrasif grossier,puis de poursuivre avec un papier fin. Ce dernier servira également à poncer ensuitel’ensemble du corps du cajon. Pour un meilleur confort de jeu et d’assise,nous conseillons de poncer toutes les arêtes afin qu‘elles soient arrondies. Lespieds en caoutchouc se fixent à l’aide des vis 4 x 15 mm. Pour une bonne stabilitédu cajon, nous conseillons de placer les pieds en caoutchouc à environ 25 mmvers l’intérieur de la face avant et de la plaque latérale. Les installer une fois lafinition du cajon terminée.Finition du cajonIl n’y a aucune limite à la finition du cajon. Il est possible de le huiler, le vernir, lecirer ou pourquoi pas le peindre selon ses préférences personnelles.10 11Pour s’asseoir confortablement surle cajon maintenant terminé, nousconseillons notre coussin pour cajonMEINL (CAJ-PAD).Les réclamations ne seront acceptées que si le montage du kit de montage n’a pas encore commencé. En outre, la société Roland Meinl Musikinstrumente GmbH & Co. KG décline touteresponsabilité pour les dommages survenus ou pouvant survenir lors du montage ou suite au montage. Sous réserve d’erreur et de modifications. Version mai 2013.
PolskiINSTRUKCJA MONTAŻUPrzed rozpoczęciem montażu Twojego cajona, powinieneś zapoznać się dokładnie z całą instrukcją montażu,skompletować potrzebne narzędzia i akcesoria montażowe. Warto też wiedzieć, że równa, pozioma powierzchnia, naktórej będziesz składał instrument, ułatwi Ci zadanie.11 4 582 3967111012 13Zestaw zawiera1 x instrukcja montażu1 2 x panel boczny2 1 x panel spodni3 1 x panel górny4 1 x panel tylny5 1 x płyta czołowa(z logo MEINL)6 2 x boczna listwa7 1 x dolna i 1 x górna listwa8 1 x listwa zabezpieczającado sprężyn9 1 x sprężyna101112134 x gumowe nóżki15 x śruby 3 x 20 mm(do płyty czołowej)4 x śruby 4 x 15 mm(do gumowych nóżek)2 x śruby 3 x 12 mm(do sprężyn)Potrzebne narzędzia› klej do drewna› 4 x docisk śrubowy 600mm lub 2 paski dociskowe› 2 do 6 x małych docisków śrubowych lub klejowych› wkrętarka, wiertarka lub ręczna wiertarka› wiertła do wiercenia w drewnie 3mm i 10mm› śrubokręt krzyżakowy› frez› papier ścierny, różne grubości ziarna› blok ścierny› wycinarka› ołówek, cyrkiel, ekierka, miarka› taśma klejąca› 2 x drewniane listewki, ok. 25 x 25 x 300mm› sklejka (lub coś podobnego) o wymiarach 310x455mm12Klejenie korpusuPierwszym krokiem jest dopasowanie i sklejenie czterech paneli, któreskładają się na korpus cajona. Klej powinien być nakładany w bruzdachposzczególnych płyt (rys. 1). Doradzamy, aby dopasować do siebie wszystkiepłyty przed rozpoczęciem klejenia, aby upewnić się, że będą prawidłowozłożone. Aby zapewnić właściwy docisk płyt podczas klejenia, należy użyćdocisków śrubowych lub pasków dociskowych (rys. 2). Upewnij się, żepanele są do siebie dopasowane i że jest między nimi kąt prosty (rys. 2).Nadwyżki kleju można usunąć ściereczką. Klej musi schnąć przez co najmniej2 godziny, zanim dociski zostaną zdjęte.Klejenie listewNastępny krok to przyklejenie czterech bocznych listew dokładnie nakrawędzi przedniej cajona. W tym miejscu, przydadzą Ci się dociski śrubowelub klejowe (rys. 3) Klej musi schnąć przez ok. 60 do 80 minut.3
4 5Wygładzanie korpusuSprężyna powinna być zamontowana, jak widać na rys. 4 na środkuprzeciwprostokątnej trójkątnej listewki i dodatkowo umocowana przy użyciudwóch śrub 3 x 12mm. Zamontuj ją lutowaną powierzchnią do góry, tak jakwidać na rys. 4. Następnie wygładź krawędzie korpusu, do których przymocujeszpanele przedni i tylny. Jest ważne, aby te krawędzie były gładkiei stanowiły równą podstawę dla panelu przedniego i tylnego. Następnieprzyklej listewkę z przymocowaną do niej sprężyną centralnie, jak pokazanona rys. 5. Mały docisk śrubowy lub klejowy będzie tu potrzebny do unieruchomienialistwy. Po tym kroku, pozostaw klej do schnięcia na 60 minut.6Przyklejanie panelu tylnegoAby upewnić się, że tylny panel będzie prawidłowo zamontowany, rekomendujemywykorzystanie w tym kroku sklejki lub podobnego materiałuo wymiarach o ok. 10 – 20 mm większych niż sam panel. Dwie drewnianelistewki (ok. 25 x 25 x 300mm) ułatwią przyłożenie właściwej siły z wykorzystaniemdocisków śrubowych lub pasków. Klej należy nałożyć na całąpowierzchnię tylnych krawędzi korpusu cajona. Ważne: Tylna strona to ta, doktórej nie przymocowałeś wcześniej listewek. Przyklejony tylny panel zabezpiecztaśmą klejącą na wszystkich czterech stronach. Całość połóż na sklejce(tylnym panelem do dołu), a tę na dwóch listewkach. (rys. 6), które wykorzystujeszjako pomoc montażową. Następnie załóż dociski śrubowe lub paskidociskowe, jak pokazano na rys. 6. Teraz ponownie sprawdź, czy w trakciewykonywania tych operacji tylny panel nie przesunął się. Jeśli wszystko jestw porządku, pozwól klejowi schnąć przez ok. 120 minut.7Przykręcanie panelu przedniegoDiagram pokazujący rozmieszczenie 15 otworów na śruby montażoweprzedniego panelu znajdziesz na odwrocie. Rekomendujemy aby otworyzostały rozmieszczone dokładnie według tego diagramu (rys. 8) 15 otworówwywiercisz z wykorzystaniem 3 mm wiertła. Ważne: przy wierceniu otworóww panelu, umieść go na listwach, aby nie uszkodzić powierzchni, na którejpracujesz. Teraz używając ręcznego frezu lub po prostu 12mm wiertła,nawierć otwory w płycie, w które schowają się główki śrub mocującychpłytę – po montażu, powierzchnia ma być gładka. Przykręć panel czołowy zwykorzystaniem 15 śrub 3 x 20mm. Ważne: Upewnij się, że płyta jest równoułożona na korpusie i na czas przykręcania, przymocuj ją do korpusu taśmąklejącą. Najlepiej zacząć przykręcanie panelu od przykręcenia śrub na rogachi wywiercenia otworów na śruby 3mm wiertłem na głębokość ok 6 – 8 mm.89Wygładzanie krawędzi i montaż gumowych nóżekNastępny krok to wygładzanie krawędzi przy przednim i tylnym panelu. Dotego celu zalecamy papier ścierny o grubszych ziarnach. Dopiero w kolejnymkroku wykorzystasz papier drobnoziarnisty. Papieru drobnoziarnistegomożesz też użyć do wygładzenia całej powierzchni cajona. Aby zwiększyćkomfort gry i siedzenia na cajonie, rekomendujemy wygładzenie wszystkichkrawędzi aż do ich zaokrąglenia. Gumowe nóżki należy przymocowaćśrubami 4 x 15mm. Aby mieć pewność, że będą spełniać swoje zadanie, rekomendujemyzamontować je w odległości 25mm od czołowego i bocznychpaneli. Nóżki mocuje się po wykończeniu cajona.Wykończenie cajonaJeśli chodzi o wykończenie cajona, Twoja wyobraźnia wyznaczy tutajgranice. Możesz go polakierować, zaolejować, pokryć woskiem, albonamalować na nim co tylko chcesz.10 11Teraz, skoro masz już własnycajon, możesz zastanowić się nadzakupem naszego dywanika nacajon dla zwiększenia komfortusiedzenia na nim.Reklamacje będą rozpatrywane wyłącznie przed rozpoczęciem montażu. Roland Meinl Musikinstrumente GmbH & Co. KG nie odpowiada za szkody powstałe w trakcie procesumontażu. Niniejsze zapisy mogą być zmienione. Niniejsza wersja pochodzi z maja 2013.
MagyarSZERELÉSI ÚTMUTATÓMielőtt a szereléshez hozzákezdene, alaposan olvassa végig az útmutatót! Készítse elő a szereléshez szükségesszerszámokat, csoportosítsa az alkotórészeket! Keressen egy sima, lapos munkafelület, ami az alábbi munka- folyamatotjelentősen megkönnyíti.11 4 582 3967111012 13Alkatrészek1 x Szerelési útmutató1 2 x oldalfal elemek2 1 x aljzat elem3 1 x tető elem4 1 x hátfal elem5 1 x előlap (Meinl logóval)6 2 x oldalléc7 1 x aljzatléc és 1 x tetőléc8 1 x sodrony rögzítő léc9 1 x sodrony101112134 x gumiláb15 x csavar 3x20mm(falakhoz)4 x csavar 4x15mm(gumilábakhoz)2 x csavar 3x12mm(sodronyhoz)Szükséges szerszámok› faenyv› 4 x csavarszorító 600mm, vagy 2 x feszítő heveder› 2 – 6 x kis csavarszorító, vagy enyvező szorító› akkus csavarhúzó, fúrógép vagy kézi fúró› fafúró 3mm és 10 mm› csillagfejű csavarhúzó› nehezék› különböző finomságú csiszolópapír› csiszolófa› lombfűrész› ceruza, szögmérő, vonalzó› ragasztószalag› 2 x fadarab kb.25x25x300 mm› farost lemez vagy hasonló min. 310x455 mm12A test enyvezéseElső lépésként a négy oldalfal összeillesztésére és enyvezésére kerül sor. Azenyvet kenje a horonyba és a külső szegélyre (1.kép). Tanácsos a négy elemetmég az enyvezés előtt összeilleszteni, hogy az esetleges összecseréléstkiküszöböljük. Ahhoz, hogy a megfelelő nyomóhatást elérjük, a600 mm-es csavarszorítóra vagy mindkét feszítő hevederre szükségünk lesz(2.kép). Figyeljen az elemek közötti kapcsolatra és derékszögre (3. kép).A felesleges enyvet egy nedves kendővel törölje le. Az enyvnek legalább kétóráig száradnia kell, mielőtt a nyomókötést eltávolítjuk.Lécek enyvezéseKövetkező lépésként a négy darab lécet szorosan a cajon elején belülről afalvégekhez ragasztjuk.A 3. képen látható módon a léceket a csavar- vagy enyvező szorítóval rögzítjük.Az enyv száradása kb.60-80 percet vesz igénybe.3
4 5Sodrony felszereléseA sodronyt a háromszög alapú hasáb átfogójának közepén szereljük fel(4.kép). A szereléshez szükségünk van a két darab 3x12 mm-es csavarra.A sodronyt a forrasztott oldalával felfelé rögzítjük. A test első és hátsó oldalána találkozásokat összecsiszoljuk, egy szintbe hozzuk, hogy az előlap és ahátsófal később tökéletesen simuljon fel. Végül a sodronnyal ellátott rudacskát,a 5.képen látható módon, középre helyezve felragasztjuk. A rögzítésheza kis csavarszorítót vagy enyvező szorítót használjuk. Az enyv kb. 1 óra alattszárad meg.Hátfal ragasztásaAhhoz, hogy a hátfal ragasztása biztosan sikerüljön, javasoljuk, hogy egyfarostlemezt, vagy más falemezt használjon. A lemeznek a hátfalnál mindenirányban kb.10-20 mm-el nagyobbnak kell lennie. A két kb.25x25x300 mmnagyságú fadarab a csavarszorító vagy feszítő hevederek erejét eloszlatja.A test oldalainak hátsó fali részeit (a lécek nélküli oldalt ) enyvvel bekenjük.Helyezze a hátfalat a farost lemezre, majd azt a két fadarabra.A hátfalat egy ragasztószalaggal fixáljuk, majd a csavarszorítóval vagyfeszítő hevederrel összeszorítjuk, (6.kép).Ellenőrizze még egyszer a hátfal helyzetét, hagyja az enyvet kb 120 percigszáradni.67Előlap felszereléseA Szerelési útmutató hátoldalán megtalálja az előlap rögzítéséhez szükséges15 db furat elhelyezkedését. Javasoljuk, hogy ezeket pontosan mérje át azelőlapra (7.kép). A 15 db lyukat a 3mm-es fúróval fúrjuk ki, 6-8 mm mélyen.Annak érdekében, nehogy kárt tegyünk az előlapban, újra szükségünk lesz afadarabokra. Egy 12mm-es fémfúró segítségével a furatokat úgy süllyesztjükbe, hogy a csavarfejek a becsavarás után az előlappal egy szintbe kerüljenek.A csavarozást a négy saroknál kezdve az előlapot a 15 db 3x20mm-escsavarral a tesre rögzítjük. Figyelem: a hátfalhoz hasonlóan itt is ügyelni kellaz egyenletes, sima átmenetekre, valamint javasolt az előrögzítést ragasztószalaggalelvégezni.89Csiszolás, gumilábak felszereléseA következő feladat az elő- és hátfal tökéletes lecsiszolása. Kezdetben egydurvább, majd később egy finom csiszolópapírt használjon. A finom pórusúcsiszolópapírral végül az egész cajon testét simára csiszoljuk. A kényelmesjáték és ülés érdekében javasoljuk, hogy a széleket kissé kerekítve csiszoljale. A gumilábakat négy darab 15mm-es csavarral rögzítjük. Ahhoz, hogy acajon stabilan álljon, a gumilábakat az elő- és oldallaptól befelé 25 mm-estávolságra helyezzük fel. Ugyanígy járjunk el a hátlapnál is. A lábakat a cajononvégzett utolsó kezelési munkálatok után javasolt csak felszerelni.Cajon FinishA cajon külső megjelenésének kialakításában nincsenek határok.. Felületétkezelheti olajjal, lakkal, viasszal, vagy saját elképzelései szerint be is festheti.10 11Hogy az elkészült cajonján kényelmesenüljön, ajánljuk figyelmébe aMEINL Cajon Pad-et.Termékünkkel kapcsolatos reklamációt csak abban az esetben tudunk elfogadni, ha az összeszereléshez még nem fogott hozzá. Továbbá a Roland Meinl MusikinstrumenteGmbH & Co. KG nem vállal felelősséget azokért az esetleges károkért, melyek a szerelés folyamán keletkeztek vagy keletkezhettek. A termékre vonatkozó változtatás jogát fenntartjuk.2013 május.
11 4 5671110 1 2 3 4 5 6 7 8 9 10111213 2 39812 13› › › › › › › › › › › › › › 1 23
4 5678910 11
中 文安 装 说 明 书在 开 始 安 装 之 前 , 请 认 真 阅 读 安 装 说 明 书 , 准 备 好 全 部 所 需 工 具 并 对 各 部 件 进 行 分 类 。 此 外 , 请 在 平 整 的 工 作 面 上 进 行安 装 , 以 方 便 实 施 下 述 操 作 步 骤 。供 货 范 围11 4 582 3967111012 13123456789101112131 安 装 说 明 书2 侧 板1 底 板1 顶 板1 背 板1 敲 击 板( 印 有 MEINL 标 志 )2 侧 板 条1 底 板 条 ,1 顶 板 条1 响 弦 固 定 板 条1 响 弦4 橡 胶 脚 垫15 螺 丝(3 x 20 mm, 固 定 敲 击 板 )4 螺 丝(4 x 15 mm, 固 定 橡 胶 脚 垫 )2 螺 丝(3 x 12 mm, 固 定 响 弦 )所 需 工 具› 木 材 粘 合 胶 水› 4 活 动 夹 钳 (600 mm) 或 2 紧 固 带› 2 - 6 小 型 活 动 夹 钳 , 或 者 夹 钳› 电 动 螺 丝 刀 , 钻 孔 机 或 手 摇 钻› 木 钻 子 (3 mm 和 10 mm)› 十 字 螺 丝 刀› 扩 孔 钻› 粗 砂 纸 及 细 砂 纸› 磨 块› 线 锯› 铅 笔 , 角 尺 , 直 尺› 胶 带› 2 安 装 辅 助 木 条 , 尺 寸 约 为 25 x 25 x 300 mm› 复 合 板 ( 或 类 似 物 ), 最 小 尺 寸 为 310 x 455 mm粘 合 共 鸣 箱第 一 步 : 拼 插 并 粘 合 构 成 共 鸣 箱 的 四 块 板 。 向 槽 中 以 及 外 侧 板 条 上 涂 抹 胶 水 , 参 见图 1。 建 议 在 涂 抹 胶 水 前 先 将 四 块 板 拼 插 起 来 一 次 , 以 免 发 生 混 淆 。 为 达 到 所 需 粘合 压 力 , 需 使 用 600 mm 的 活 动 夹 钳 或 紧 固 带 进 行 固 定 ( 参 见 图 2)。 操 作 时 , 注意 确 保 板 的 齐 平 和 垂 直 性 , 如 图 2 所 示 。 用 湿 布 擦 掉 多 余 的 胶 水 。 使 胶 水 晾 干 120分 钟 以 上 , 然 后 松 开 活 动 夹 钳 或 紧 固 带 。1 2粘 合 板 条第 二 步 : 将 四 根 板 条 齐 平 地 粘 合 至 卡 宏 正 面 。 操 作 时 需 要 使 用 活 动 夹 钳 或 夹 钳 , 如图 3 所 示 。 涂 抹 的 胶 水 需 晾 干 60 至 80 分 钟 。3
打 磨 共 鸣 箱如 图 4 所 示 , 将 响 弦 安 装 至 三 角 形 板 条 的 斜 面 上 。 拧 上 两 个 3 x 12 mm 螺 丝 。 安装 时 , 使 响 弦 的 焊 接 面 朝 上 , 如 图 4 所 示 。 现 在 , 对 共 鸣 箱 正 面 及 背 面 的 接 合 处 进行 打 磨 。 为 在 正 面 及 背 面 形 成 理 想 的 支 撑 面 , 需 将 接 合 处 打 磨 平 整 , 这 一 点 至 关 重要 。 然 后 , 将 装 好 响 弦 的 三 角 形 板 条 粘 合 至 中 央 位 置 , 如 图 5 所 示 。 操 作 时 需 使 用小 型 活 动 夹 钳 或 夹 钳 进 行 固 定 。 胶 水 的 晾 干 时 间 为 约 60 分 钟 。4 5粘 合 背 板为 使 背 板 得 到 理 想 的 粘 合 效 果 , 建 议 使 用 比 背 板 大 10 - 20 mm 的 复 合 板 ( 或 类 似物 ) 进 行 辅 助 。 借 助 于 两 根 安 装 辅 助 木 条 ( 约 25 x 25 x 300 mm), 可 以 方 便 地 使用 活 动 夹 钳 或 紧 固 带 进 行 固 定 。 现 在 , 向 共 鸣 箱 的 整 个 背 面 涂 抹 胶 水 。 注 意 : 背 面是 未 安 装 板 条 的 那 一 面 。 将 背 板 置 于 复 合 板 上 , 然 后 将 复 合 板 置 于 两 根 安 装 辅 助 木条 上 ( 参 见 图 6)。 用 胶 带 固 定 背 板 , 使 背 板 在 每 一 边 上 都 有 超 出 共 鸣 箱 的 余 量 。然 后 , 用 活 动 夹 钳 或 紧 固 带 压 紧 背 板 , 如 图 6 所 示 。 现 在 , 再 次 通 过 检 查 确 保 背 板位 置 正 确 , 然 后 使 胶 水 晾 干 约 120 分 钟 。6拧 上 前 板在 本 说 明 书 背 面 的 图 纸 中 , 标 明 了 用 于 固 定 前 板 ( 敲 击 板 ) 的 15 个 孔 的 位 置 。 建议 您 依 照 图 纸 先 在 前 板 上 准 确 标 出 孔 位 , 如 图 7 所 示 。 然 后 , 用 3 mm 的 钻 头 钻孔 。 注 意 : 为 避 免 工 作 面 损 坏 , 需 再 次 使 用 安 装 辅 助 木 条 。用 手 摇 扩 孔 钻 或 12 mm 的 钢 钻 进 行 扩 孔 , 确 保 螺 丝 被 拧 入 后 螺 丝 头 沉 在 表 面 之 下 。通 过 15 个 3 x 20 mm 的 螺 丝 将 前 板 固 定 在 共 鸣 箱 上 。 注 意 : 请 确 保 前 板 在 每 一 边上 都 均 匀 地 超 过 共 鸣 箱 ( 与 背 板 一 样 ), 然 后 用 胶 带 固 定 。 在 给 前 板 拧 螺 丝 时 , 建议 先 操 作 四 个 角 : 用 3 mm 的 木 钻 子 钻 出 深 约 6 至 8 mm 的 孔 , 以 便 拧 入 螺 丝 。7打 磨 , 安 装 橡 胶 脚 垫接 下 来 , 磨 去 前 板 和 背 板 上 的 余 量 。 建 议 先 用 粗 砂 纸 粗 磨 , 后 用 细 砂 纸 精 磨 。 之后 , 用 细 砂 纸 打 磨 卡 宏 的 整 个 箱 体 。 为 使 您 演 奏 和 坐 在 卡 宏 上 时 更 加 舒 适 , 建 议 打磨 全 部 棱 边 。 橡 胶 脚 垫 通 过 4 x 15 mm 的 螺 丝 进 行 固 定 。 为 确 保 卡 宏 平 稳 , 建 议 将橡 胶 脚 垫 安 装 在 距 离 前 板 和 侧 板 边 缘 约 25 mm 的 位 置 上 。 当 卡 宏 的 其 它 安 装 作 业 完成 之 后 , 再 安 装 橡 胶 脚 垫 。89整 饰 卡 宏您 可 以 采 用 各 种 各 样 的 方 式 对 卡 宏 进 行 整 饰 。 您 可 以 在 卡 宏 上 涂 油 、 刷 漆 、 打 蜡 ,或 是 按 照 自 己 的 想 象 绘 制 非 常 个 性 化 的 图 案 。10 11建 议 您 使 用 MEINL 卡 宏 坐 垫 (CAJ-PAD),增 加 就 座 舒 适 度 。我 们 仅 接 受 针 对 尚 未 开 始 安 装 的 卡 宏 套 件 的 索 赔 要 求 。 此 外 , 对 于 安 装 时 产 生 的 损 失 ,Roland Meinl Musikinstrumente GmbH & Co. KG 公 司 不 承 担 责 任 。 保 留 修 正 错 误 及 实 施 更 改 的 权 利 。版 本 :2013 年 5 月 。
15mm65mm65mm15mm21mm17mm21mm100mm100mm435mm100mm100mm17mm21mm21mm105mm105mm300mmModel: MYO-CAJRoland Meinl Musikinstrumente GmbH & Co. KG • Musik-Meinl-Str. 1 • 91468 Gutenstetten • Germany • meinlpercussion.com