ECOLINE Jig saw - kinzo
ECOLINE Jig saw - kinzo
ECOLINE Jig saw - kinzo

You also want an ePaper? Increase the reach of your titles
YUMPU automatically turns print PDFs into web optimized ePapers that Google loves.
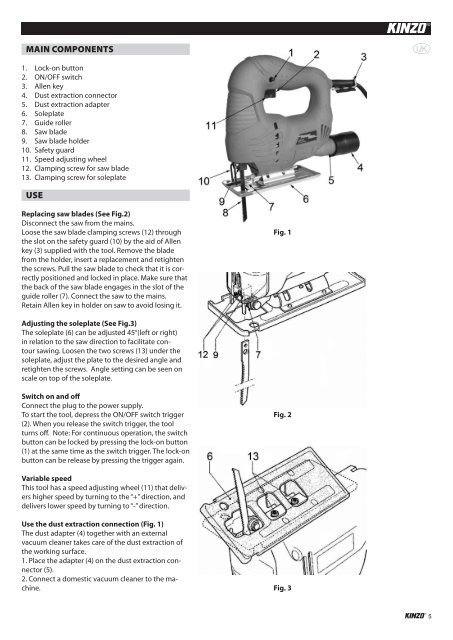
Main components<br />
1. Lock-on button<br />
2. ON/OFF switch<br />
3. Allen key<br />
4. Dust extraction connector<br />
5. Dust extraction adapter<br />
6. Soleplate<br />
7. Guide roller<br />
8. Saw blade<br />
9. Saw blade holder<br />
10. Safety guard<br />
11. Speed adjusting wheel<br />
12. Clamping screw for <strong>saw</strong> blade<br />
13. Clamping screw for soleplate<br />
A<br />
Use<br />
Replacing <strong>saw</strong> blades (See Fig.2)<br />
Disconnect the <strong>saw</strong> from the mains.<br />
Loose the <strong>saw</strong> blade clamping screws (12) through<br />
the slot on the safety guard (10) by the aid of Allen<br />
key (3) supplied with the tool. Remove the blade<br />
from the holder, insert a replacement and retighten<br />
the screws. Pull the <strong>saw</strong> blade to check that it is correctly<br />
positioned and locked in place. Make sure that<br />
the back of the <strong>saw</strong> blade engages in the slot of the<br />
guide roller (7). Connect the <strong>saw</strong> to the mains.<br />
Retain Allen key in holder on <strong>saw</strong> to avoid losing it.<br />
Fig. 1<br />
Adjusting the soleplate (See Fig.3)<br />
The soleplate (6) can be adjusted 45°(left or right)<br />
in relation to the <strong>saw</strong> direction to facilitate contour<br />
<strong>saw</strong>ing. Loosen the two screws (13) under the<br />
soleplate, adjust the plate to the desired angle and<br />
retighten the screws. Angle setting can be seen on<br />
scale on top of the soleplate.<br />
Switch on and off<br />
Connect the plug to the power supply.<br />
To start the tool, depress the ON/OFF switch trigger<br />
(2). When you release the switch trigger, the tool<br />
turns off. Note: For continuous operation, the switch<br />
button can be locked by pressing the lock-on button<br />
(1) at the same time as the switch trigger. The lock-on<br />
button can be release by pressing the trigger again.<br />
Fig. 2<br />
Variable speed<br />
This tool has a speed adjusting wheel (11) that delivers<br />
higher speed by turning to the “+” direction, and<br />
delivers lower speed by turning to “-” direction.<br />
Use the dust extraction connection (Fig. 1)<br />
The dust adapter (4) together with an external<br />
vacuum cleaner takes care of the dust extraction of<br />
the working surface.<br />
1. Place the adapter (4) on the dust extraction connector<br />
(5).<br />
2. Connect a domestic vacuum cleaner to the machine.<br />
Fig. 3<br />
5<br />
71779 manual.indd 5 31-12-10 14:49